Create a Small Game from Scratch: Endless Standing First-Person Shooter
Level: Beginner
Type: Blueprint
Version: 5.6
Download Project
If you haven’t read the introduction yet, please do—it will help you follow along.
We’ll now start creating the main classes for the game. I’ve already written a detailed explanation of the base class architecture, which you should use as a reference. The classes we’re about to create were explained there.
Create new Blueprint Blank project.
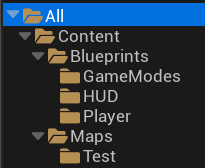
Folder Structure
This is the folder structure I’m using, but feel free to use whatever works best for you.
Game Instance
Create a new Blueprint named STGameInstance, based on the GameInstance class. You can leave it empty for now.
Game Mode
We’ll be creating a structure that allows us to define base functionality that can be shared across different game modes. That’s why we’ll start by creating a base Game Mode class, and then have other game modes extend from it.
- STGameModeBase
- STGameModeGameplay
- STGameModeMainMenu
Create a new Blueprint Class extending from GameModeBase (since we don’t need multiplayer functionality) and name it STGameModeBase.
Then, create two new Blueprints that inherit from STGameModeBase: STGameModeGameplay and STGameModeMainMenu.
As you can see, we’re already separating gameplay logic from the main menu, which will make the project more modular and easier to manage.
Player
Since this will be a standing shooter, we don’t need the advanced functionality provided by the Character class. That’s why we’ll extend from Pawn instead.
Create a new Blueprint named STGameplayPlayerPawn, based on the Pawn class.
As the name suggests, it will be used only during gameplay. We might want to create a separate Pawn for the main menu map later—we’ll see as the project evolves.
Player Controller
Create a new Blueprint named STGameplayPlayerController, extending from PlayerController.
As the name suggests, this controller will be used only on the gameplay map. The PlayerController can differ on other maps—such as the main menu—so keeping them separate helps maintain a modular structure.
HUD
Create a new Blueprint based on the HUD class and name it STBaseHUD.
Then, create another Blueprint that extends from STBaseHUD and name it STGameplayHUD.
This structure will help you define shared HUD functionality in the base class while keeping gameplay-specific elements separate. Let me know if you’d like to include UMG widgets later on!
What about other classes?
Since our game will be simple, we don’t need to implement GameState, PlayerState, GameSession, Spectator, or similar classes. It’s still good to be aware of them, as they can be useful in more complex projects—especially in multiplayer games or systems that need to track more detailed player or match data.
For our case, we’ll keep things simple and avoid unnecessary complexity. If we don’t need a class, we won’t use it.
Connect Classes
Now open STGameModeGameplay and assign the appropriate gameplay classes:
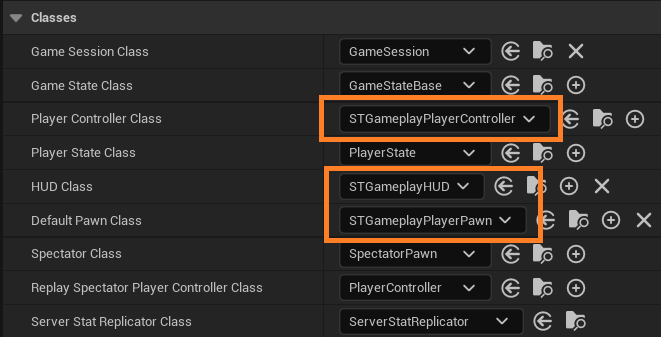
- Default Pawn Class →
STGameplayPlayerPawn - Player Controller Class →
STGameplayPlayerController - HUD Class →
STGameplayHUD
This tells the engine to use these classes whenever STGameModeGameplay is active.
Simple as that!
Placeholder Map
Now we need a level to use STGameModeGameplay and spawn our gameplay classes. From this point on, we’ll use a placeholder level to quickly test things since the full game loop isn’t implemented yet. This will help us build and test base gameplay features efficiently.
Create a new level using the Basic template and save it as TestMap_EarlyGameplay.
In the level’s World Settings, set the GameMode to the STGameModeGameplay we created earlier.

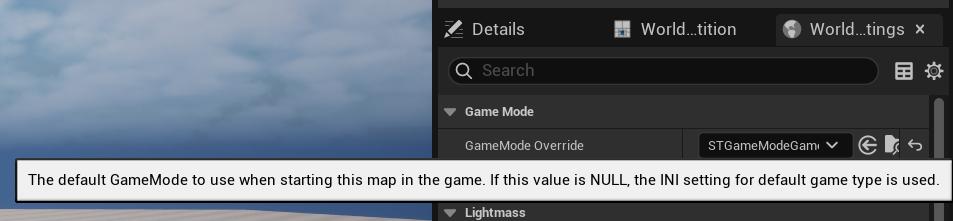
Thanks to this setup, our game mode will be automatically created by the engine whenever this map is opened. You could also set the game mode globally in the project settings, but since you’ll eventually choose the main menu game mode there, I preferred to assign it at the level level for now.
Project Settings
The last step is to let the engine know about our setup. Go to Project Settings → Maps & Modes.

Don’t worry if STGameModeMainMenu isn’t configured yet—we’ll set that up later.
And that’s basically it! The main engine base classes are done in just a few minutes.
Now, let’s move on to the next part: Part 3: Input

Leave a reply to Daniel Williams Cancel reply