
Create a Small Game from Scratch Series: Endless Standing First-Person Shooter
Level: Beginner
Type: Blueprint
Version: 5.6
Download Project
In the previous tutorial, we implemented a basic Camera and Animation Blueprint. Now we’re getting to the core of the project — the weapon system. The best way to learn this part is to download the project, and find out the data and functions from this post directly in the editor.
- Hi Level Goals
- Weapon Modes
- Weapon System Properties
- Blueprint vs C++ — A Quick Note
- Data
- IWeapon Interface
- Weapon Component
- Player Pawn Updates
- What next?
Hi Level Goals

Let’s start by thinking about what we want to achieve. It’s always a good idea to begin with this kind of mindset.
System goals
- Support most of the common weapon types we know from other games: pistols, rifles, shotguns, miniguns.
- Allow aiming functionality.
- Support multiple fire modes (e.g., a double-barrel shotgun).
- Work for both player and AI.
- Make it easy for developers to add new weapons quickly.
Sounds good, right? Yes — it’s totally possible to build a system that supports most of your weapons. Later on, when we start creating real weapons instead of just test ones, you’ll see how well this approach scales.
Of course, you won’t be able to create highly specific or unique weapons — like a harpoon gun that pulls enemies — without adding extra logic. But with a solid, systemic approach, you’ll be able to cover all the core, basic weapon types.
When I talk about “basic weapons,” I mean things like hitscan rifles, semi-automatic pistols, pump-action shotguns, or even burst-fire SMGs. These are weapons that mostly differ in behavior, fire rate, ammo usage, and visual/audio feedback — but they all follow the same core structure. That’s exactly what our system is designed to handle.
By building a flexible and modular foundation, we won’t need to rewrite logic for every new weapon. Instead, we’ll define the core rules once and reuse them — tweaking only what’s needed for specific weapon types.
Weapon fire loop analyze
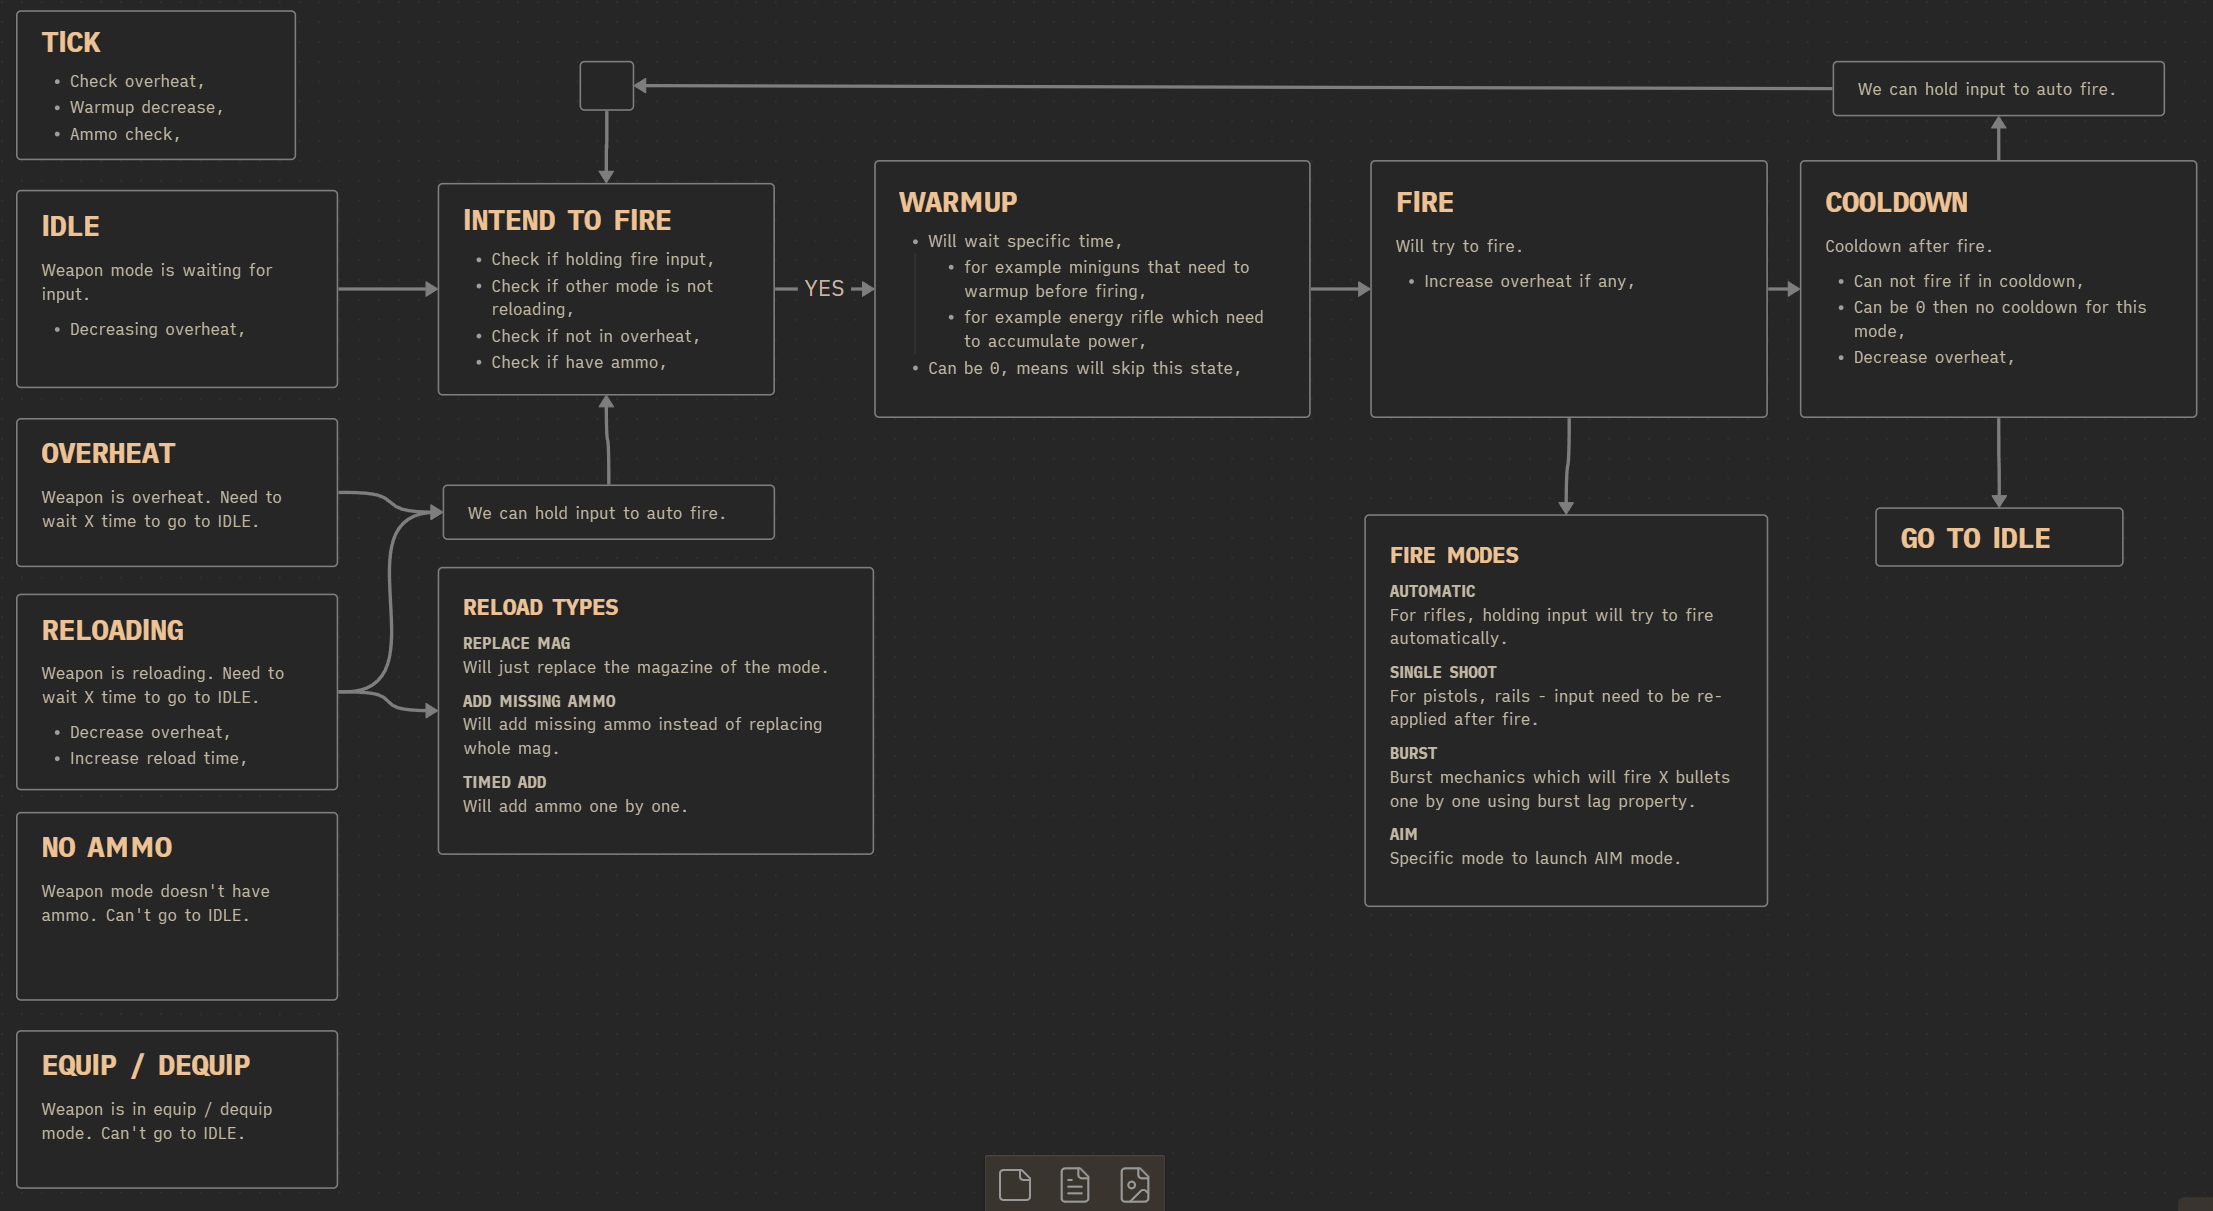
This diagram shows how the weapon system will work to support our system goals.
If you’re not using diagrams yet — you should definitely start!
💡 TIP: I use Obsidian for all my notes and diagrams. Highly recommended!
It’s really not that hard, as long as you spend some time thinking through how most weapons behave:
- Idle – Check if the player (or AI) wants to fire and if the weapon is allowed to fire.
- If yes, check whether the weapon has a warmup phase.
- If yes → perform warmup → then proceed to firing.
- If no → go directly to firing.
- Fire – Try to shoot a bullet.
- If successful:
- Increase overheat, spread, or any other related mechanics.
- If successful:
- After firing, check if the weapon should enter cooldown.
- If in cooldown → wait until it’s over before going back to idle.
The most important part of the flow looks like this:
IDLE → INTEND TO FIRE → WARMUP → FIRE → COOLDOWN
This structure allows us to support a wide variety of weapon types, from simple pistols to complex miniguns, while keeping the logic manageable and consistent.
Weapon Modes
Our weapon system will support three weapon modes:
- Primary – e.g. single-shot fire
- Secondary – e.g. aiming down sights
- Tertiary – e.g. firing a burst of 3 bullets with a single input
Each mode is handled and updated independently, which makes the system more modular. That means you can easily add or modify modes in the future without rewriting core functionality.
Weapon System Properties
Each weapon will have its own Data Asset to configure its properties.
This is a great way to describe the weapon system’s features — by going through all the properties one by one.
It will also give you better context for the system we’re about to build.
I know it might feel like reading the documentation for a marketplace plugin, but trust me — it’s important.
I want to make sure you have enough information before we dive into the implementation.
Spread
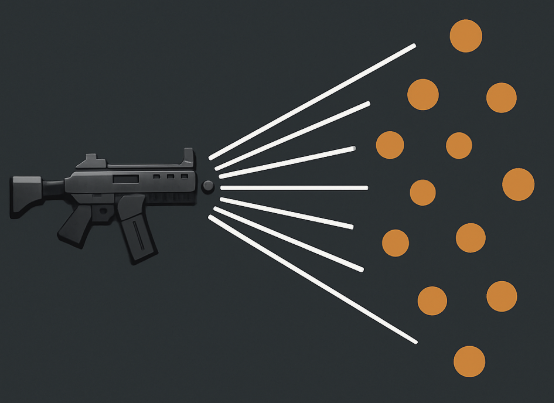
Our system will support spread functionality, which simulates weapon inaccuracy. The spread value will:
- Increase after each shot is fired
- Increase when the player is moving their aim (optional)
- Increase during Reloading, Equipping, and Unequipping
- Decrease over time when the weapon is Idle
Every spread-related property also has a separate version for Aiming, allowing more precise control when aiming down sights.
Min/Max Values
- SpreadMin – Minimum spread value (can be
0for perfect accuracy) - SpreadMinAim – Minimum spread when aiming
- SpreadMax – Maximum spread (spread will never go beyond this)
- SpreadMaxAim – Maximum spread when aiming
Spread Decrease (Over Time)
- SpreadDecreaseSpeed – How fast spread decreases when not aiming
- SpreadDecreaseSpeedAim – How fast spread decreases when aiming
Spread from Looking Around (Optional Feature)
This feature can be toggled on or off (default is off). If enabled, spread increases when the player moves their look input (e.g., moving the mouse or right stick).
- LookSpreadIncreaseSpeed – How fast spread increases from look input
- LookSpreadIncreaseSpeedAim – Same as above, but when aiming
- LookSpreadMaxIncrease – Maximum spread added from looking
- LookSpreadMaxIncreaseAim – Max look-spread when aiming
Spread Increase (Per Shot)
These properties are set per weapon mode (e.g., primary/secondary).
- SpreadIncrease – How much spread increases after firing
- SpreadIncreaseAim – How much it increases when firing while aiming
Spread will be used later when we implement actual projectile or hitscan logic, and it will also feed into the UI, to visually show the current spread.
For now, we’re focusing on getting the mechanics and data set up correctly.
Camera & Animation Configuration

In an earlier tutorial, we implemented several features directly in the Player Animation Blueprint and Camera System — like leaning, recoil, aiming offsets, and FOV changes.
Now, each weapon will be able to configure these features individually.
FOV Settings (FOVInfo)
- CameraFOV – Default camera field of view (interpolated by the camera system)
- CameraFOVAim – Camera FOV when aiming
Player Hands Animation (PlayerHandsAnim)
These are variables we previously implemented, but now they’re fully configurable per weapon:
- LeanSpeed
- IdleInterpolationSpeed
- IdleSineSpeed
- IdleLocMin / IdleLocMax – Range for idle position movement
- IdleRotMin / IdleRotMax – Range for idle rotation movement
- AimingLeanMultiplier – Multiplier for lean when aiming
Weapon Positioning (PlayerHandsLocation)
Again, these were added earlier but are now controlled per weapon:
- WeaponLocation / WeaponLocationAim – Hand-held weapon location in idle and aim states
- WeaponRotation / WeaponRotationAim – Rotation of the weapon for idle and aim
- ReloadLoc / ReloadRot – Position and rotation of the weapon during reload
Aim Modifiers
We’ve added a new AimModifiers array, which stores custom modifiers that activate while aiming.
This gives you full flexibility to define unique aim behavior per weapon — for example, activating a sniper scope effect or a thermal overlay.

Each weapon now acts as a controller for both the camera and player weapon animations.
Later in the series, we’ll also add support for weapon-specific animation assets (e.g., reloads, equip animations).
Weapon Modes — Core of the System

This is where the real power of the weapon system lies — Weapon Modes control most of the weapon’s behavior, and they come with a lot of properties.
- AmmoSettings
AmmoType– AGameplayTagthat defines the ammo type used by this mode (e.g., primary mode uses rifle ammo, secondary uses grenades).UsingTheSameMagazineFrom– Specifies if this mode shares its magazine with another mode (Primary, Secondary, Tertiary). Useful for setups like pistols that fire differently per mode but share ammo.DamageMultiplier– Modifies the base ammo damage (e.g., secondary fire might deal 2× damage).
- MagazineConfig
UnlimitedAmmoInMagazine– If true, the weapon can fire infinitely without consuming ammo.AmmoInOneMagazine– Total ammo capacity for this mode.
- Fire Mode & Timing
WeaponFireMode– Determines the fire mechanic. Automatic | SingleShoot | Burst | AIMCooldownAfterFire– Time to wait before this mode can fire again.BulletsInOneShot– Number of bullets fired per shot (e.g., a shotgun might fire 2).BurstCount– For burst fire: how many bullets per burst.BurstLag– Delay between each bullet in a burst sequence.
⚠️ In C++, you can hideBurstCountandBurstLagunless the mode isBurst, but Blueprints don’t support conditional visibility, so keep that in mind.
- Camera & Input Feedback
FireAutoCamRot– Controls automatic camera rotation after each shot. Can be different when aiming.OnFireAutoInput– Applies additional input after fire (e.g., simulate recoil pushing the view up for an Uzi).RecoilAnim– Links to the recoil animation to play for this mode.
- Reload Settings (
ReloadInfo)- ReloadType
ReplaceMag– Swap entire magazineAddMissingAmmo– Fill missing bullets (e.g., revolver)TimedAdd– Add ammo one-by-one (e.g., shotgun shell loading)
ReloadTime– Time it takes to reloadAutoReload– If true, the weapon will try to reload automatically when emptyTimedBulletsToAdd– How many bullets are added when usingTimedAdd
- ReloadType
- Overheat System (
OverheatConfig)OverheatIncrease– How much overheat is added per shotMaxOverheat– Maximum overheat limitOverheatDecreaseSpeed– How fast overheat drains over timeTimeToCooldown– Time to wait before leaving overheat lockout state
- Warmup System (
WarmupConfig)WarmupInputHoldTime– Time the player must hold input to exit warmup and fireWarmupDecreaseSpeed– How fast the warmup state decays when input is releasedWarmupClearType:ClearAfterFire– Reset warmup immediately after firingDecreaseWhenNotHolding– Gradually clear warmup only when input is released (e.g., miniguns)
OnFireCameraMods– Array of camera modifiers to apply on fire (e.g., camera shake, zoom, blur)
As you can see, this system is highly modular, with each weapon mode controlling:
- Ammo usage and damage
- Firing behavior and delays
- Reload mechanics
- Overheat logic
- Warmup gating
- Camera feedback and recoil animations
With this design, each weapon can feel and behave entirely differently, while still reusing the same base system.
Blueprint vs C++ — A Quick Note
This tutorial series is focused entirely on Blueprints — everything in this project will be built using Blueprint-only logic. However, the Weapon System is a good example of something that would be better suited for C++ in a real production scenario. Why?
- Advanced Blueprint logic is often hard to read
- It’s also harder to debug complex behaviors in Blueprints
- In C++, the same system would be cleaner, easier to debug, and more readable
That said, this tutorial will stay in Blueprints so that everyone can follow along, even without C++ experience.
💡 If you’re curious, you can download the C++ source code here to take a look at how the system could be implemented in C++.
Data
Let’s Start by Creating the Data. Now that we’ve covered the system’s design and features, it’s time to start creating the actual data we’ll work with.
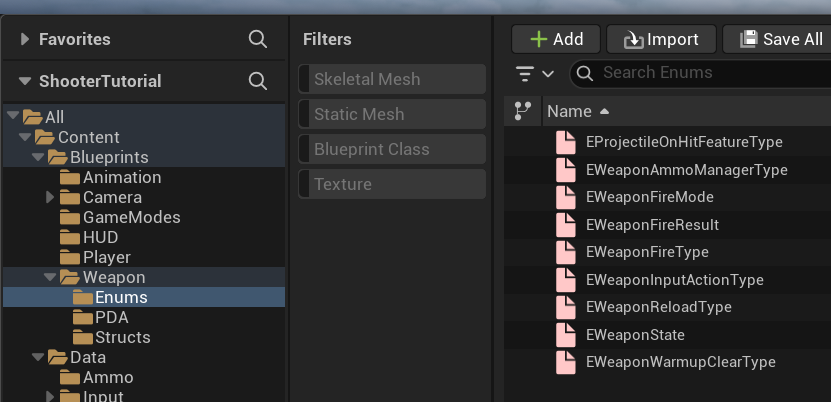
Enums
All enums in this project will follow the E_* naming convention, which is the recommended style in Unreal Engine.
EProjectileOnHitFeatureType. This enum defines what happens when a projectile hits something.
We’ll be using this later, but it’s useful to create it now to prepare for upcoming features.
| None | No special behavior on hit |
| Penetration | The projectile will try to penetrate the hit material |
| Bounce | The projectile will try to bounce off surfaces |
EWeaponAmmoManagerType. Weapons can be used by both players and AI, and not every character will have an inventory system.
This enum defines how the weapon will manage ammo.
| InventoryComponent | Uses an Inventory Component to manage ammo (not implemented yet) |
| WeaponComponent | Uses a basic ammo system directly inside the weapon component (this will be implemented in the weapon mechanics phase) |
EWeaponFireMode. This enum defines how the weapon fires. You can expand it later to add more fire types.
| Automatic | Fires continuously while input is held |
| SingleShoot | Fires once per input press; player must release and press again |
| Burst | Fires a burst of multiple bullets with delays between them (e.g., 3 shots with 0.1s lag) |
| AIM | Represents an aiming mode, not a firing action |
EWeaponFireResult. Every time a weapon attempts to fire, it will return a result from this enum.
This allows us to handle different situations (like no ammo or cooldown) properly — for example, by playing a “no ammo” sound or showing a UI indicator.
| Success | Weapon fired successfully |
| NoAmmo | Cannot fire; no ammo available |
| Overheat | Cannot fire; weapon is in cooldown due to overheat |
| Reloading | Cannot fire; weapon is currently reloading |
EWeaponFireType. Weapons in our system will use two types of firing implementations: projectile-based and trace-based. We will implement both in later tutorials.
| Projectile | Will use physical projectiles (more advanced; includes velocity, travel time, gravity, etc.) |
| Trace | Uses instant line traces (no travel time or velocity). Great for fast-firing weapons like railguns or hitscan rifles. |
EWeaponInputActionType. This enum stores information about the type of input the user or AI is attempting to use. It’s essential for mapping behavior to the correct weapon mode.
| NONE | No input |
| Primary | Primary input (e.g., left mouse click / fire) |
| Secondary | Secondary input (e.g., right mouse click / aim or alt-fire) |
| Tertiary | Tertiary input (e.g., middle mouse or other special mode) |
EWeaponReloadType. This enum determines how the weapon reloads. Each type represents a different reload mechanic.
| ReplaceMag | Replaces the entire magazine with a new one |
| AddMissingAmmo | Fills only the missing bullets in the current magazine |
| TimedAdd | Adds bullets one by one over time (common for shotguns or revolvers) |
EWeaponState. Tracks the current operational state of a weapon mode.
Each state can affect whether the weapon can fire or perform other actions.
| Idle | Mode is idle and ready |
| Warmup | Warming up before firing |
| Fire | Actively firing |
| Cooldown | Cooling down after firing |
| RealoadingMag | Reloading the weapon |
| Overheat | Cooling down due to overheating |
| NoAmmo | No ammo available |
| Equiping | Being equipped |
| Dequiping | Being unequipped |
EWeaponWarmupClearType. Defines how warmup state is cleared, allowing support for weapons like miniguns or energy-based guns.
| DecreaseWhenNotHolding | Warmup decreases only when the user is not holding the input (e.g., minigun) |
| ClearAfterFire | Warmup resets immediately after firing (e.g., a charge-up laser shot) |
Structs
Now that we have all of our enums defined, it’s time to move on to structure definitions — the core data containers for our weapon system.
In Unreal Engine, each structure should start with the prefix F_*, following standard naming conventions.
⚠️ Note:
While this tutorial series uses Blueprints, I can’t stress enough that enums, structs, and all basic data setups should ideally be done in C++.
It’s:
- More maintainable in larger or more complex projects
- Faster to create and iterate on
- Easier to read and organize
If this were a production project, I would not build these structs in Blueprints. The entire weapon system — especially something as complex and feature-rich as this one — should absolutely be implemented in C++ for performance, scalability, and clarity.
That said, since this tutorial is focused on Blueprints, we’ll continue building the system visually. Just know that this is one of the places where going the C++ route is strongly recommended.
FFOVInfo. Holds data related to the player camera’s Field of View.
| CameraFOV | float | Default camera FOV |
| CameraFOVAim | float | Camera FOV when aiming |
FWeaponMagazineConfig. Stores information about the weapon’s magazine.
| UseUnlimitedAmmoInMagazine | bool | If true, the weapon can fire without consuming ammo |
| AmmoInOneMagazine | int | Maximum ammo capacity of the magazine |
FWeaponSpreadDecrease. Controls how fast the spread decreases over time.
| SpreadDecreaseSpeed | float | How quickly spread shrinks when not aiming |
| SpreadDecreaseSpeedAim | float | Spread decrease speed while aiming |
FWeaponSpreadIncrease. Controls how much the spread increases after firing.
| SpreadIncrease | float | Spread increase after each shot |
| SpreadIncreaseAim | float | Spread increase when aiming |
You might be wondering: “Why not combine FWeaponSpreadIncrease and FWeaponSpreadDecrease into one structure, since the data is the same?” You’re absolutely right — reusing structures is a great practice in Unreal Engine and in programming in general. In this case, we could merge both into a single structure, e.g. FWeaponSpreadSpeedConfig, and simply use two instances of it: SpreadIncreaseConfig and SpreadDecreaseConfig. But in this specific case, I’m intentionally keeping them separate — because I know I’ll be adding different properties to each later on.
So yes, if you notice patterns in your data that can be generalized and reused, that’s excellent! Reuse is one of the key advantages of using USTRUCTs.
FWeaponSpreadIncreaseWhileLooking. Controls how spread increases when the player is moving the aim/look input (e.g., rotating the camera or using the right stick). This feature is optional and can be toggled per weapon.
| LookSpreadIncreaseSpeed | float | How fast spread increases when the weapon is being aimed around |
| LookSpreadMaxIncrease | float | Maximum additional spread added by look input |
FAmmoRangeConfig. Defines optimal damage ranges for the bullet/projectile.
This will be used later when we implement the damage system, especially for weapons like shotguns that lose power over distance.
| MaximumRange | float | The maximum range before damage starts scaling down |
| IdealRangeMin | float | Minimum range where 100% damage is applied |
| IdealRangeMax | float | Maximum range where 100% damage is still applied |
FProjectilePenetrationConfig. Used for projectiles that can penetrate surfaces (e.g., bullets that go through wood or soft materials). This feature will also be part of the future damage system.
| PenetrationNum | int | How many times the projectile can penetrate surfaces |
| RandomDirectionPercent | float | Amount of random direction applied to the projectile after penetration |
| DamageMultiplier | float | Damage reduction after each penetration (e.g., 0.7 = 70%) |
FWarmupConfig. Defines how weapon warmup works. Warmup is required before the weapon can fire — useful for energy weapons or miniguns.
| WarmupInputHoldTime | float | How long the fire input must be held to complete the warmup |
| WarmupDecreaseSpeed | float | How fast the warmup decays when input is released |
| WarmupClearType | EWeaponWarmupClearType | Controls how the warmup is cleared (after fire or when not holding input) |
FWeaponRotationMinMax. Stores rotation ranges that can be used for weapon sway, recoil, camera movement, or idle animation.
| PitchMin | float | Minimum pitch rotation |
| PitchMax | float | Maximum pitch rotation |
| YawMin | float | Minimum yaw rotation |
| YawMax | float | Maximum yaw rotation |
FWeaponSpreadMinMax. Defines the minimum and maximum spread values, with separate values for aiming and non-aiming states.
| SpreadMin | float | Minimum spread when not aiming |
| SpreadMax | float | Maximum spread when not aiming |
| SpreadMinAim | float | Minimum spread when aiming |
| SpreadMaxAim | float | Maximum spread when aiming |
FOverheatConfig. Controls how the overheat mechanic works. Overheating prevents the weapon from firing temporarily, adding a risk-reward mechanic to rapid fire.
| OverheatIncrease | float | How much overheat is added per shot |
| MaxOverheat | float | Value at which the weapon enters the overheat state |
| OverheatDecreaseSpeed | float | How fast overheat decreases over time |
| TimeToCooldown | float | How long it takes to cooldown when hit overheat. |
FWeaponReloadInfo. Defines the behavior and configuration of the reload system for each weapon mode.
| ReloadType | EWeaponReloadType | Type of reload behavior (see Enum) |
| ReloadTime | float | How long the reload takes |
| AutoReload | bool | Automatically start reloading when out of ammo |
| TimedBulletsToAdd | int | Number of bullets to add when using TimedAdd reload type |
FProjectileBounceConfig. Stores data for future bouncing projectile behavior. This will be used later in the damage and physics system.
| ChanceToBounce | float | Probability that the bullet will bounce on impact |
| RandomDirectionPercent | float | Amount of random direction added after bounce |
| DamageMultiplier | float | Damage reduction after each bounce (e.g. 0.8 = 80% remaining) |
| BounceNum | int | Maximum number of times a bullet can bounce |
| ProjectileSpeedMultiplier | float | Speed reduction after each bounce (e.g. 0.9 = 90% of previous speed) |
FWeaponDefaultLocation. Used in the Player Animation Blueprint to correctly position and animate the weapon during different states (idle, aim, reload).
| WeaponLocation | vector | Default weapon position |
| WeaponLocationAim | vector | Weapon position when aiming (e.g. near the camera) |
| WeaponRotation | rotator | Default rotation of the weapon |
| WeaponRotationAim | rotator | Rotation while aiming |
| ReloadLoc | vector | Weapon location during reload |
| ReloadRot | rotator | Weapon rotation during reload |
These values are used to interpolate the weapon’s transform depending on its current state (e.g., idle → aim → reload).
FWeaponRecoilAnim. This struct holds data for the procedural recoil animation implemented in the Animation Blueprint (from the previous tutorial).It will be passed to the Anim BP when a weapon is equipped.
| RecoilLoc | vector | Target location offset for the recoil animation |
| RecoilRot | rotator | Target rotation offset for the recoil animation |
| AimingRecoilMultiplier | float | Multiplier to reduce/increase recoil while aiming (e.g. 0.2 = 20%) |
| RecoilGoBackTime | float | Time it takes to return from recoil to default pose |
| RecoilBlendIn | float | How quickly the weapon transitions into recoil pose |
| RecoilBlendOut | float | How quickly the weapon transitions out of recoil pose |
| UseRemainingSpreadAsBlendOut | bool | If true, blend out will scale with current spread instead of using a fixed time. Default: false |
FHandsAnimConfig. This struct stores settings for procedural idle and lean animations of the player’s weapon — also implemented in the Anim BP.
| LeanSpeed | float | Speed at which the weapon leans during movement or aim adjustments |
| IdleInterpolationSpeed | float | Speed at which the idle animation interpolates to new values |
| IdleSineSpeed | float | How frequently a new idle animation position is randomly selected |
| IdleLocMin | vector | Minimum idle location offset |
| IdleLocMax | vector | Maximum idle location offset |
| IdleRotMin | rotator | Minimum idle rotation offset |
| IdleRotMax | rotator | Maximum idle rotation offset |
| AimingLeanMutliplier | float | Multiplier for reducing/enhancing lean when aiming |
This configuration makes idle and lean behavior fully weapon-dependent, allowing different styles per weapon.
FProjectileMechanicsInfo. Contains data for configuring projectile movement mechanics.
Although this system isn’t implemented in this tutorial yet, it will be used when we introduce the damage and projectile system.
Many of these values mirror those in Unreal’s UProjectileMovementComponent.
| InitialSpeed | float | Starting speed of the projectile |
| MaxSpeed | float | Maximum speed the projectile can reach |
| ProjectileGravityScale | float | How much gravity affects the projectile |
| CollisionRadius | float | Radius of the projectile’s collision shape |
| CanBounce | bool | Whether the projectile can bounce on impact |
| BounceAngleAffectFriction | bool | Specified in Projectile Movement |
| Bounciness | float | Specified in Projectile Movement |
| Friction | float | Specified in Projectile Movement |
| BounceVelocityStopSimulatingThreshold | float | Specified in Projectile Movement |
| MinFrictionFraction | float | Specified in Projectile Movement |
These values will be directly passed into the UProjectileMovementComponent inside your projectile actor. This will be implemeted later in Damage System tutorial.
FAmmoConfig. A high-level structure that contains all the relevant data for defining ammo types used by weapons. This includes damage settings, projectile/tracer configuration, and behavior on hit.
| Name | GameplayTag | Identifier tag for the ammo type |
| Damage | float | Base damage of the ammo |
| WeakSpotMultiplier | float | Multiplier when hitting weak spots (e.g., headshots) |
| bUseRangeDamageModifier | bool | Whether to use range-based damage scaling |
| RangeDamageModifier | FAmmoRangeConfig | Struct holding ideal and falloff range data |
| UseUnlimitedInventoryAmmo | bool | If true, this ammo is unlimited (not tracked in inventory) |
| FireType | EWeaponFireType | Determines whether the ammo uses a Trace or Projectile mechanic |
| ProjectileMechanics | FProjectileMechanicsInfo | Holds projectile-specific mechanics |
| OnHitFeature | EProjectileOnHitFeatureType | Determines behavior on hit (e.g., bounce, penetrate) |
| Penetration | TMap<GameplayTag, FProjectilePenetrationConfig> | Per-material penetration configuration (material tag → config) |
| Bounce | TMap<GameplayTag, FProjectileBounceConfig> | Per-material bounce configuration (material tag → config) |
This structure is designed to support multiple ammo types in a single weapon system, with advanced per-material behavior.
FWeapomModeConfig. This is the core structure of the weapon system, defining one specific weapon mode (e.g., Primary Fire, Secondary Fire, or Tertiary Mode).
It brings together ammo, spread, recoil, reload, warmup, camera feedback, and more.
This config allows the creation of diverse weapon behaviors — from pistols to energy cannons.
| AmmoType | GameplayTag | Defines which ammo type this mode uses |
| UsingTheSameMagazineFrom | EWeaponInputActionType | Share magazine with another mode (optional) |
| DamageMultiplier | float | Multiplier applied to ammo base damage |
| MagazineConfig | FWeaponMagazineConfig | Magazine info for this mode |
| WeaponFireMode | EWeaponFireMode | Fire behavior (Automatic, Burst, Single, AIM, etc.) |
| CooldownAfterFire | float | Time in seconds this mode is locked after firing |
| BulletsInOneShoot | int | Number of bullets fired per shot (e.g. shotgun = 2) |
| BurstCount | int | How many bullets are fired in a burst (if using Burst mode) |
| BurstLag | float | Time between bullets in burst fire |
| SpreadIncrease | FWeaponSpreadIncrease | How spread increases after each shot |
| FireAutoCamRot | FWeaponRotationMinMax | Camera auto-rotation after fire |
| FireAutoCamRotAim | FWeaponRotationMinMax | Camera auto-rotation after fire while aiming |
| FireSocketName | name | Name of the socket the projectile should spawn from |
| FireSocketOffset | vector | Optional offset from the fire socket |
| RecoilAnim | FWeaponRecoilAnim | Procedural recoil animation setup |
| ReloadInfo | FWeaponReloadInfo | Reload system configuration for this mode |
| OverheatConfig | FOverheatConfig | Overheat mechanics for this mode |
| WarmupConfig | FWarmupConfig | Warmup timing and decay mechanics |
| OnFireCameraMods | Class Array STCamModBase | List of camera effects (e.g. shake, FOV pulse) |
| OnFireAutoInput | FWeaponRotationMinMax | Auto input applied after fire (e.g., recoil pull) |
| OnFireAutoInputAim | FWeaponRotationMinMax | Same, but when aiming |
Yes, this struct holds a lot of data — but that’s the point. With this configuration-based approach, you’ll be able to:
- Create almost any weapon without code changes
- Reuse logic and mechanics cleanly
- Keep data flexible and scalable
PrimaryDataAssets
We will use PrimaryDataAsset to configure players, ammo types and weapons.
While in C++ you’d usually use UDataAsset, the PrimaryDataAsset class gives you additional control over loading and memory management, which is especially helpful in large-scale games.
Use the PDA_ prefix for consistency and searchability (e.g., PDA_Player_Main, PDA_Player_Bot, etc.).
PDA_Player
Create new PrimaryAssetData named PDA_Player. Base data asset class for player-related configuration. Leave this empty for now. We won’t be using specific player data at this stage.
PDA_Ammo
Defines all ammo type configurations used in the game. Store only FAmmoConfig. One PDA_Ammo = One unique ammo type (e.g., PDA_Ammo_ShorgunBullets, PDA_Ammo_Grenade).
PDA_Weapon
Holds all settings for a single weapon. Supports up to three modes (e.g. primary, secondary, tertiary).
| Primary | FWeaponModeConfig | Primary fire mode |
| Secondary | FWeaponModeConfig | Secondary fire mode |
| Tertiary | FWeaponModeConfig | Tertiary fire mode |
| bUsePrimary | bool | Whether the primary mode is enabled |
| bUseSecondary | bool | Whether the secondary mode is enabled |
| bUseTertiary | bool | Whether the tertiary mode is enabled |
| AimModifiers | STCamModBase class Array | Optional camera modifiers applied when aiming |
These assets allow designers and technical artists to define new weapons and ammo without touching logic or Blueprints.
You can define default values inside each PDA_Weapon for reuse across the project — e.g., standard recoil, spread, or aim modifiers.
I won’t go over each parameter and its default value again here — you can find all defaults already set up in the downloadable project.
IWeapon Interface

We’ll be using an interface as a communication bridge between the weapon component and the actor that’s using the weapon. For now, just add one function:
- GetLookingSpread outputing float.
Why to use Interface? That’s a great question — and one I might cover in a future stream. In the meantime, I highly recommend Zak Parrish’s excellent video on the topic:
Understanding how objects and actors communicate is absolutely critical when developing systems in games.
In our case, GetLookingSpread will be used by the looking spread system, which may behave differently depending on who is holding the weapon:
| Player | The system will use input (like IA_Look) to pass the current spread back to the weapon. |
| AI Type 1 | Spread can be calculated using the delta between the AI’s target rotation and its current rotation. |
| AI Type 2 | Spread might be computed based on the AI’s movement speed — for example, if it’s sprinting, it becomes harder to fire accurately. |
| AI Type 3 | AI can have something like a stress mechanics which will drive the look at spread. |
Using an interface for this is a smart choice, because it allows different implementations on different actor types, while keeping the weapon system decoupled and flexible.
Our player (STGameplayPlayerPawn) should implement this IWeapon interface.

Weapon Component
Let’s create a new component extending from UActorComponent called WeaponComponent.
This is where the main weapon mechanics will be implemented.
This component will include many properties and functions. I’ll walk you through each of them and explain what they do.
Base Variables
| CurrentWeapon | PDA_Weapon (object reference) | Holds a reference to the current weapon in use. The SetWeapon() function assigns this, and it will be used to access weapon data. |
| StartingWeapon | PDA_Weapon (soft object reference) | Soft reference used to set the starting weapon at runtime without loading it immediately. |
| bHoldingFire | TMap<EWeaponInputAction, bool> | Tracks input state (pressed or not) for each supported fire mode (e.g. Primary, Secondary, Tertiary). |
| bCanOperate | float | Will be set to true after the weapon is properly configured and ready to operate. |
Why using Soft References?
Simple: to avoid massive loading times and memory issues. I saw projects opening 20 minutes. I saw project going out of memory when starting out.
If you reference all assets directly (hard references), Unreal will load everything upfront — even if you don’t need it yet. This leads to:
- Longer load times
- Higher RAM usage
- Slower iteration speed
If you are using soft references you are optimizing your game from start.
By using soft references (TSoftObjectPtr or TSoftClassPtr), assets are only loaded when needed. It’s a best practice in any project. Use LoadSynchronous() or AsyncLoad() when you actually need the asset. You can also implement your own async loading system, but this is not the scope of this tutorial.
Why using TMap? What’s TMap?
It lets you store key–value pairs.
Use it when:
- You want to associate one piece of data with another (e.g. input → state)
- The number of items is dynamic or not fixed
- Fast lookup by key is important
bHoldingFire map stores a boolean flag (true/false) for each input action (e.g. Primary, Secondary, Tertiary fire), so you can easily check if mode is holding fire.
Aim Variables
These variables handle aim-related states. While individual weapon modes (like Primary or Secondary) can define aim behaviors, these properties apply at the weapon level, based on the active modes.
| bHoldingAim | bool | Is the weapon currently attempting to aim? This is true if any weapon mode is actively trying to aim (based on input). |
| bCanAim | bool | Can the current weapon support aiming at all? This will be true if any of its modes are set up with WeaponFireMode = AIM. |
| bisInAim | bool | Is the weapon currently in aim state? Useful to know whether the camera, animations, and modifiers should be applied. |
These variables help centralize aim logic across multiple weapon modes, which simplifies animation handling, FOV, and UI behavior.
Reload Variables
These variables track and control the reload behavior for each weapon action type (e.g., Primary, Secondary, Tertiary).
By using TMap<EWeaponInputActionType, ...>, the system supports independent reload logic per mode.
| ReloadType | TMap<EWeaponInputActionType, EWeaponReloadType> | Stores the reload type (e.g. ReplaceMag, TimedAdd) for each weapon mode. |
| ReloadTime | TMap<EWeaponInputActionType, float> | Stores the reload duration per action type. |
| bAutoReload | TMap<EWeaponInputActionType, bool> | Indicates whether auto-reload is enabled for each mode. |
| bIsReloading | TMap<EWeaponInputActionType, bool> | Tracks whether each mode is currently reloading. |
| AccumulatedReloadTime | TMap<EWeaponInputActionType, float> | Stores the accumulated time spent reloading per mode. Useful for timed reloads like shotguns. |
This setup allows highly modular behavior — for example, a primary mode could use a quick magazine swap, while a secondary grenade launcher uses slow, timed reloads.
Ammo Variables
These variables define how ammo is managed for weapon and action type. The system is designed to be flexible and modular, allowing for support of multiple ammo types, inventory logic, and custom ammo behaviors.
| WeaponAmmoManagerType | EWeaponAmmoManagerType | Defines who handles ammo logic — either the (future) InventoryComponent or a simple internal system in the weapon itself. |
| BulletsInOneShoot | TMap<EWeaponInputActionType, int> | Stores how many bullets are fired per trigger pull for each weapon action (e.g., 1 for rifle, 2 for shotgun). |
| AmmoToUseForAction | TMap<EWeaponInputActionType, GameplayTag> | Maps each action type to the ammo GameplayTag it should use. This allows different fire modes (like grenades) to use different ammo types. |
| CurrentAmmoInMagazine | TMap<GameplayTag, int> | Tracks the current number of bullets in the magazine for each ammo type. |
| MaxAmmoInMagazine | TMap<GameplayTag, int> | Stores the maximum magazine capacity per ammo type. |
| bUnlimitedMagazineAmmo | TMap<GameplayTag, bool> | Flags whether the magazine for a given ammo type is infinite. |
| CurrentAmmoInInventory | TMap<GameplayTag, int> | Tracks how much reserve ammo the weapon has for each ammo type. |
| bUnlimitedInventoryAmmo | TMap<GameplayTag, bool> | Indicates if an ammo type has infinite reserve ammo. |
| StartingCompInvAmmo | TMap<GameplayTag, int> | Stores the initial inventory ammo count for each type (used for initialization or testing) |
With this setup, you can support:
- Multiple ammo types (rifle, grenade, energy)
- Shared magazines (between primary/secondary)
- AI or player-specific ammo logic
- Infinite ammo scenarios (debugging, special weapons)
Overheat Variables
These variables control the overheat mechanic, allowing each weapon mode to handle overheat independently.
Overheat adds tactical depth by forcing cooldown management, especially for automatic or energy-based weapons.
| OverheatCurrent | TMap<EWeaponInputActionType, float> | Tracks the current overheat value per weapon action type. |
| AccumulatedOverheatCooldownTime | TMap<EWeaponInputActionType, float> | Stores how long the weapon mode has been cooling down from an overheat state. |
| OverheatConfig | TMap<EWeaponInputActionType, FOverheatConfig> | Contains the overheat settings per action type. |
This per-action overheat system enables weapons like:
- Energy rifles that overheat on sustained fire
- Grenade launchers with slow cooldowns
- Miniguns requiring tactical burst fire
Warmup Variables
The Warmup system adds a delay before a weapon can fire, often used for powerful or charge-based weapons (like miniguns or energy rifles).
These variables allow each weapon action to manage warmup independently.
| WarmupConfig | TMap<EWeaponInputActionType, FWarmupConfig> | Contains the warmup settings per action type. Defined in FWarmupConfig. |
| AccumulatedWarmupTime | TMap<EWeaponInputActionType, float> | Stores the accumulated warmup time per weapon action type — used to determine when the weapon can fire after input is held long enough. |
This system supports mechanics like:
- Energy weapons that charge before firing
- Miniguns that spin up before they shoot
- Variable warmup behavior based on holding vs tapping input
Burst Variables
The Burst system allows weapons to fire multiple shots in rapid succession with a delay between them — typical for burst rifles or smart-fire modes. These variables allow each weapon action type (Primary, Secondary, Tertiary) to have its own burst behavior.
| BurstCount | TMap<EWeaponInputActionType, int> | Defines how many bullets will be fired in a single burst per weapon action type. |
| BurstLag | TMap<EWeaponInputActionType, float> | Defines the delay (in seconds) between each shot in a burst. Per weapon action type. |
| AccumulatedBurstTime | TMap<EWeaponInputActionType, float> | Tracks how much burst lag time has been accumulated, used to space out shots within a burst. Per weapon action type. |
| CurrentBurstCount | TMap<EWeaponInputActionType, int> | Tracks how many shots have been fired so far in the current burst sequence. Resets when burst finishes. Per weapon action type. |
This burst logic supports weapons like:
- M4 with 3-round burst
- Semi-auto pistols with burst fire upgrades
- AI weapons that simulate controlled volleys
Cooldown Variables
The Cooldown system defines how long a weapon must wait after firing before it can fire again.
Each weapon action type can have its own cooldown duration and internal timer.
| AccumulatedCooldownTime | TMap<EWeaponInputActionType, float> | Tracks the current accumulated cooldown time after firing for each weapon mode. Used to determine when firing is allowed again. |
| CooldownAfterFire | TMap<EWeaponInputActionType, float> | Defines how long the weapon must wait after firing before it’s ready to fire again, per action type. |
Cooldowns help:
- Balance high-damage weapons with slower recovery
- Prevent spamming of powerful attacks
- Synchronize with animation and effects
Fire Modes Variables
These variables manage the firing behavior, mode logic, and weapon state transitions per action type (Primary, Secondary, Tertiary). This setup enables full control over each firing mode — including automatic, burst, aim-based, or single-shot logic.
| FireModesPerActionData | TMap<EWeaponInputActionType, FWeaponModeConfig> | Holds the full weapon mode configuration (FWeaponModeConfig) for each action type. |
| WeaponFireMode | TMap<EWeaponInputActionType, EWeaponFireMode> | Specifies the fire mode type (e.g. Automatic, Burst, SingleShot, AIM) per action. |
| CurrentWeaponState | TMap<EWeaponInputActionType, EWeaponState> | Tracks the current operational state of each weapon mode (e.g. Idle, Fire, Reloading). |
| WantedWeaponState | TMap<EWeaponInputActionType, EWeaponState> | Stores the desired target state based on player input or system transitions. |
| LastWeaponState | TMap<EWeaponInputActionType, EWeaponState> | Keeps record of the previous state, useful for debugging or managing animation/state transitions. |
This structure allows you to:
- Run parallel logic for different fire modes (e.g. firing rifle + preparing grenade)
- Drive animations and effects based on state
- Cleanly manage transitions (Idle → Warmup → Fire → Cooldown)
Spread Variables
The Spread system defines the inaccuracy of shots, influenced by firing, movement, and aiming.
These variables track real-time spread values for dynamic gameplay and responsive UI.
| CurrentSpread | float | The current total spread value applied when firing. |
| CurrentSpreadMin | float | The current minimum possible spread based on aiming state and configuration. |
| CurrentSpreadMax | float | The maximum allowed spread, used to clamp over-spread scenarios. |
| CurrentSpreadDecreaseSpeed | float | How fast the spread value is currently decreasing over time (e.g. while idle). |
| CurrentLookingSpread | float | Spread contribution from player/AI look input or rotation. |
| CurrentLookSpreadIncreaseSpeed | float | How fast looking spread increases when rotating the view. |
| CurrentLookMaxSpreadIncreaseSpeed | float | Maximum limit of spread caused by looking. |
These values feed into:
- Projectile/trace direction offsets
- Crosshair size/UI visualization
- Procedural accuracy loss or bloom mechanics
Dispatchers
The Weapon Component provides several event dispatchers to allow other systems (UI, animation, sound, AI, etc.) to react to weapon changes and state transitions. These are broadcast during key weapon actions.
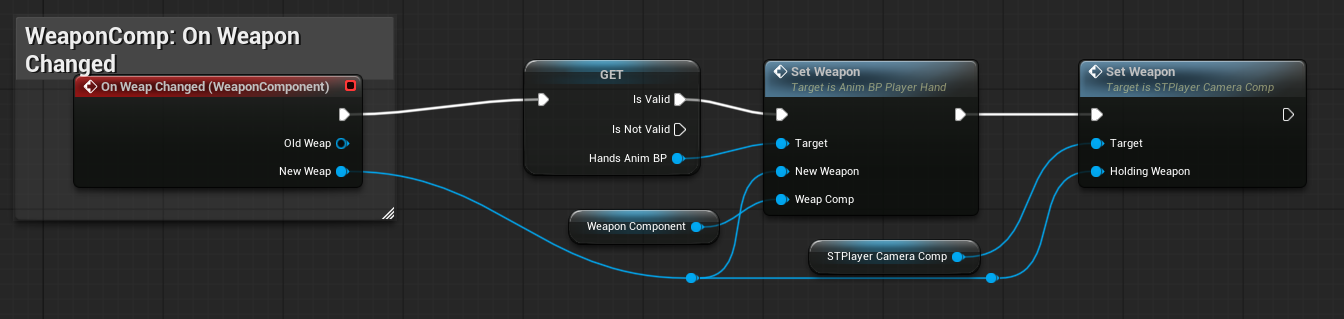
OnWeapChanged. Called when a new weapon is equipped.
- OldWeap –
PDA_Weaponreference - NewWeap –
PDA_Weaponreference
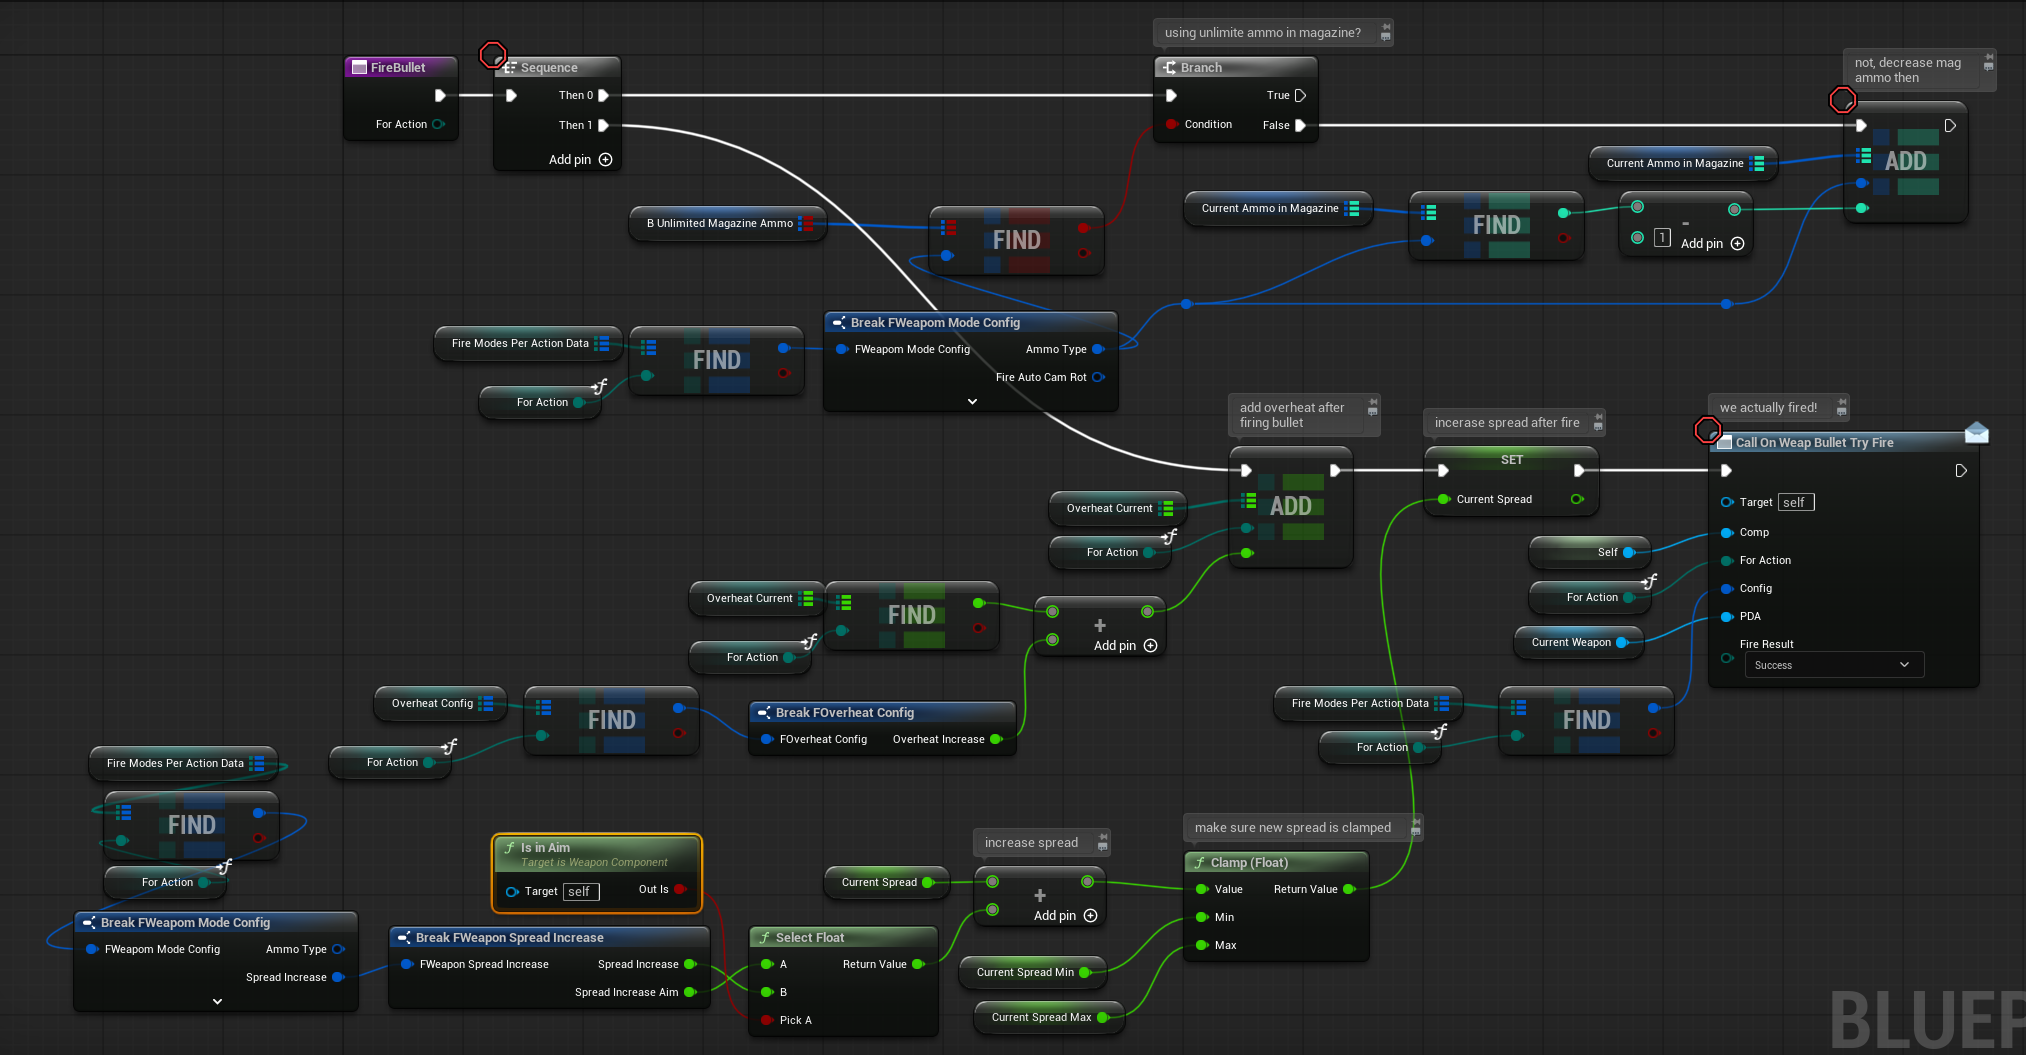
OnWeapBulletTryFire. Called when the weapon attempts to fire, regardless of success.
- Comp –
WeaponComponentreference - ForAction –
EWeaponInputActionType - Config –
FWeaponModeConfig - PDA –
PDA_Weaponreference - FireResult –
EWeaponFireResult(Success, NoAmmo, Overheat, etc.)
OnWeapAim. Called when the weapon starts or stops aiming.
- OutAiming –
bool - Comp –
WeaponComponentreference - ForAction –
EWeaponInputActionType - PDA –
PDA_Weaponreference
OnWeapHoldingFireChanged. Called when a fire input is held or released.
- Comp –
WeaponComponentreference - ForAction –
EWeaponInputActionType - Config –
FWeaponModeConfig - PDA –
PDA_Weaponreference - IsHolding –
bool
OnReloadStarted. Called when reload starts.
- Comp –
WeaponComponentreference - ForAction –
EWeaponInputActionType - PDA –
PDA_Weaponreference
OnReloadEnded. Called when reload finishes.
- Comp – WeaponComponent reference
- ForAction – EWeaponInputActionType
- PDA – PDA_Weapon reference
OnOverheatStarted. Called when a weapon mode enters overheat.
- Comp –
WeaponComponentreference - ForAction –
EWeaponInputActionType - PDA –
PDA_Weaponreference
OnOverheatEnded. Called when the overheat ends and the weapon can fire again.
- Comp –
WeaponComponentreference - ForAction –
EWeaponInputActionType - PDA –
PDA_Weaponreference
These dispatchers make it easy to:
- Trigger UI updates (ammo, spread, state)
- Play sounds or animations
- Log debugging info
Input Functions
The Weapon Component exposes simple input functions for handling fire modes and reloads.
Each supported input action (Primary, Secondary, Tertiary) is mapped to its corresponding weapon mode logic.
- OnPrimaryPressed / Released
- OnSecondaryPressed / Released
- OnTetriaryPressed / Released
- ReloadInput
Let’s take a look at the fire modes inputs. Open the WeaponComponent and find those functions.
The logic is straightforward — each input checks if the action is allowed and then marks the weapon as holding fire or holding aim, depending on the fire mode type. When the reload input is triggered, it iterates over all supported weapon modes and calls ForceReloadFromInput() for each mode that supports reloading.
Also check STGameplayController which have new input implementation.
Fire Functions
SetIsHoldingFire. Will call IntendToFire if we can call it.
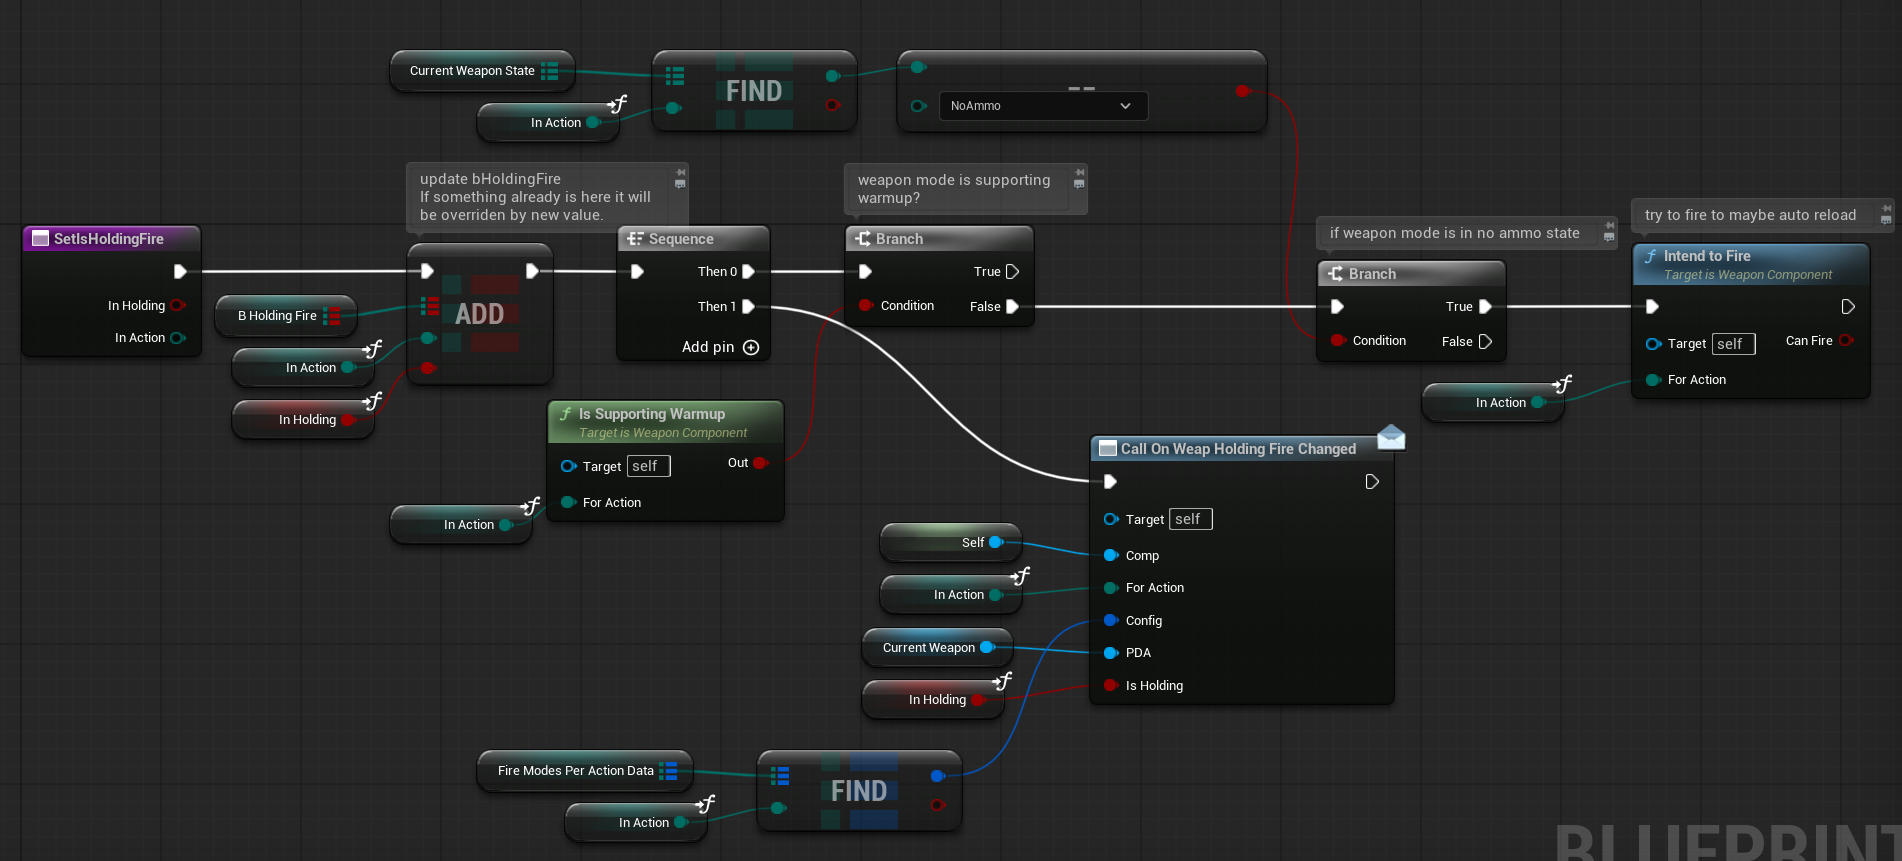
IntendToFire. Function will return true if we can actually fire.
Fire. One fire action can fire more than one bullet. That’s why we have two functions here.

FireBullet. This is the actual firing bullet function.
State Functions
SetState. Handles state transitions for each weapon mode. Called to update the current state (Idle, Fire, Reloading, etc.) based on gameplay logic or input.
Reload. Executes the actual reload logic for a specific weapon mode.
SetNewWeapon. Updates the currently equipped weapon and reconfigures the component.
This function sets the CurrentWeapon reference and calls configuration functions for each supported fire mode.
ConfigureDataForMode. This is where the real weapon mode configuration happens.
It reads all relevant data from the PDA_Weapon and applies the values to the Weapon Component — including fire mode settings, reload data, spread behavior, overheat, etc.
WeaponTick. This is the core update loop of the weapon system, called every frame.
Also check Begin Play in Event Graph when we are setting up the ammo.
Player Pawn Updates
Check out the updated STGameplayPlayerPawn. I’ve removed the second weapon to make the WeaponComponent easier to read and manage. The C++ implementation still supports dual weapons — this is just a simplification for clarity in Blueprints.
Aiming Updates

The camera modifiers are now triggered directly from the Pawn.
AfterFireAutoInput & UpdateAfterFireAutoInput . The Pawn is now responsible for storing and updating the auto input after firing.
UpdateLookingSpread. The Pawn also handles updating the looking spread, depending on player input.
When the weapon is changed, the Pawn updates both the Animation Blueprint and the Camera with the new weapon settings.
And most importantly — the Pawn is now responsible for actually firing the bullet.
It also handles updating both the Animation Blueprint and the Camera when a shot is fired.
What next?
After implementing such a large system, we need a proper debugging tool to verify that everything is working correctly.
In the next part I’ll show you how to implement a simple debug system that will help you inspect and validate key parts of the weapon system in real time. And also help you understand how it works.

You must be logged in to post a comment.