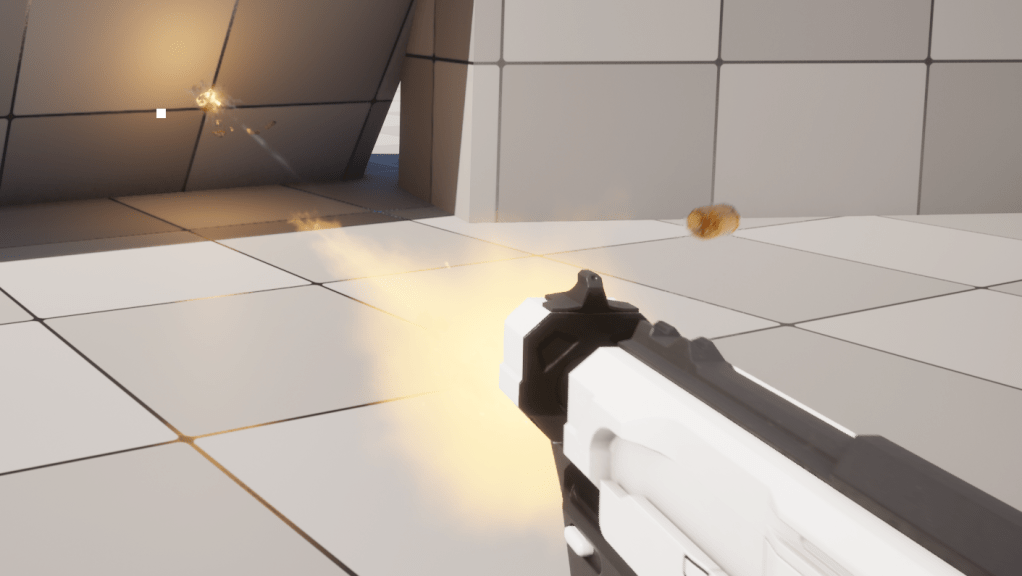
Create a Small Game from Scratch Series: Endless Standing First-Person Shooter
Level: Intermediate
Type: Blueprint
Version: 5.6
Download Project
Last time we have implemented Damage System now we have everything to put a weapon audio visual system.
This will be long post as we not only implemented the audio visual system but also created lot of FXes and sounds which I would try to explain here as well.
- Hi Level Overview
- Data – Named Audio Visual Params
- Good practice: Parameters
- Good practice: Global Parameters
- Data – Spawn Configs
- Data – Bullet Decal Config
- Data – Surface Types
- Data – Bullet Ricochet Config
- Data – Smoke On Fire
- Data – Bullet Custom Effects
- Data – Projectile Audio Vis Config
- Data – Anim and Sound Config
- Data – Presets
- Data – Presets – Bullet Hit Audio Visual
- Data – Presets – Bullet Audio Visual
- Data – Presets – Weapon Audio Visual
- Player Audio Visual Manager
- Audio Visual Function Library
- Base Projectile Updates
- Weapon Class
- Near Clip Plane
- Effects – Lyra
- Effects – Shell out of mag
- Effects – Bullet Beam Trace
- Effects – Decals
- Effects – Muzzle Flash
- Effects – Muzzle Smoke Loop
- Effects – Impact
- Effects – Ricochet
- Conclusion
Hi Level Overview
First let’s try to analyze what we will be doing and why.
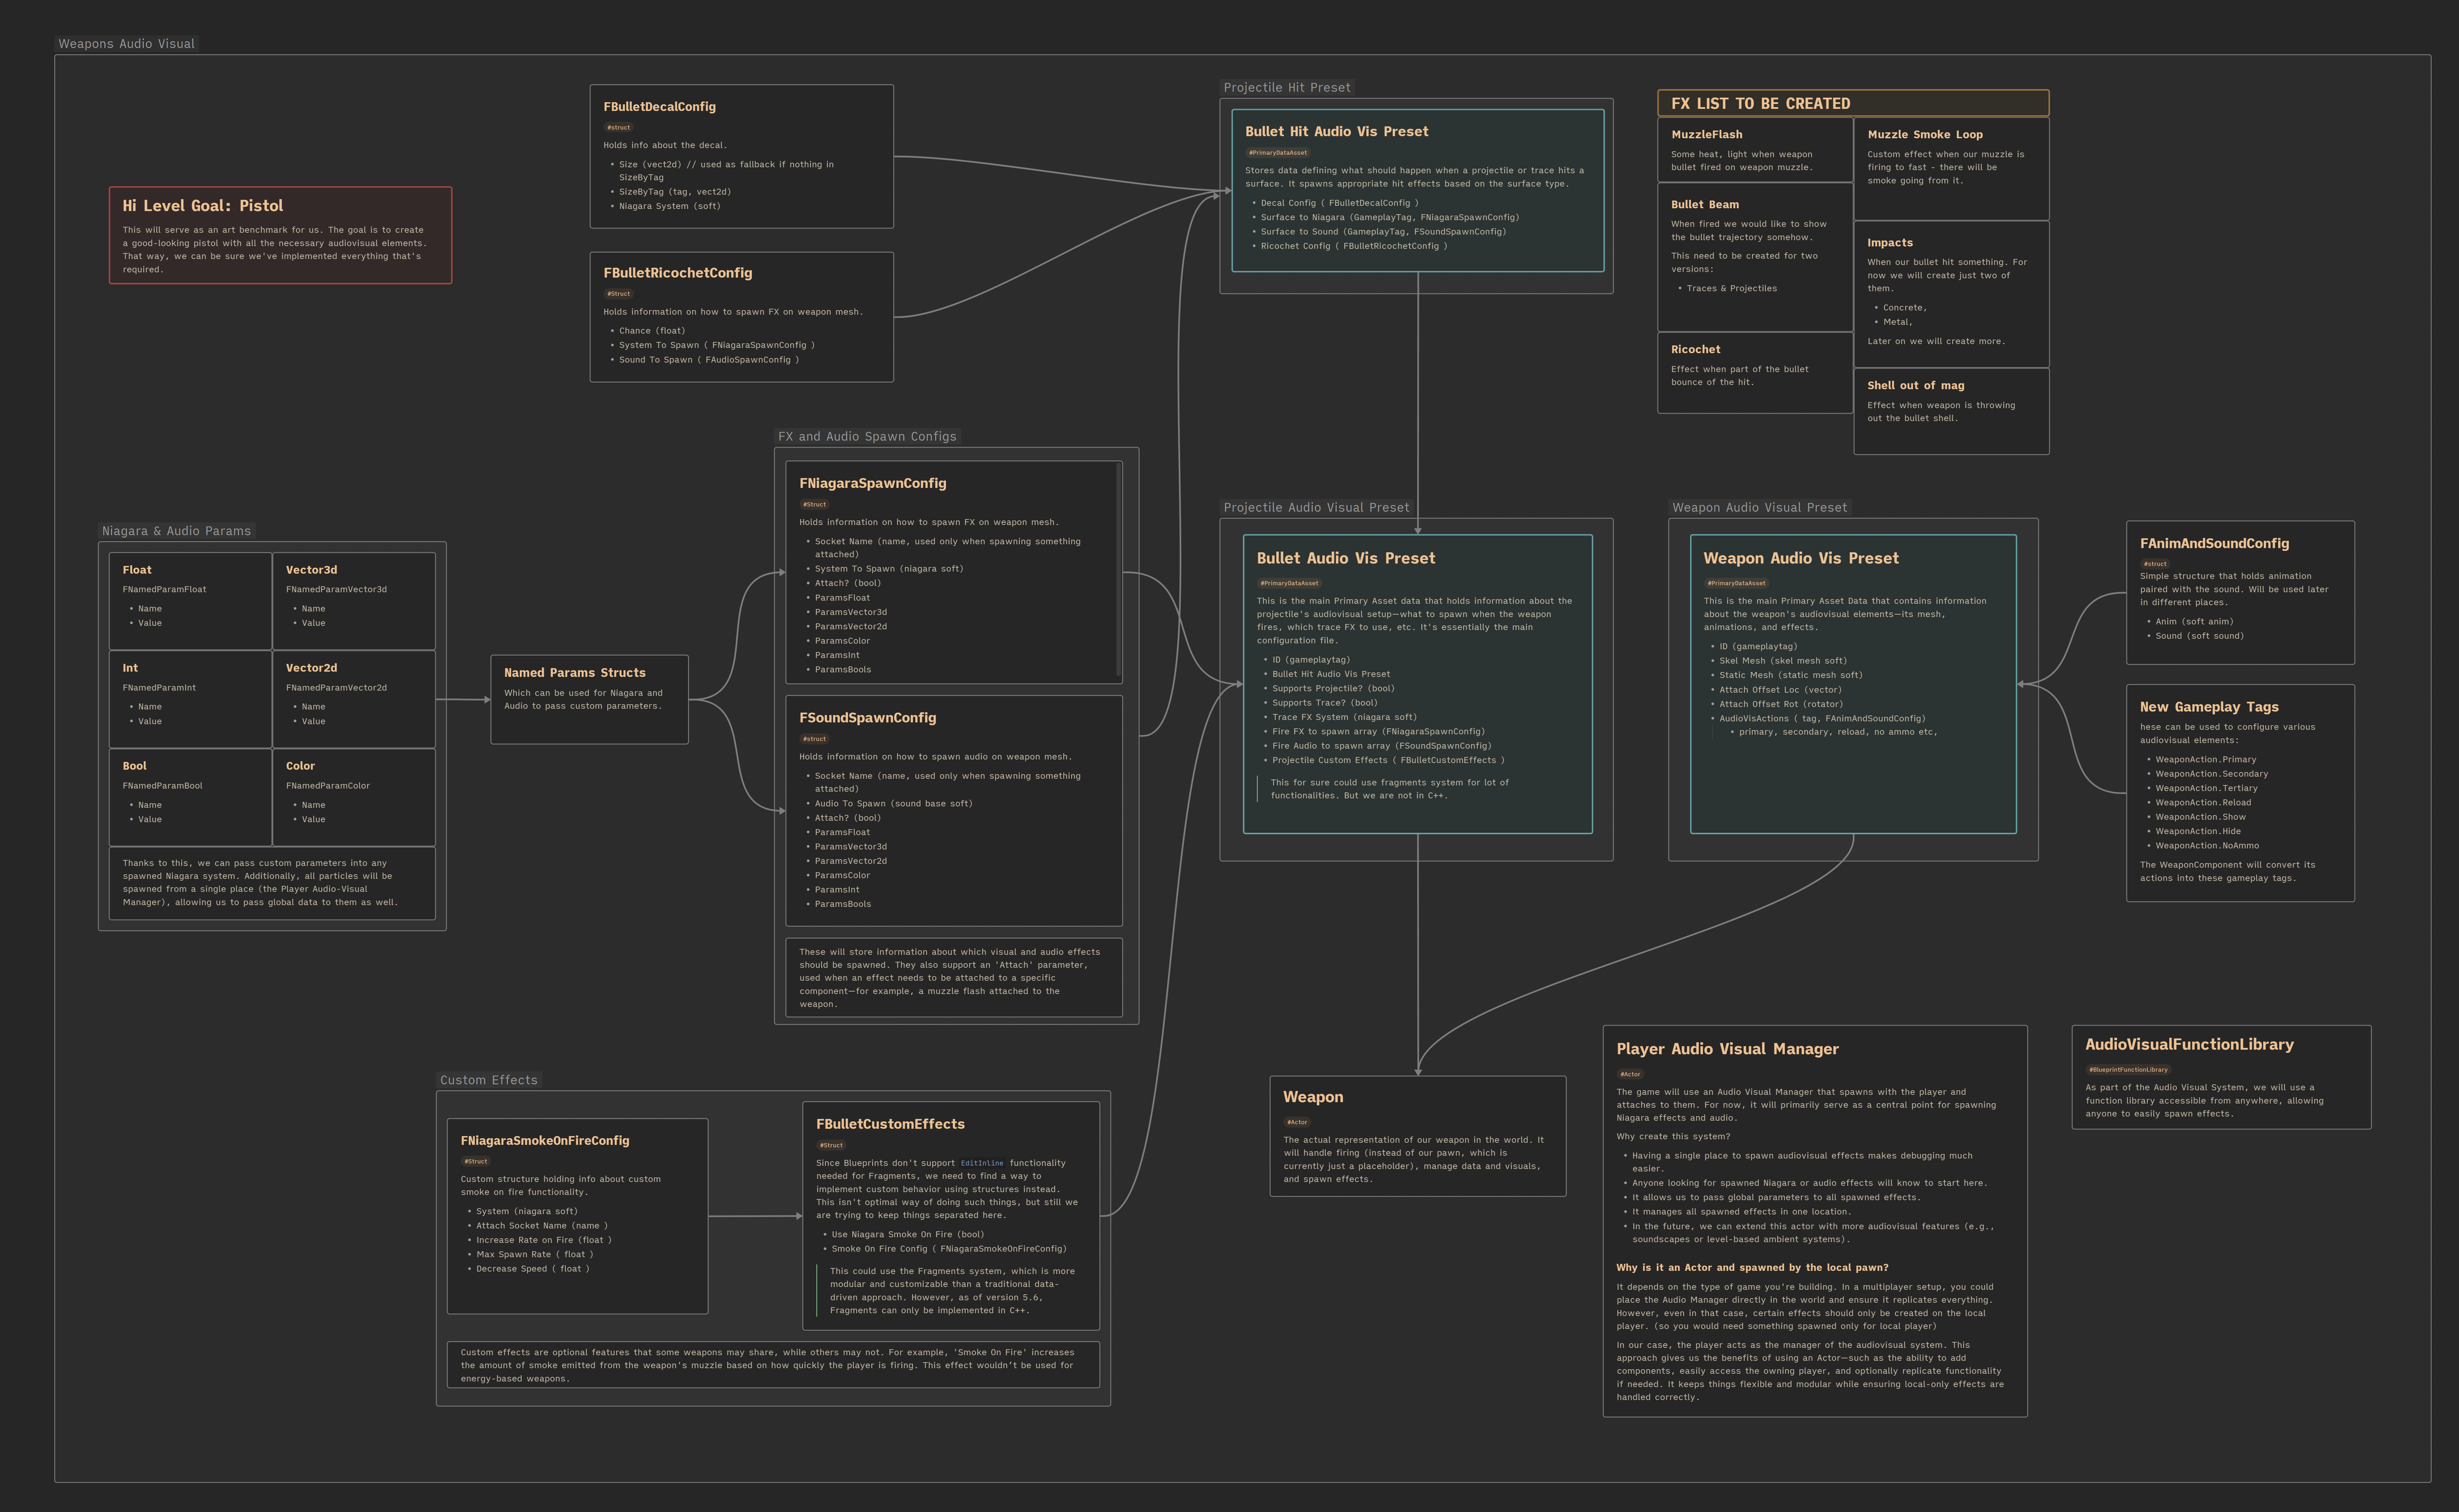
Take your time to review this diagram, as it contains a lot of information about the system.
The system can basically be divided into three parts:
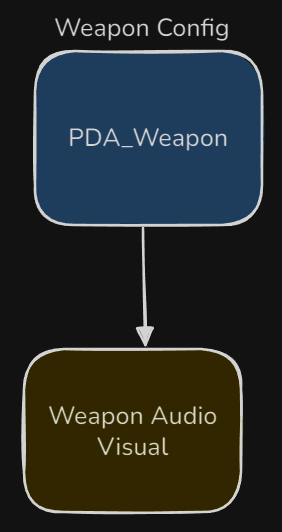
- Weapon – Configures the audiovisual aspects of the weapon: mesh, Niagara/audio actions for each mode (firing, reloading, aiming, etc.), and weapon placement.
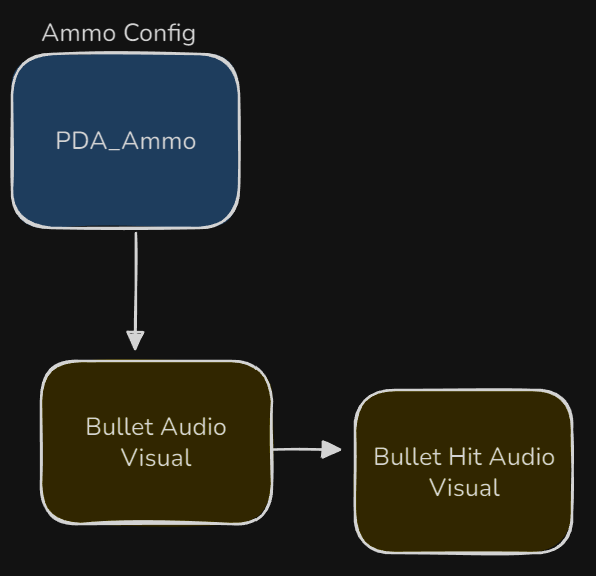
- Bullet – Configures the audiovisual aspects of the projectile: trace beam, firing Niagara/audio, and some custom features.
- Bullet Hit – Configures the bullet hit effects: decals, Niagara, and audio.
Additionally, we’ll implement an Audio Visual Manager and a Function Library to make debugging and managing all audiovisual elements in our game easier.
Data – Named Audio Visual Params
When it comes to the audiovisual side of game development, there are both good and bad practices. In this tutorial, we’ll focus on two key good practices.
Good practice: Parameters
Always design your effects (both audio and visual) with reusability and configurability in mind. Instead of creating many similar assets for every use case, create a single effect that can be reused with different parameters.
For example:
- A unified decal system for projectile hits that supports all surface types.
- A single muzzle flash effect that’s reused across multiple weapons, each using different parameters.
This approach helps reduce:
- Memory usage
- Data size
- Compile times
- Iteration time during development
Why? Because you’re maintaining one flexible asset instead of dozens of nearly identical ones.
To support this, we’ll use custom structs to configure and pass parameters into every spawned sound or Niagara system.
Examples include:
FNamedParamBoolFNamedParamColorFNamedParamFloatFNamedParamIntFNamedParamVector2DFNamedParamVector3D

Each struct contains a name and a value, and will be used to automatically pass parameters into Niagara and audio systems at spawn time.
💡 Note: Don’t try to parameterize everything right away. Creating parameters takes time, and many effects won’t need them. Add parameters when you see an opportunity to reuse an effect or optimize.
Good practice: Global Parameters
Another solid practice is to define global parameters that are passed to every Niagara and audio effect you spawn. These can include:
- Player speed
- Velocity
- Crouch state
- Rain intensity
These values can significantly affect how your effects look and sound.
For Niagara, you can use Niagara Parameter Collections, which are great for passing shared data (like what’s already being used in material parameter collections). However, for audio – there’s no built-in equivalent (yet), so you’ll need a custom system. Also, some Niagara data may not be suitable for parameter collections, so you’ll need to pass those manually too.
To sum up, our system will consist of:
- A list of user-configurable parameters
- A unified place to spawn audio and visual effects
- Automatic passing of:
- User-defined parameters
- Global parameters (player state, world conditions, etc.)
This will help us build a more flexible, scalable, and performant audiovisual system.
Data – Spawn Configs
We need a way to configure parameters when spawning audiovisual effects. Take a look at FNiagaraSpawnConfig and FSoundSpawnConfig. These structs contain:
| SocketName | name | If we’re attaching the effect, this is the name of the socket to attach to (e.g., a muzzle flash socket or shell ejection socket). |
| Attach | bool | Indicates whether the audiovisual effect should be attached to the specified socket or spawned independently. |
| System or Audio | Niagara Soft Object Ref or Base Audio Soft Object Ref | A soft reference to the Niagara system or sound asset (depending on the type of effect). |
We will use this struct in couple of places.
- Bullet audio visual preset (which we don’t have yet) will have this information
- Bullet hit audio visual
- Other places where we would like to spawn more advanced effects
As you can see, whenever we reference an asset, we use a soft reference. This means the asset won’t be loaded during the game or engine loading phase. I’ve mentioned this in earlier tutorials, but it’s worth repeating — this is a crucial detail for maintaining good performance.
Data – Bullet Decal Config
Each projectile (or trace) will create a decal effect on hit, depending on the surface it impacts. Our decals will be created using Niagara systems, not traditional decal actors. Take a look at FBulletDecalConfig:
| Size | vector2d | Default decal size used when there is no specific size defined for the surface hit. |
| SizeByTag | GameplayTag, vector2d | Stores custom decal sizes based on the surface type (identified by GameplayTag). |
| System | Niagara Soft Object Ref | A soft reference to the Niagara system used to spawn the decal effect. |
We use Niagara instead of standard decal actors because it’s more performance-friendly and makes it easier to implement pooling later on.
Data – Surface Types
To react differently to various surface types when a bullet hits something, we need more than just the default surface type.
In Project Settings → Engine → Physics, under Physical Surfaces, you can define a list of surface types used in your project. I’ve added: Concrete and Metal.
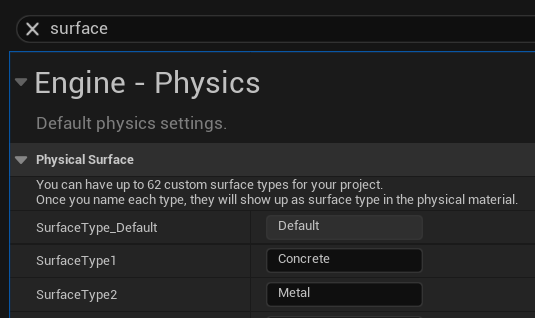
These surface types can now be selected in each Physical Material asset – it includes:
PhysMat.ConcretePhysMat.Metal
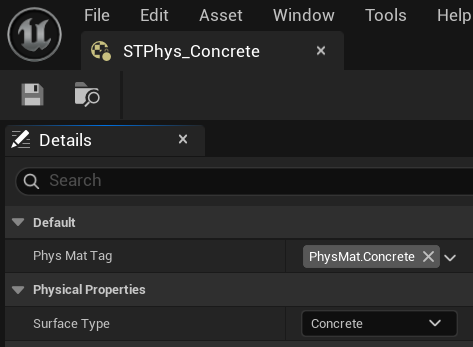
I’ve also created two new physical material assets:
STPhys_MetalSTPhys_Concrete
Each of these holds:
- The appropriate surface type
- The matching gameplay tag
Why Not Just Use Surface Types?
You can use only the surface types defined in Project Settings. You don’t have to use STPhys materials or gameplay tags.
But having our own data setup gives us more flexibility:
- You can expand
STPhyswith more data during development, such as:- Behavior in rain
- Bullet penetration multipliers
- Bounce modifiers
- Surface Types are stored in
.inifiles and are easy to break if someone changes the order — which can lead to bugs. - Gameplay Tags are safer and easier to maintain.
- With tags, you can search for references in the editor to see where a surface type (like
Concrete) is used.
When to Use What?
You don’t have to use both systems. You could rely purely on Gameplay Tags + STPhys materials and ignore the default Surface Types if you prefer.
You can also use just Surface Types without any gameplay tags or custom STPhys materials — especially if your game doesn’t focus on shooting or surface-specific interactions. If you don’t need extra metadata per surface (like penetration modifiers, effects in rain, etc.), then using the built-in Physical Surface system from Project Settings is perfectly fine. It’s simple, lightweight, and gets the job done in many cases.
I use both Surface Types and Gameplay Tags, depending on the situation:
- If I only need the gameplay tag, I don’t need to load the
STPhysmaterial asset. - If I need more detailed data, I load the full
STPhysobject.
To help with this, we’ll create functions to convert Surface Types to our custom gameplay tags when needed. Keep in mind that this is shooter game, and for sure hit details and surface will have impact to the gameplay.
Data – Bullet Ricochet Config
When a bullet hits a surface, we not only want the option to make it bounce, but also to spawn ricochet audiovisual effects.
Take a look at FBulletRicochetConfig:
| Chance | float | The probability (from 0 to 1) of spawning ricochet effects when a bullet hits a surface. |
| System | FNiagaraSpawnConfig | Stores information about how to spawn the Niagara ricochet visual effect. |
| Sound | FSoundSpawnConfig | Stores information about how to spawn the ricochet sound effect. |
The bullet hit audiovisual system will support a mapping from surface type to ricochet config, so you can define ricochet effects only for specific surfaces, like metal or concrete.
This allows you to skip ricochet effects on softer surfaces like wood or dirt, making the system both more realistic and more optimized.
Data – Smoke On Fire
This is part of our custom effects system. The idea is to spawn smoke from the weapon’s muzzle based on how quickly it’s firing — the faster you shoot, the more smoke builds up.
💡 Note: Normally, for such custom features, I would use Fragments — modular data blocks that support custom logic and can be added independently to specific weapons. However, Fragments are currently only available in C++ (as of Unreal Engine 5.6) and are not yet supported in Blueprints.
Check out FNiagaraSmokeOnFireConfig which holds the configuration for the smoke effect:
| System | Niagara System soft obj ref | A soft reference to the Niagara system used to spawn the smoke effect. |
| AttachSocketName | name | The name of the socket to attach the smoke to — typically the weapon’s muzzle flash socket. |
| IncreaseRateOnFire | float | How much the smoke spawn rate increases each time a bullet is fired. |
| MaxSpawnRate | float | The maximum allowed spawn rate for the smoke particles. |
| DecreaseSpeed | float | How quickly the smoke spawn rate decays over time when not firing. |
The implementation will be done directly inside the Weapon Class for now, but ideally this would be handled by a Fragment system once Blueprint support is available.
This struct will also be added to FBulletCustomEffects to allow per-weapon customization.
Data – Bullet Custom Effects
Take a look at the FBulletCustomEffects struct. Right now, it contains just two properties:
| UseNiagaraSmokeOnFire | bool | Determines whether the weapon should use the custom smoke-on-fire effect. |
| SmokeOnFireConfig | FNiagaraSmokeOnFireConfig | Holds the configuration data for the smoke effect (spawn rate, decay, attachment, etc.). |
As you can imagine, this struct will grow over time as we introduce more custom visual or audio effects. It’s meant to be a flexible container for weapon-specific behavior.
This is a perfect example of where Fragments would shine — modular, reusable, and easy to add per weapon. Unfortunately, since Fragments are only available in C++ (UE 5.6+) and not yet exposed to Blueprints, we’re implementing this manually for now.
This struct will be used in the Bullet Audio Visual Preset to configure any custom bullet-related effects, such as smoke on fire or future advanced visuals. It acts as an extension point for unique per-weapon behaviors.
Data – Projectile Audio Vis Config
When we’re not using traces for bullets and instead rely on projectile actors (like grenades or rockets), we need a way to configure their visuals and audio.
That’s where FProjectileAudioVisConfig comes in:
| StaticMesh | Static Mesh Soft Obj | Which static mesh should use. |
| Scale | vector | Scale to apply to the projectile mesh. |
| ProjectileSystem | FNiagaraSpawnConfig | Niagara system to be used for the projectile’s visual effect. This replaces the default system in Niagara Component inside the base projectile class. |
| ProjectileSound | FSoundSpawnConfig | Sound configuration for the projectile. This replaces the default sound in Audio Component in the base projectile class. |
This struct provides the flexibility to customize how each projectile looks and sounds. Later on, we can expand it with more variables.
Data – Anim and Sound Config
This is a simple structure designed to hold animation and sound references.
Take a look at FAnimAndSoundConfig:
| Anim | Animation Asset Soft Object | A soft reference to the animation asset to play. |
| Sound | Sound Base Soft Object | A soft reference to the sound to play. |
These will be triggered in various situations — such as weapon firing, reloading, or any other action.
This struct is part of our “fire-and-forget” system, which will use gameplay tags as action IDs to determine what to play and when.
Data – Presets
Now that we’ve defined all the necessary structures, it’s time to create Primary Asset Data for the following:
- Bullet Hit Preset
- Bullet Preset
- Weapon Preset
In an earlier tutorial, we discussed how using Primary Assets to store game data is a best practice. It allows for better data organization and reference handling — especially for larger projects. That’s why our presets (which act as data holders) will also be implemented as Primary Asset Data Assets.
Data – Presets – Bullet Hit Audio Visual
This data asset serves as the base for all bullet hit presets. Later in the project, you’ll likely create many of them, such as:
- DA_BulletHit_Pistol
- DA_BulletHit_EnergyPistol
- DA_BulletHit_GrenadeLauncher
Each will store different audiovisual data specific.
Check out PDA_BulletHitAudioVis variables:
| Decal | FBulletDecalConfig | Holds the configuration for the decal effect on impact. |
| SurfaceToNiagara | GameplayTag to FNiagaraSpawnConfig | Maps surface types (via gameplay tags) to Niagara effects. |
| SurfaceToSound | GameplayTag to FSoundSpawnConfig | Maps surface types to sound effects. |
| SurfaceToRicochet | GameplayTag to FBulletRicochetConfig | Maps surface types to ricochet effect configs. |
And some helper functions like GetNiagaraBySurface, GetSoundBySurface and GetRicochetBySurface which simply look up the corresponding values in the appropriate map (TMap). These help keep logic clean when retrieving effects based on surface types.

PDA assets are a great place to define default settings for various behaviors and visuals. You should check them out.
For now we are using only one asset: DA_TestAmmoHitVis. For now, we’re only using one preset: DA_TestAmmoHitVis – just to test things out.
Data – Presets – Bullet Audio Visual
This Primary Data Asset (PDA) stores all the necessary information about a bullet’s audiovisual behavior. It allows us to configure how a bullet looks and sounds during various stages: firing, traveling, and hitting a target.
Let’s go over the variables in PDA_BulletAudioVis:
| ID | GameplayTag | A unique identifier for the audiovisual preset. Can be used to reference or fetch the asset later (e.g. by ammo type). |
| HitAudioVis | PDA_BulletHitAudioVis object ref | A reference to the hit effects preset, which defines what happens when the bullet impacts a surface (decals, impact VFX, ricochets, etc.). |
| ProjectileAudioVis | FProjectileAudioVisConfig | Contains visual/audio settings for bullets using projectile actors instead of traces. (e.g. visible grenades, rockets). |
| TraceFXSystem | Nigara System soft object | Soft reference to the Niagara system used for beam/trail effects when using trace-based fire modes. |
| FireNiagaraToSpawn | FNiagaraSpawnConfig Array | List of Niagara effects to spawn when the bullet is fired, such as muzzle flashes. |
| FireSoundToSpawn | FSoundSpawnConfig Array | List of sound effects to play on fire. |
| CustomEffects | FBulletCustomEffects | Ability to configure custom effects for this bullet. Smoke on fire here |
Thanks to this setup, we can fully configure the audiovisual aspect of a bullet. Different ammo types can simply select the appropriate preset, making the system flexible, clean, and reusable.
Be sure to define default values in this PDA (PDA_BulletAudioVis). These defaults can be reused by other Primary Data Assets.
Data – Presets – Weapon Audio Visual
Now let’s move on to the Weapon Audio Visual configuration. Open PDA_WeaponAudioVis and check out its variables:
| ID | GameplayTag | A unique identifier for the audiovisual preset. Useful for referencing or fetching the asset later, for example by weapon type. |
| SkelMesh | Skel Mesh soft object | Soft reference to the skeletal mesh that visually represents the weapon. |
| StaticMesh | Static Mesh soft object | Soft reference to the static mesh, used if the weapon doesn’t need animations. Our system supports both skeletal and static mesh-based weapons. |
| AttachOffsetLoc | vector | Location offset for the mesh when attached to the player character. |
| AttachOffsetRot | rotator | Rotation offset for the mesh when attached to the player character. |
| AnimSoundActions | GameplayTag to FAnimAndSoundConfig | Maps gameplay action tags (like reload started, ended, primary fired etc) to their corresponding animation and sound configs. This lets you define what to play for each action. |
As for the functions currently we just need one to get AnimSoundConfig per tag as earlier GetNiagaraBySurface in PDA_BulletHitAudioVis.
This allows us to separate audiovisual logic from core weapon mechanics, which gives us flexibility to:
- Reuse the same audiovisual preset across different weapons.
- Swap out visuals/sounds without changing gameplay code.
- Maintain a clean data-driven design.
Separating data, logic, and visualization is key to building modular, maintainable, and scalable systems.
- Data (e.g. PDAs, configs) holds what should happen.
- Logic (e.g. weapon or gameplay systems) decides when and how it happens.
- Visualization (e.g. meshes, sounds, VFX) shows it to the player.
By keeping these parts decoupled:
- You can reuse logic with different visuals,
- Swap out data without rewriting code, and
- Maintain a much cleaner, more flexible project structure.
This is the foundation of our audiovisual system — and a good practice across all gameplay systems.
Player Audio Visual Manager
As described in the high-level overview.
The game will use an Audio Visual Manager that spawns with the player and attaches to them. For now, it will primarily serve as a central point for spawning Niagara effects and audio.
Why create this system?
- Having a single place to spawn audiovisual effects makes debugging much easier.
- Anyone looking for spawned Niagara or audio effects will know to start here.
- It allows us to pass global parameters to all spawned effects.
- It manages all spawned effects in one location.
- In the future, we can extend this actor with more audiovisual features (e.g., soundscapes or level-based ambient systems).
Why is it an Actor and spawned by the local pawn?
It depends on the type of game you’re building. In a multiplayer setup, you could place the Audio Manager directly in the world and ensure it replicates everything. However, even in that case, certain effects should only be created on the local player. (so you would need something spawned only for local player)
In our case, the player acts as the manager of the audiovisual system. This approach gives us the benefits of using an Actor—such as the ability to add components, easily access the owning player, and optionally replicate functionality if needed. It keeps things flexible and modular while ensuring local-only effects are handled correctly.

So let’s open PlayerAudioVisual and take a look at the functions:
AddGlobalParamsToSpawnedNiagara.
This function is responsible for adding global parameters to a spawned Niagara component.
Currently, it just calls the Function Library version, since we don’t have any custom data to pass yet.
AddGlobalParamsToSpawnedAudio.
Same as above, but for audio components.
PlaySoftSoundAtLocation.
This function handles spawning a sound at a specific location using a soft sound reference.
There’s also a SpawnAttached version available.

PlaySoftNiagaraAtLocation.
Similar to the audio version, but for spawning a Niagara component at a location using a soft reference.
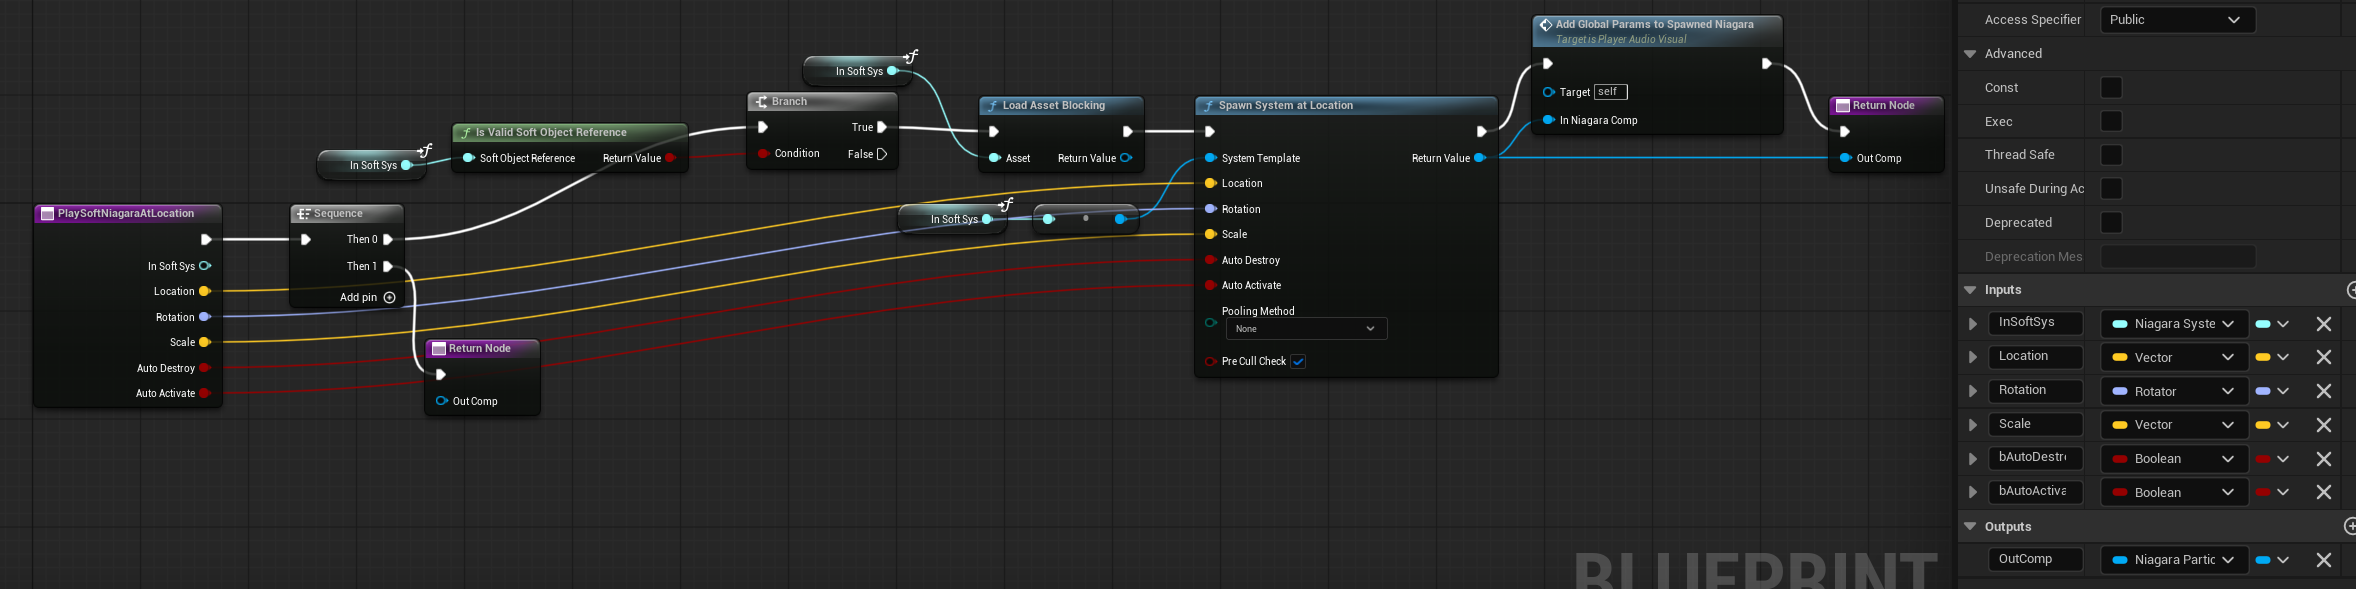
As you can see, these functions allow us to spawn audio and Niagara components from soft asset references, while also ensuring global parameters are passed into the spawned components.
These functions will be used by the Audio Visual Function Library.
💡 Note: On Begin Play, the Audio Manager registers itself with the Game Mode so it can be accessed later by the Global Function Library.
Audio Visual Function Library
As you learn earlier Blueprint Function Library acts like a globals functions for the whole projects. We will also use them to create our Audio Visual Function Library. Let’s open the AudioVisFunctionLib and check out the functions.
| GetDecalSizeForTag | Searches FBulletDecalConfig for a matching gameplay tag and returns the corresponding decal size.If no match is found, it returns the default size (not specific to a tag). |
| PlaySoftSoundAtLocation | Gets the Game Mode, retrieves the Audio Visual Manager, and calls its version of the function to spawn the sound at a world location. |
| PlaySoftSoundAttached | Same as above, but attaches the sound to a specific component/socket instead of spawning it at a world location. |
| PlaySoftNiagaraAtLocation | Gets the Game Mode, retrieves the Audio Visual Manager, and calls its version to spawn the Niagara effect at a world location. |
| PlaySoftNiagaraAttached | Same as above, but attaches the Niagara effect to a specific component/socket. |
| SetNiagaraParamsFromSpawnConfig | Takes a FNiagaraSpawnConfig and a NiagaraComponent, and sets all configured Niagara parameters on that component. |
| SetAudioParamsFromSpawnConfig | Takes a FSoundSpawnConfig and an AudioComponent, and sets all configured audio parameters on that component. |
| ConvertSurfaceTypeToGameplayTag | Converts a Physical Surface Type (from Project Settings) into a matching Gameplay Tag. |
| ConvertSurfaceTypeToInt | Converts a Physical Surface Type into an integer value. Useful for passing surface data into Niagara Systems or MetaSounds, where integers are more efficient to handle. |
| AddGlobalParamsToSpawnedNiagara | Currently left empty — this is where you’ll add global Niagara parameters (like player speed, weather state, etc.) in the future. |
| AddGlobalParamsToSpawnedAudio | Also currently empty — this is the place for injecting global audio parameters when they become relevant. |
Now anyone can access these functions, and they will be used by our Weapon Audio Visual System and everything else later on.
Base Projectile Updates
I’ve updated UpdateAudioVisual function to BaseProjectile to set the Mesh, Niagara, and Audio components. This allows the projectile to respond to the audio-visual configuration passed to it.
Weapon Class
I moved a lot of functionality from the Pawn class to the newly created Weapon class. The Pawn will simply spawn the weapon actor and call its primary functions such as FireBullet, OnReloadStarted, etc.
Open the Weapon class and let’s take a look at the functions.
| OnProjectileStop | Moved from Pawn. Called when the spawned projectile stops on impact. |
| DoPenetrationProjectile | Moved from Pawn. No changes. |
| DoBounceProjectile | Moved from Pawn. No changes. |
| DoPenetrationTraces | Moved from Pawn. Now includes storing hit locations, which is needed for trace FX. |
| DoBounceTraces | Moved from Pawn. Now includes storing hit locations, which is needed for trace FX. |
| OnNoAmmo | Called by the owning actor (which has a weapon component) when attempting to fire without ammo. This triggers PlayAudioVisForAction with the NoAmmo action. |
| OnReloadStarted | Called by the owning actor when reload starts. This triggers PlayAudioVisForAction with the Reload action. |
| OnReloadFail | Called when reload fails (e.g., no ammo in inventory). Triggers PlayAudioVisForAction with the ReloadFail action. |
| OnAimStarted | Called when aiming starts. Triggers PlayAudioVisForAction with the AimStarted action. |
| OnAimEnded | Called when aiming ends. Triggers PlayAudioVisForAction with the AimEnded action. |
| UpdateWeaponMesh | Called by the owning actor to set the weapon mesh (static or skeletal). |
| GetAudioVisMeshSpawnTransform | Retrieves the mesh transform for a specified socket. |
| GetOperatingMesh | Returns the active mesh component (skeletal or static). |
| PlayAudioVisForActionTag | Plays animation and sound based on the provided tag in the audio-visual config. Tags are stored in WeaponTags and it have new action tags inside. |
| PlayBulletFireEffects | Main function for spawning fire effects using the current audio-visual config. |
| UpdateSmokeOnFire | Called every frame to cool down the smoke Niagara spawn rate. |
| PlayTraceFX | Spawns beam FX and sets up the corresponding data. |
| SpawnHitEffects | Spawns hit effects when a projectile or trace impacts something, using the audio-visual config. |
| SetHoldingWeapon | Called by the owning actor to cache the currently held weapon PDA. |
| GetRangeDamageMultiplier | Moved from Pawn without changes. |
| FireBullet | Moved from Pawn with additional function calls – eg. PlayBulletFireEffects. |
| GetBulletTransform | Moved from Pawn without changes. |
| SetIsFirstPerson | Sets data for first-person rendering. For more information, check out Epic Games’ presentation on First Person Rendering. |
So essentially, the core mechanics haven’t changed. What has changed is the addition of several functions related to audio-visual feedback. As you can see, there’s quite a bit of new functionality here.
In my opinion, when you’re programming any gameplay system, you should keep the audio-visual side in mind from the beginning—because it will influence how you structure and implement things.
Programmers who don’t have the audio-visual context should coordinate with a technical artist to ensure the implementation supports the intended visual and audio effects. Otherwise, important elements might be missed or implemented in a way that’s difficult to integrate later.
Note: How the rico is calculated?
The ricochet effect is just a Niagara system that needs to be spawned at the hit location with the correct rotation. The rotation is calculated by mirroring the incoming direction vector using the surface normal at the hit point. In other words, we take the direction vector and reflect it across the hit normal. This gives us the correct ricochet direction, which we can then convert into a spawn rotation for the Niagara effect.

Additionally, the dot product is used to determine whether the ricochet effect should be spawned at all. If the angle between the incoming direction and the surface normal isn’t within a certain threshold (i.e., not “sharp” enough), the effect is skipped. This helps avoid unrealistic ricochets on flat or glancing hits.

If you feel that any part of the Weapon class should be described in more detail, feel free to leave a comment. In my opinion, everything should be fairly straightforward.
Near Clip Plane
The near clip plane is the closest distance from the camera at which geometry is rendered. Anything closer than this value will be clipped—meaning it won’t be drawn.
When working in first-person view, you may notice that meshes sometimes clip through the camera. This happens due to an optimization setting related to the near clip plane. Fortunately, this can be adjusted or disabled to prevent that visual issue.

It will have some impact on performance, but I haven’t found a quick alternative.
Now let’s move to the actual effects.
Effects – Lyra
For all meshes, textures, materials, audio files, Niagara systems—in other words, all assets—I’ll be using Lyra content, as I’m can’t share any other assets. For some of the assets I did some changes, and I will let you know where and why.
Effects – Shell out of mag

Open PS_ShellOut and I’ll walk you through a few things.
Shell hiding is handled in the M_BasicBulletCasing material using a Dither Opacity Mask.
You’ll notice that the shell randomly start to rotate when it’s spawned and stops rotating on collision.
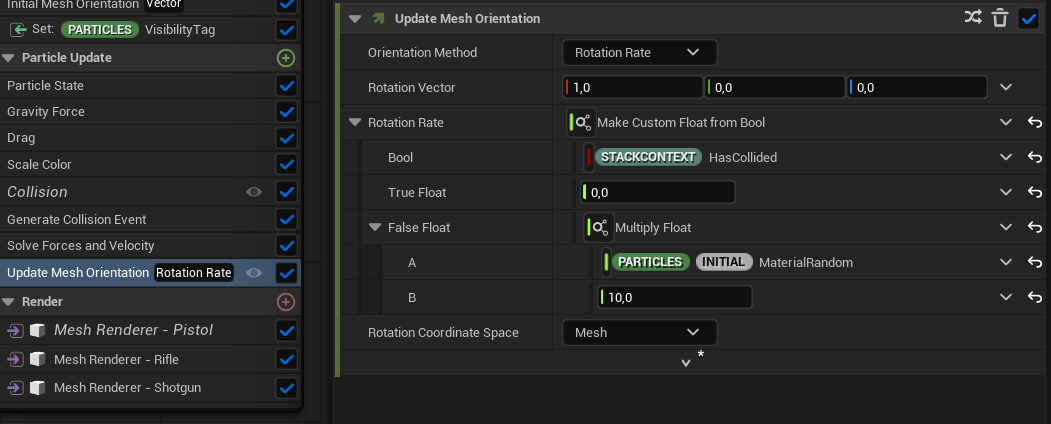
If the particle collides, the rotation rate is set to 0. If not, it remains between 0 and 10, based on the MaterialRandom value—which is chosen between 0 and 1 by default. It’s a simple setup, but visually effective because it creates a clear cause-and-effect dynamic.
There’s also another emitter: a small puff of smoke coming out of the shell, using a flipbook texture from the Lyra sample. Nothing fancy, but it adds a nice bit of detail to the overall effect.
Lastly, there’s the ability to play a sound when the shell hits something. Unfortunately, I couldn’t find any shell sound assets in Lyra or the Shooter Example, so that part has been left empty.
As you can see there are 3 Mesh renderers for each shell type. They are using VIsibility Tag to chose which one should be rendered.


💡 Note: This is a nice way of optimizing things. You have one particle system which will support all of the shell types.
Effects – Bullet Beam Trace

Here is the magic and you should invest some time to learn how this effect was made because it’s not using Beam particle renderer just a sprite which is streched / moved to the hit location.
The base input for this particle is ImpactPositions – it’s an array of locations our bullet hit. In Shooter Tutorial we are not using the array, just a first index of it as each our bullet will fire this effect. (even Shotgun burst)
It contains two major Renderers. Tracer Core which is just a high emissive sprite moving along direction, and Tracer Smoke which is scaling to the end position.
I was looking at the math of it the original particle (from Lyra) and it will be hard to describe it without actually talking with a scratch table – need to buy camera and mic.
So—I’ve implemented a simpler version of the math that’s easier to explain for beginners.


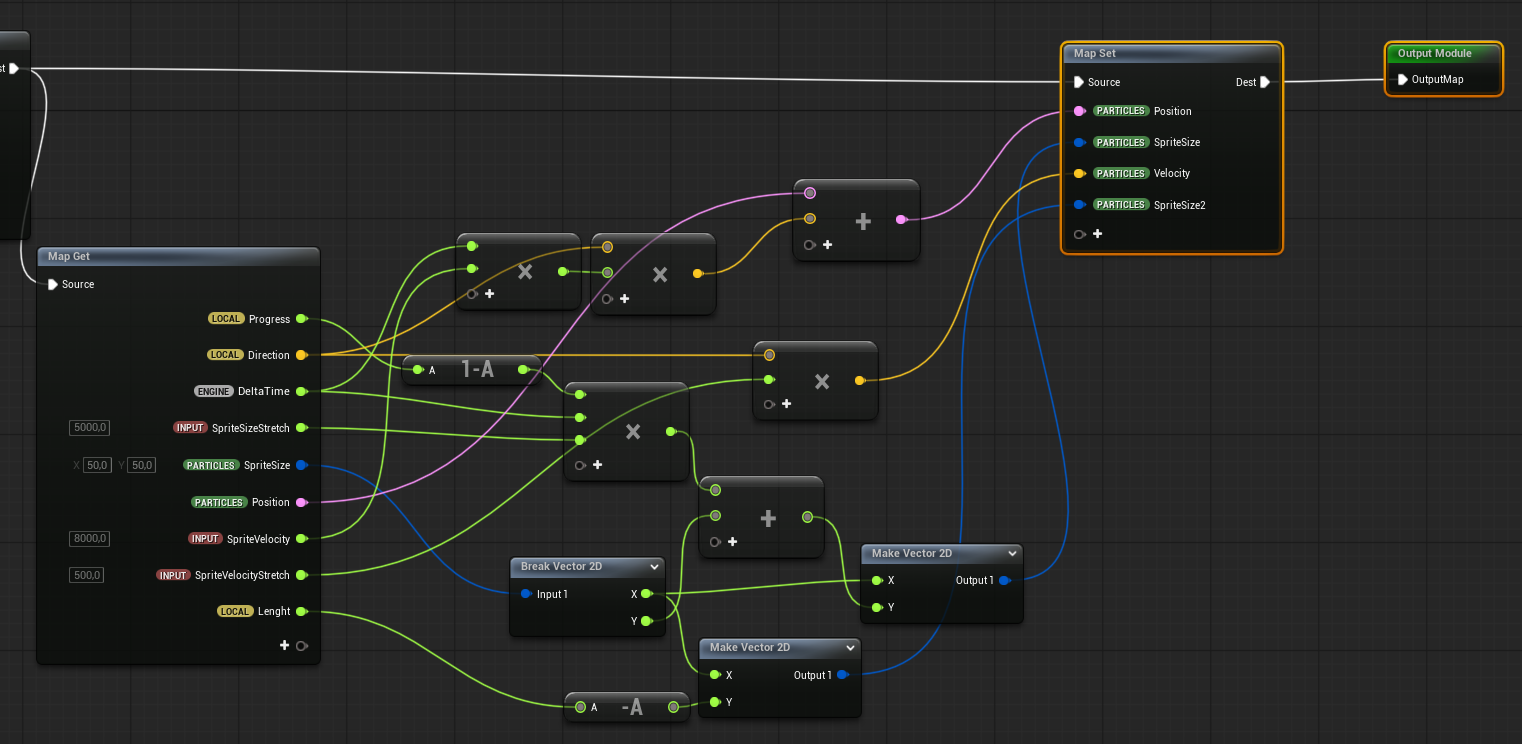
Here’s how it works:
- We know where the beam starts and ends.
- From the start and end positions, we calculate the length and direction.
- We then calculate the progress of the particle along that path, normalized from 0 to 1.
- We output whether the particle has reached the end position (
progress >= 1).- this is also used to scale down the particle alpha.
- We move the particle toward the direction vector using a speed parameter.
- We also output the correct velocity, since the particles are velocity-aligned.
- Smoke particle size is scaled based on the beam’s length. Since the pivot is at the start, the smoke stretches toward the end.
- you can also use progress here to animate it if you wish.
- Core particle size increases based on progress and a stretch parameter.
So, just by using size scaling and simple math, we can create animated effects without relying on accurate physics or complex simulation.
Effects – Decals

I haven’t made any changes to NS_ImpactDecals from Lyra—it’s used as-is. However, here are a couple of things to keep in mind:
- Visibility ID: This is used to apply different decal textures based on the surface type that was hit.
- The system uses the Hit Normal and Hit Tangent to control particle facing and alignment coordinate space, ensuring decals align properly with the impact surface.

The result is a vector perpendicular to both the reflection direction and the hit normal. This tangent lies in the surface plane, orthogonal to the direction the surface is facing (HitNormal). Tangent can be also used for sliding – it would be the slide direction.
💡 Note: If you’re not familiar with cross products, tangents, or vectors in general—now is a great time to start learning. These concepts are fundamental for game developers, and everyone creating games should have at least a basic understanding of them. Old but still great videos about math.
Effects – Muzzle Flash
NS_MuzzleFlash_Gentle. This system is mostly based on the Lyra example, but I’ve tweaked several parameters and materials to better fit the project. When using existing assets, don’t be afraid to modify them to suit your needs—small changes can make a big difference.
I also created a custom glow sphere emitter (NE_GlowSphere) that adds a gentle, fake volumetric light to enhance the overall effect.
Effects – Muzzle Smoke Loop
This one is really simple.
The effect (NS_MuzzleSmoke_Infinite) is used to show the player that the weapon has fired repeatedly, causing heat and smoke to come out of the barrel.
- It uses the MuzzleSmoke emitter from the earlier
MuzzleFlasheffect. - Adds random velocity to the particles.
- Relies mostly on rotation and color to drive the animation.
The FX itself is straightforward, but it’s important to also look at the implementation in the Weapon class. Each time the weapon fires, the current smoke-on-fire value increases, which controls the spawn rate of this effect.

Over time, the spawn rate decreases, creating a natural fade-out.
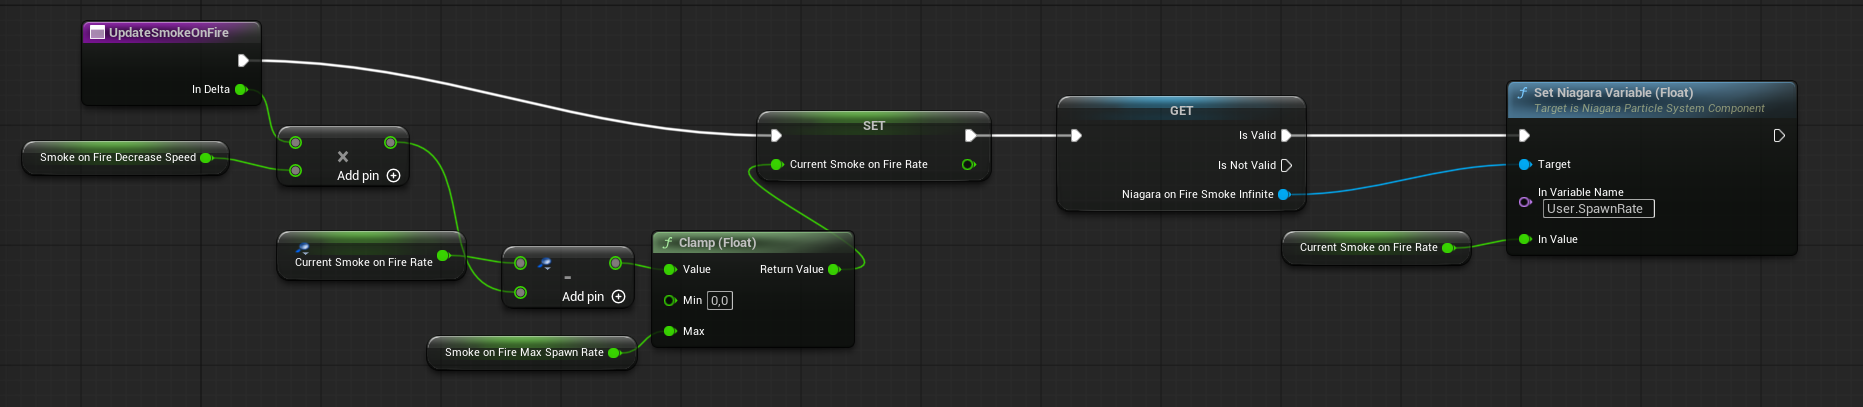
This subtle detail adds life to the audio-visual feedback, letting the player see smoke coming out when firing rapidly.
Effects – Impact

NS_ImpactConcrete effect includes a lot of emitters—most of them are based on Lyra content with some small tweaks. It demonstrates that, sometimes, creating a good-looking visual effect requires layering multiple elements. This particular effect is built using:
- Impact streaks
- Impact sparks
- Impact smoke
- Impact concrete debris mesh
- Glow sphere mesh
- Light
All of these components work together to create a more dynamic and believable impact. It’s a great example of how complexity and layering in FX can result in something that feels much more impactful and polished—even when each piece on its own is relatively simple.
Effects – Ricochet

NS_Ricochete. This effect is built using two emitters: Core and Smoke. The Core emitter generates a location event when its particles have high velocity and are not close to dying.
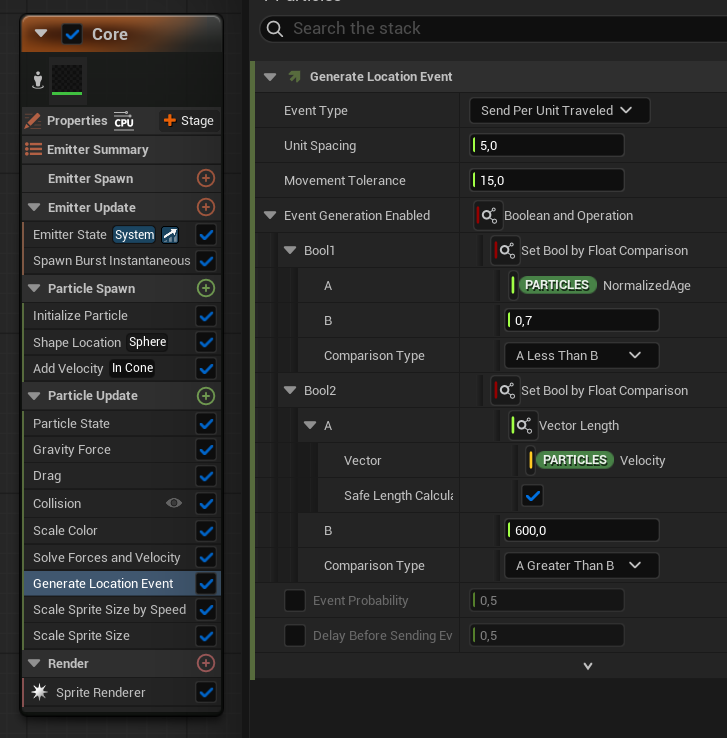
The Smoke emitter is then triggered by that location event.

Simple as that. The result feels natural—when the ricochet has high velocity (indicating energy), we see smoke, reinforcing the visual impact.
Keep in mind that the ricochet effect only spawns when certain conditions are met.

Also, don’t treat it as a bounce—it’s a completely different thing. This effect is purely visual and not tied to gameplay. It’s meant to be subtle and atmospheric, so the player doesn’t mistakenly assume that the ricochet caused damage or should have hit something. It’s just there to add a touch of realism and feedback without creating confusion.
Conclusion
Take your time and carefully analyze everything covered in this chapter. If you truly understand how it all works, you’ll be able to create similar effects on your own. And building things yourself is always better in the long run—you’ll know how to fix issues, tweak behavior, and expand the system as needed.
Up next, we’ll dive into HUD and crosshair implementation.

You must be logged in to post a comment.