
Create a Small Game from Scratch Series: Endless Standing First-Person Shooter
Level: Beginner
Type: Blueprint
Version: 5.6
Download Project
Last time we have implemented most of the Weapon Audio Visual System. I wanted to move on to the crosshair material implementation, but before that, I need a UI manager to work with.
The goal is to implement a simple UI manager that will:
- Be layer-based, similar to the Common UI plugin from Lyra
- Allow pushing and pulling widgets from layer stacks
- Manage stack priorities
- Support necessary layers like HUD, menus, and confirmations
- Automatically handle back input and enable appropriate widget
You could use the Common UI plugin from Lyra directly. However:
- It’s more complex and advanced than what I want to build
- By creating our own system, you’ll learn how to implement a simple UI manager for any game
- Building our own system will also make it easier for you to understand and work with Lyra’s Common UI plugin later
- Hi Level
- First Things First – PIE Exit Shortcut
- Data – Enums
- Data – Tags
- Data – Back Input Action
- Base Widgets – GameWidget
- Base Widgets – GameActivatableWidget
- Base Widgets – GameHUD
- Base Widgets – ActivatableWidgetContainer
- Base Widgets – GameLayout
- Base Widgets – W_OverallUILayout
- Base Widgets – W_OverallHUD
- UIManager
- Player Controller
- HUD – Crosshair
- Conclusion
Hi Level
As always, let’s start by understanding the system on paper. Below is an overview of the class design and flow:

The process of creating layers and widgets

The loop that handles back action input
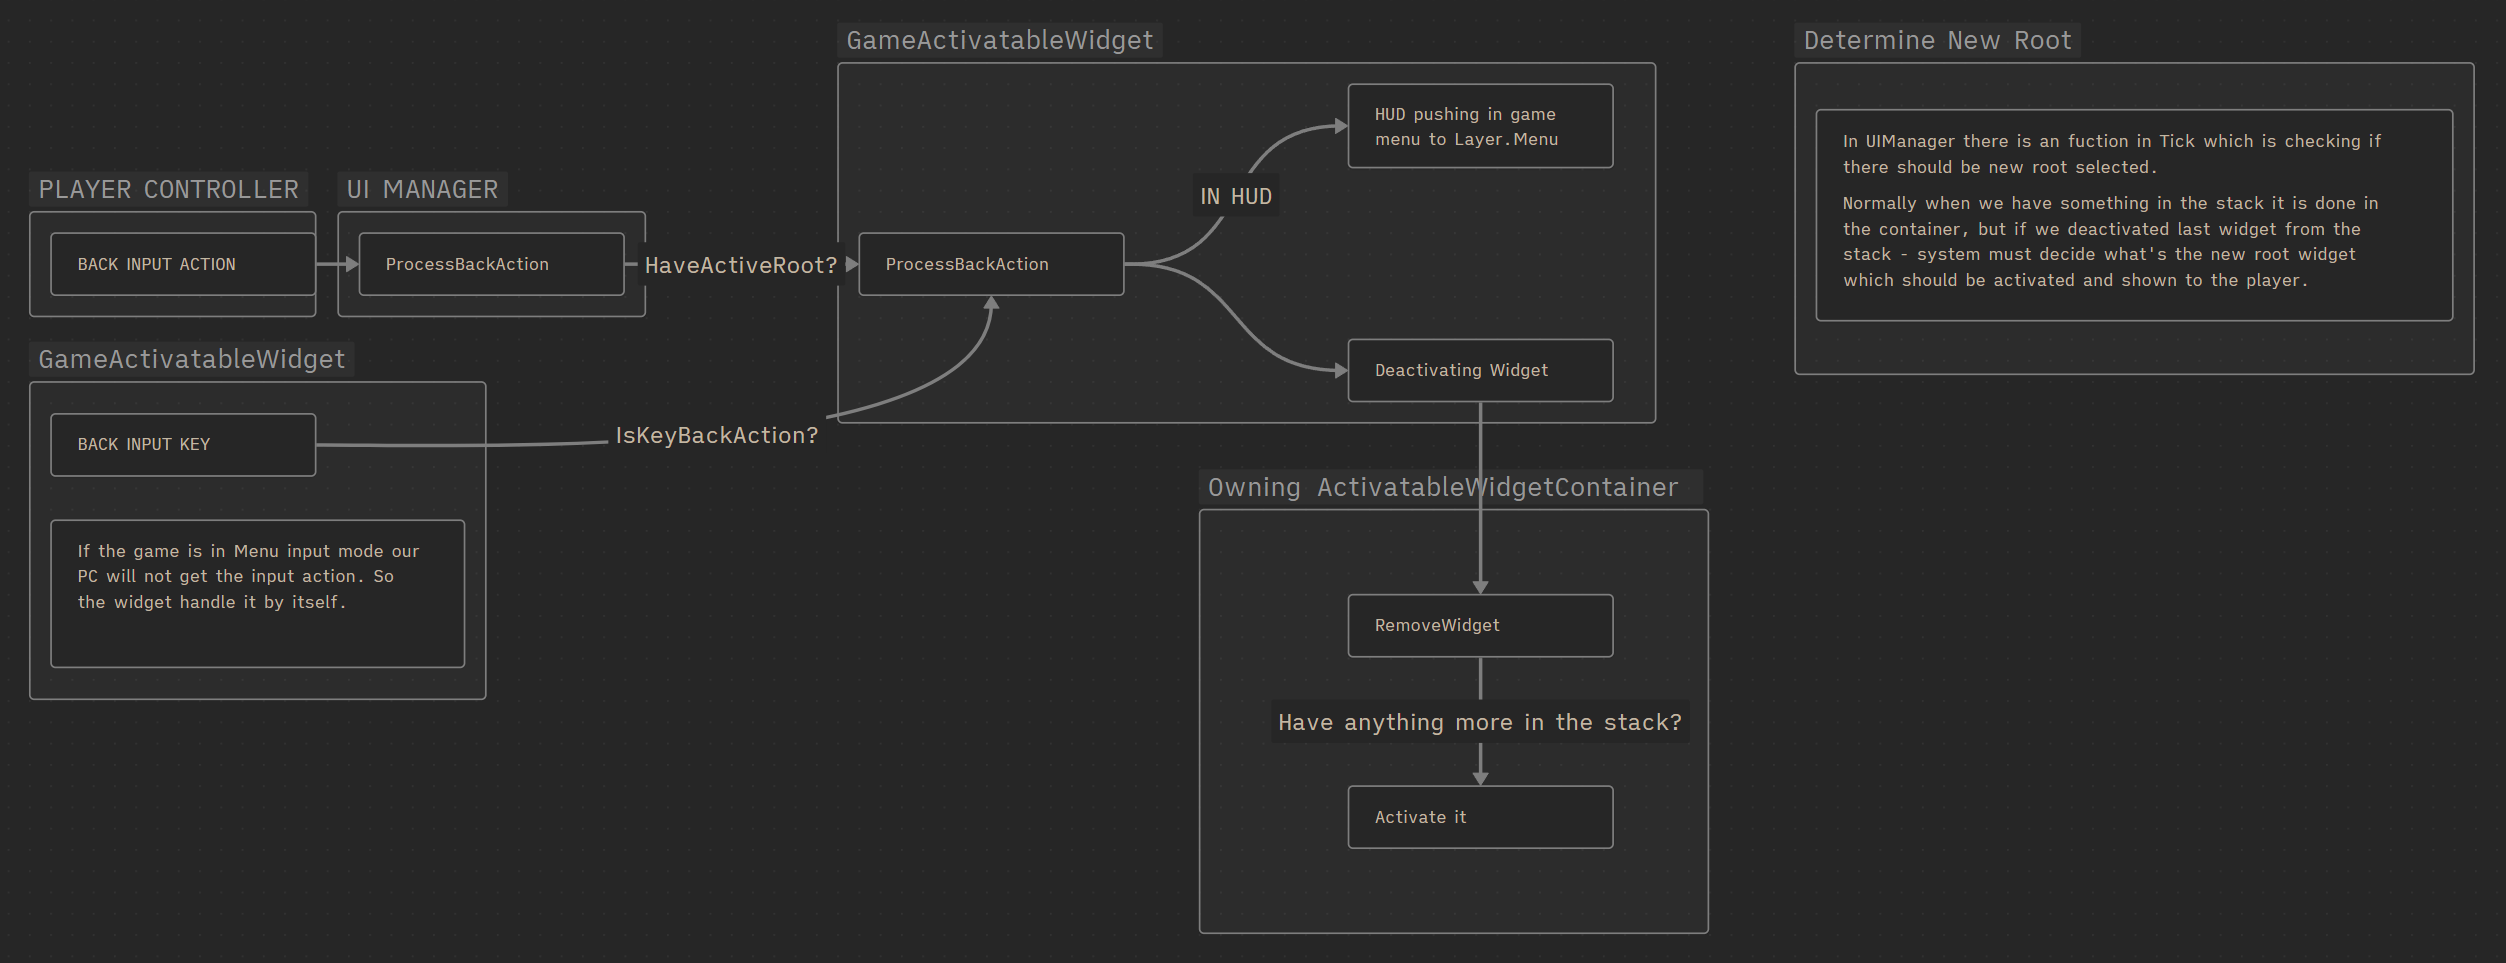
The loop for removing widgets from the stack

In essence, we’ll have a few layers, each with its own stack of widgets:
- Game ( prio 0 ) – Used for HUD elements. Input mode will be Game Only.
- GameMenu ( prio 1 ) – For things like inventory, where you still want to interact with the game.
- Menu – ( prio 2 ) For in-game menus or options screens. Input mode will be UI Only.
- Modal (prio 3 ) – The highest priority layer, used for important messages like disconnection alerts. This will appear above all other layers.
Each stack can contain multiple widgets. When a new widget is pushed to a layer, it will sit on top of the stack. When it’s removed, the one below it becomes active again. When a stack becomes empty (i.e. all its widgets have been removed), the Manager will determine which of the remaining stacks should become active.
First Things First – PIE Exit Shortcut
Before we start, make sure to change the default PIE Stop shortcut in the Editor Settings.
I recommend using SHIFT + ESC for easier access.

Data – Enums
EGameMouseCaptureMode. This is a custom enum that replicates EMouseCaptureMode, which cannot be used in Blueprints as of Unreal Engine 5.6.
| NoCapture | |
| CapturePermanently | |
| CapturePermanently_IncludingInitialMouseDown | |
| CaptureDuringMouseDown | |
| CaptureDuringRightMouseDown |
EGameWidgetInputMode. This enum is used to determine which input mode function will be called. These functions inform the engine how to handle input focus.
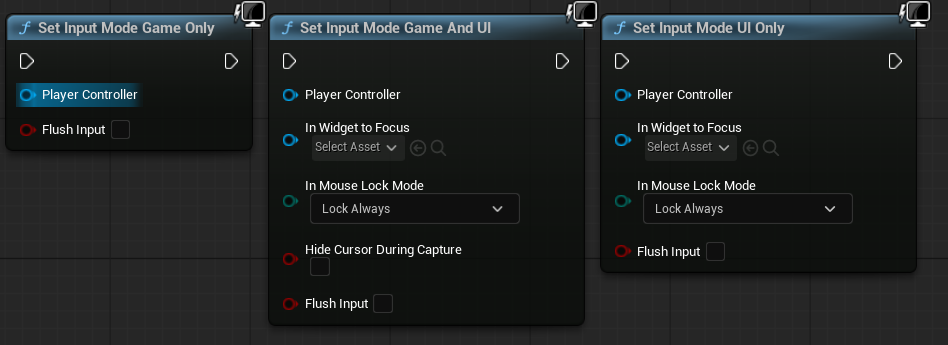
| Default | |
| GameAndMenu | Will trigger SetInputModeGameAndUI |
| Game | Will trigger SetInputModeGameOnly |
| Menu | Will trigger SetInputModeUIOnly |
Data – Tags
Refer to the UITags Gameplay Tag Data Table. It includes tags corresponding to the UI layers, allowing the system to identify and manage them consistently through gameplay tags.

Don’t forget to add the UITags Data Table to Project Settings → Gameplay Tags → Gameplay Tag Tables.
You should already be familiar with this step by now.
Data – Back Input Action
Make sure to check out the IA_UI_Back Input Action. It has been created and added to both the Player Controller and the Default Input Mapping Context.
Base Widgets – GameWidget
This serves as the base class for all other widgets in the system.
Currently, it includes a single function to store a reference to the UIManager.

Since our UIManager is not part of a GameInstanceSubsystem (as it typically would be in a C++ project), we instead pass the manager that created the widget and store the reference directly inside each widget.
Base Widgets – GameActivatableWidget
This is the base class for all widgets that will be used with the layering and stacking system—such as the HUD, in-game menus, inventory screens, etc.
It holds couple of variables:
| InputConfig | EGameWidgetInputMode | Holds our custom enum defining the widget’s input mode. |
| MouseCaptureMode | EGameMouseCaptureMode | Holds our custom enum defining the widget’s mouse capture behavior. |
| bIsActive | bool | True if the widget is currently active. |
These are broadcast events that the UI Manager will bind to:
- OnWidgetActivated
- OnWidgetDeactivated
Key Functions
OnKeyDown
Since we can’t extend the Game Viewport in Blueprints to reroute base input, we handle it directly within the widget. This function checks if the pressed key matches the one configured in IA_UI_Back. If so, it triggers the Back Action for this widget.
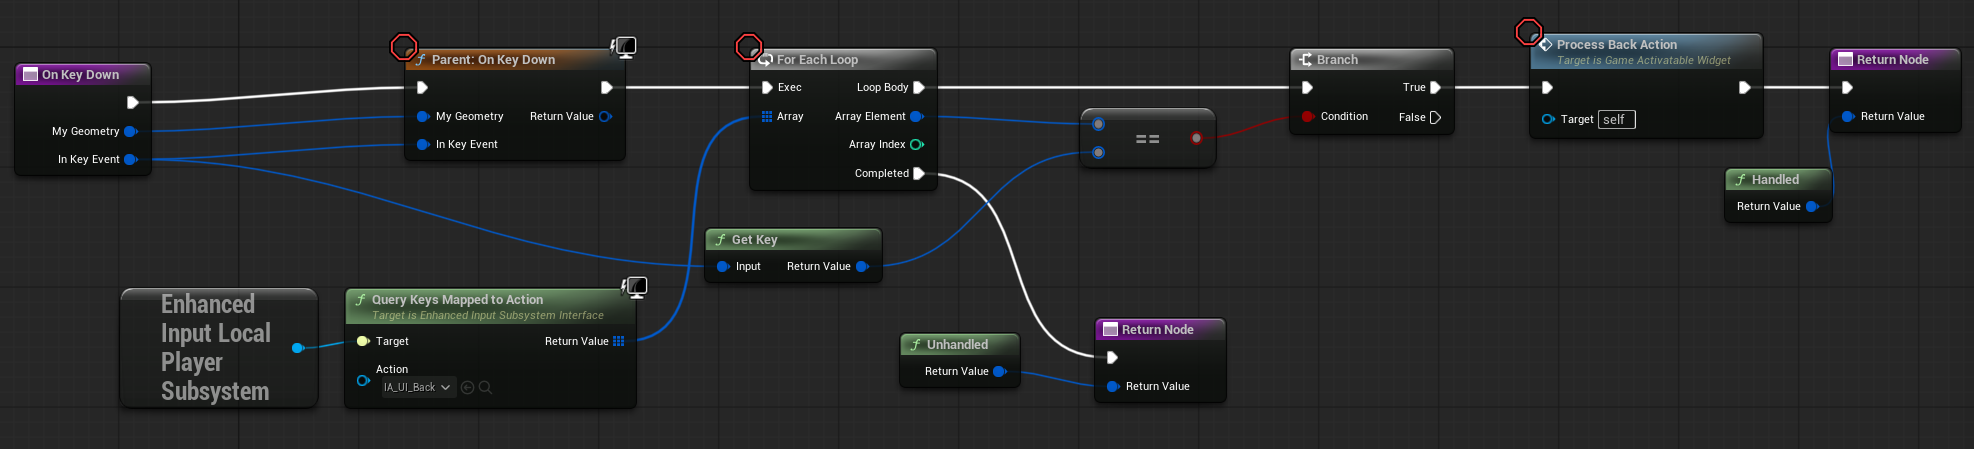
Make sure to check out the Player Controller’s input graph, as it also handles the IA_UI_Back input action.
This input is triggered when no widget currently has focus, ensuring the back action is still handled at the controller level when the UI doesn’t catch it directly.
ActivateWidget
This function makes the widget visible by setting its visibility, configures the appropriate input mode based on the widget’s settings, and then calls the OnWidgetActivated dispatcher to notify other systems of the activation.
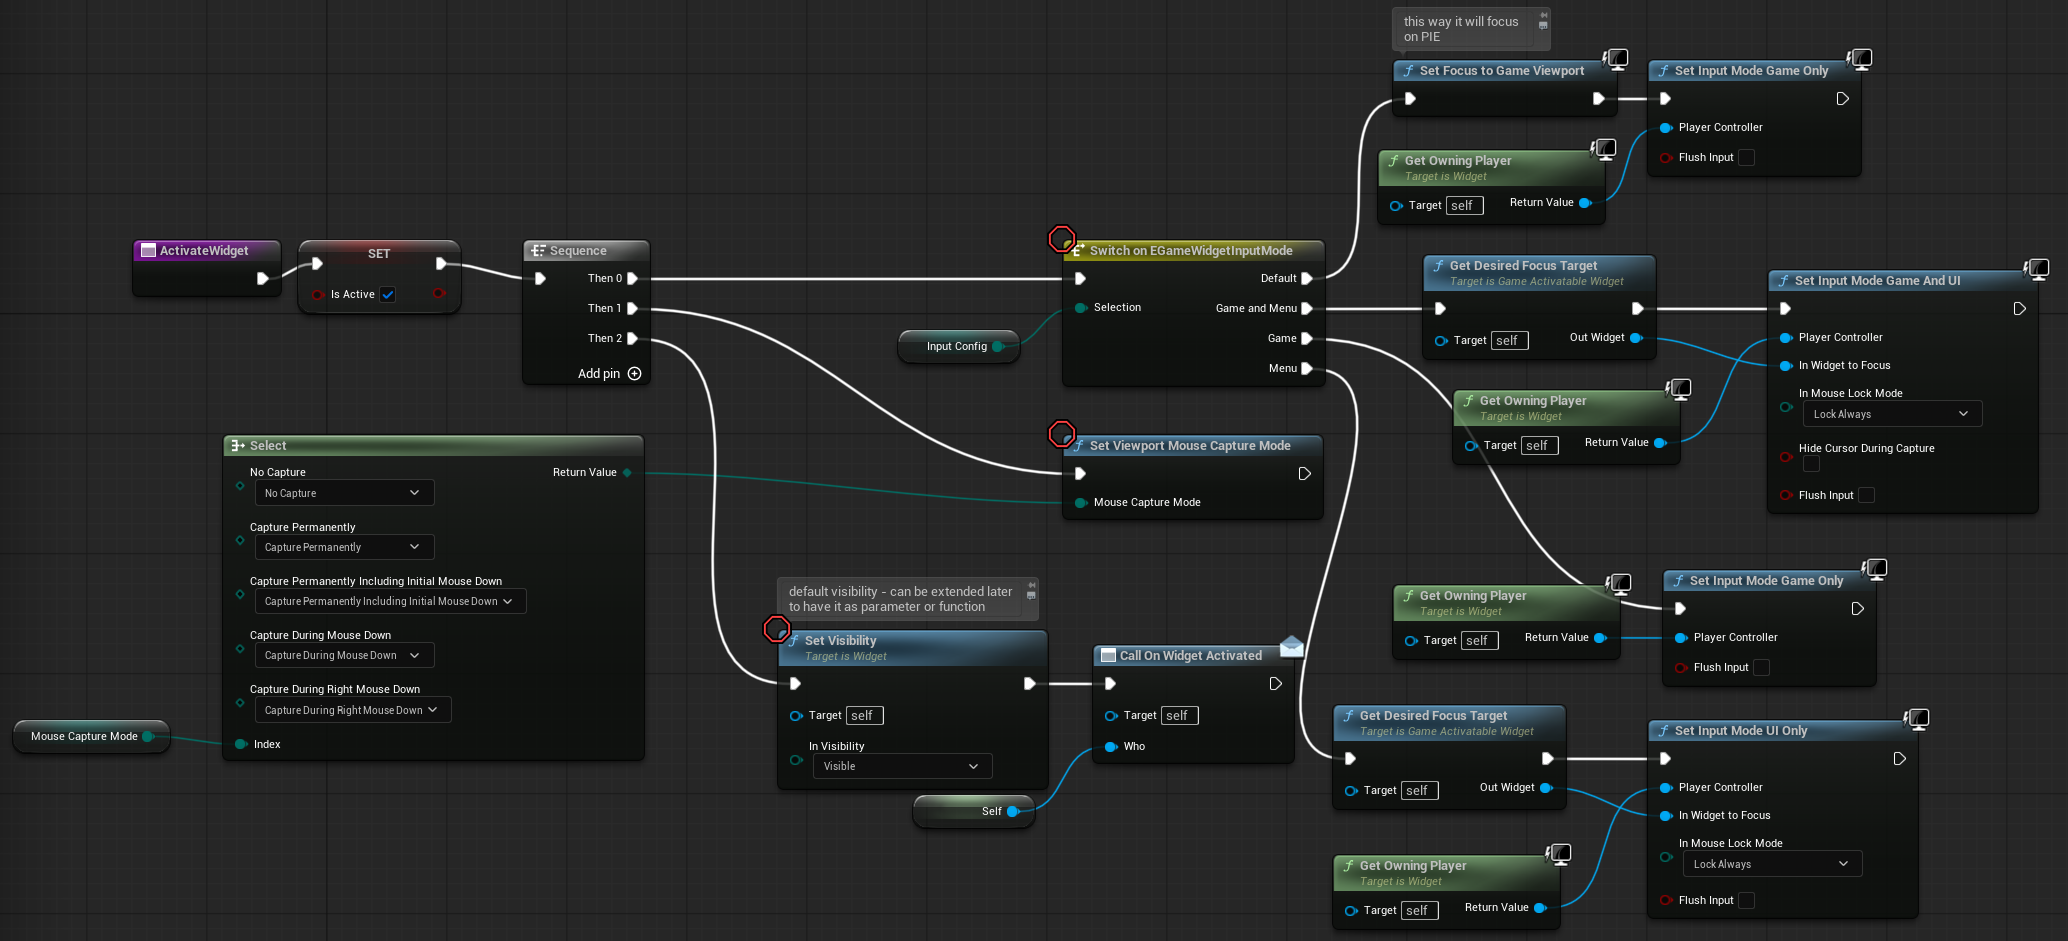
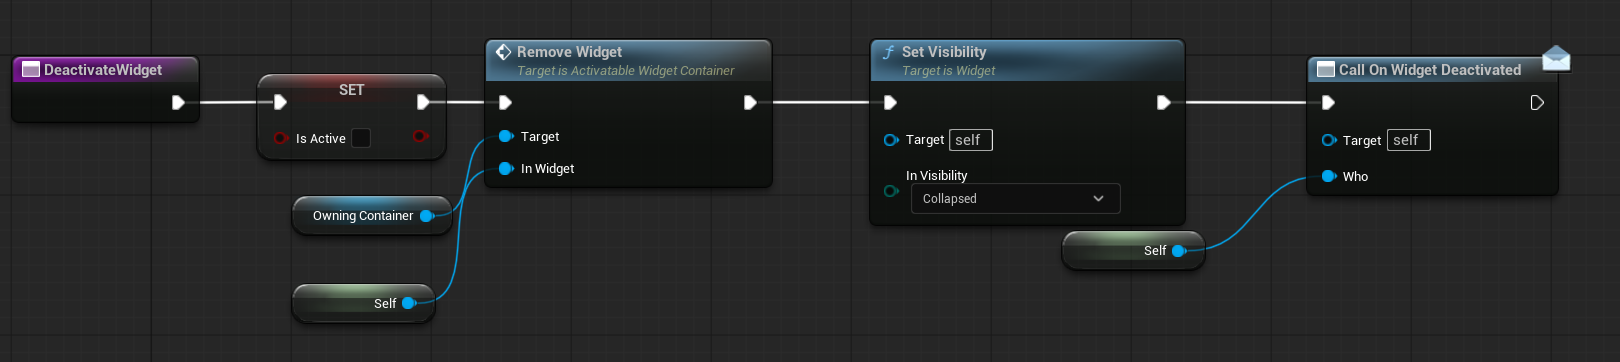
DeactivateWidget
This function hides the widget by setting its visibility to Collapsed, notifies the owning container to remove the widget from its stack, and calls the OnWidgetDeactivated dispatcher to signal that the widget has been deactivated.
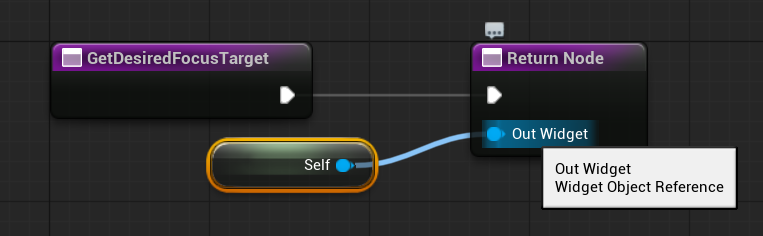
GetDesiredFocusTarget
This function returns the widget that should receive focus when the current widget is activated or where the focus should remain after actions like Alt-Tab. Subclasses override this function to specify which widget within their hierarchy should be focused by default.
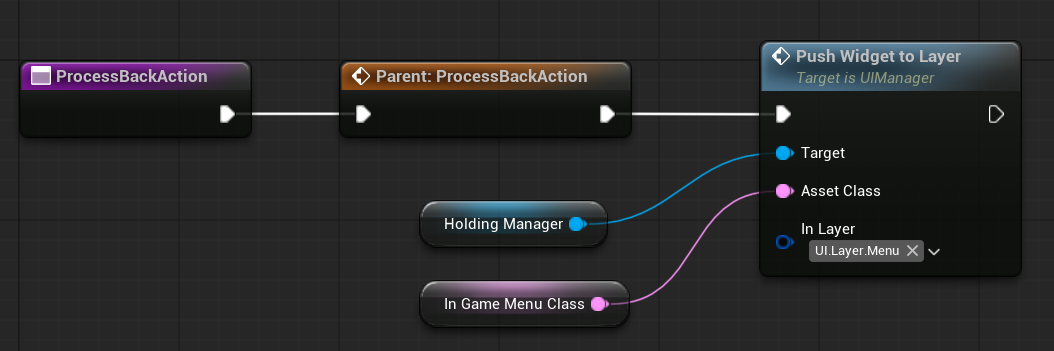
ProcessBackAction
This function is empty in the base class but is intended to be overridden by subclasses. For example, the HUD might override it to push the in-game menu when back is pressed, while other widgets typically override it to remove themselves from their owning container.
Base Widgets – GameHUD
This is the base class for the HUD widget. It will be used by W_OverallHUD to display elements such as the crosshair material, health, and weapon data on the screen.
It holds a soft class reference to in game menu widget and attempts to push this menu onto the Layer when the Back action is triggered.
Base Widgets – ActivatableWidgetContainer
This widget acts as a container for managing other widgets in a specific UI layer stack. The main layout widget (e.g., GameLayout) will have four instances of this container—one for each UI layer defined by gameplay tags.
It uses a WidgetSwitcher to handle which widget in the stack is currently displayed.

Let’s check the variables.
| HoldingManager | UIManager obj ref | Holds a reference to the UI Manager that owns this container. |
| WidgetSwitcher | Switcher Widget from the Designer | The WidgetSwitcher widget used to display one widget at a time from the stack. |
| WidgetStack | GameActivatableWidgets obj ref Array | Stores the current stack of widgets in this container/layer. |
| DisplayedWidget | GameActivatableWidgets obj ref | The currently active/visible widget in the stack. |
| CreatedWidgets | GameActivatableWidgets obj ref Array | This is used for widget pooling—so we can reuse widgets instead of creating new ones every time. |
Now two major functions.
AddWidget. This function is responsible for adding a widget to the stack. Here’s how it works:
- Checks if the widget already exists in the
CreatedWidgetspool:- If it does, it reuses the existing instance and activates it.
- If not, it creates a new instance and adds it to both
CreatedWidgetsand the stack.
- Updates the
WidgetSwitcherto display the newly added widget. - Returns a reference to the added (or reactivated) widget.
- Also updates the UI Manager’s Active Root Widget to reflect the current state of the stack.

RemoveWidget. This function handles removing a widget from the stack:
- If the widget being removed is currently displayed (
DisplayedWidget), it clears the reference. - Calls
DeactivateWidgeton the widget. - Removes the widget from the
WidgetStack. - If there are still widgets left in the stack after removal, the last one will be reactivated and shown.
- Also updates the UI Manager’s Active Root Widget to reflect the current state of the stack.
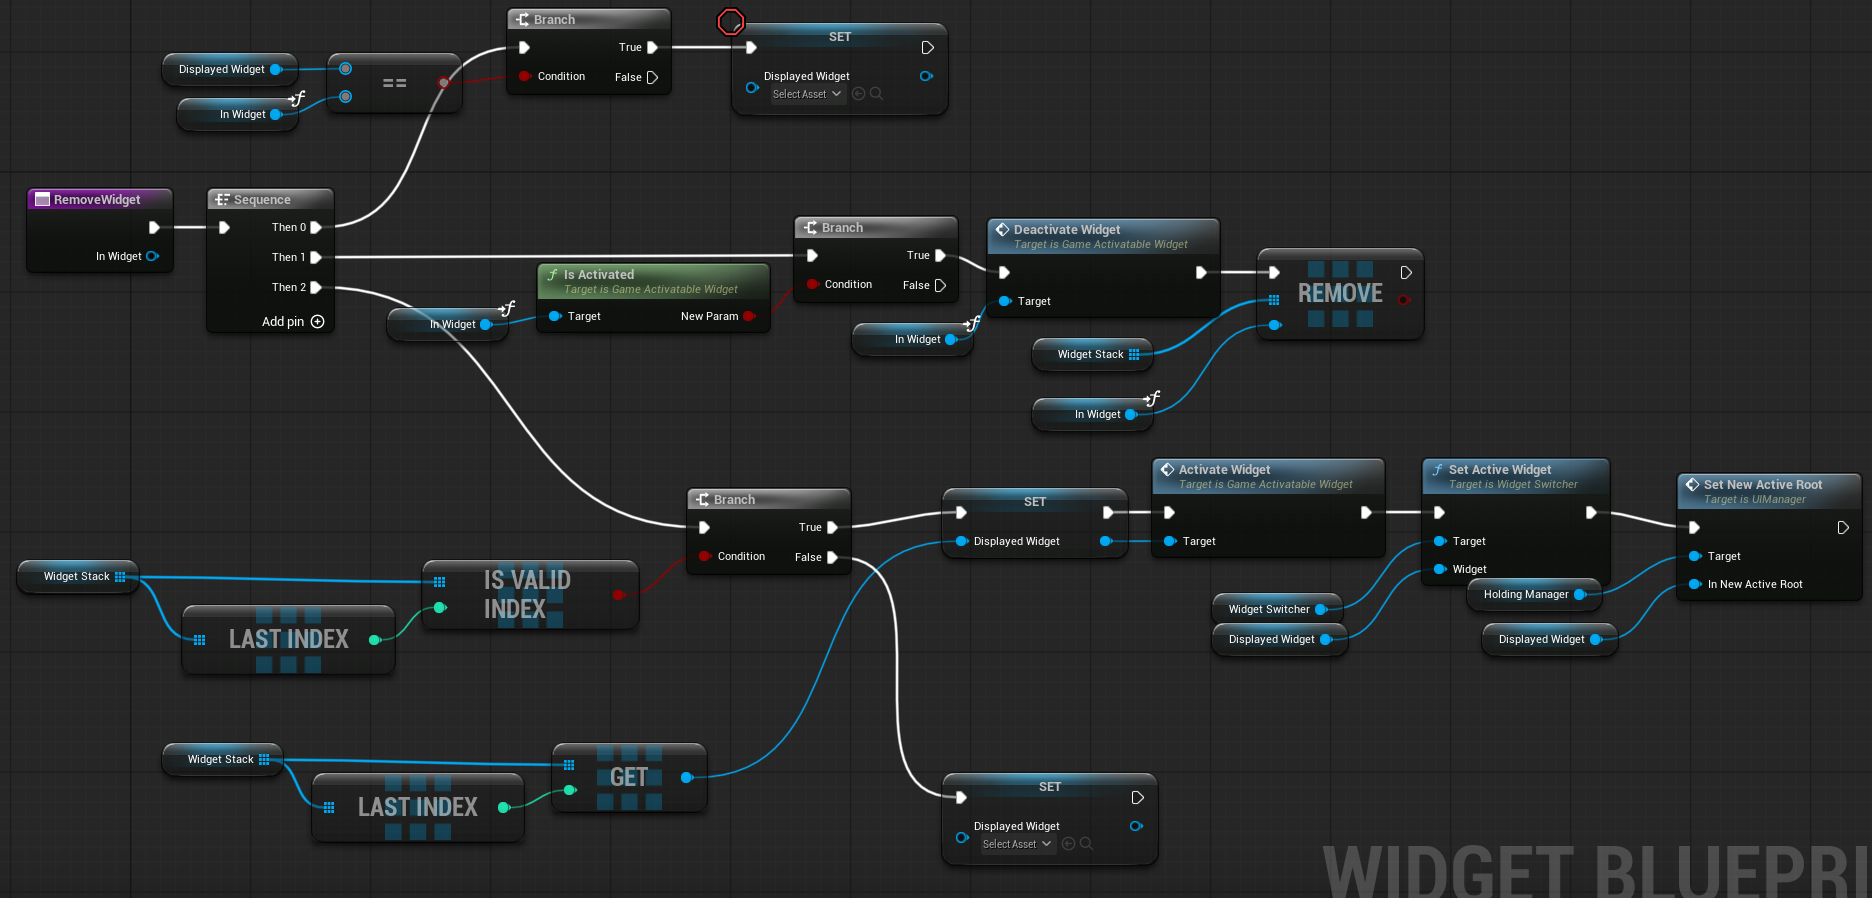
Take your time to understand how this is working – as such stacking approach can be used in different systems as well.
💡 Note: Take the time to fully understand how this stacking system works. This approach is highly flexible and can be reused across different systems—whether it’s UI layers, gameplay state transitions, dialog trees, or even ability activation queues.
Base Widgets – GameLayout
This is the base class used to define the overall layout of the game’s UI.
The W_OverallUILayout widget will extend from this class.
| Layers | TMap of GameplayTag, Activatable Widget Container Obj Ref | This map holds all the UI layers (containers), each identified by a Gameplay Tag. The RegisterLayer function is responsible for populating this map. |
Once initialized, the Layers map will be used to retrieve specific UI layers or add widgets to them during runtime.
RegisterLayer. This function simply adds a new layer to the Layers map variable. It takes a Gameplay Tag and an ActivatableWidgetContainer reference, and stores the pair in the map so the system can access or modify that layer later.

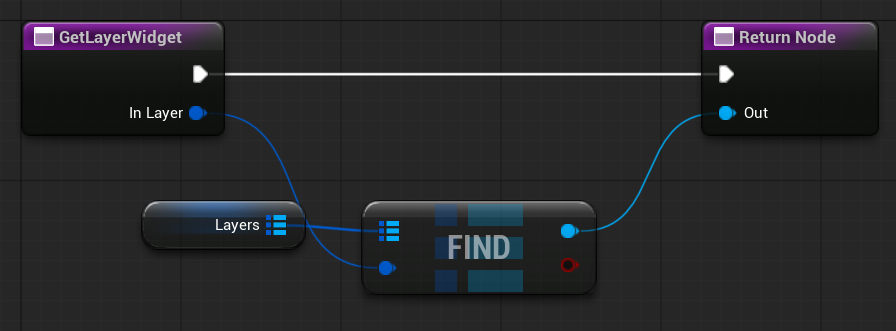
GetLayerWidget. This function returns the container widget (ActivatableWidgetContainer) associated with the specified Gameplay Tag (i.e. the requested UI layer). It’s a simple lookup in the Layers map to retrieve the correct layer for further operations like pushing or removing widgets.
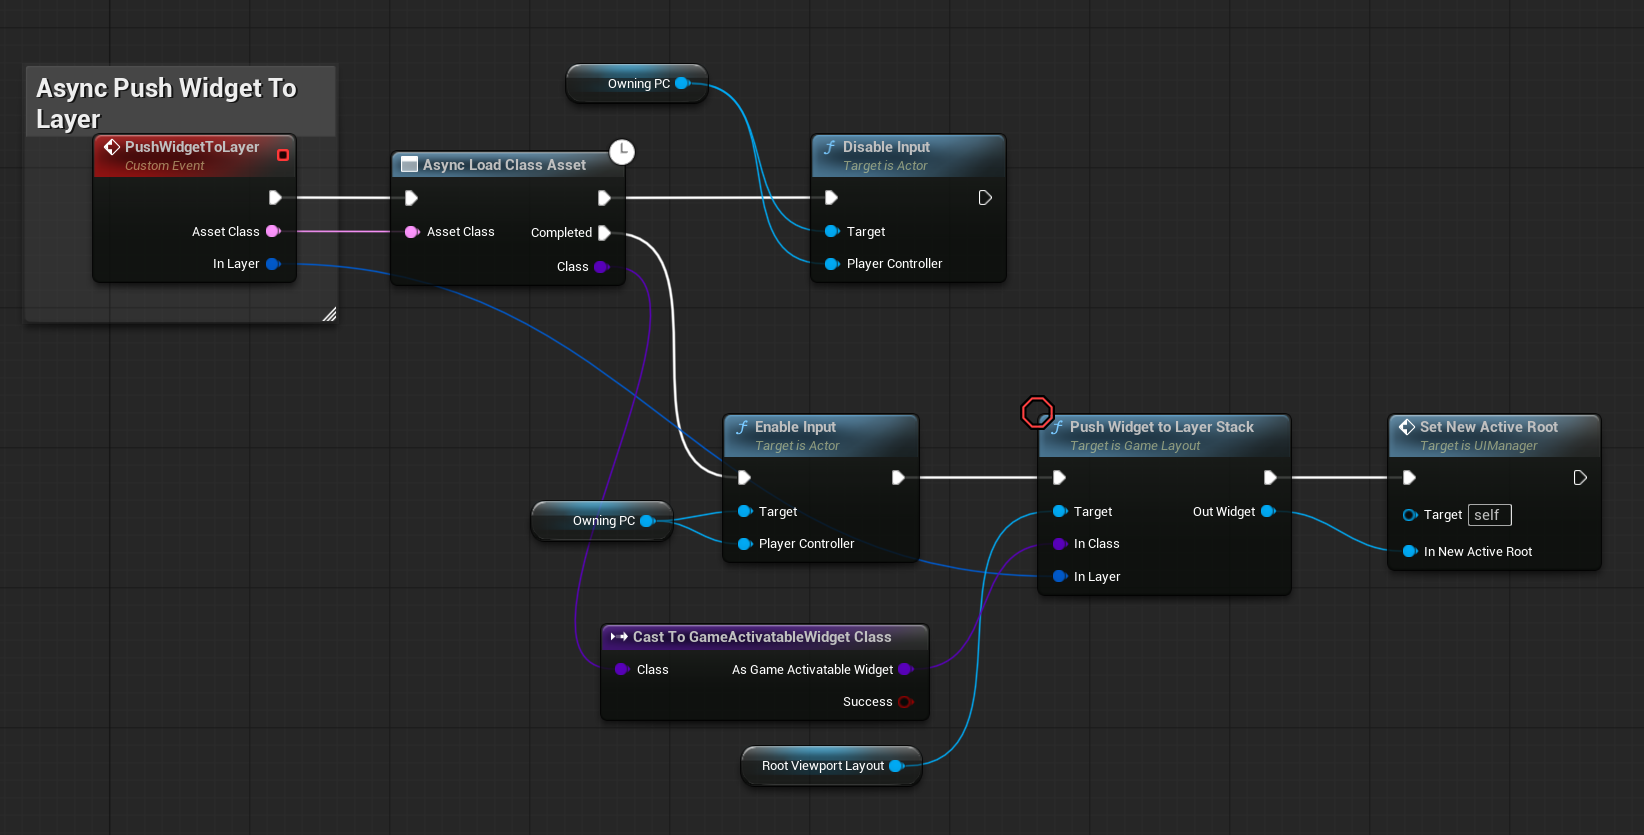
PushWidgetToLayerStack. This function is responsible for adding a widget to a specific layer’s stack. Internally, it simply calls AddWidget on the corresponding ActivatableWidgetContainer for the given layer.
UIManager will use this function to display a new widget on a particular UI layer.

Base Widgets – W_OverallUILayout
This widget serves as the main UI layout for the game.
It contains four ActivatableWidgetContainer widgets, each representing a different UI layer (e.g., Game, GameMenu, Menu, Modal). During initialization, it registers each container using corresponding Gameplay Tag.
This setup allows the UI Manager to push and pull widgets from the correct layers as needed.


Base Widgets – W_OverallHUD

This widget is the main HUD for the game. Currently, it displays weapon ammo information and a crosshair, but it’s designed to be extended with additional HUD elements in the future (e.g., health, minimap, objectives). When the HUD is created, it also passes relevant data to its child widgets (such as weapon status or player references), allowing them to update and display the correct information.

UIManager

This is the core manager that controls the entire UI system. It is responsible for initializing the layout, managing widget stacks across layers, and handling back input navigation.
| LayoutClass | GameLayout class soft pointer | Defines which layout widget the manager should instantiate and use. |
| RootViewportLayout | Game Layout obj ref | Holds the currently spawned layout widget in the viewport. |
| DefaultBackAction | Input action obj ref | Allows customization of the input action used for triggering “back” navigation in the UI. |
| OwningPC | Player Controller obj ref | Stores a reference to the player controller that owns this UI manager. |
| ActiveRoot | GameActivatableWidget obj ref | Tracks the currently active widget on the root layout. This is the top-most visible widget in the stack and typically receives focus and back input. |
| AllWidgetsToLoadAsync | GameWidget class soft reference array | Storing all widgets that should be async loaded. |
It also have lot’s of functions.
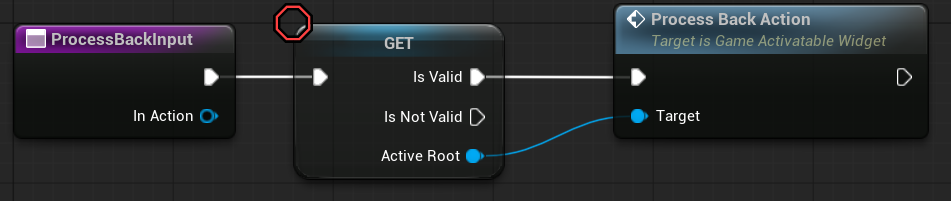
ProcessBackInput. This function simply calls the ProcessBackAction method on the ActiveRoot widget.It handles the back navigation by delegating the action to the top-most active widget in the UI stack.
OnPlayerAdded. This function is called by the Player Controller.
Its main purpose is to create and initialize the UI layout (RootViewportLayout) for that PC.

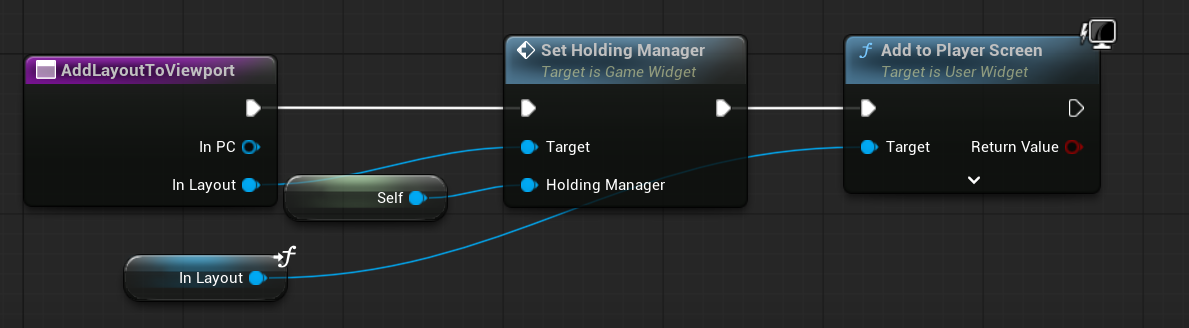
CreateMainLayoutWidget. This function is responsible for creating the main UI layout widget (LayoutClass) that will manage all UI layers for the player.

AddLayoutToViewport. This function adds the main layout widget to the player’s screen, making the UI visible during gameplay.
OnWidgetDeactivated. This function is called via a dispatcher when a widget is deactivated.
If the widget being deactivated is currently the ActiveRoot, this function will clear the ActiveRoot reference to reflect that no widget is active on top.

AsyncLoadAssets. This function iterates through each widget and requests asynchronous loading of its assets. By preloading these assets in the background, it helps reduce hitches and frame drops when widgets are first displayed.

DetermineNewRoot. This is an important function that runs every frame to decide which widget should become the new ActiveRoot. Understanding how this function works is key, as it manages the priority and focus of UI widgets to ensure the correct one is active at any given moment.
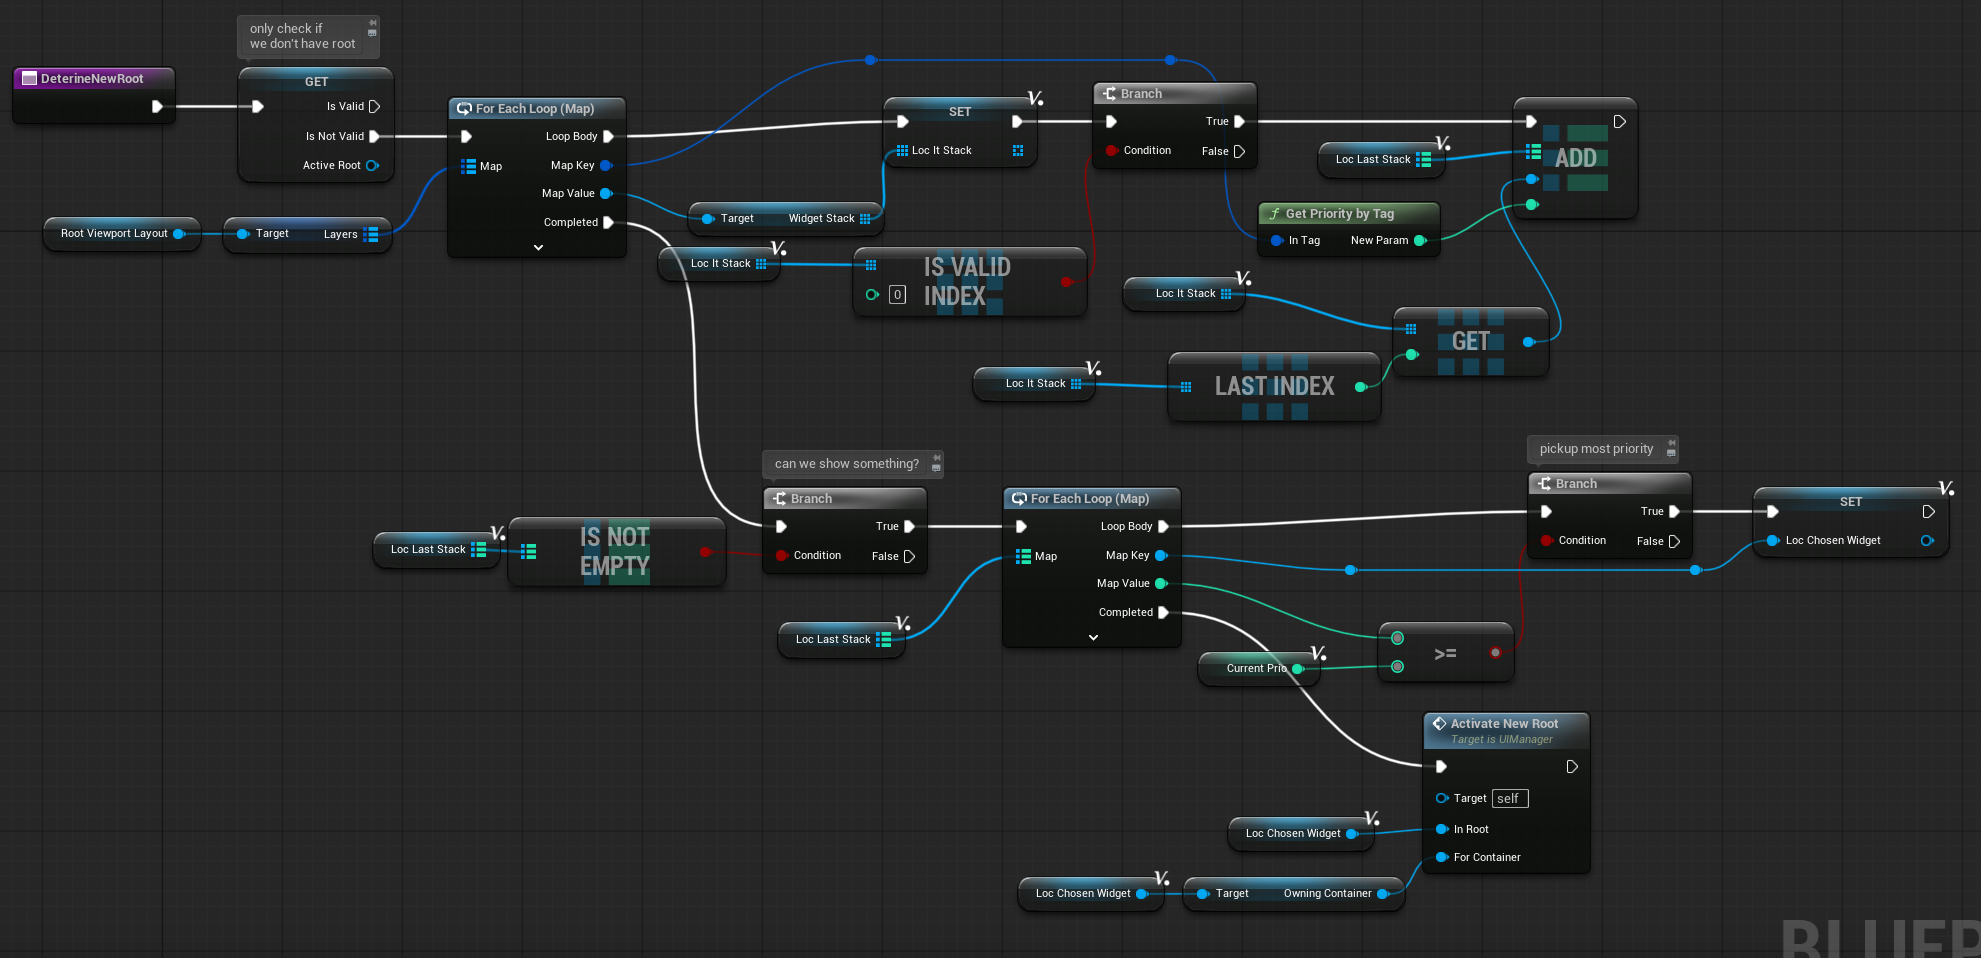
OnNewRootDetermined. This function is called whenever a new ActiveRoot widget has been determined.

SetNewActiveRoot. This function is called when a new root widget is pushed onto the stack.

And lastely PushWidgetToLayer event. This is the base event used to add a widget to a specific UI layer and display it on the viewport.
In Blueprints, because asynchronous loading requires an event rather than a function, this must be implemented as an event.
Due to this limitation, creating an efficient async loading system is more challenging in Blueprints compared to C++.
Player Controller
Currently, the UIManager is stored in the STGameplayPlayerController.
In the future, it will be moved to the base Player Controller to enable UI functionality not only during gameplay but also on menu screens.
Additionally, as mentioned earlier, the Player Controller has new functions added specifically to handle UI input.

HUD – Crosshair
Now that we have the mechanics and HUD visible, let’s move on to creating the crosshair shader and widget.

I’m planning to buy a camera and mic soon to make YouTube tutorials about materials and VFX — it’s always easier to explain things with visuals and voice!
About the crosshair material:
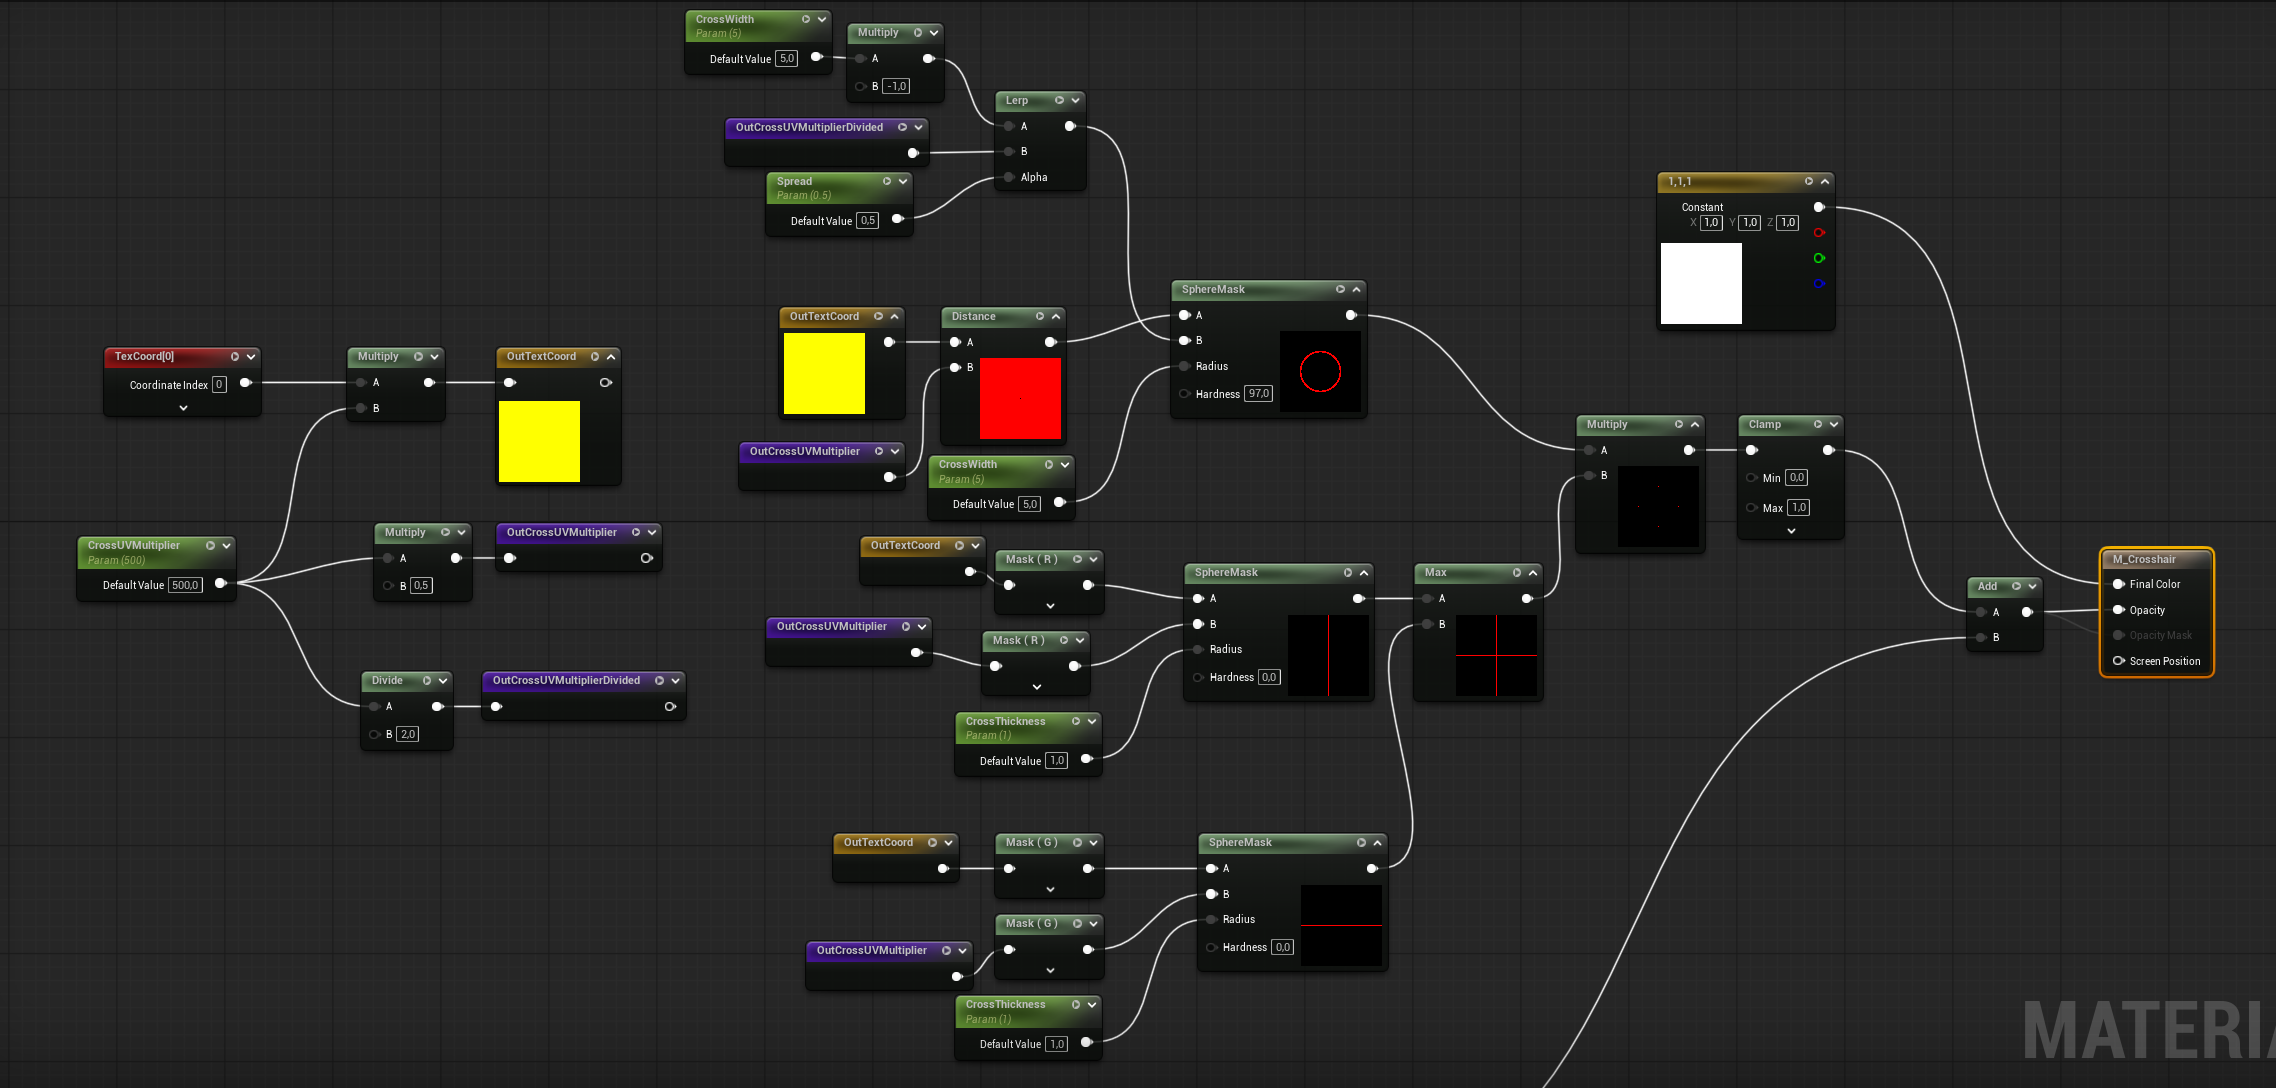
It should be pretty straightforward to set up. You could use different math to get the U/V lines and cross.
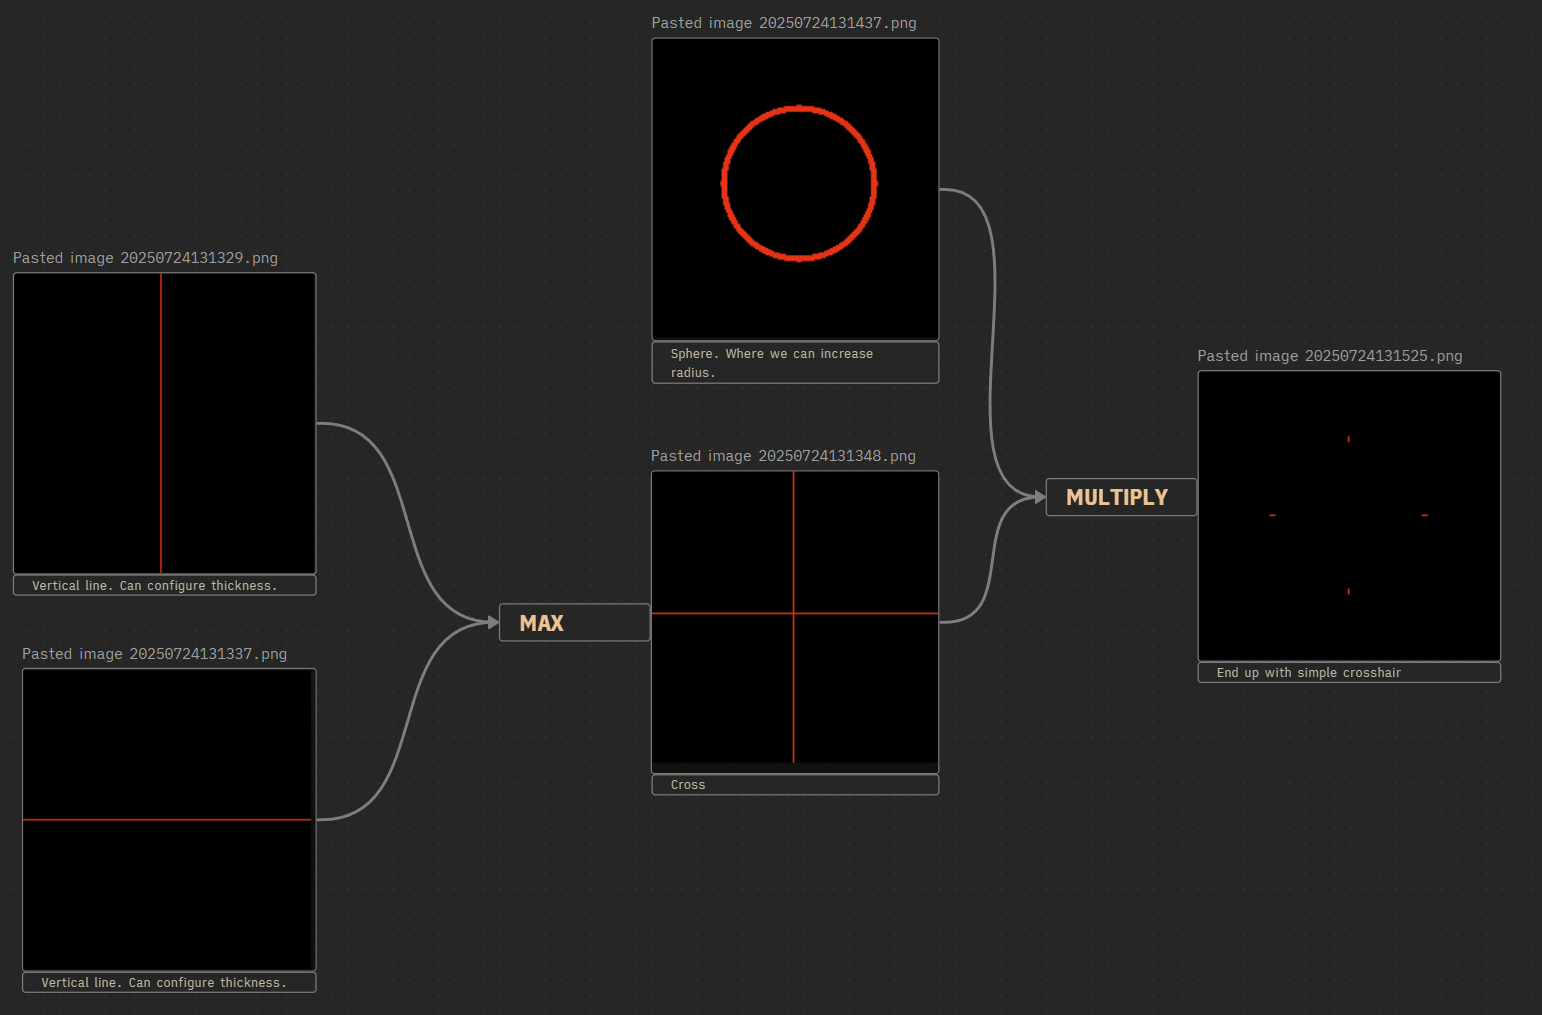
The dot is even simpler:
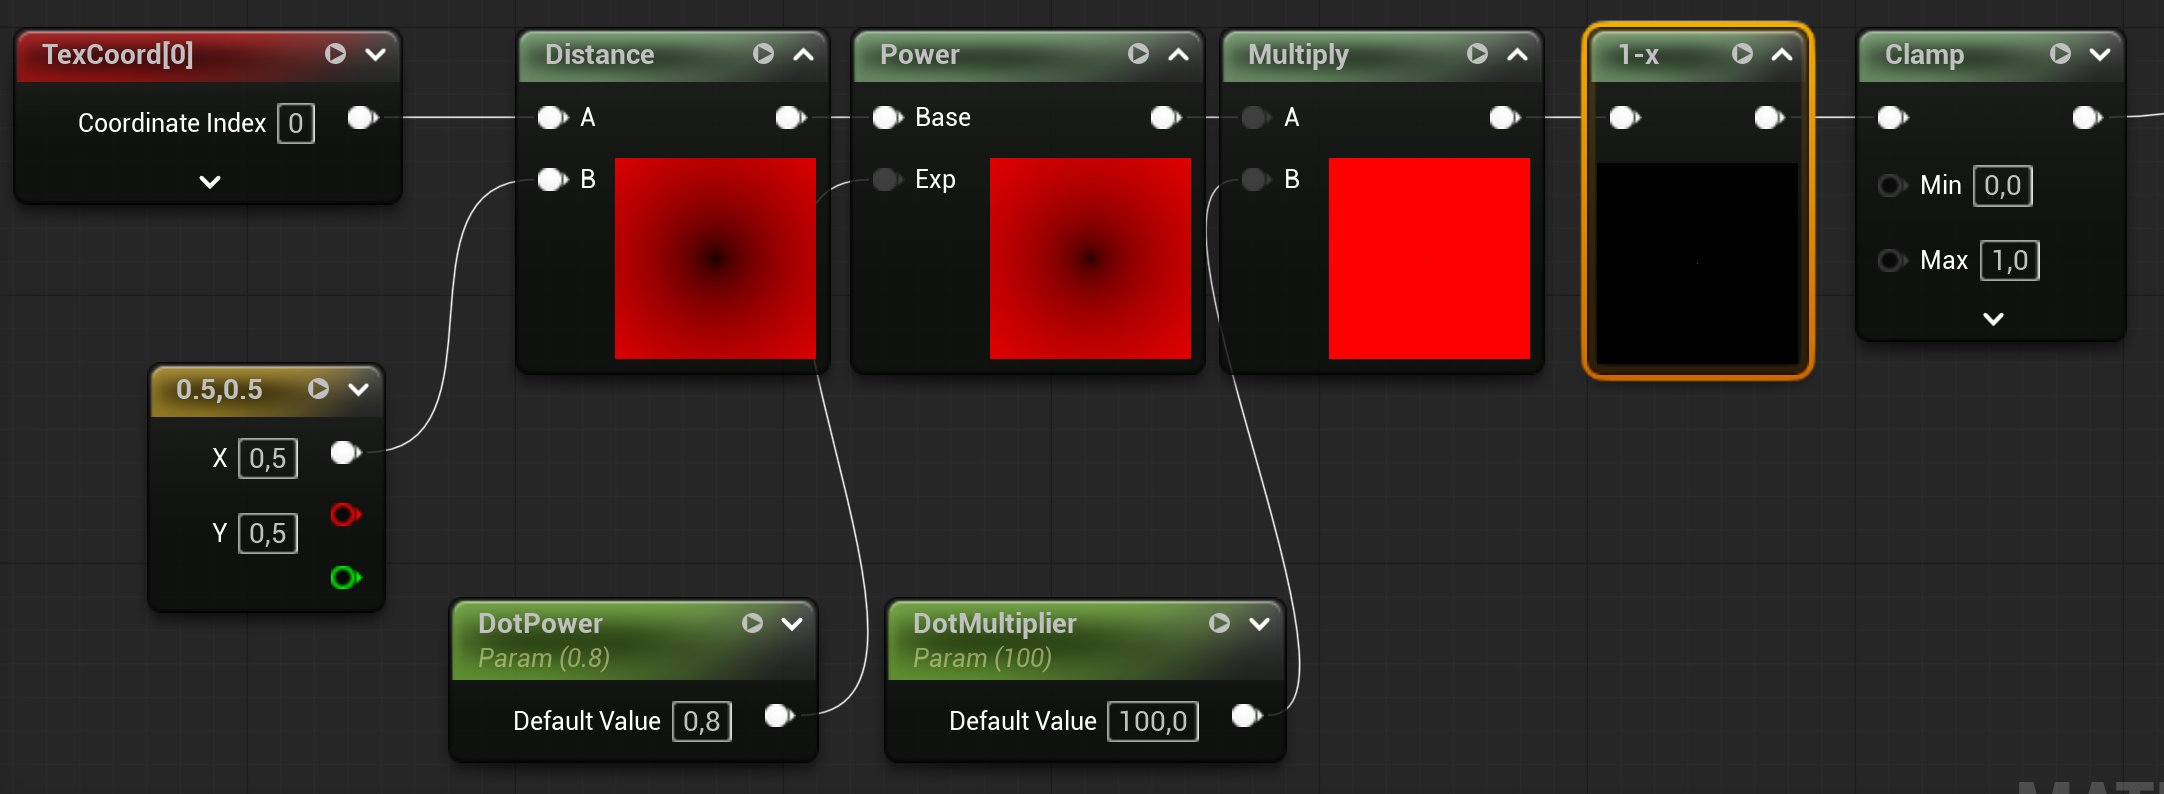
Just using Distance and simple math.
Using a shader for the crosshair allows you to create more weapon variants without needing to rely on many different textures. This approach is more flexible and efficient, as you can tweak parameters in the shader to change the look dynamically.
Here’s how the widget ( W_Crosshair ) updates the spread:
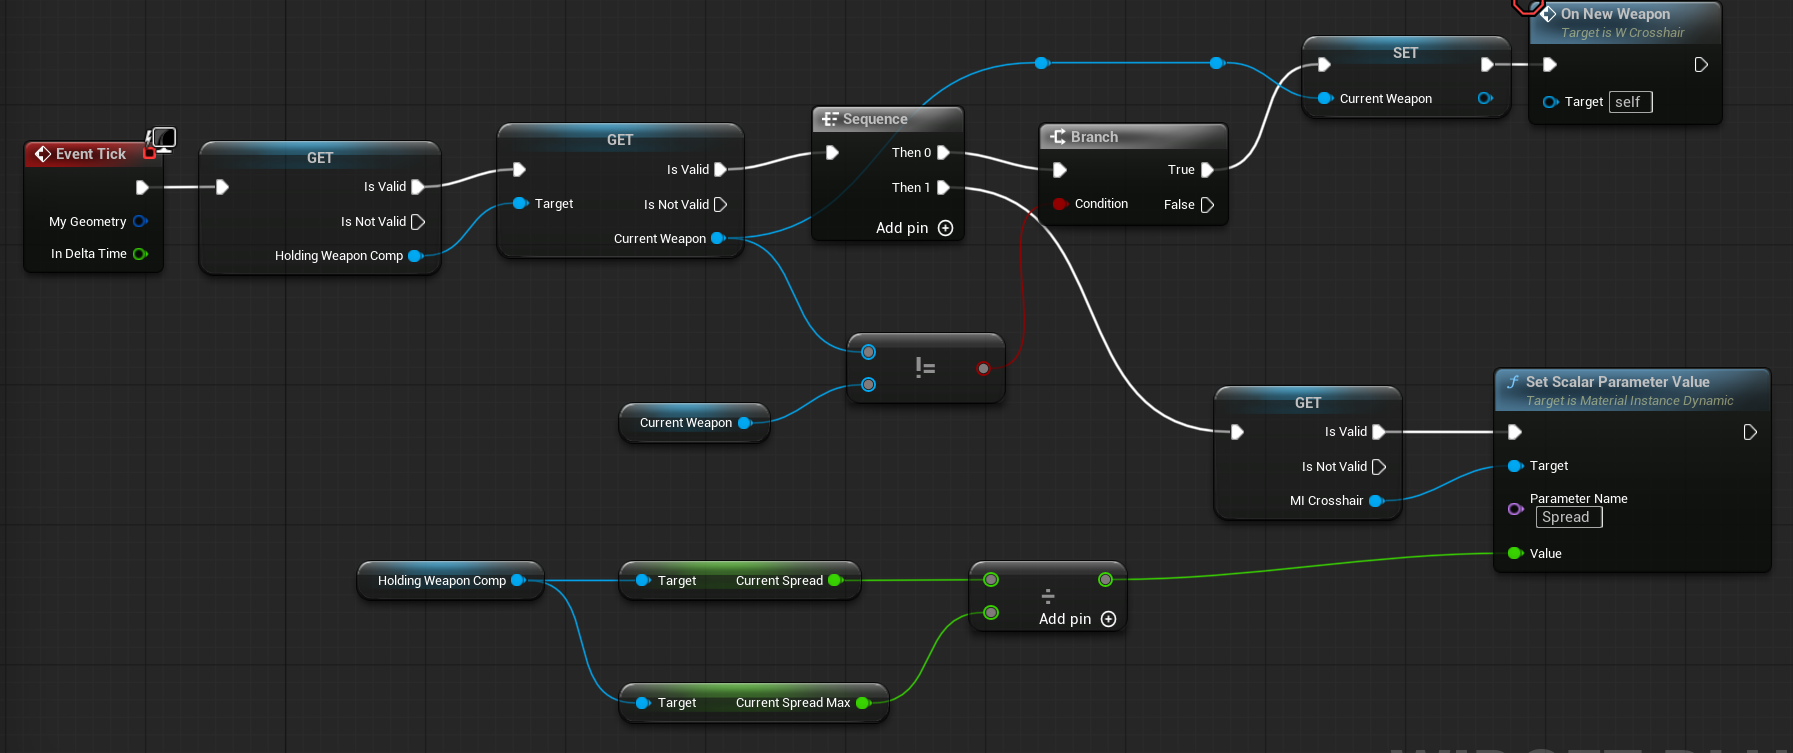
When a new weapon is picked up by the Tick, a material instance is created.

Yes, our Audio Visual system now has a new structure that includes UI data for storing and configuring weapon visuals.
FWeaponUIConfig
| AmmoIcon | Texture2d object soft ref | Holds the ammo icon texture for the weapon. |
| CrosshairMaterial | Material Interface soft ref | Holds the crosshair material used for the weapon. |
Remember to store these as soft references to optimize memory usage and loading times.
Conclusion
Thanks to the new UI system, we can now easily create and add widgets to the screen without needing custom management for each case.
Regarding the crosshair, I hope I’ve encouraged you to use shaders instead of textures whenever possible — they offer greater flexibility and efficiency.
The next part will focus on enemies and AI, so stay tuned!

You must be logged in to post a comment.