Create a Small Game from Scratch Series: Endless Standing First-Person Shooter
Level: intermediate
Type: Blueprint
Version: 5.6
Download Project
Last time, we implementen our first enemy. We can move into implementing damage indicators system for the game.
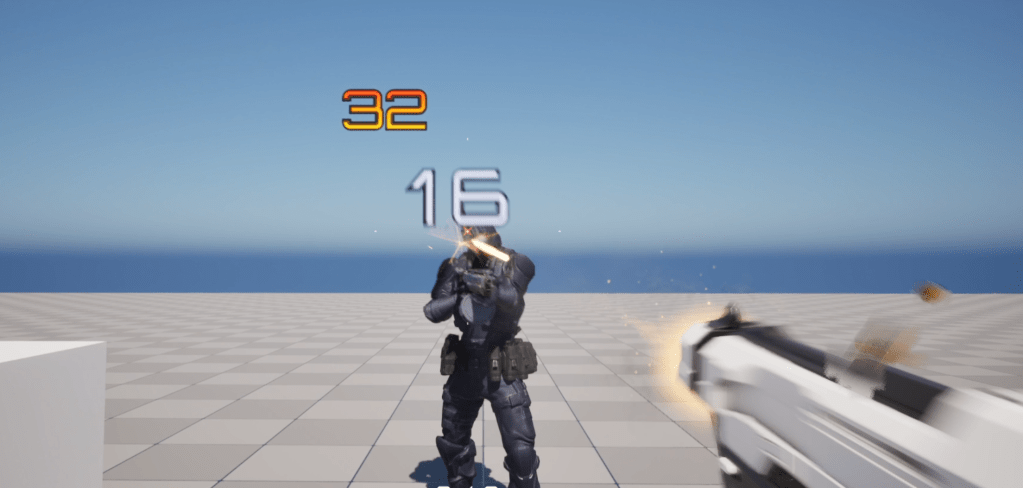
Final Result
- Final Result
- Theory
- Niagara vs UMG
- Niagara – Material
- Niagara – System
- Niagara – Spawning
- Niagara – Widget Hack
- UMG – Damage Number Widget Component
- UMG – Damage Numbers Manager
- UMG – Damage Numbers Widget
- Conclusion
Theory
There are a couple of ways to create damage indicators:
- 2D sprites spawned by Niagara
- 3D meshes spawned by Niagara or different manager
- UMG widgets created by Widget Components
- Drawing them directly on the canvas
In this post I will focus on Niagara and UMG because I think you will learn a lot from those two examples.
Niagara vs UMG
First, let’s figure out which approach might be better for our game.


| Niagara | UMG | |
| 3d or 2d space? | 3D only. You can use some tricks to maintain particle scale at different distances, but it’s not ideal. | 3D or 2D. You can set the Widget Component to render in 2D screen space. |
| Will be visible behind the wall? | No. It exists in 3D space. (but you could change the material to translucent with depth test disabled – then it will be rendered last) | Yes, if rendered in screen space. |
| Need pooling? | No. A single system can handle all damage indicators. | Yes. Widget Components are memory-heavy and expensive to create, so pooling is necessary. |
| Can animate? | Yes. Directly in Niagara and in the material. This allows for a lot of visual customization. | Yes, but only via UMG animations or with limited material effects like shadows. |
| Can we pass parameters? | Yes, via Niagara arrays. Can be limited if using one system for all indicators. But still you don’t want to pass a lot of data. | Yes, with no significant limits. |
| Better performance? | Generally better than Widget Components. | Slower, since each indicator is a separate component being rendered. |
| Others | We need an numbers atlas texture which will be loaded without any Mipmaps. | UMG can use the font we are using for the game so no need for additional textures. |
I’d go with Niagara if it could somehow be rendered in 2D. I know it’s doable—there’s even a plugin that enables Niagara UI rendering. I’m confident something like this will become natively supported in Unreal Engine in the future.
For me Niagara is easier to create a good looking animations than in UMG.
That said, I’ll implement both approaches. They can be toggled in the Player Controller PlayPlayerDamageNumber function.
Niagara – Material
I’m using content from the Lyra Example, with some tweaks to the material and system to make them easier to understand and learn from.
When working with Niagara, it renders a sprite, so we need a texture atlas containing numbers.
Then we perform some math to determine which part of the texture (UV space) to display based on two parameters:
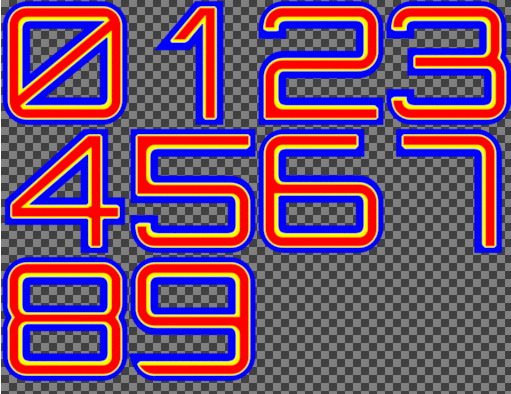
- Number of digits.
- Actual value we want to render
Here’s the HLSL code I’m using. It’s easier to read and follow than a messy material node graph. It takes the following inputs:
- InValue,
- InNumberOfDigits
- UV
The output is a float2, which represents the corrected UV coordinates.
// Grid info
float TileSizeX = 1.0 / 4.0;
float TileSizeY = 1.0 / 4.0;

// Compute DigitIndex from UV
float DigitIndex = floor(UV.x * InNumberOfDigits);

// Get local UV within a digit cell
float2 LocalUV;
LocalUV.x = frac(UV.x * InNumberOfDigits);
LocalUV.y = UV.y;

// Extract the correct digit from InValue
float power = pow(10.0, InNumberOfDigits - DigitIndex - 1.0);
float digit = fmod(floor(InValue / power), 10.0);

// Find atlas row and column
float col = fmod(digit, 4.0);
float row = floor(digit / 4.0);

// Base tile UV offset
float2 tileUV;
tileUV.x = col * TileSizeX;
tileUV.y = row * TileSizeY;

// Final full UV
float2 resultUV;
resultUV.x = tileUV.x + LocalUV.x * TileSizeX;
resultUV.y = tileUV.y + LocalUV.y * TileSizeY;

return resultUV;
I’ve also added comments to the node graph to make it easier to follow, but honestly, it’s much clearer when written in HLSL.

Doing math in the Material Graph can get complex and hard to manage. While Unreal theoretically compiles graphs more optimally for each platform, using a bit of HLSL is often more readable and maintainable—as long as you keep it efficient.
This HLSL snippet doesn’t use any advanced or expensive operations, so performance shouldn’t be a concern.
How the math works:
NumberOfDigitsdetermines how the UV space is split horizontally- We extract each digit from the value based on
NumberOfDigits - Then we calculate the row and column in the texture where that digit is located
- Finally, we convert the row and column into proper UV coordinates
Also – check how the Texture is sampled. It will not use mipmaps because we are doing math for the UV and we need full precision.

Niagara – System
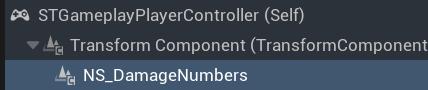
You can check out NS_DamageNumbers in the project files.
The goal here is to use a single Niagara System to handle all active damage indicators. This approach is highly efficient, since we don’t need to spawn a new system every time damage occurs.
Niagara doesn’t currently support infinite lifetime for systems. So for persistent effects like this, we just set the loop duration to a very large value.

Don’t worry—this is a common and acceptable practice. Niagara isn’t just for particle effects—it can act as a general-purpose system on both CPU and GPU. Some examples of what Niagara can manage:
- Spawning ocean grid meshes based on camera location
- Driving custom cloth animations
- Drawing textures—like hit indicators—directly onto render targets, which is much faster than using CPU-based render targets via Blueprints
DamageInfo Float 4 Array
Our system uses a single user parameter: a Float4 array called DamageInfo. Each element in this array represents one damage event, with the following data:
- X: Hit location X (not used currently—you could use this for custom offset or direction)
- Y: the same as X
- Z: the same as X
- W: Damage value – if below 0, it’s a critical hit
The logic is simple:
- If there’s a new entry in the
DamageInfoarray: Set up Niagara parameters and Spawn a new particle from the system - After spawning, remove the last index from the array
UpdateSpawnFromArray
Niagara is extremely powerful, and it’s worth taking the time to learn it properly. In the Emitter Update phase, we’re running a custom module that handles the logic described earlier—processing the DamageInfo array and preparing particles for spawning.

We’ve added a few custom emitter parameters to help transfer data from the array into individual particles:
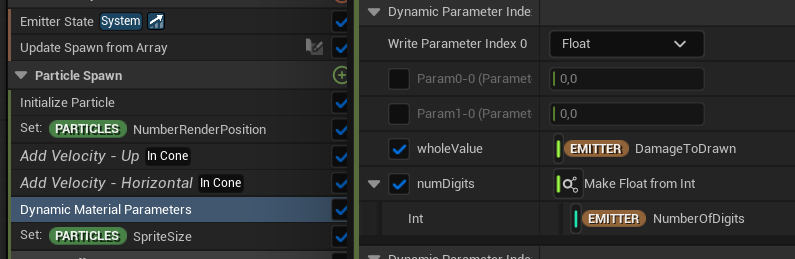
DamageToDrawn(Float) – The actual damage value to displayNumberOfDigits(Int) – Used to determine how many digits we need to renderWasCritical(Bool) – Indicates whether the hit was critical (e.g., based on negative damage value)
These parameters are calculated in the Emitter Update and are then used during the Particle Spawn phase.
Initialize Particle
In this stage, we’re using the WasCritical parameter to determine the lifetime and color of each particle.
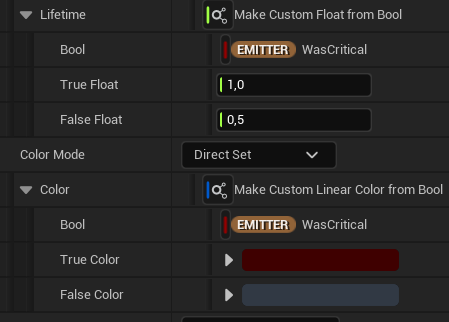
If the hit was critical, the particle will live longer and have a red color.
This allows us to visually distinguish critical hits from normal ones, adding clarity and feedback for the player.
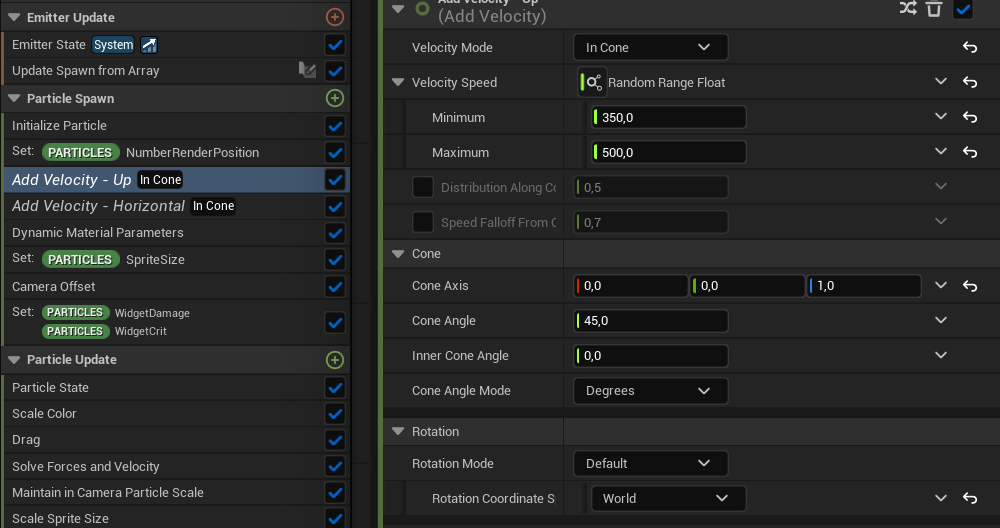
Add Velocity
We’re using two separate add velocity modules to control the particle’s movement:
- One for moving the particle upward (vertical velocity)
- Another for moving it horizontally (side-to-side velocity)
This gives us more control over the trajectory and allows for more dynamic and readable movement of the damage indicators.

Dynamic Material Parameters
This is how we pass the damage value and the number of digits to the material:
We use dynamic material parameters to feed these values into the material instance used by the particle. This allows the material to:
- Display the correct number
- Adjust based on the digit count (e.g. single vs. triple-digit numbers)
This approach ensures that the material can respond to real-time gameplay data without needing separate materials or textures for each value.
Maintain in Camera Particle Scale
Finally, in the Particle Update stage, we use a module to scale the particle based on its distance from the camera.
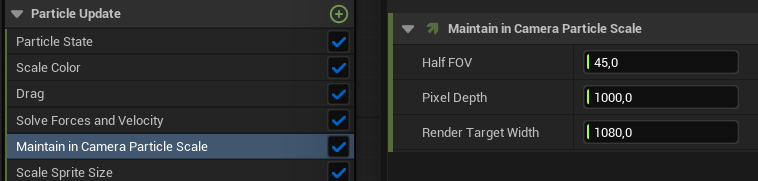
This helps keep the damage indicator’s screen-space size consistent, making it more readable regardless of how far the player is from the source.
You could definitely implement a more refined version yourself—with better math to simulate true 2D screen-space behavior.
For example, you might:
- Adjust particle position to be closer to the camera
- Project world position to screen space and align particles accordingly
But that’s beyond the scope of this tutorial.
That wraps up all the custom elements in the Niagara System. It’s actually not too complex once broken down. Now, let’s move on to creating the Niagara System in Blueprint (or C++) and passing data into it.
Niagara – Spawning
Since damage indicators are only visible to the local player, the best place to handle spawning is in the Player Controller. We’re not using a custom Niagara Component—just the default one provided by Unreal.
Auto Activate should be disabled, since we’ll be activating the system manually. The System Asset field should be left empty—we’re assigning it at runtime via a soft reference.
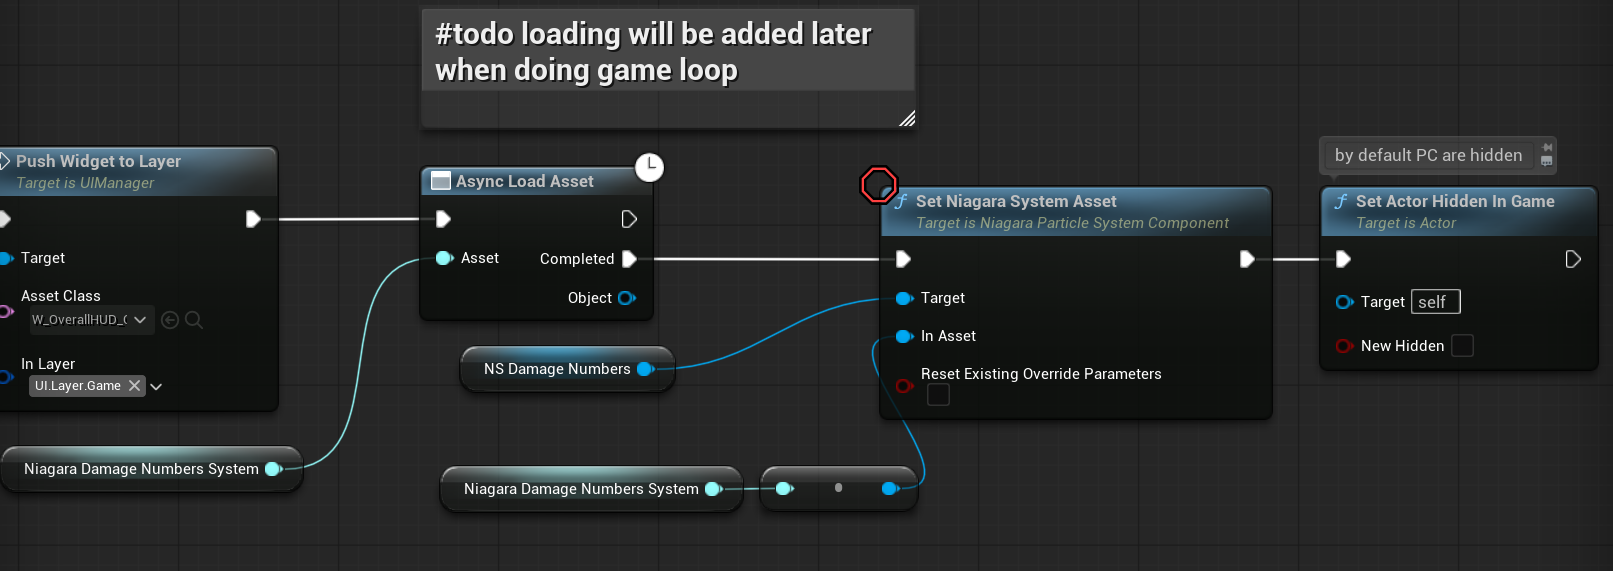
💡 Note: By default, Player Controllers are hidden in the world, so any visual component attached to them won’t be visible. To fix this, make sure your Player Controller is set to not hidden in game, so the damage indicators can actually render.
PlayPlayerDamageNumber (link)
This function is responsible for
- Activating the Niagara System
- Setting its world location to the hit location
- This eliminates the need to use the X, Y, Z components of the
Float4(calledVector4in Blueprints), since the particle spawns directly at the correct position and uses world space for updates
- This eliminates the need to use the X, Y, Z components of the
- Passing the updated
DamageInfoarray to Niagara, which includes the damage value and critical hit information

This function is called from the Pawn – inside STGameplayPawn::ApplyDamage—when we actually hit someone.

That means damage indicators are only created when we successfully apply damage, ensuring the effect only triggers on confirmed hits. Please refer to the Damage System post.
Niagara – Widget Hack
💡 Note: This solution is currently disabled and included for learning purposes only.
In this setup, we’ve added a Widget Component Renderer to the Niagara System. Instead of spawning a sprite, it spawns a Widget Component that displays a User Widget.
While this feature is still experimental, it’s worth exploring. Niagara can spawn components—just like we did with Decals in an earlier tutorial.
To pass data into the widget, we’ve created a custom component called DamageNumberNiagaraWidgetComponent. This component receives data from Niagara, including the damage value and critical hit flag.

From there, the component passes data into the User Widget (W_DamageNumberNiagara).
This is done using the Tick function, which is not optimal and should not be used in production.


Why it’s using Tick? Because Niagara uses component pooling, the BeginPlay event is only called once when the component is first created—not every time it’s reused.
Since there’s no built-in OnSpawn or OnActivate event, we rely on Tick to update the widget every frame.
In fact, Tick is required both in the Component and in the User Widget it holds, for the same reason: there’s no reliable spawn-time hook when using Niagara’s pooled components.
If you were to modify the engine source, you could implement a proper OnSpawn event for Niagara-spawned components.
So, while this technique should not be used in production, it might spark ideas on how to:
- Push Niagara beyond traditional particle systems
- Use it as a generalized spawning/management system
- Or even extend the engine to unlock new possibilities
UMG – Damage Number Widget Component
To display Damage Indicators as UI Widgets, we use the Widget Component renderer.
I’ve created a custom DamageNumberWidgetComponent to store some default values and handle basic setup.
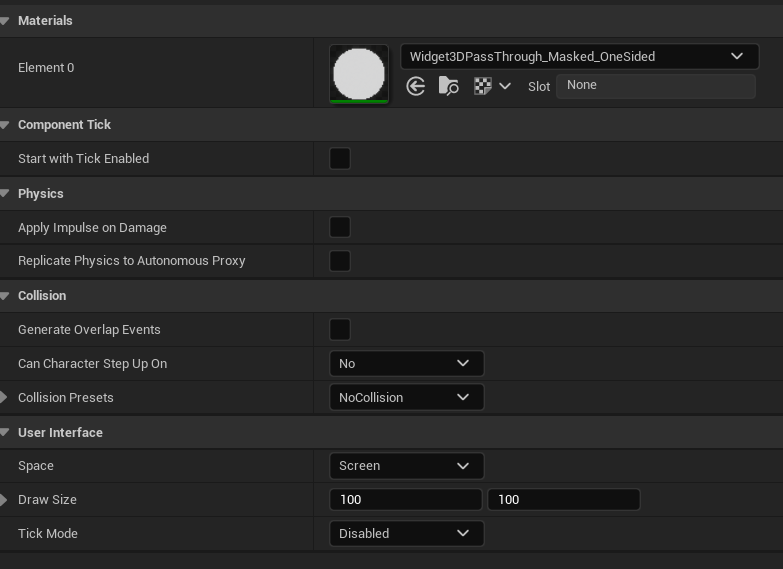
Keep in mind:
- Widget Components can have collisions by default — these should be disabled.
- Also disable Tick and any unnecessary features.
- This component should do nothing but render the User Widget — no logic, no physics, just pure UI.
Keeping the component lightweight ensures better performance, especially when multiple damage indicators are visible on screen.
UMG – Damage Numbers Manager
Just like Niagara uses pooling for spawning components, we also need a pooling system for UI-based damage indicators. We don’t want to create a new Widget Component and User Widget every time a hit occurs—this would be both inefficient and performance-heavy.
If you followed the projectiles tutorial, you should already be familiar with the concept of pooling.
| FreePool | DamageNumberWidgetComponent Array | An array holding components that are available for reuse. |
| TakenPool | DamageNumberWidgetComponent Array | An array holding components that are currently active (i.e. visible on screen). |
AddNumber (link)
This function is responsible for:
- Retrieving a component from the free pool (or creating one if necessary)
- Setting up the widget, including:
- Assigning the damage value
- Positioning it at the hit location
- Binding to an event that triggers when the damage number’s animation is complete
(so the component can be returned to the pool)

This is the event to free the component.

When a widget component is idle (i.e. waiting in the pool), you can set its mobility to Static.
This can be a major performance win, especially when you’re dealing with a large number of pooled damage indicators.
⚠️ I’m not applying this optimization just yet, as I plan to cover it in a separate profiling and optimization post later on.
Still, it’s a good practice to keep in mind when scaling your system.
UMG – Damage Numbers Widget
This is the actual UI widget that displays the damage number. It’s a simple setup containing a Text Block with the selected font and visual style.

And two basic animations:
- ShowNormal
- ShowCritical
ou could easily extend this by creating more animations like: NormalLeft, Right, Bottom etc This would allow you to add variation in movement direction, making the indicator feel more dynamic. You could then randomly select one.
Normally I would create custom Slate widget in C++ to drive the animation from there.
In this example, I used Tick to animate the Text Widget procedurally, just to demonstrate that it’s possible.
However, this is not optimal.

It’s not optimal – Widgets should not have Tick enabled. It is included purely for educational purposes.
The widget knows when its animation finishes, and it fires a Completed dispatcher when that happens. You can bind to animation events directly in UMG, making it easy to notify the manager when the widget has finished its job and can be returned to the pool.

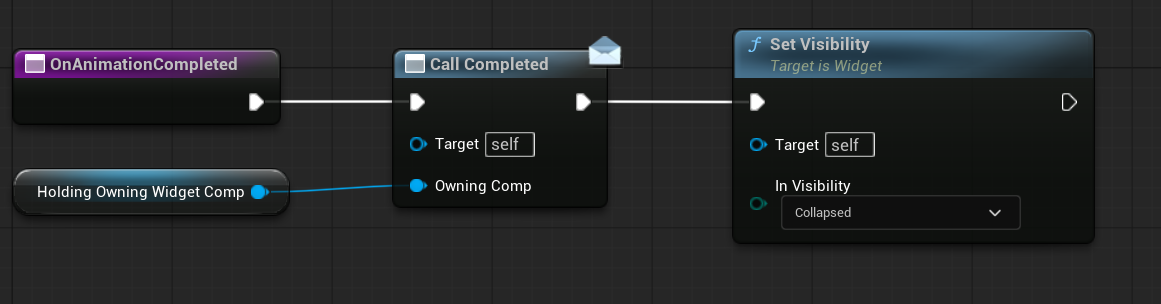
This notifies the manager that the widget has finished its job and is ready to be returned to the pool.
SetupDamage (link)
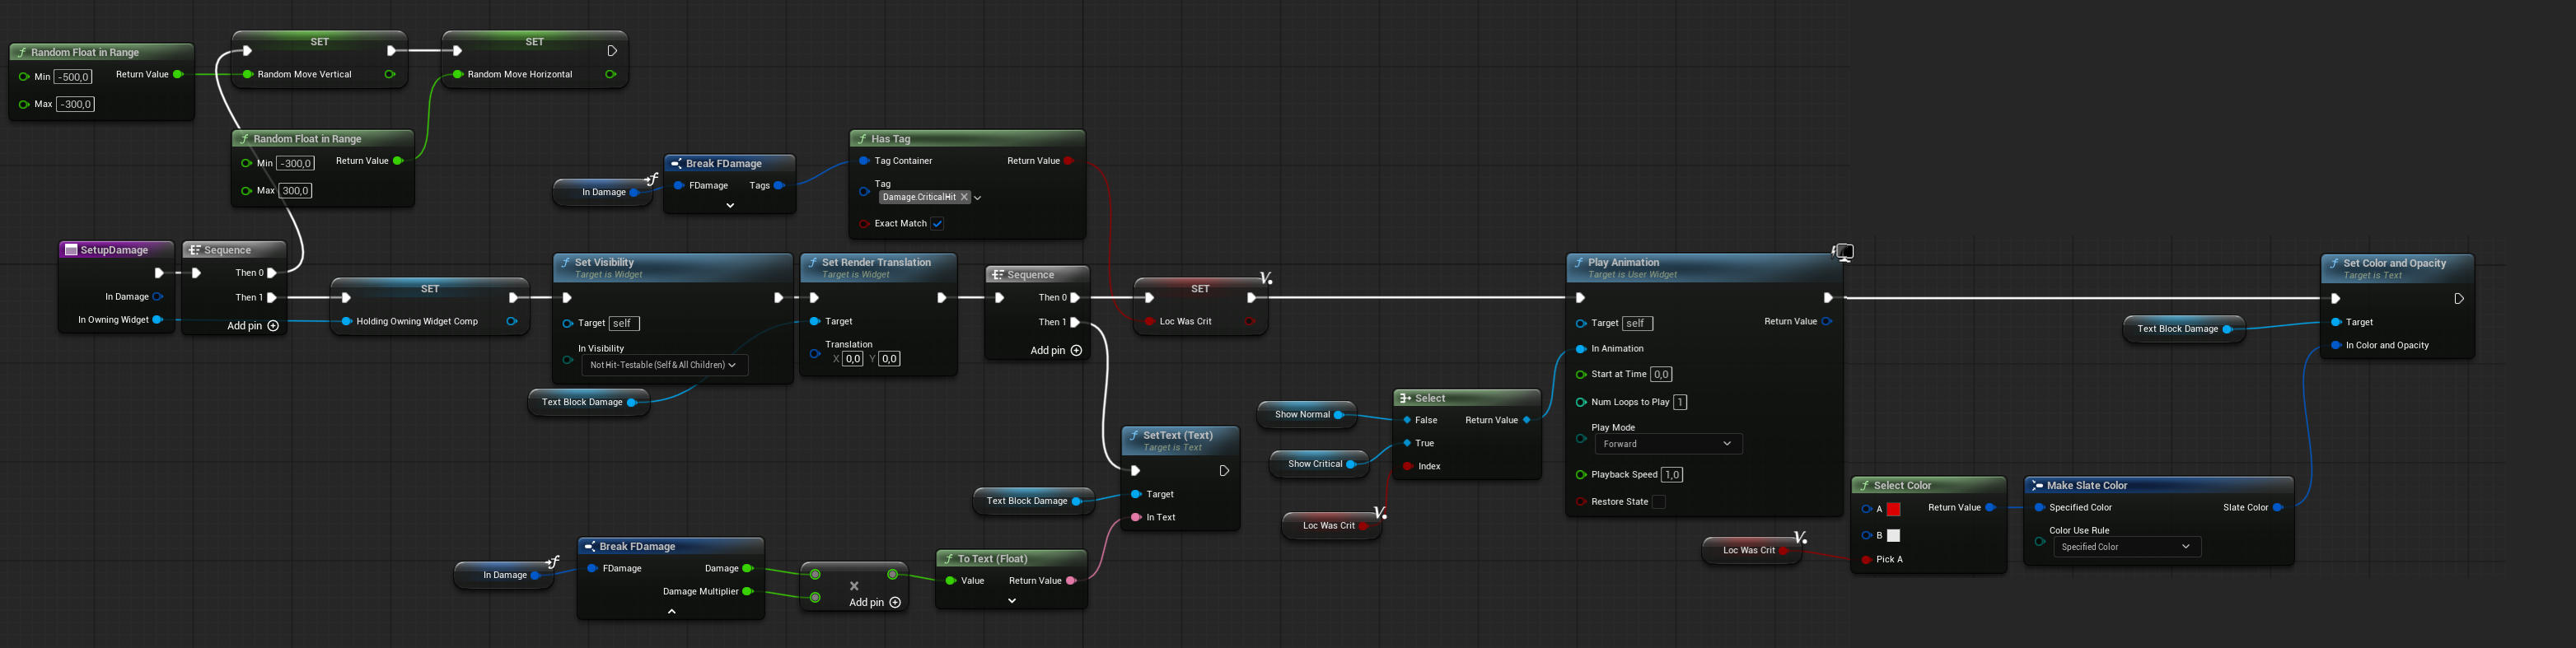
This function handles:
- Calculating random animation values
- Initializing the widget with the damage amount and critical hit status
- Preparing the appropriate animation to play
Conclusion
As you can see, displaying damage indicators isn’t that complicated.
I hope you’ve gained some new insights and ideas from this guide.
Next up, we’ll be diving into decals—creating blood splatters on walls and surfaces.
Stay tuned!

You must be logged in to post a comment.