Create a Small Game from Scratch Series: Endless Standing First-Person Shooter
Level: Intermediate
Type: Blueprint
Version: 5.6
Download Project
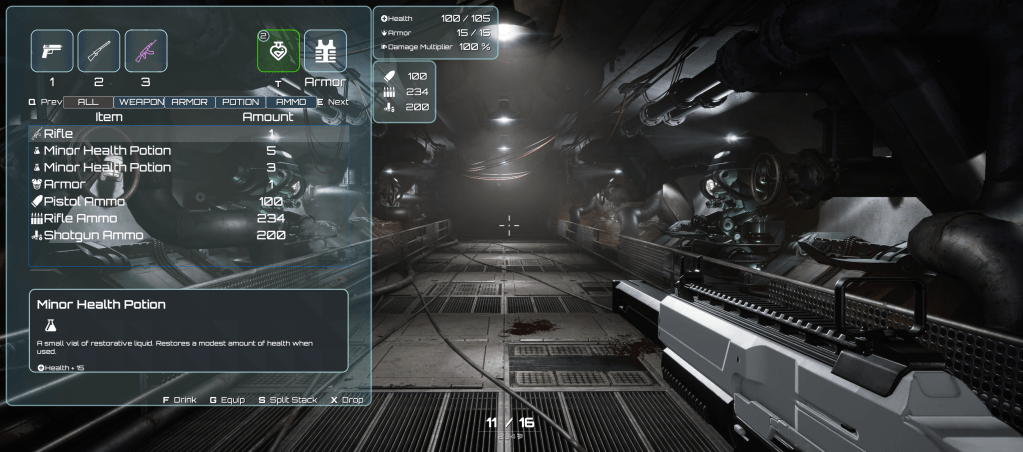
Last time, we implemented last of the weapon – Rifle. Now it’s the time to let the player to use the three weapons we have and also swap them. To do this we will implement inventory system.
- C++ dilema
- Blueprint Instanced Struct
- Features
- Inventory Component
- High-Level Overview
- Data – Enums
- Data – FInventoryItem
- Data – PDA_ItemDefinition
- Data – Item Fragments
- Data – Item Usable Fragments
- Data – FInventorySlotConfig
- Data – Variables
- Data – Events
- Functions – Add/Remove
- Functions – Slot
- Functions – Events
- Functions – Equip
- Functions – Use
- Functions – Stack
- Functions – Ammo
- Functions – Weapon
- Inventory Function Library
- Weapon Component
- Player Pawn
- Player Controller
- Stat Manager
- Gamepad UI Input
- Inventory UI
- Hi Level
- Data
- UIFunctionLibrary
- W_InventoryItemAction
- W_InventoryItemActionsList
- W_SingleInventoryAmmo
- W_InventoryAmmo
- W_SingleInventoryStat
- W_InventoryStats
- W_SplitStack
- W_ItemDescription
- W_ItemSlotEntry
- W_DragAndDropItem
- InventoryDragAndDropOperation
- InvListViewObj
- W_InventoryListVertical
- W_InventoryListHorizontal
- W_Inventory
- Conclusion
C++ dilema
To create a modular, data-driven inventory and item architecture, you’ll need to use C++.
Such a system requires “Fragments” functionality, which is only possible through UObject/UStruct instancing—currently fully available only in C++.
Hopefully, one day this will be fully available in Blueprints. (It kind of is—though with many limitations—read below!)
Before you start, you should watch Epic’s presentation on data in UE5:
There’s also a great tutorial demonstrating struct instancing that you might find helpful.
Blueprint Instanced Struct
However, there are Instanced Structs in Blueprints, and they can be used effectively—perfect for introducing you to more modular, “Fragments”-based systems.
I should have used them earlier in the weapon system, but I’m not a heavy Blueprint user. I’m primarily a C++ programmer, and I wasn’t aware that Instanced Structs were available in Blueprints until recently.
That’s really great news.
Features
This tutorial post will be long because, for me, the inventory system is much more than just holding items. For a simple Shooter Tutorial, I could have created a basic inventory. However, I wanted to demonstrate how to build a more advanced, modular inventory system that can be used across different types of games.
Here are the key features implemented in this system:
- Inventory system based on slots — Fully configurable slot types such as weapon, armor, and backpack.
- Item system based on Data and Fragments — Items are defined with
ItemDefinitionand composed of modular fragments (Instanced Structs). - Ability to use items — Supports consumables like potions and ammo packs.
- Ability to equip/dequip items — Manage equipment such as armor, potions, and weapons.
- Item stacking support — Items can be stacked in a single slot.
- Stack splitting — Allows splitting a stack into smaller stacks.
- Modular stat system — Supports stats like max health, armor, and more.
- Advanced UI features:
- Vertical and horizontal slot layouts
- List views
- Drag & drop support
- Gamepad Support
- Gamepad support with automatic input icon switching between keyboard and gamepad
- Rich text usage and decorators for better visual feedback
- Item filtering in inventory — Easily filter items by type or category.
Inventory Component
Before diving into the UI, let’s take a closer look at the data and logic behind the inventory system. Understanding the architecture is essential to fully grasp how items, slots, and equipment interact.
High-Level Overview
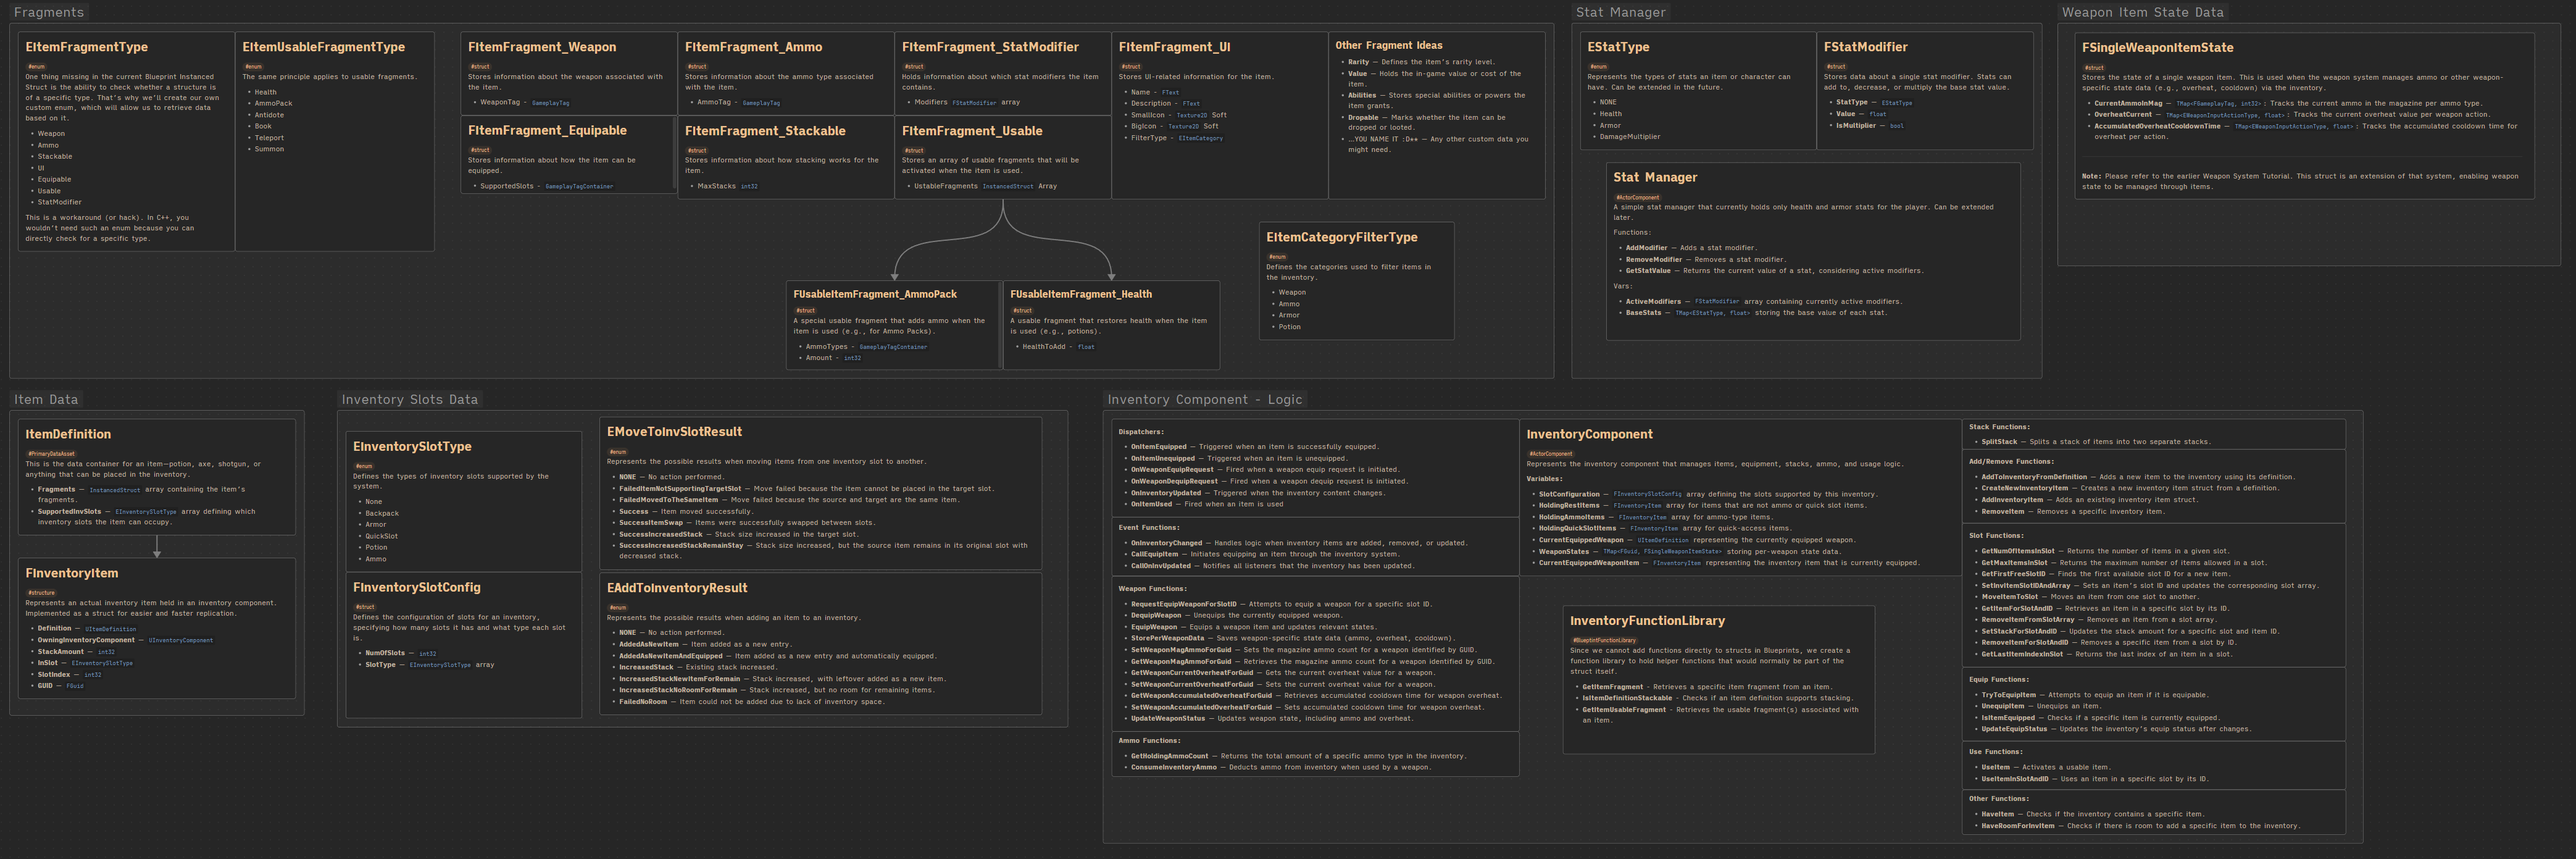
Take your time to analyze the architecture. The inventory is designed to be modular and flexible, allowing it to support:
- Multiple types of slots (weapons, armor, backpack, quick slots, etc.)
- Item stacking and splitting
- Equipping and unequipping items
- Usable items like potions or ammo packs
- Per-item state management (e.g., weapon ammo, cooldowns, overheat)
- A modular stat system that can track player or item stats
This high-level structure ensures the inventory system can be easily extended for different game genres, not just shooters.
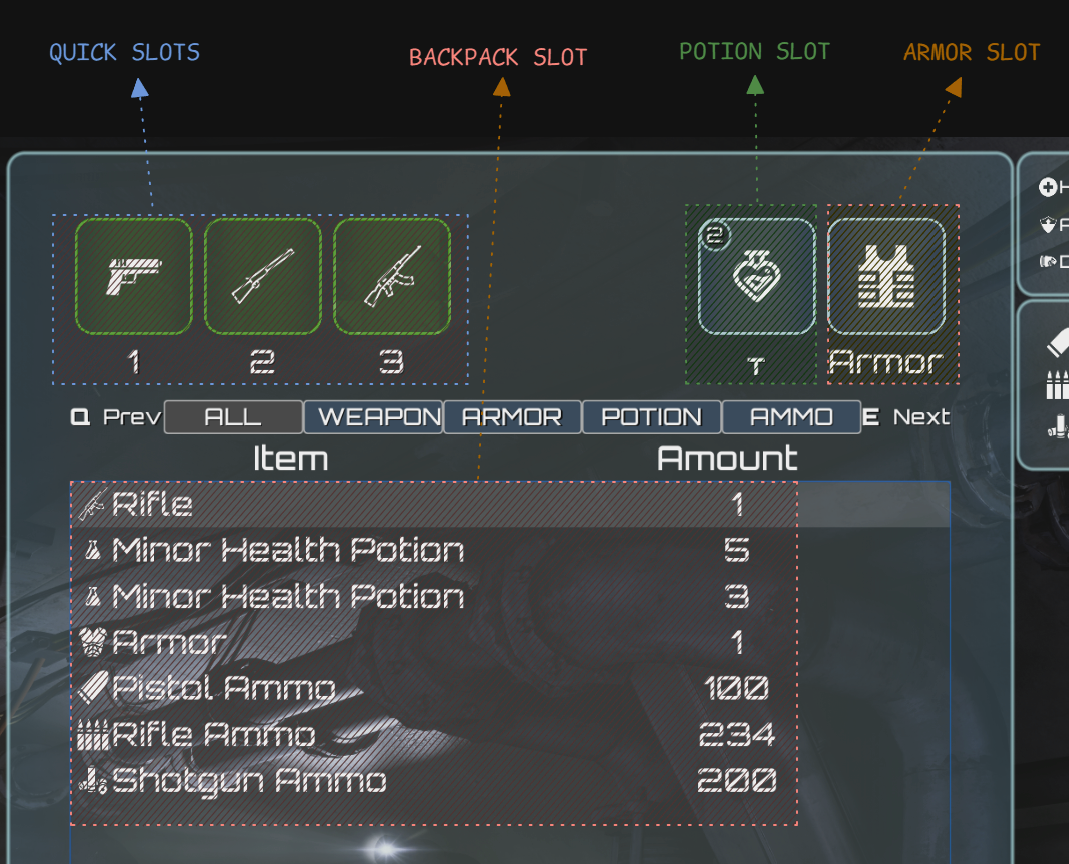
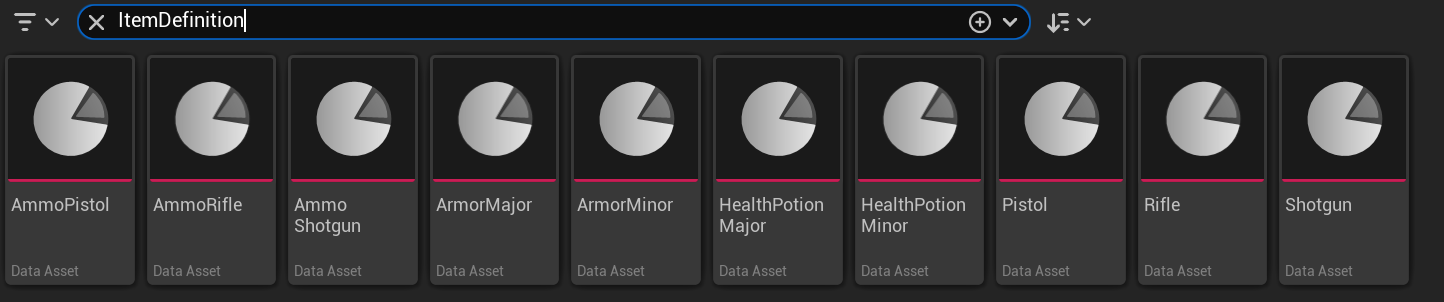
To better understand how the inventory system works, let’s look at some example items. Seeing actual items and how they are defined will make the concepts of ItemDefinition, fragments, and slot behavior much easier to grasp.
Pistol Ammo

- Slot Type: Ammo
This item uses the Ammo inventory slot, meaning it will be stored in the dedicated ammo array. This allows the system to quickly find specific ammo types without iterating through the entire backpack. - Ammo Fragment:
Contains ammo type information. The weapon system can use this fragment to request the inventory to decrease a specific ammo type when firing a weapon. - Stackable:
This item supports stacking, with a maximum of 100 units per stack. - UI Support:
The item supports display in the inventory UI. The UI reads this fragment to set the item’s image, name, description, and filter category.
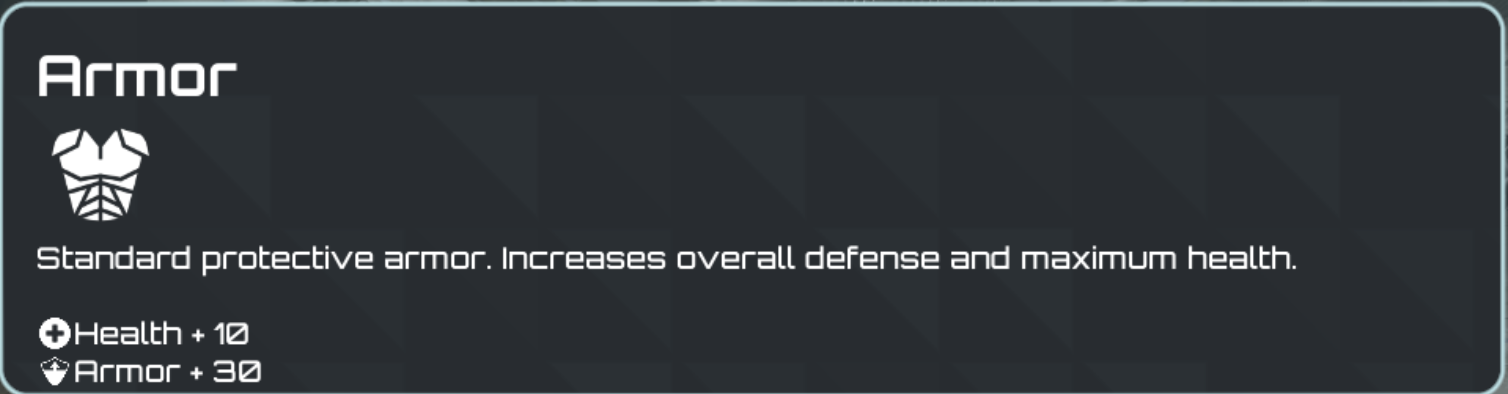
Armor Major
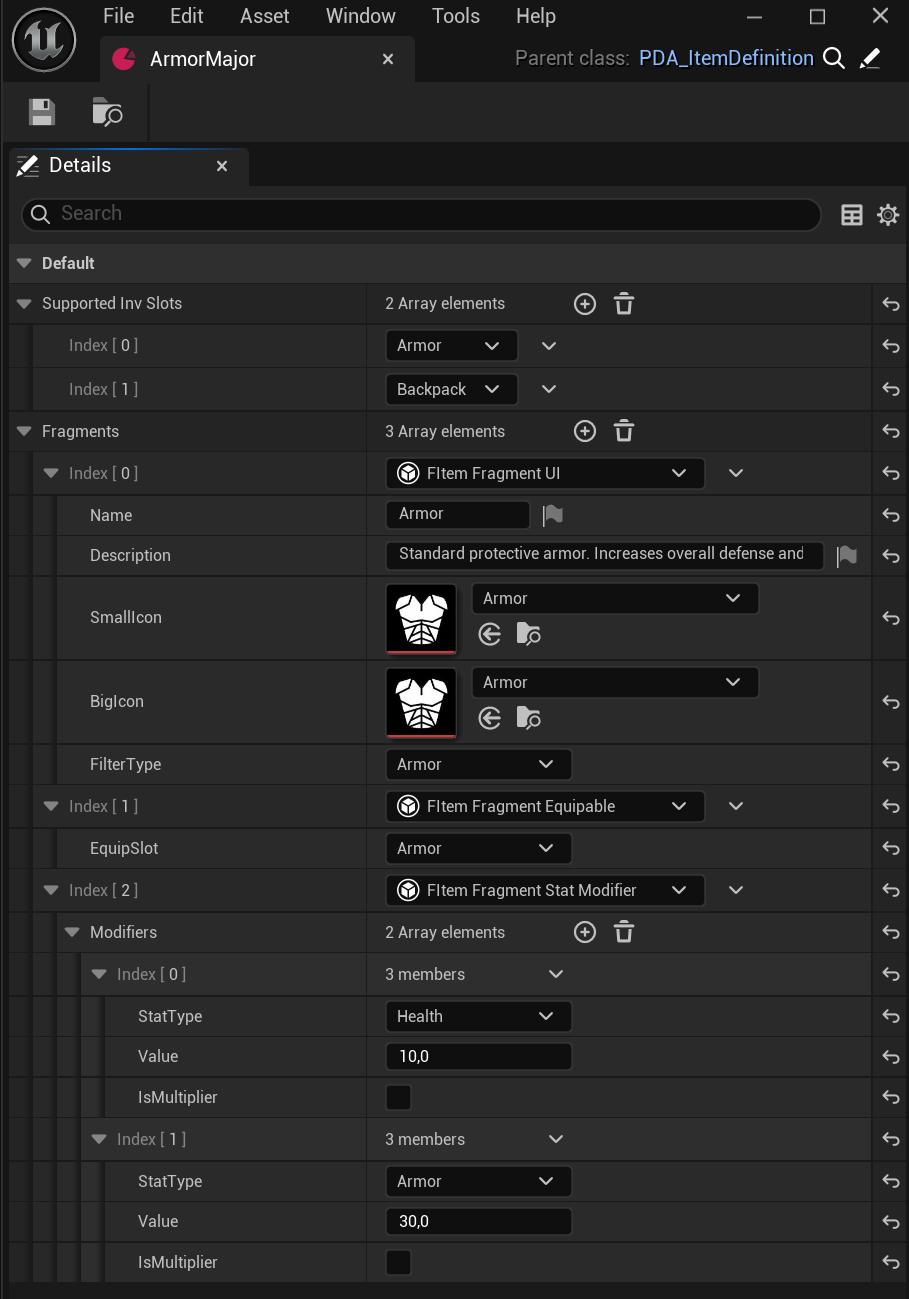
- Slot Types: Armor, Backpack
This item can be placed in either the Armor slot or a Backpack slot. - Equippable Fragment:
The Armor slot is selected, which means this item can be equipped to provide armor benefits to the character. - Stat Modifier Fragment:
Contains two modifiers:- Health +10
- Armor +30
- These modifiers are applied when the item is equipped.
- UI Support:
The item can be displayed in the inventory UI, showing its image, name, description, and category.
Health Potion Major
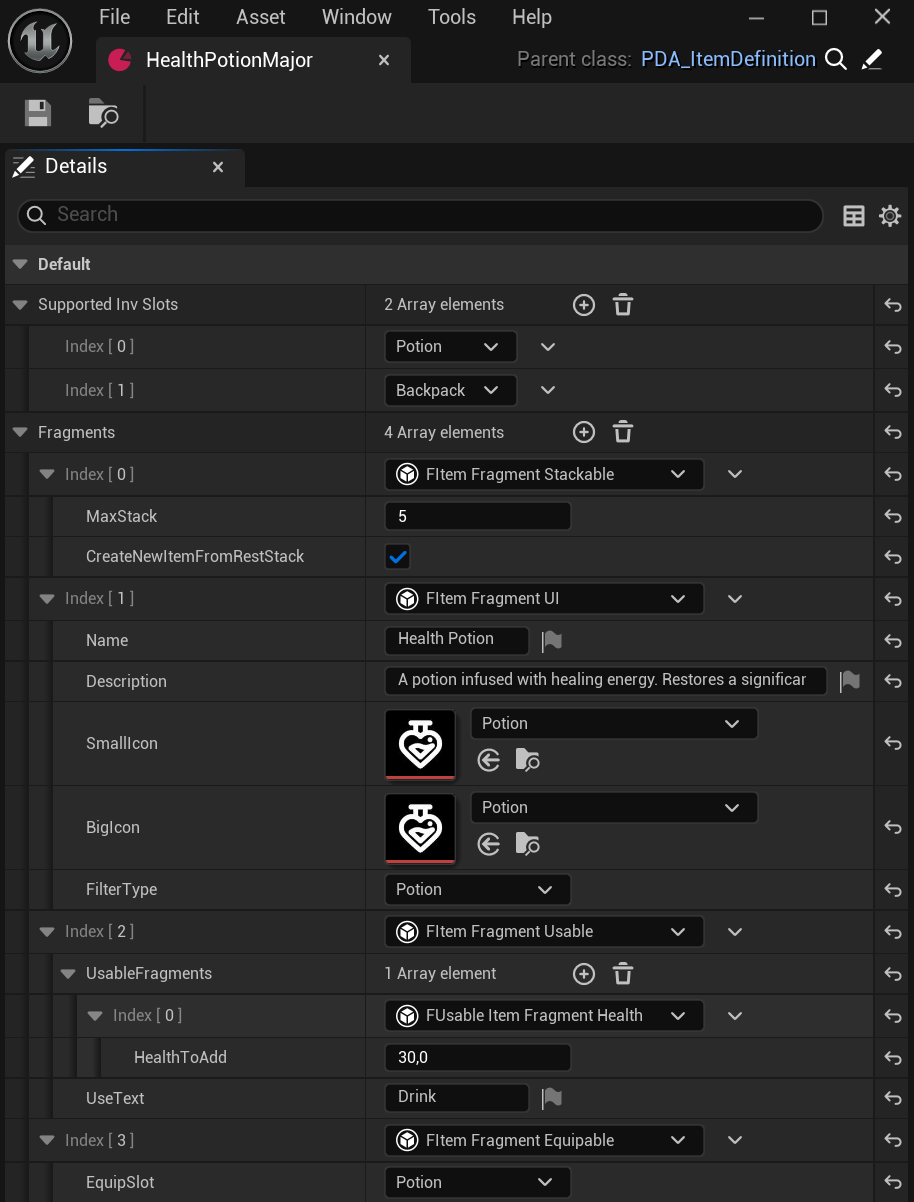
- Slot Types: Potion, Backpack
This item can be stored in either the Potion slot (quick-use slot) or a Backpack slot. - Stackable:
Supports stacking, with a maximum of 5 units per stack. - Usable Fragment:
Contains one usable fragment:- Health — Restores 30 health when used.
- Equippable Fragment:
Can be equipped into the Potion slot, enabling quick use during gameplay without opening the inventory. - UI Support:
Displays item image, name, description, and category in the inventory UI.
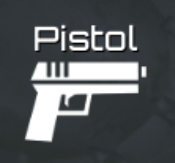
Pistol

- Slot Types: QuickSlot, Backpack
QuickSlots are special slots (1, 2, 3) for fast weapon access. The item can also be stored in a Backpack slot. - Weapon Fragment:
Stores the weapon’s constant data, including theWeaponDefinitionandWeaponTag. - Equippable Fragment:
Can be equipped to a QuickSlot, enabling rapid weapon switching during gameplay. - UI Support:
Displays item image, name, description, and category in the inventory UI.
Now let’s describe the data itself.
Data – Enums
EAddToInventoryResult. Represents the possible results when adding an item to an inventory.
| None | No action performed. |
| AddedAsNewItem | Item added as a new entry. |
| AddedAsNewItemAndEquipped | Item added as a new entry and automatically equipped. |
| IncreasedStack | Existing stack increased. |
| IncreasedStackNewItemForRemain | Stack increased, with leftover added as a new item. |
| IncreasedStackNoRoomForRemain | Stack increased, but no room for remaining items. |
| FailedNoRoom | Item could not be added due to lack of inventory space. |
EMoveToInvSlotResult. Represents the possible results when moving items from one inventory slot to another.
| None | No action performed. |
| FailedItemNotSupportingTargetSlot | Move failed because the item cannot be placed in the target slot. |
| FailedMovedToTheSameItem | Move failed because the source and target are the same item. |
| Success | Item moved successfully. |
| SuccessItemSwap | Items were successfully swapped between slots. |
| SuccessIncreasedStack | Stack size increased in the target slot. |
| SuccessIncreasedStackRemainStay | Stack size increased, but the source item remains in its original slot with decreased stack. |
EInventorySlotType. Defines the types of inventory slots supported by the system.
| None | |
| Backpack | Standard backpack slot for general storage. |
| Armor | Slot for equippable armor items. |
| QuickSlot | Quick-access slot for weapons. |
| Potion | Slot for potions, enabling quick use during gameplay. |
| Ammo | Slot dedicated to storing ammo items. |
EItemCategoryFilterType. Defines the categories used to filter items in the inventory.
| Weapon | Filters only weapon items. |
| Ammo | Filters only ammo items. |
| Armor | Filters only armor items. |
| Potion | Filters only potion items. |
EItemFragmentType. This enum is important because it allows you to retrieve a specific fragment from an item. In C++, this can be done directly, but in Blueprints, you cannot cast InstancedStructs easily. Using this enum provides a way to identify and access specific fragments.
| Weapon | Represents the weapon fragment. |
| Ammo | Represents the ammo fragment. |
| Stackable | Represents the stackable fragment. |
| UI | Represents the UI fragment. |
| Equipable | Represents the equippable fragment. |
| Usable | Represents the usable fragment. |
| StatModifier | Represents the stat modifier fragment. |
💡 Note: This enum is primarily used to identify and retrieve a specific fragment from an item in Blueprints.

EItemUsableFragmentType. The same principle applies to usable fragments. This enum identifies the type of usable effect an item has:
| Health | Represents a health-restoring usable fragment. |
| AmmoPack | Represents an ammo pack usable fragment. |
| Antidote | Represents an antidote usable fragment. |
| Book | Represents a book usable fragment. |
| Teleport | Represents a teleport usable fragment. |
| Summon | Represents a summon usable fragment. |
In practice, an item can have an ItemFragment_Usable, which contains one or more UsableFragments. This allows a single item to support multiple usable effects, like restoring health, adding ammo, or triggering a teleport.
Data – FInventoryItem
Represents an actual inventory item held in an inventory component. Implemented as a struct for easier and faster replication.
| Definition | UItemDefinition | Holds a reference to the PDA_ItemDefinition data asset. |
| OwningInventoryComponent | UInventoryComponent | References the inventory component that owns this item. Useful when moving items between inventories (e.g., player to player or chest to player). |
| StackAmount | int32 | The current stack amount of the item. |
| InSlot | EInventorySlotType | Indicates which inventory slot the item currently occupies. |
| SlotIndex | int32 | The index of the item within the slot. |
| GUID | FGuid | A unique identifier assigned when the item is created. Used for storing specific weapon data or for saving/loading the item in a save system. |
Data – PDA_ItemDefinition
This is the data container for an item—potion, axe, shotgun, or anything that can be placed in the inventory.
| Fragments | | Array containing the item’s fragments. |
| SupportedInvSlots | EInventorySlotType Array | Array defining which inventory slots the item can occupy. |
Data – Item Fragments
FItemFragment_Ammo. Adds ammo feature to an item.
| AmmoTag | | Specifies the type of ammo the item holds. This allows the weapon system to identify and consume the correct ammo type from the inventory. |
FItemFragment_Equipable. Adds equip / dequip feature to an item.
| SupportedSlots | | Specifies which inventory slots the item can be equipped into. This allows the system to determine if an item can be placed in a particular slot (e.g., Armor, QuickSlot, Potion). |
FItemFragment_Stackable. Adds stacking feature to an item.
| MaxStacks | int32 | Specifies the maximum number of items that can be stacked in a single inventory slot. |
FItemFragment_StatModifier. Adds stat modifier feature to an item.
| Modifiers | FStatModifier Array | Holds one or more stat modifiers that are applied when the item is equipped or used (e.g., increasing health, armor, or other stats). |
FItemFragment_UI. Adds UI display functionality to an item.
| Name | FText | The display name of the item. |
| Description | FText | A description of the item. |
| SmallIcon | Texture2D Soft | The small icon used in inventory lists or quick slots. |
| BigIcon | Texture2D Soft | The larger icon used in detailed UI views. |
| FilterType | EItemCategory | Defines the item’s category for filtering in the inventory (e.g., Weapon, Ammo, Armor, Potion). |
FItemFragment_Usable. Adds “use” functionality to the item.
| UsableFragments | | Holds one or more usable fragments, defining what happens when the item is used (e.g., restore health, add ammo, teleport). |
FItemFragment_Weapon. Adds weapon functionality to the item.
| WeaponTag | GameplayTag | Identifies the weapon type with a tag. |
| Weapon | PDA Weapon | Reference to the weapon’s primary data asset. |
Data – Item Usable Fragments
FUsableItemFragment_AmmoPack. A special usable fragment that adds ammo when the item is used (e.g., for Ammo Packs).
| AmmoTypes | | Specifies which ammo types this item affects. |
| Amount | int32 | The amount of ammo added when the item is used. |
FUsableItemFragment_Health. A usable fragment that restores health when the item is used (e.g., potions).
| HealthToAdd | float | The amount of health restored when the item is used. |
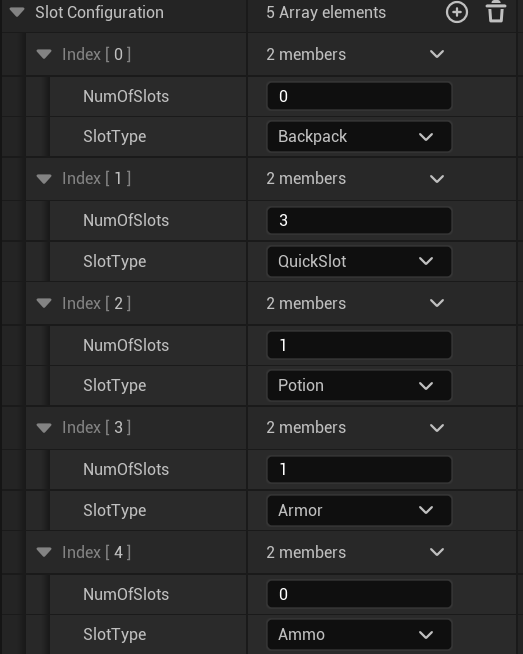
Data – FInventorySlotConfig
Defines the configuration of slots for an inventory, specifying how many slots it has and what type each slot is. The InventoryComponent holds an array of this struct.
| NumOfSlots | int32 | The number of slots of this type in the inventory. |
| SlotType | EInventorySlotType | The type of slot (e.g., Backpack, Armor, QuickSlot, Potion, Ammo). |
Data – Variables
List of Inventory Component variables.
| SlotConfiguration | FInventorySlotConfig Array | Defines the slots supported by this inventory. |
| HoldingRestItems | FInventoryItem Array | Stores items that are not ammo or quick-access items. |
| HoldingAmmoItems | FInventoryItem Array | Stores ammo-type items for quick access and management. |
| HoldingQuickSlotItems | FInventoryItem Array | Stores quick-access items, such as weapons or consumables. |
| CurrentEquippedWeapon | UItemDefinition | References the currently equipped weapon. |
| WeaponStates | TMap<FGuid, FSingleWeaponItemState> | Stores per-weapon state data, such as ammo, cooldown, and overheat information. |
| CurrentEquippedWeaponItem | FInventoryItem | Represents the inventory item that is currently equipped. |
Data – Events
These events are used by the owning actor (eg. player) or UI to respond to inventory changes and actions.
| OnItemEquipped | Triggered when an item is successfully equipped. |
| OnItemUnequipped | Triggered when an item is unequipped. |
| OnWeaponEquipRequest | Fired when a weapon equip request is initiated. |
| OnWeaponDequipRequest | Fired when a weapon dequip request is initiated. |
| OnInventoryUpdated | Triggered when the inventory content changes. |
| OnItemUsed | Fired when an item is used. |
Functions – Add/Remove
These functions handle creating, adding, and removing items from the inventory.
Let’s describe the process of adding an item to the inventory. Take a look at this diagram.
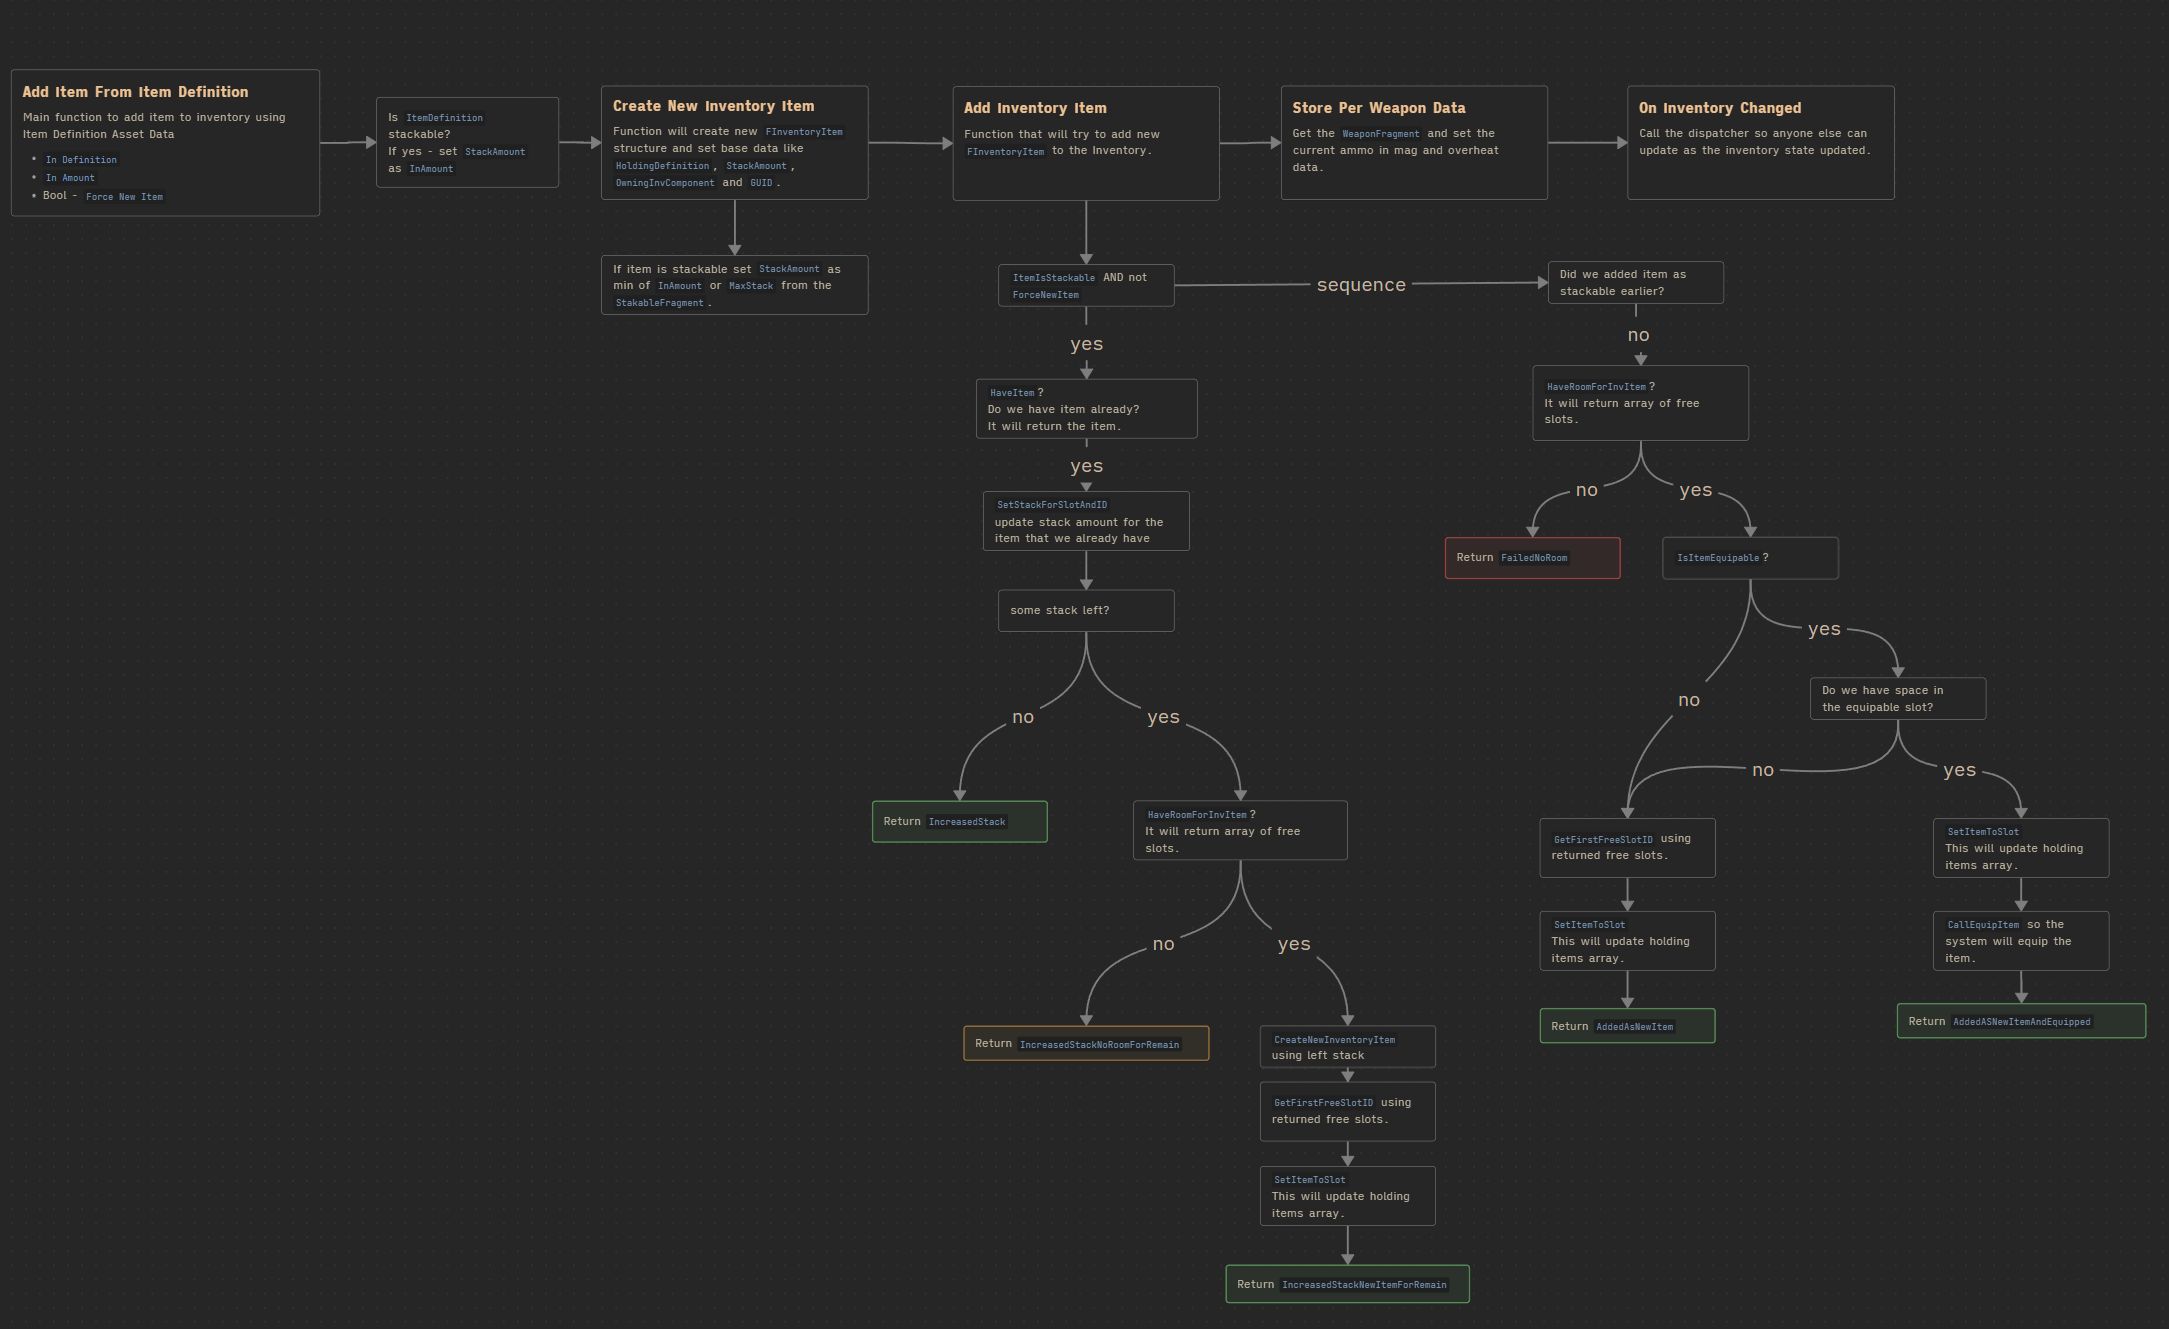
Since we are using slots and items can be stackable, adding something to the inventory isn’t straightforward. We need to check several conditions:
- If the item is stackable:
- Do we already have this item?
- Yes → Update the stack amount of the existing item.
- If there’s still a remaining stack → Create a new item and add it with the leftover amount.
- Do we already have this item?
- If not added item as stackable
- Do we have room for a new inventory item?
- Is the item equipable?
- Yes → Do we have space in the equipable slot?
- Yes → Place the item there.
- No → Place it in the first available free slot.
- No → Place it in the first available free slot.
- Yes → Do we have space in the equipable slot?
- Is the item equipable?
- Do we have room for a new inventory item?
HaveItem. (link)
This function returns true if the inventory already contains the item. It also returns the item itself using its ItemDefinition.
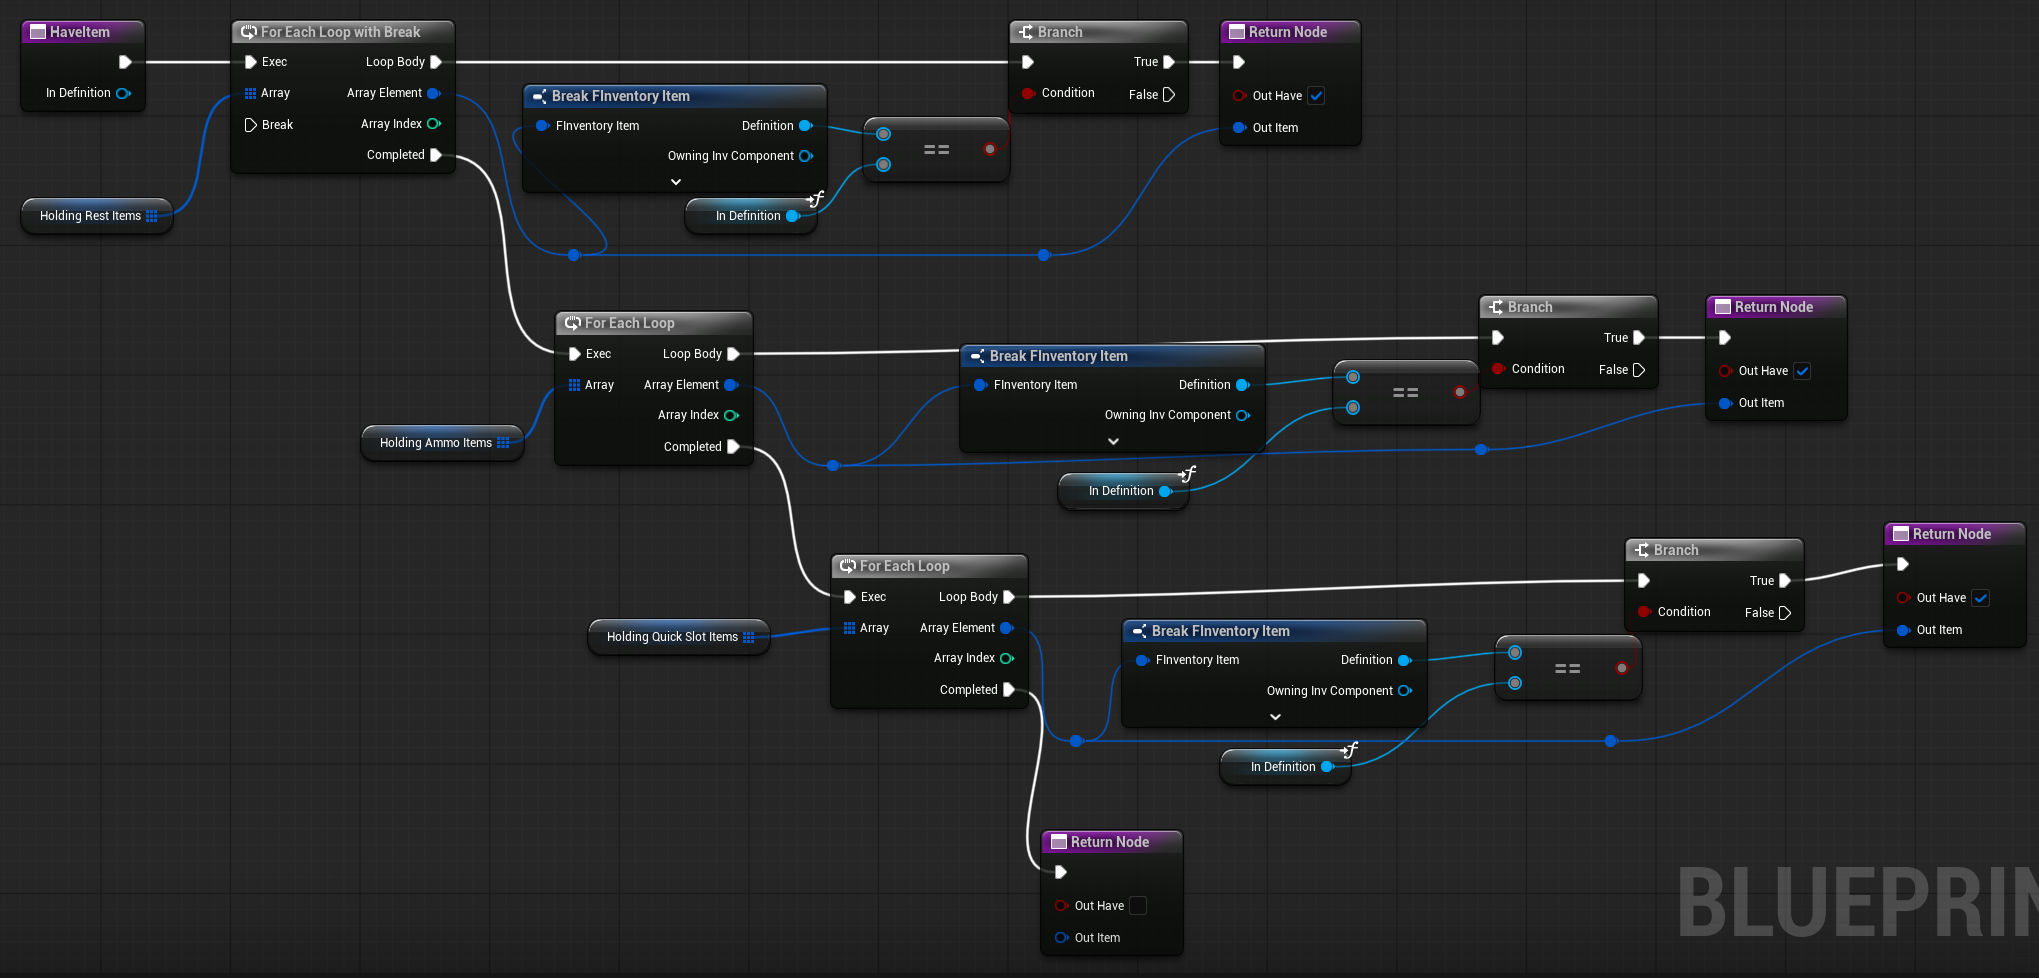
As you can see, we need to iterate over three different arrays. This is because the backpack can be infinite, while ammo and quick slots are stored in separate arrays. Separating them allows faster iteration when performing specific queries (e.g., checking for ammo).
💡 Note: Some inventory systems store the item type as a variable inside the item itself and then iterate over all inventory items. (not separating arrays) This approach works well if you have a fixed number of inventory slots—for example, 50 slots, similar to a Diablo-style inventory.
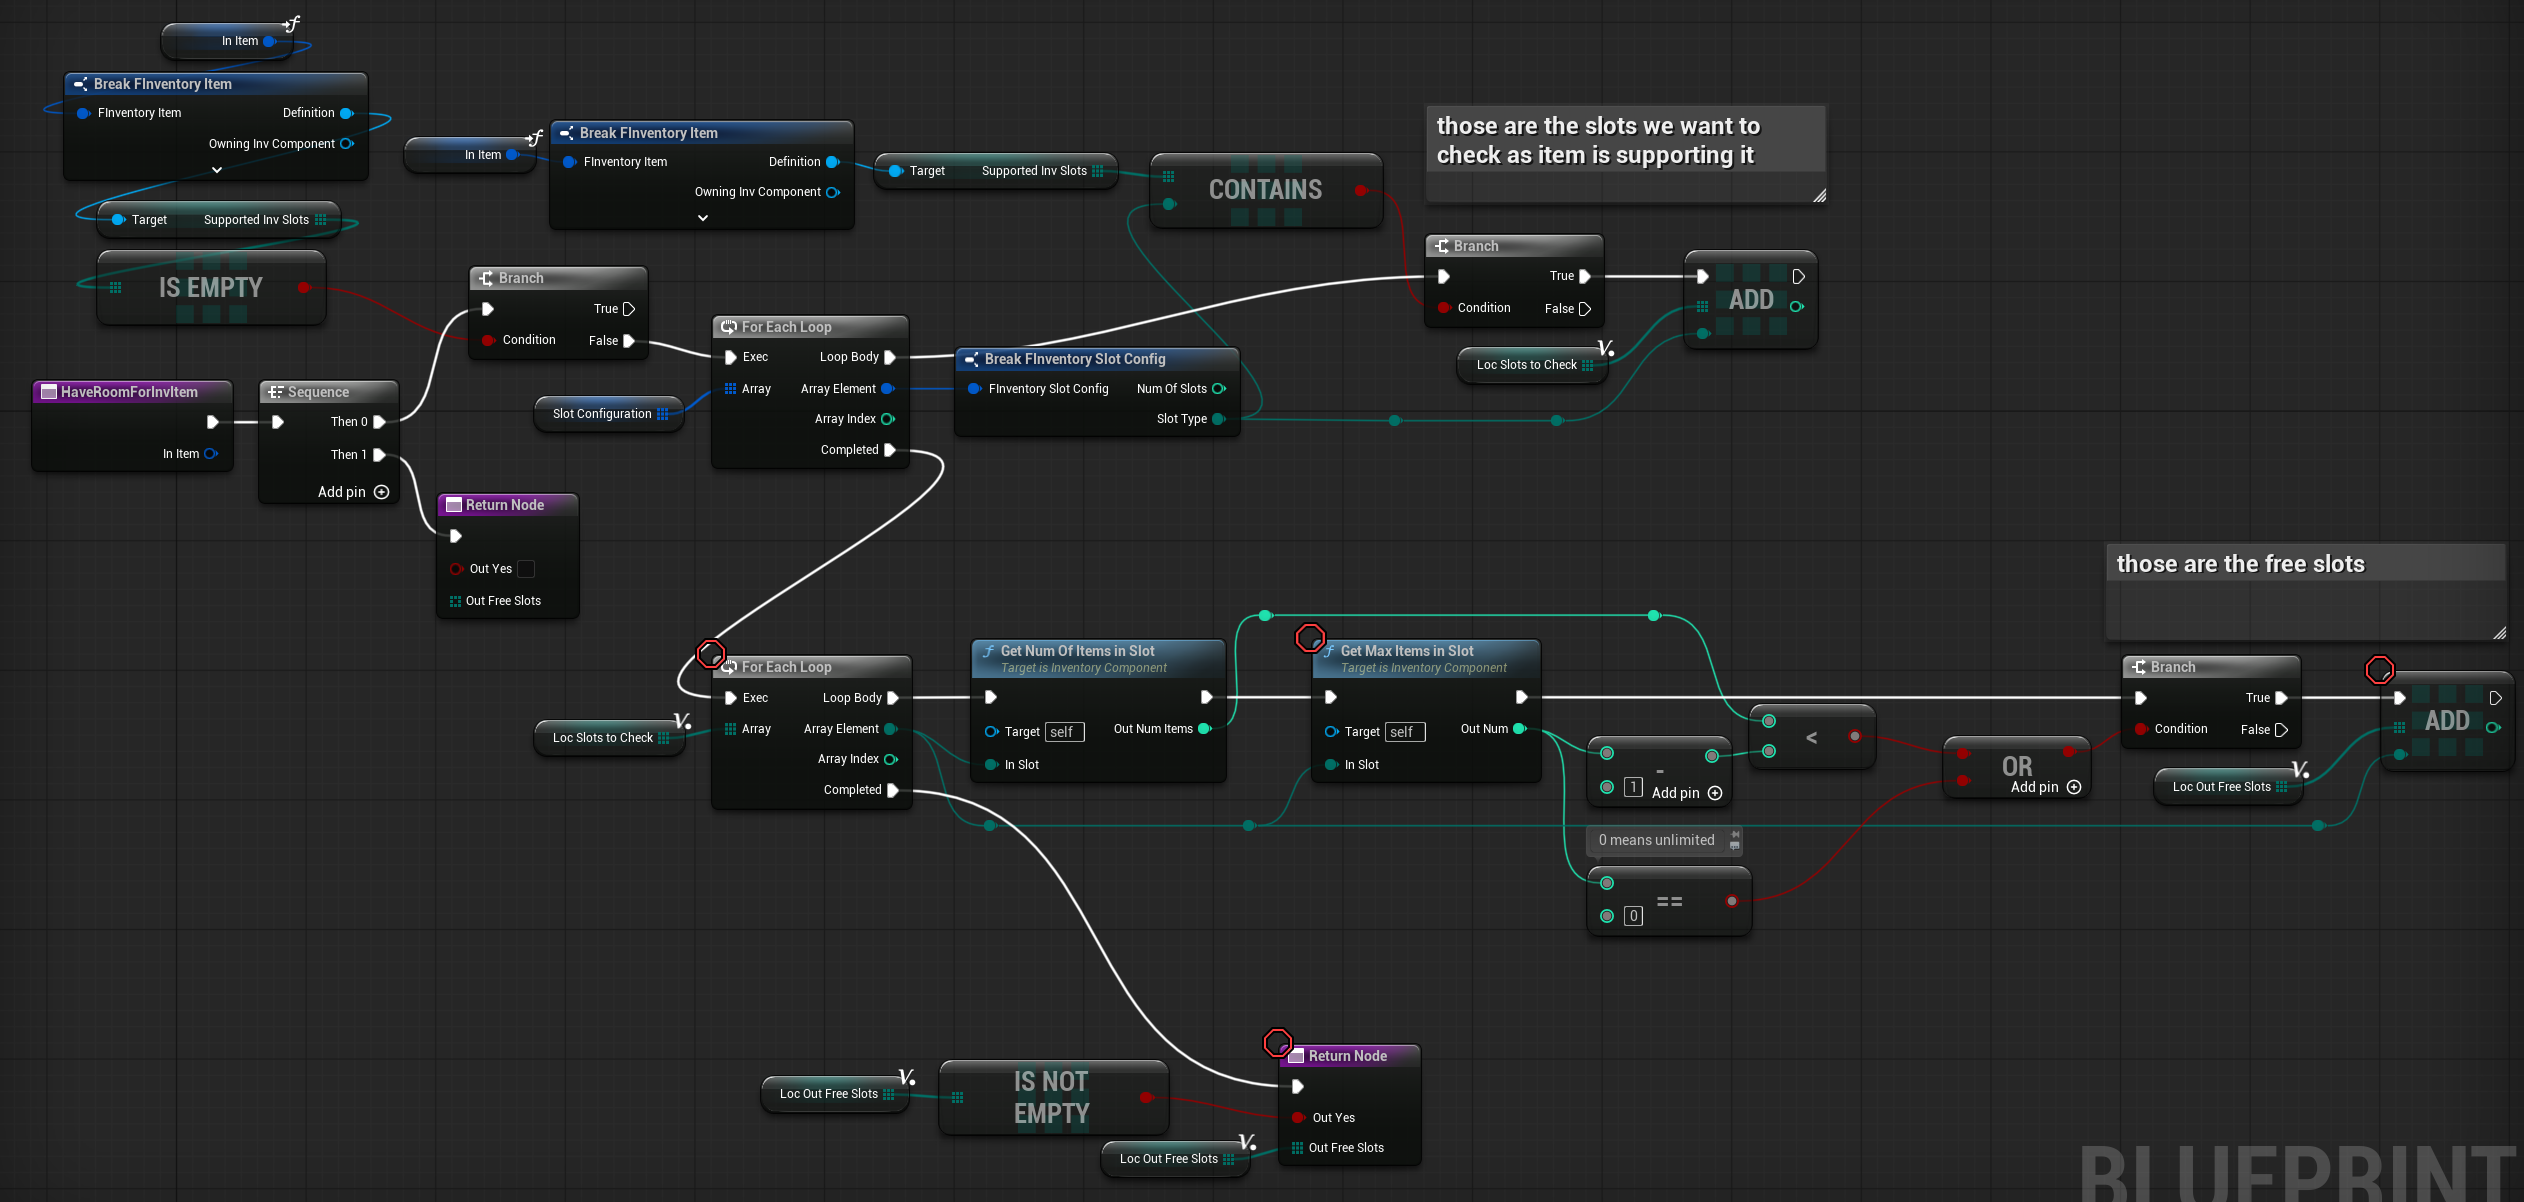
HaveRoomForInvItem (link)
This function returns true if there is room for the item in the inventory. It also returns an array of the available free slots.
AddToInventoryFromDefinition ( link )
This is the main function for adding an item to the inventory component using its item definition (primary asset data).

It performs the following steps:
- Checks if the item is stackable and sets the corresponding stack amount.
- Creates a new
FInventoryItemstructure and initializes its parameters (inventory component, GUID, stack amount, etc.). - Attempts to add the item to the inventory using the flow described earlier.
- If the item is a weapon, stores the weapon state data.
- Calls the update dispatcher so other systems know that the inventory was updated.
💡 Note: An enum is used to determine the type of result returned. This makes it possible to handle different outcomes later—for example, if the stack increased but there is still leftover – I could spawn the item with left stack on the ground.
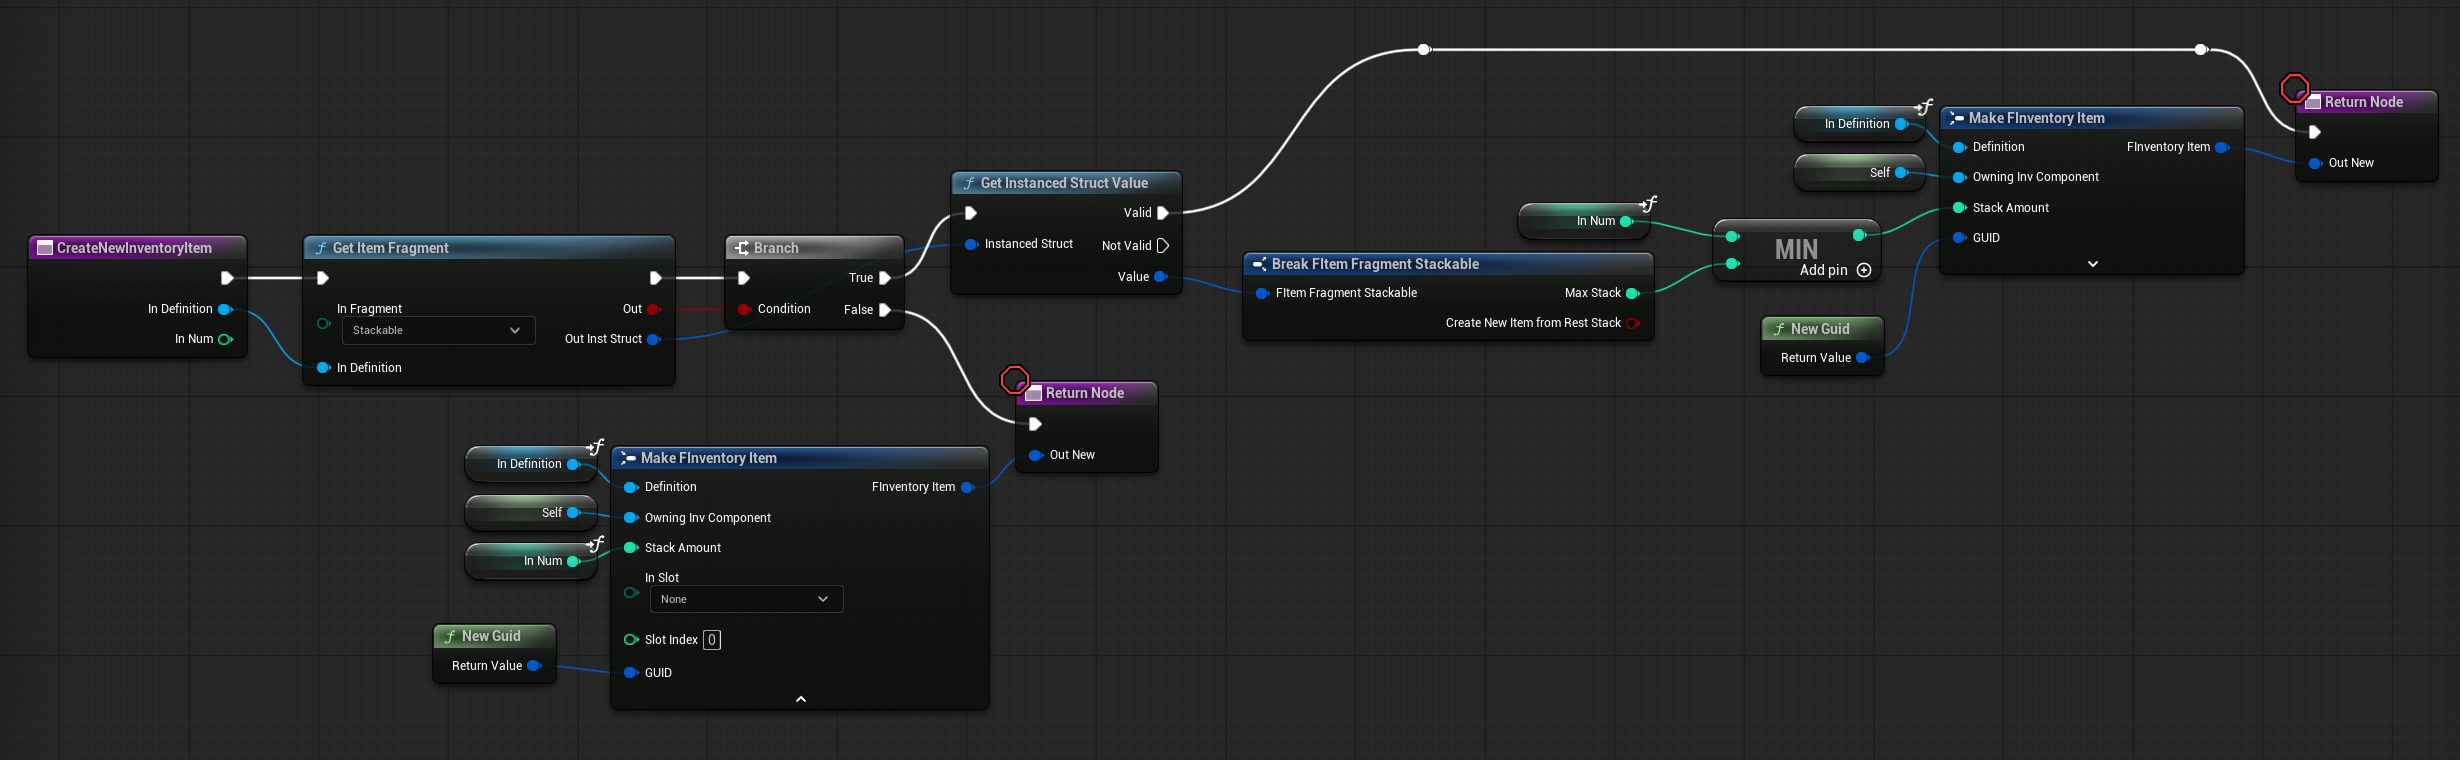
CreateNewInventoryItem ( link )
This function creates a new FInventoryItem, initializes its basic parameters, and returns the struct for later use (e.g., assigning slots).
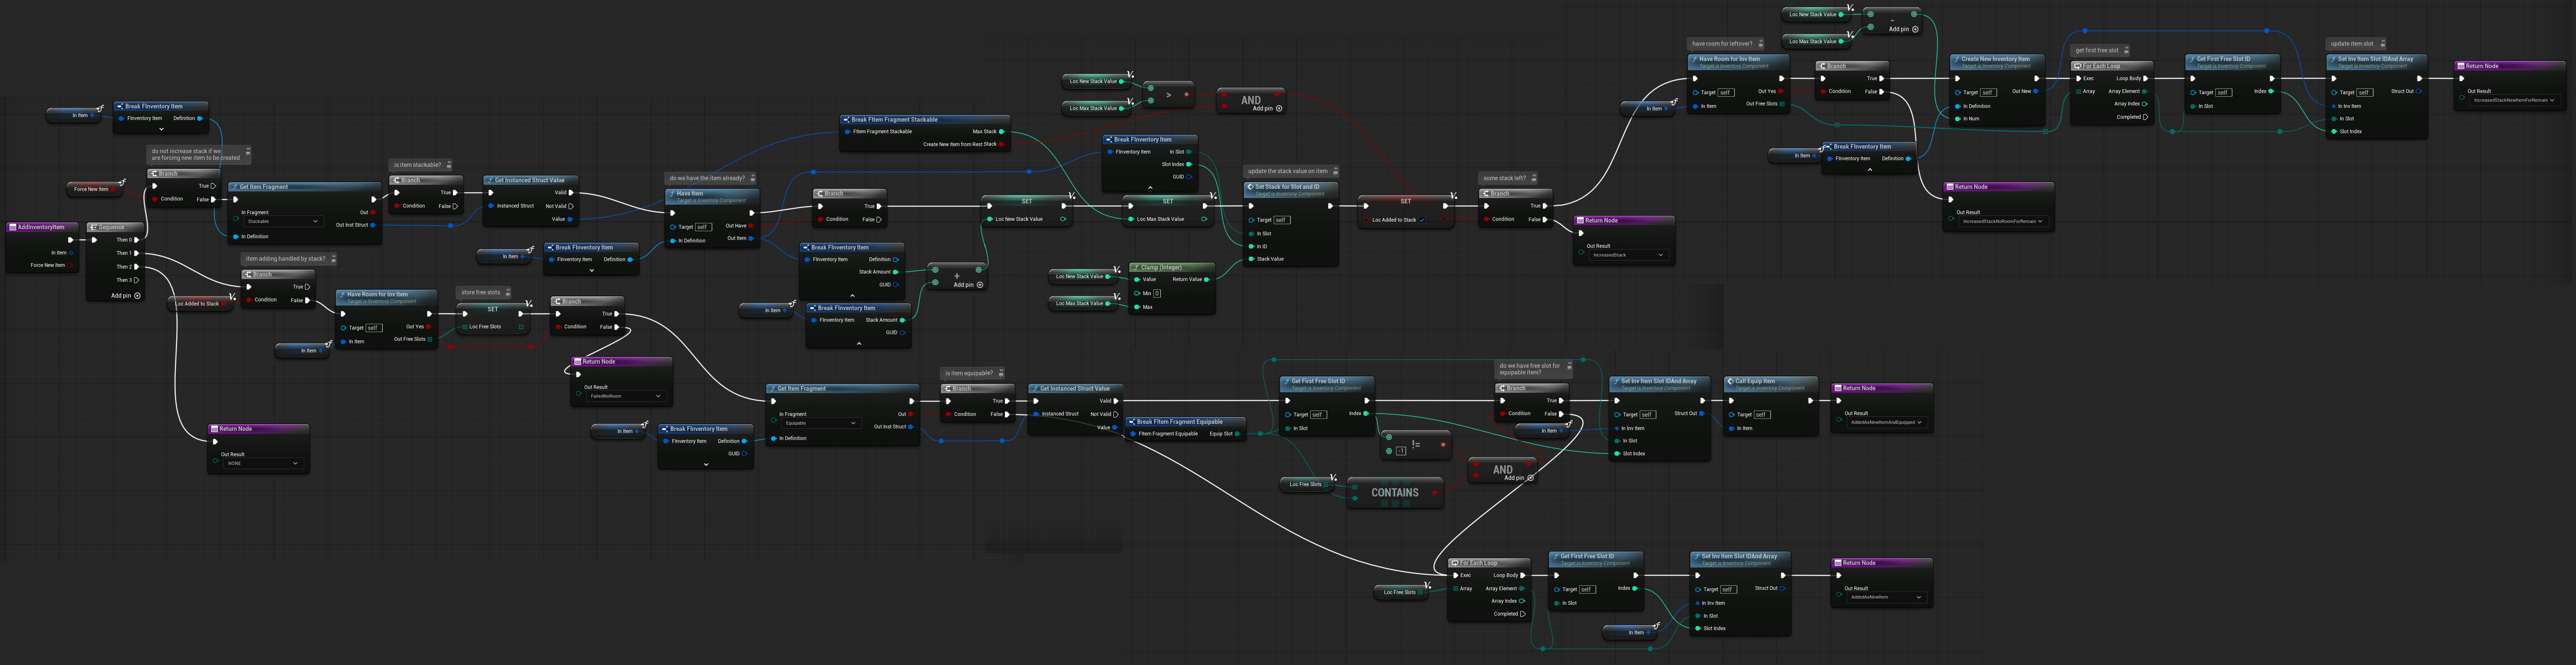
AddInventoryItem ( link )
This is the main function for adding an FInventoryItem into the inventory slots. Refer to the earlier graph for a detailed overview of the flow.
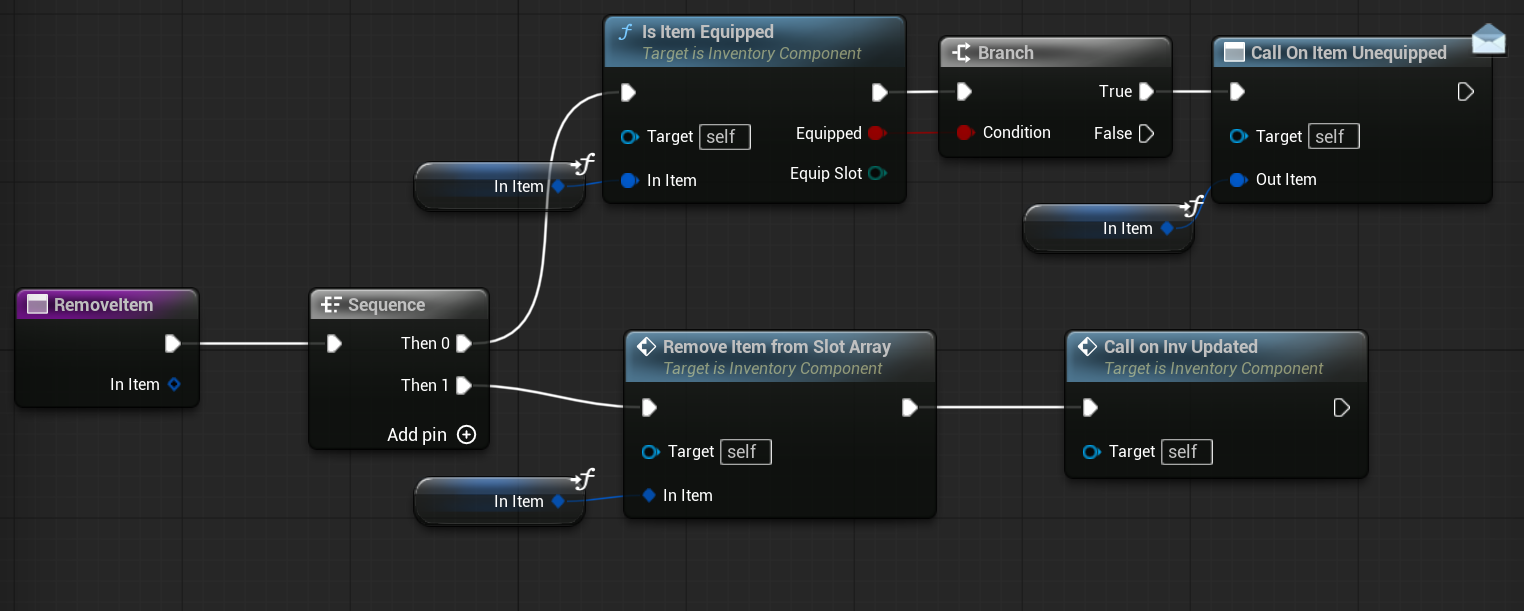
RemoveItem ( link )
This function removes an item (FInventoryItem) from the inventory. If the item is currently equipped, it also updates the system to indicate that the item has been unequipped.
Functions – Slot
These functions are responsible for moving, removing, and setting items within the inventory slots.
Before diving into the details, let’s analyze the logic for moving an item from one slot to another.
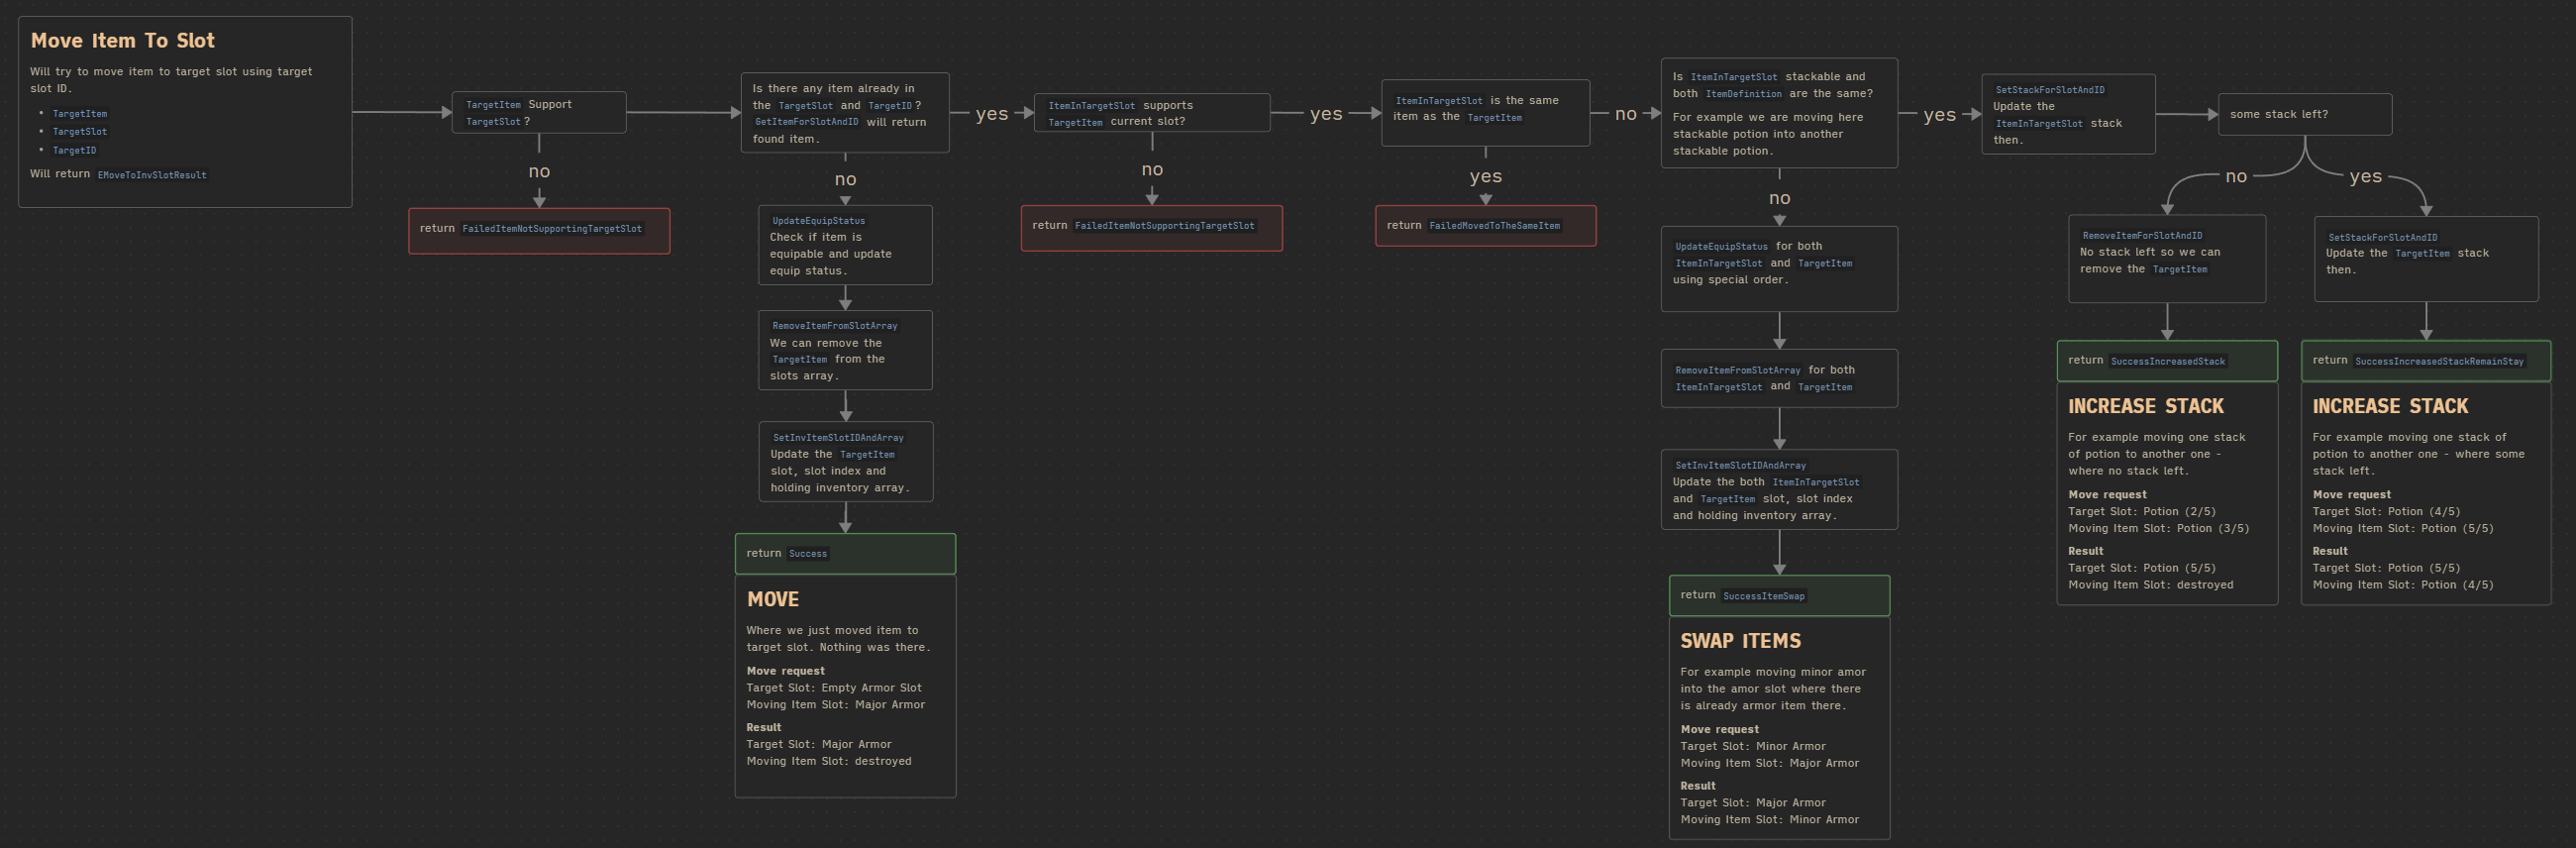
As you can see, it’s not that simple because we need to handle several cases:
- Moving an item to a slot that already contains another item.
- Handling stackable items and checking if we can increase the stack.
- Updating equip/unequip status if necessary.
- Swapping items between slots.
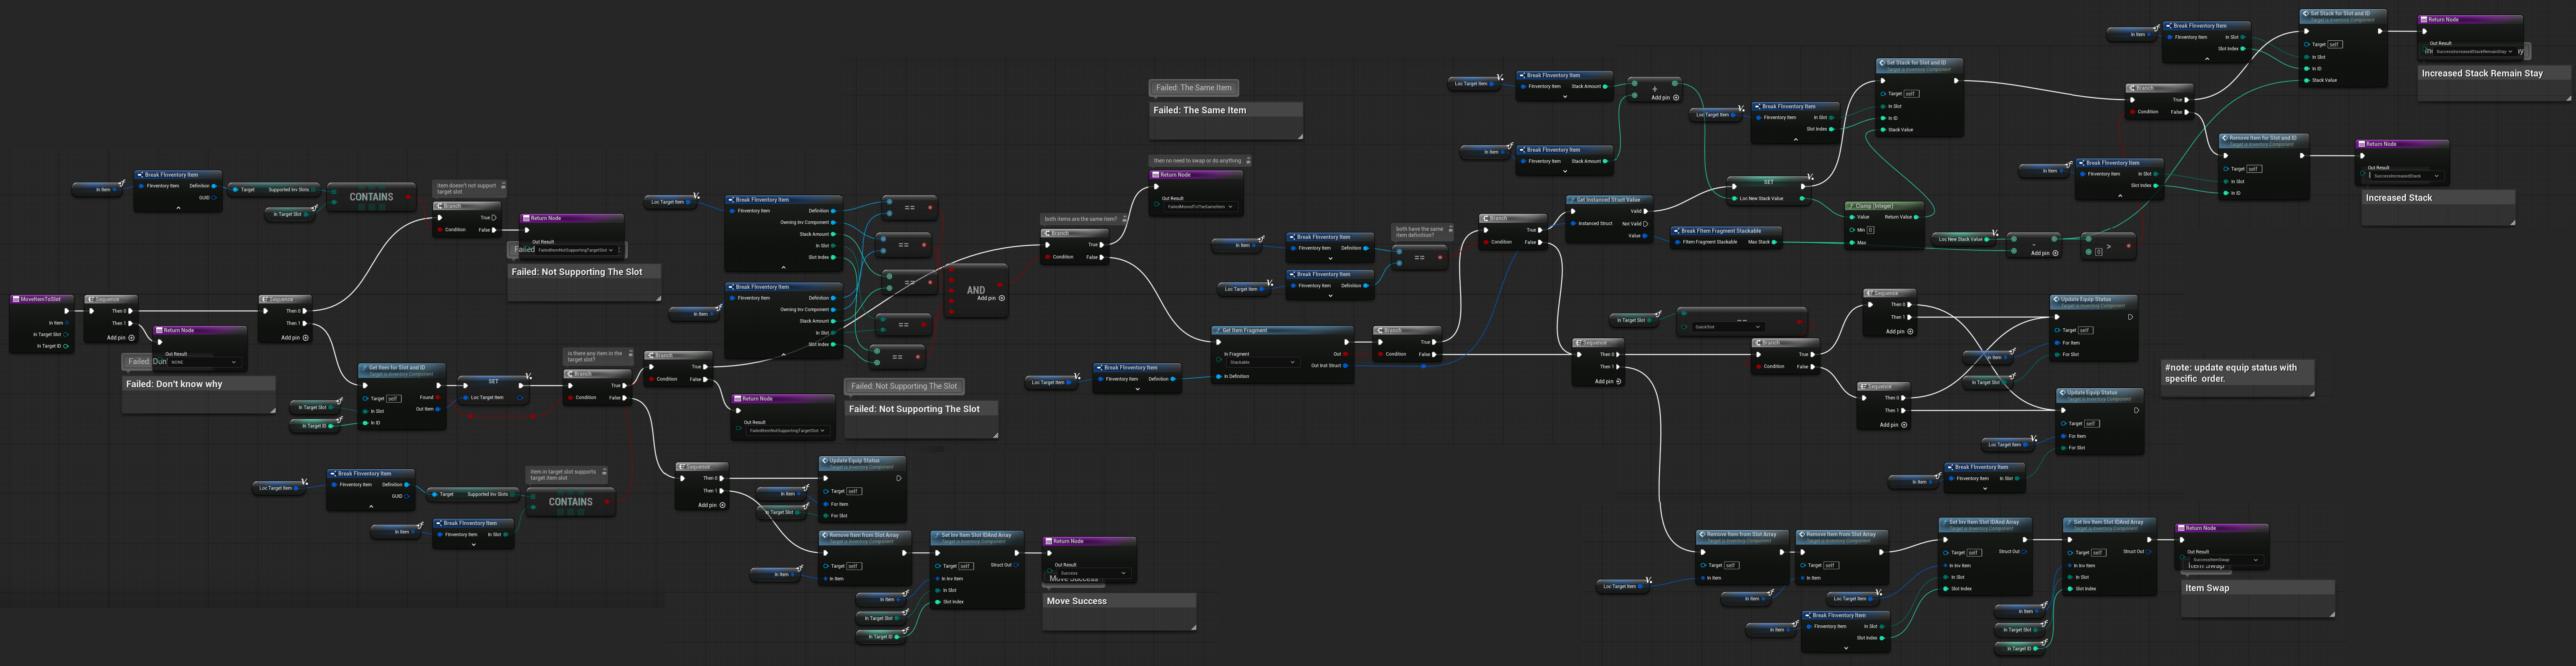
MoveItemToSlot ( link )
This is the base function for moving an item to a target slot. It handles all the logic described in the diagram, including stack checks, swapping, and updating equip/unequip status.
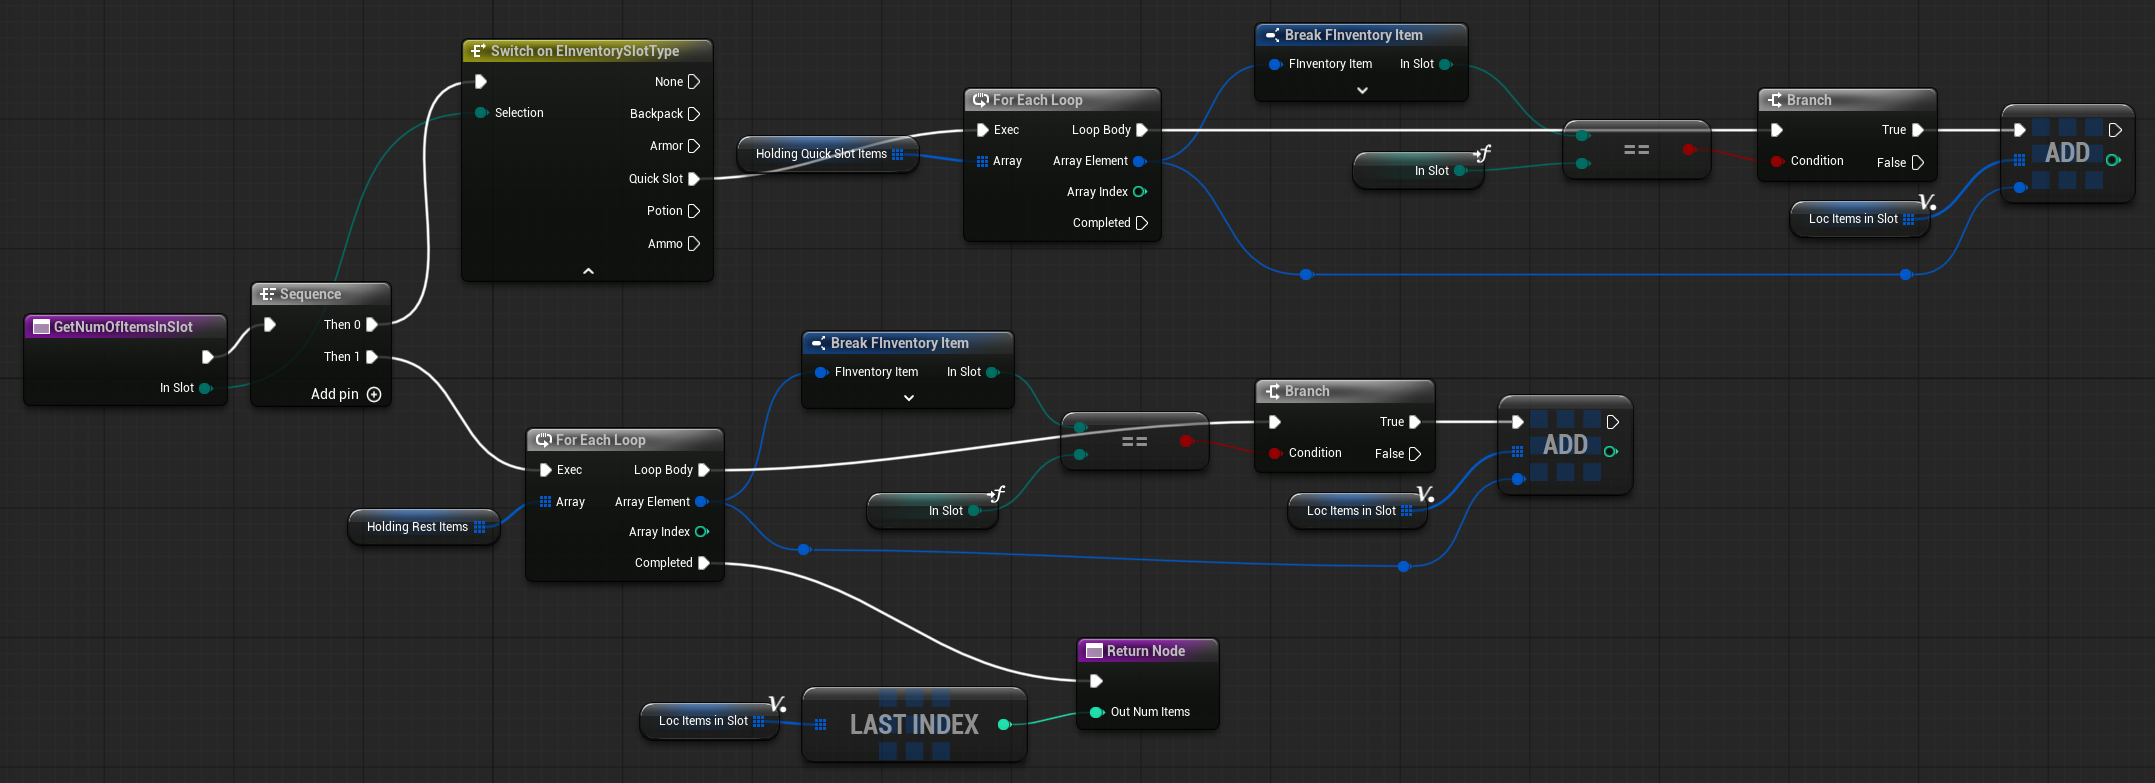
GetNumOfItemsInSlot ( link )
This function returns the number of items in the target slot. Currently, it only counts items in quick slots, but if you want to support multiple armor slots (or other types), this function should be updated accordingly.
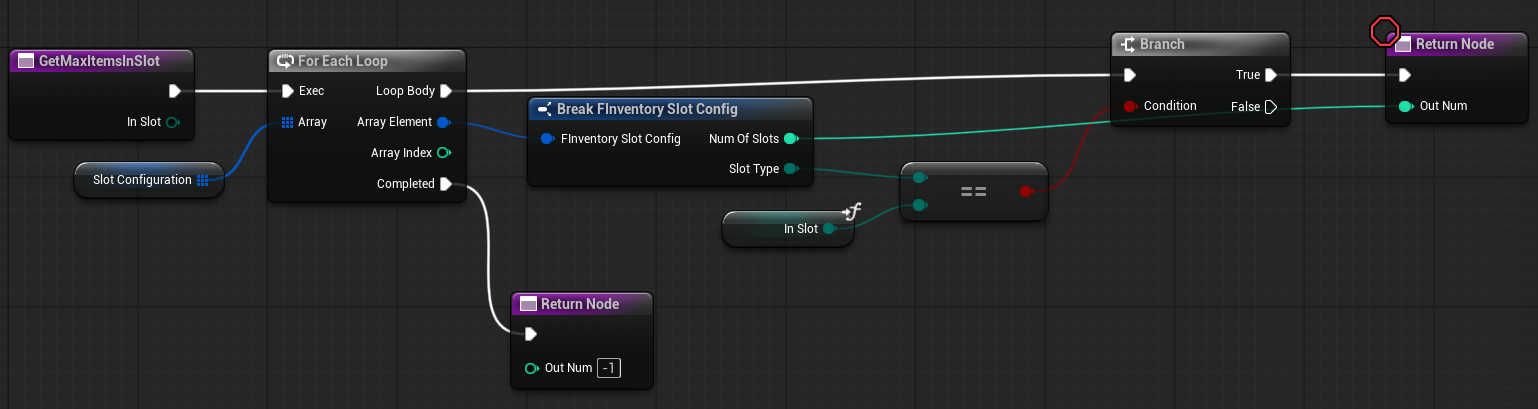
GetMaxItemsInSlot ( link )
This function returns the maximum number of items that can be stored in the target slot. A return value of 0 indicates that the slot has unlimited space.
GetFirstFreeSlotID ( link )
This function returns the first free slot ID for the target slot.
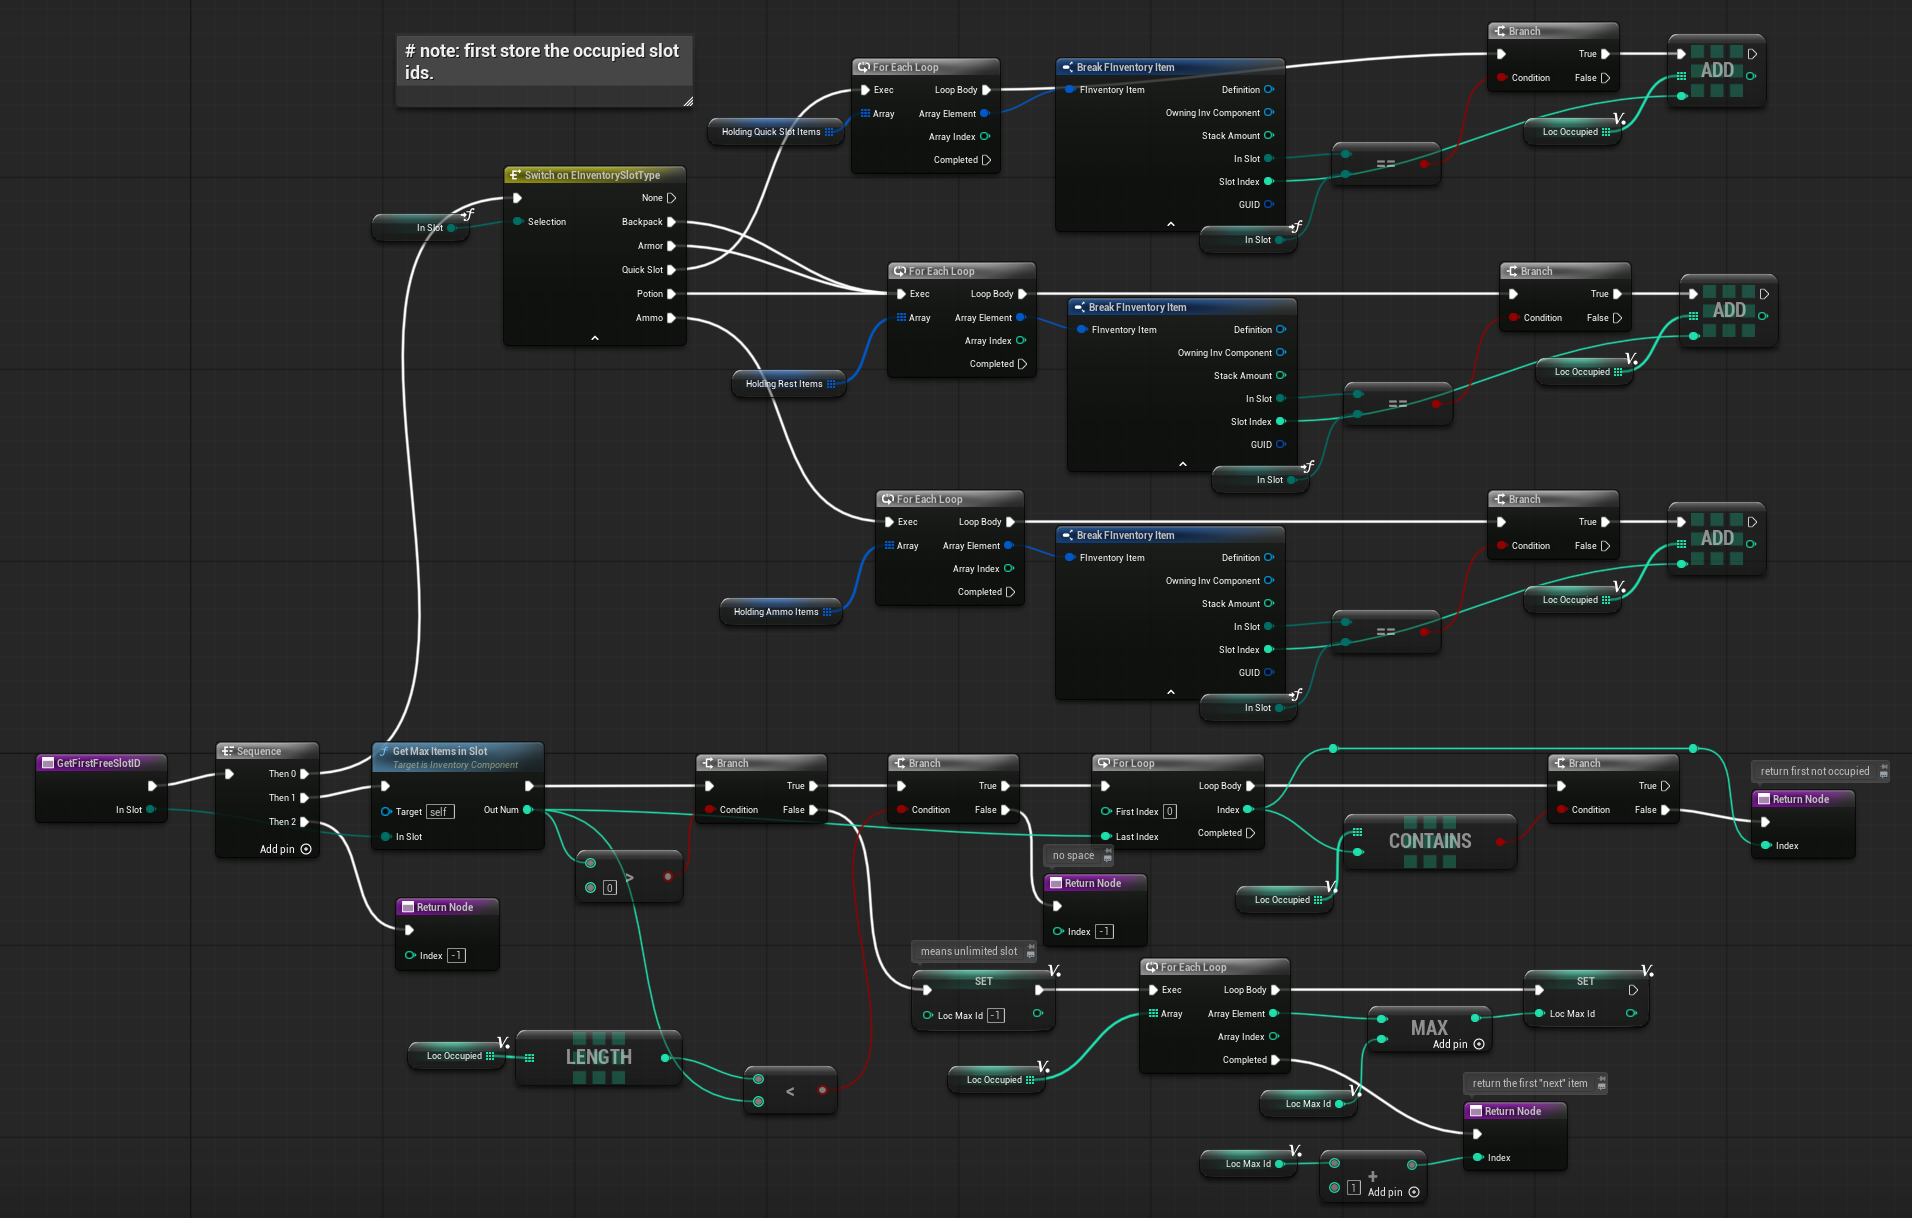
The logic works as follows: we first get the IDs of all occupied slots and then iterate over them to find the first unoccupied slot. If the slot has unlimited capacity, it will return the last slot.
💡 Note: This function would be simpler in C++, where we can work directly with struct arrays by reference.
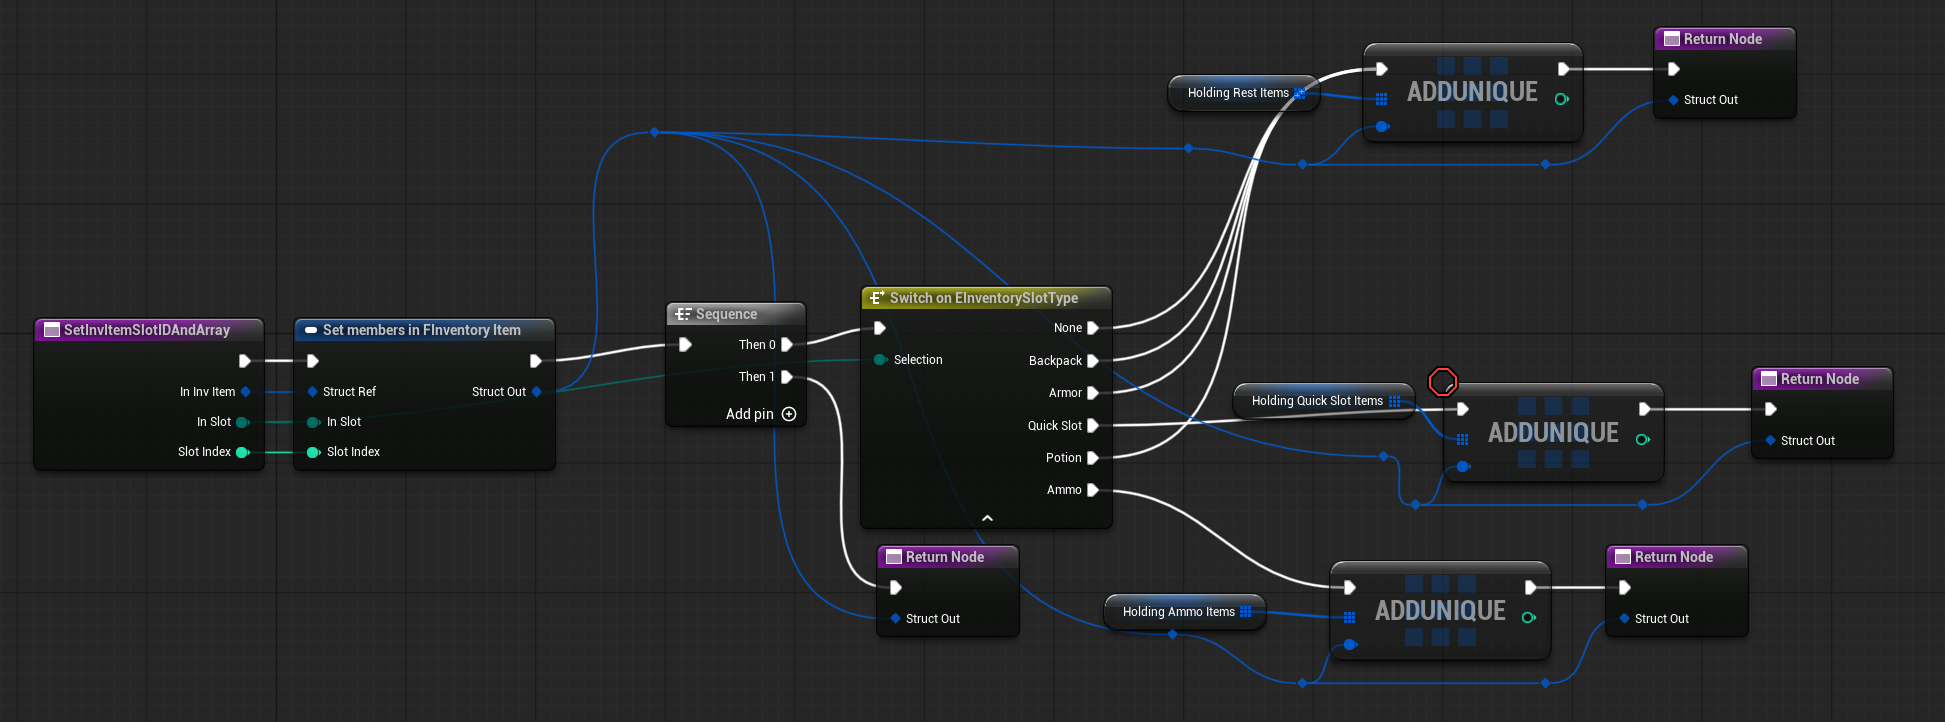
SetInvItemSlotIDAndArray ( link )
This function takes an FInventoryItem, sets its slot and slot index, and adds it to the appropriate inventory item array.
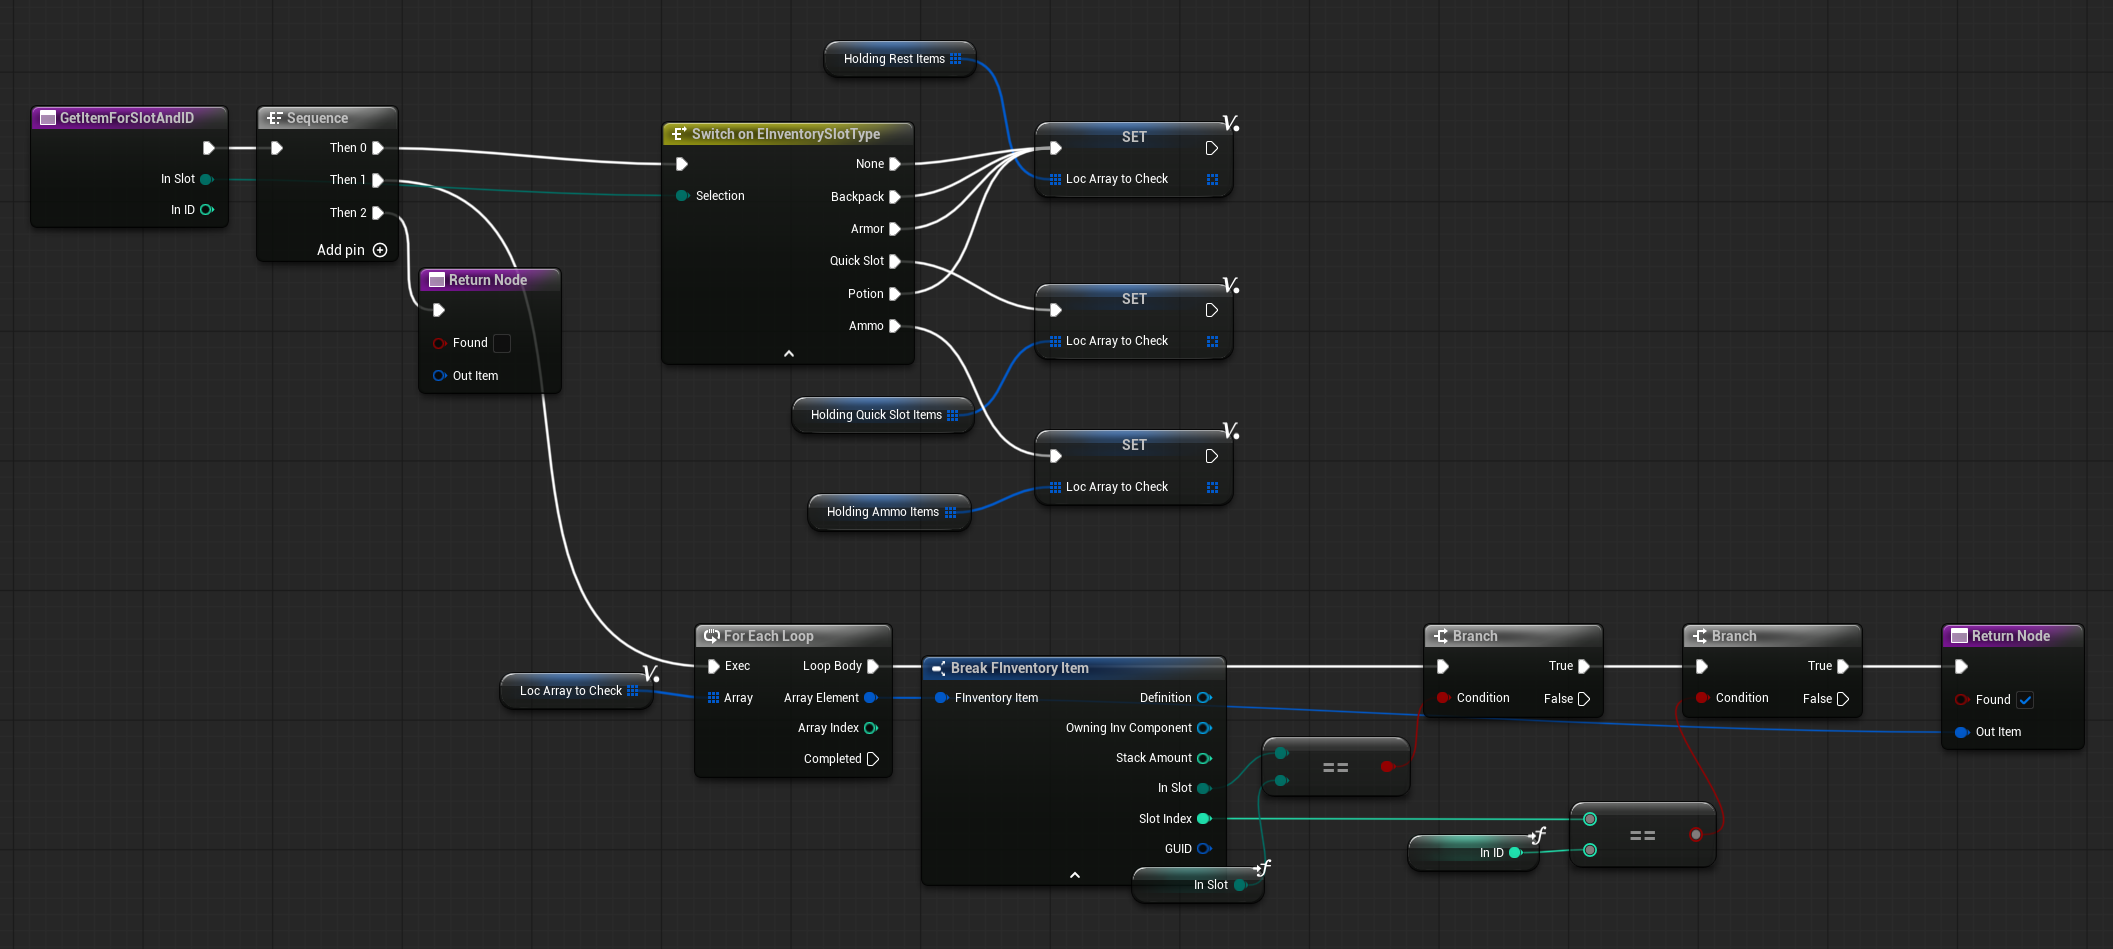
GetItemForSlotAndID ( link )
This function retrieves the item located in the specified slot and slot ID, if one exists.
RemoveItemFromSlotArray ( link )
This function removes the target item from a specific inventory array.
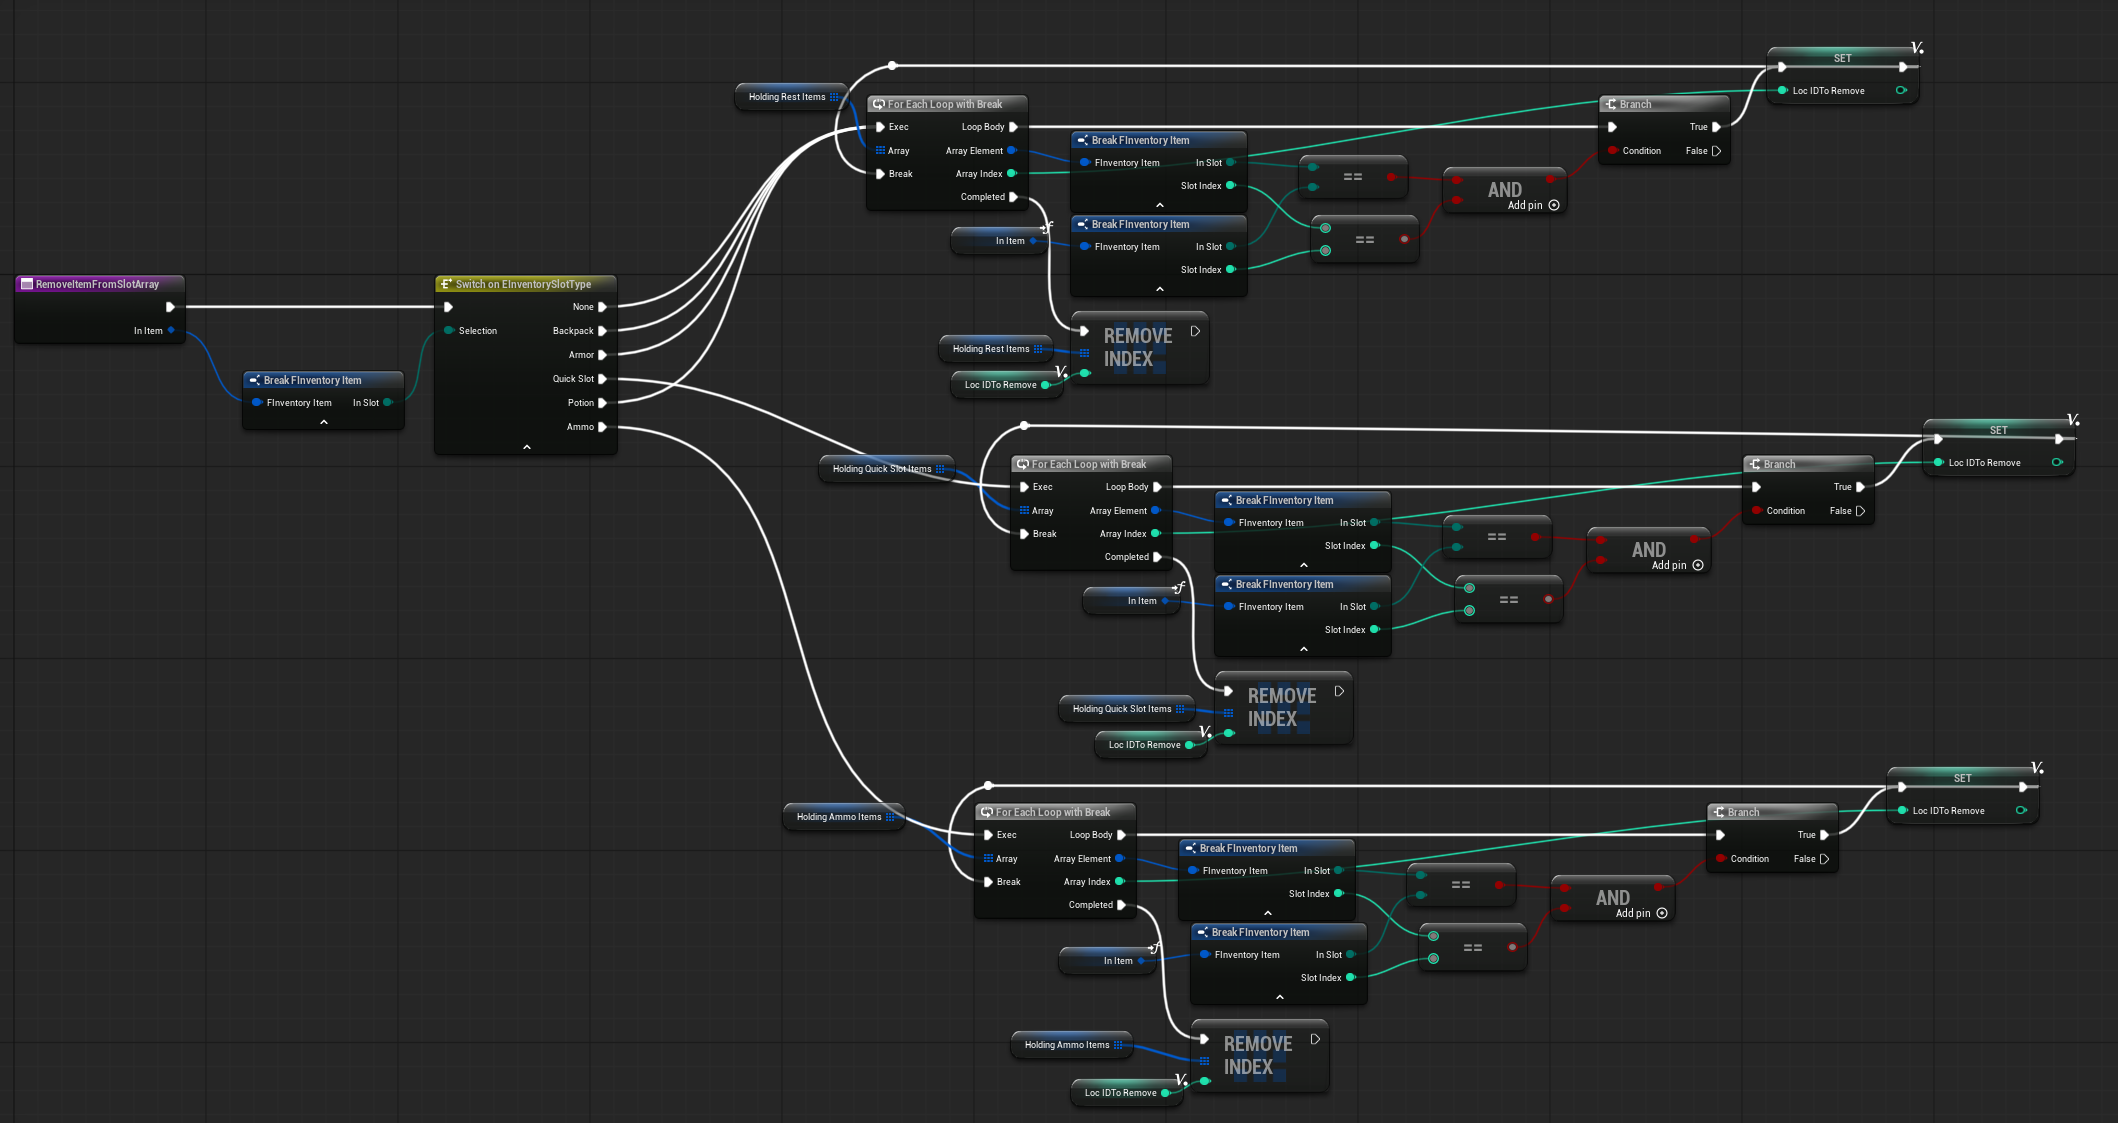
The implementation uses a for-each loop with a break to exit the loop before removing the item from the array, ensuring safe removal without indexing issues.
💡 Note: While modifying an array during a for loop might not cause issues in Blueprints, it’s not a good practice. That’s why I’m using break here. I could return immediately after finding the item and remove it inside the loop, but I chose not to. Doing so can lead to subtle, hard-to-find bugs later.
SetStackForSlotAndID ( link )
This function will set the stack amount for an target slot and ID.
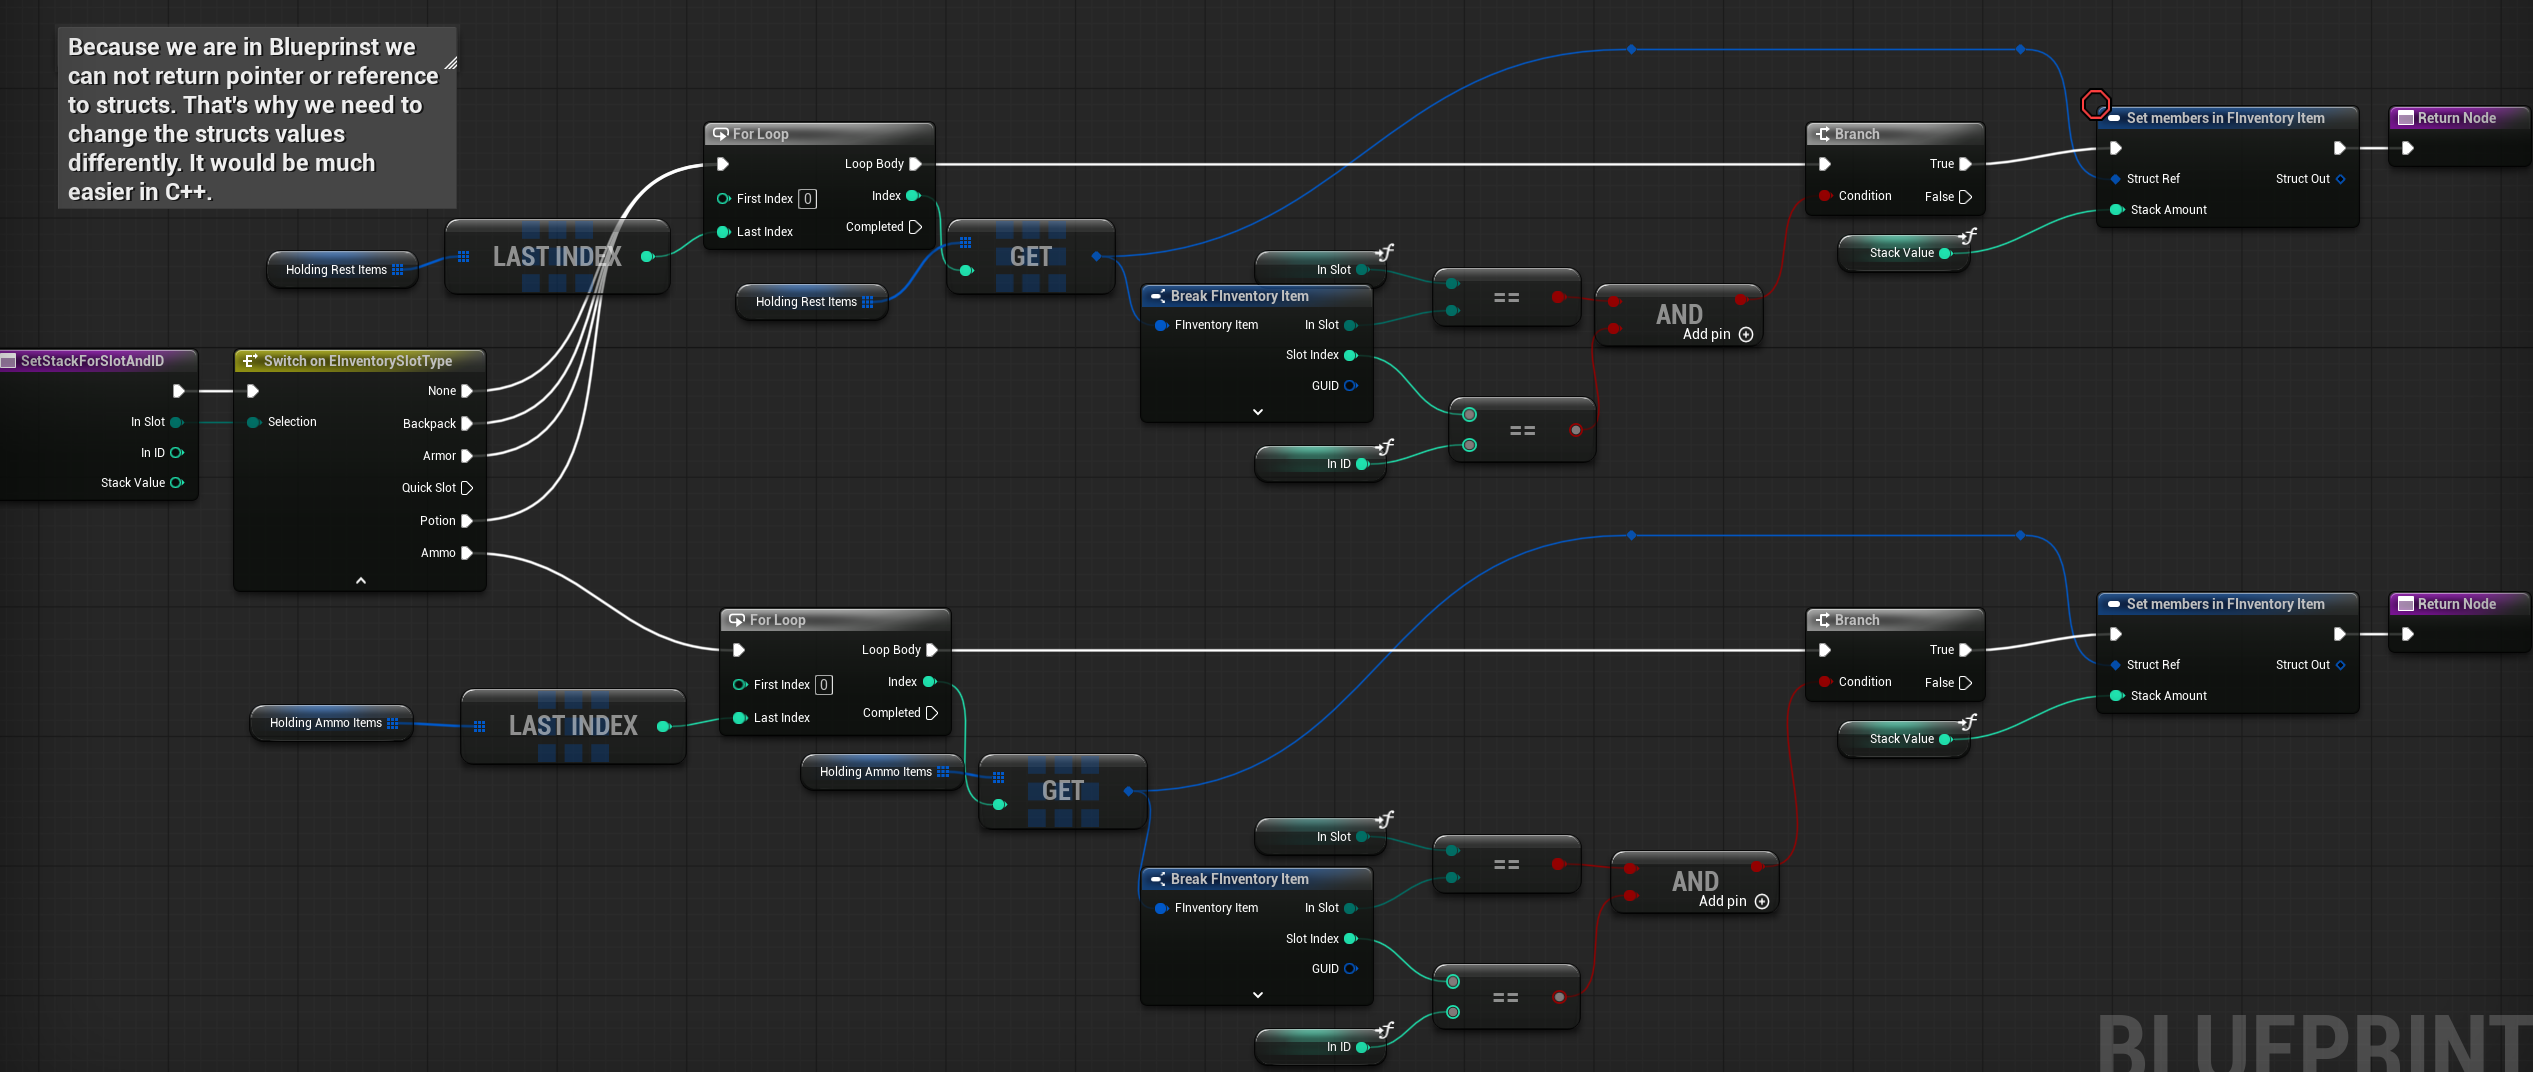
💡 Note: When using a For Each Loop on a struct array in Blueprints, you are working with copies of the structs, not references. This means you cannot modify the original values directly. In C++, you can choose to loop using either references or copies. In Blueprints, if you want to work with the actual struct array, you need to use a For Loop instead of a For Each Loop. This is a good example of why C++ is often better for handling struct arrays, allowing you to create simple functions that can then be safely called from Blueprints.
RemoveItemForSlotAndID ( link )
This function removes an inventory item from the specified slot and slot ID.
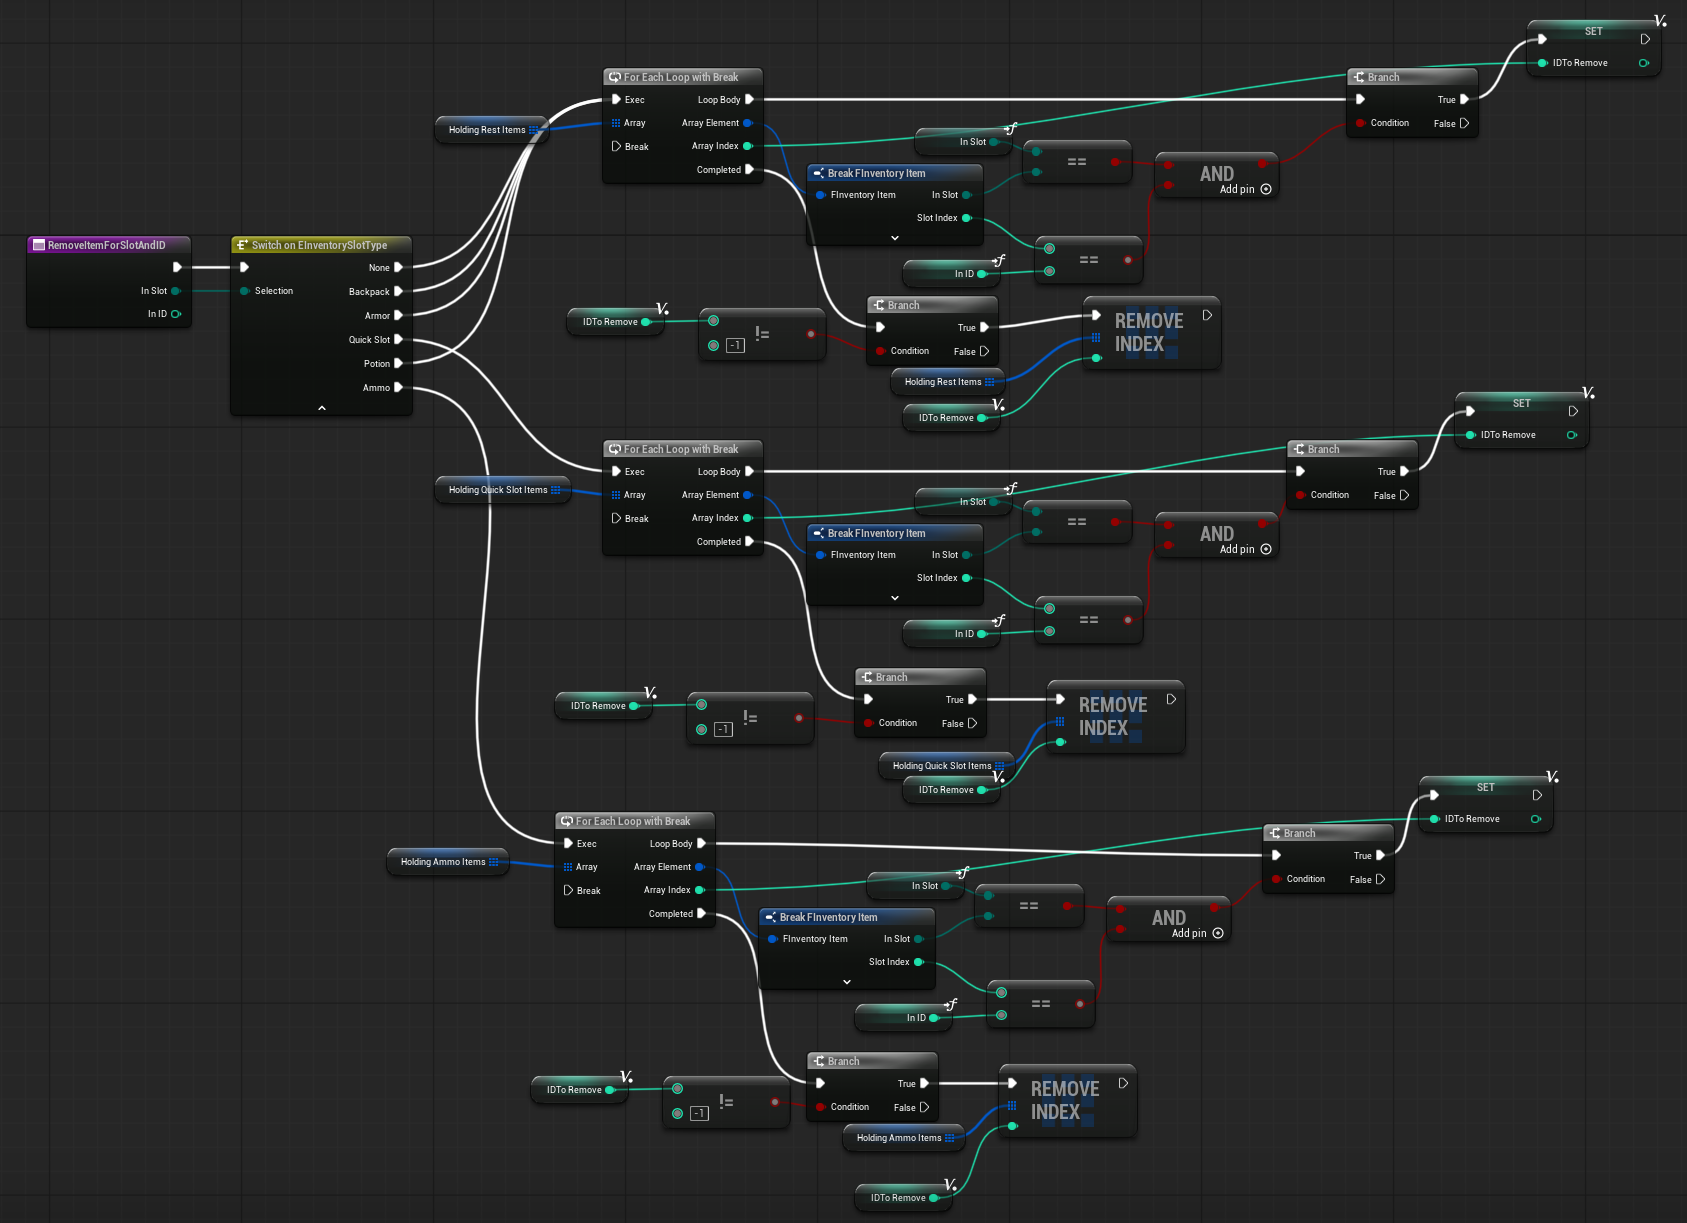
As before, because items are stored in separate arrays, each array needs to be checked individually. If you store all items in a single array, this function could be simpler.
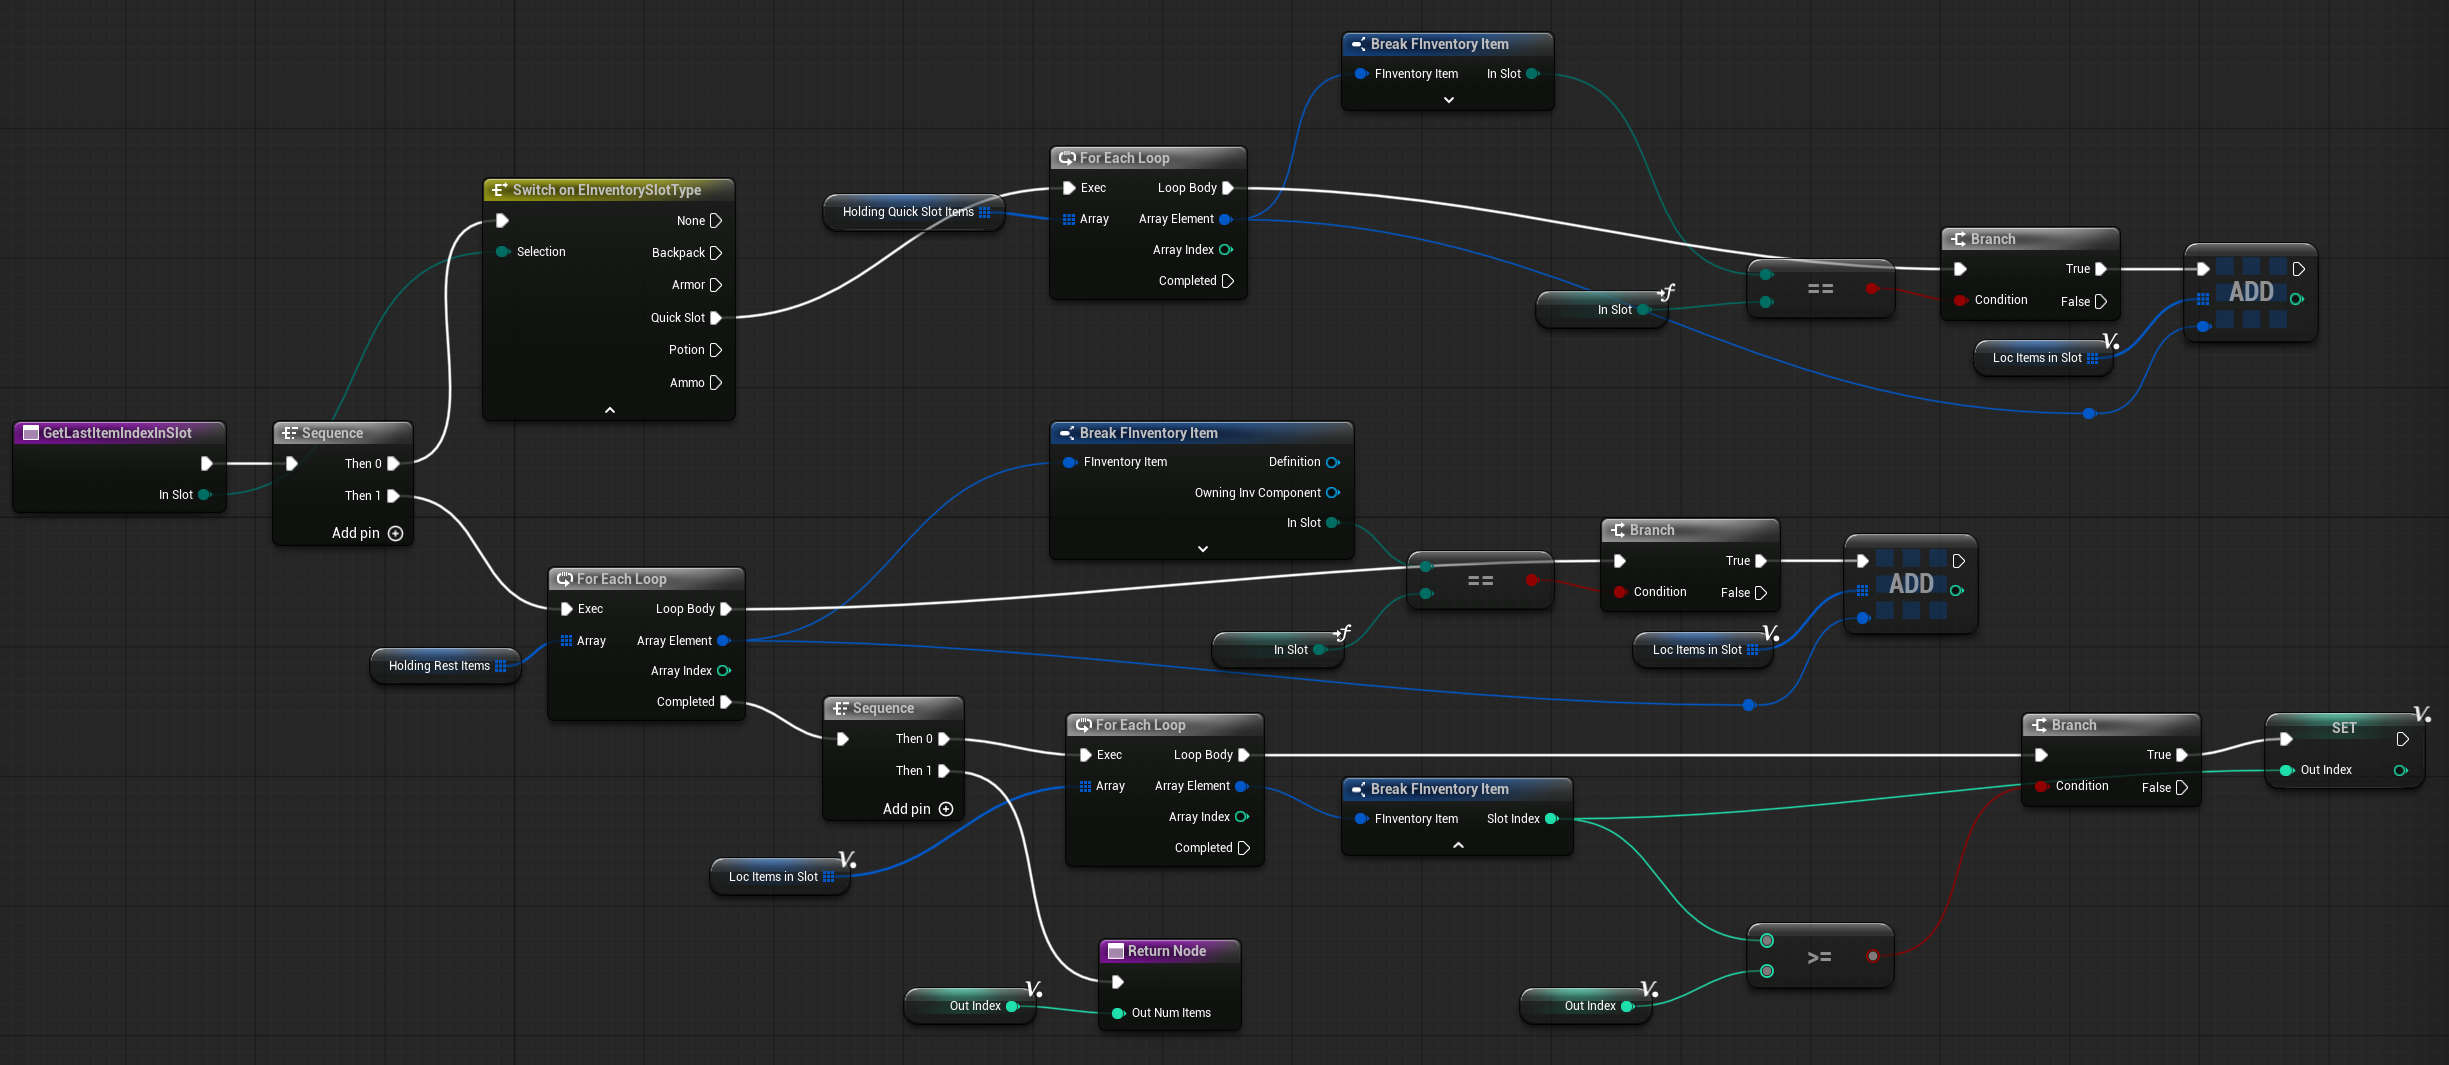
GetLastItemIndexInSlot ( link )
This function returns the last slot index used in the specified target slot.
Functions – Events
CallEquipItem ( link )
This function simply calls the OnItemEquipped dispatcher and OnInventoryUpdated.
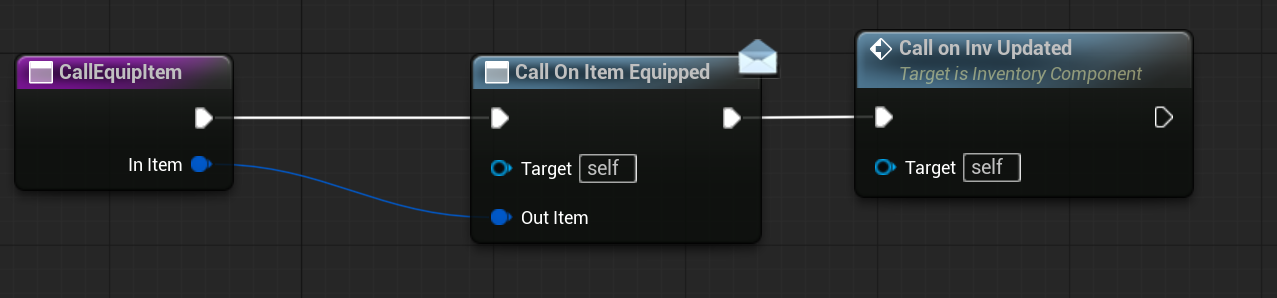
💡 Note: It’s a good practice to avoid calling dispatchers directly within your main functions. Instead, create a separate function to handle dispatcher calls—this makes debugging much easier later on.
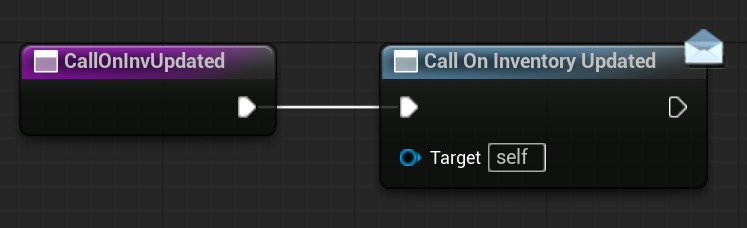
CallOnInvUpdated ( link )
This function simply calls the OnInventoryUpdated dispatcher.
Functions – Equip
Please refer to the equip flow diagram below.
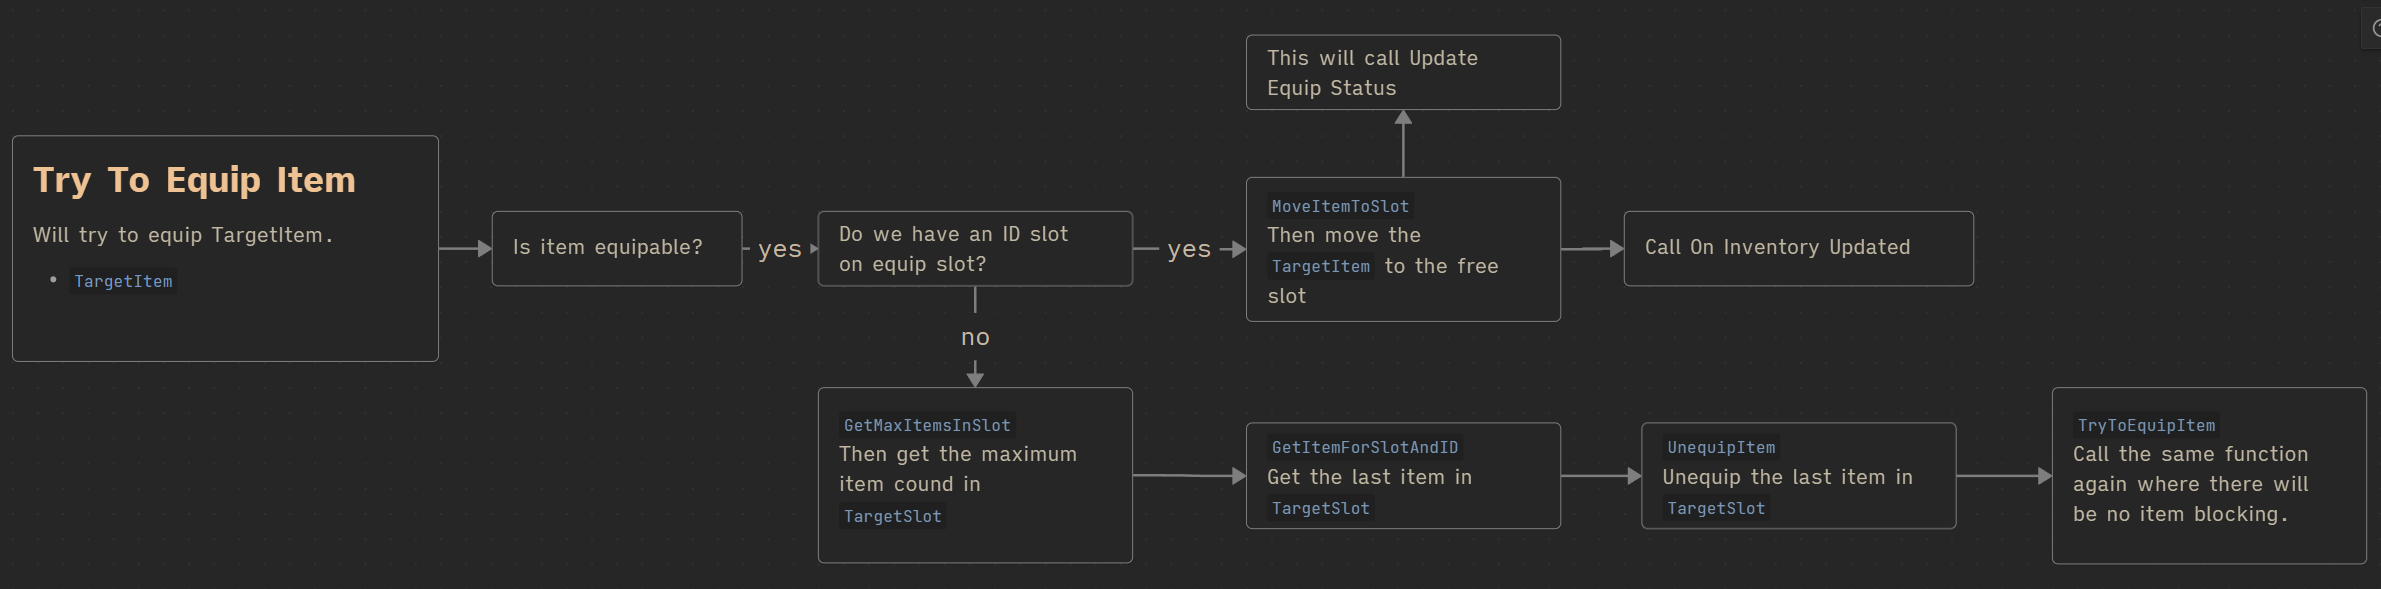
The flow is straightforward:
- If nothing is blocking the equip action, simply move the item to the equip slot.
- If an item is blocking the slot, unequip the blocking item first, then attempt to equip the new item again.
TryToEquipItem ( link )
This function executes the logic described in the equip flow diagram above, handling blocked slots and moving items to the equip slot as needed.

UnequipItem( link )
This function unequips the target item. It uses the backpack as the destination, moving the item back into an available backpack slot.

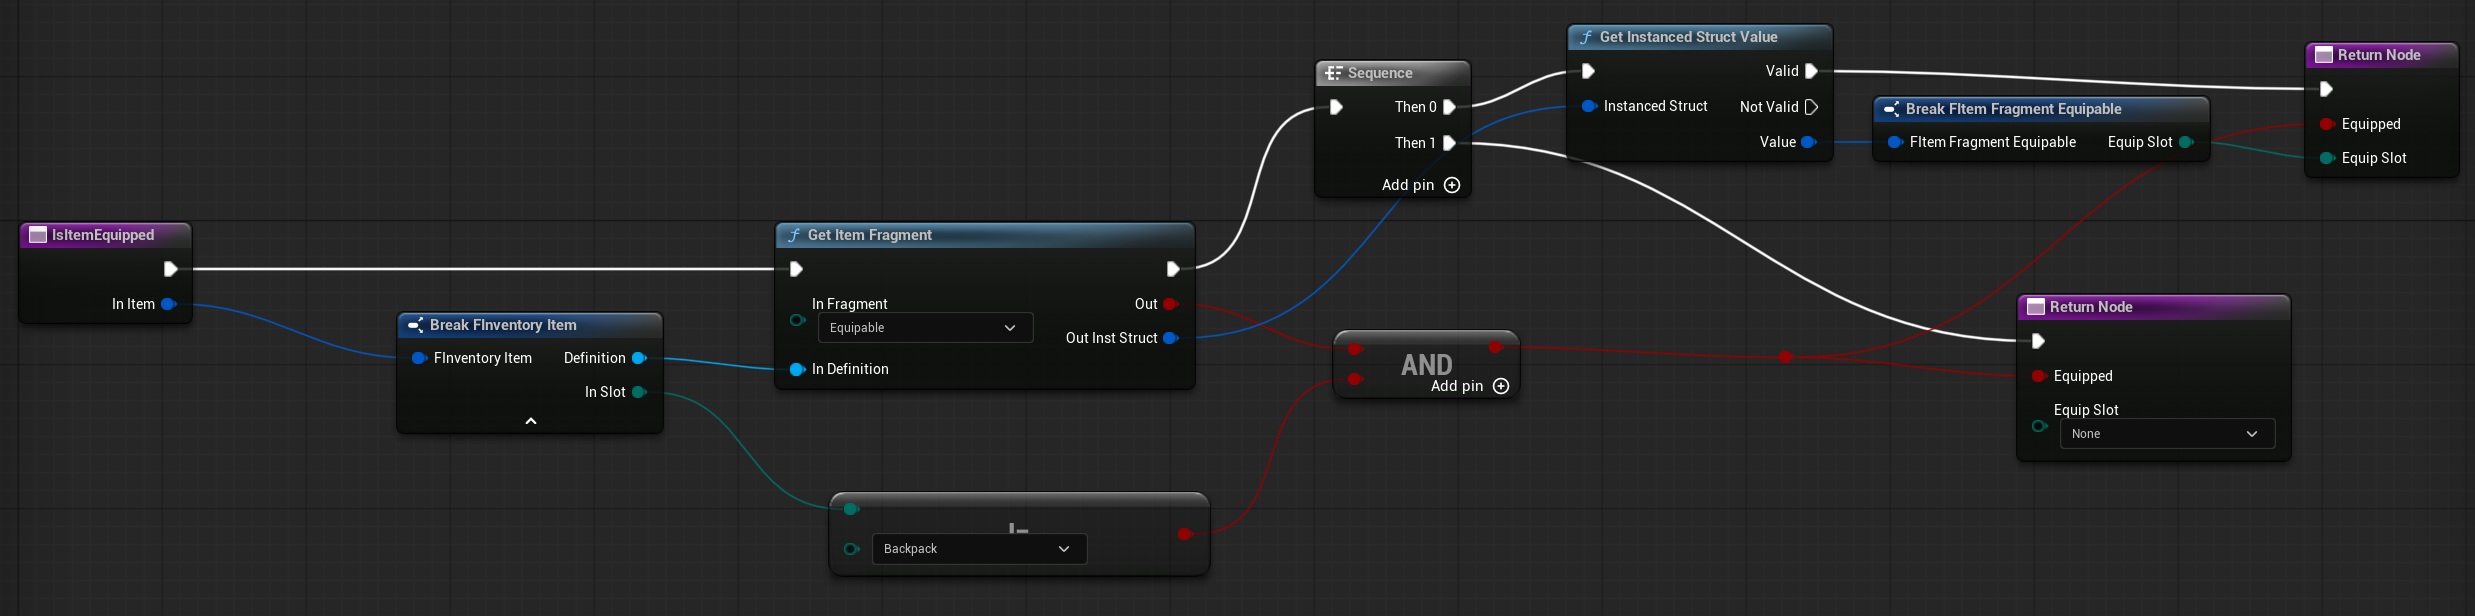
IsItemEquipped( link )
This function checks if the target item is currently equipped and returns the slot where it is equipped, if any.
UpdateEquipStatus( link )
This function update the equip status for target item and slot. Will call the dispatchers if needed.
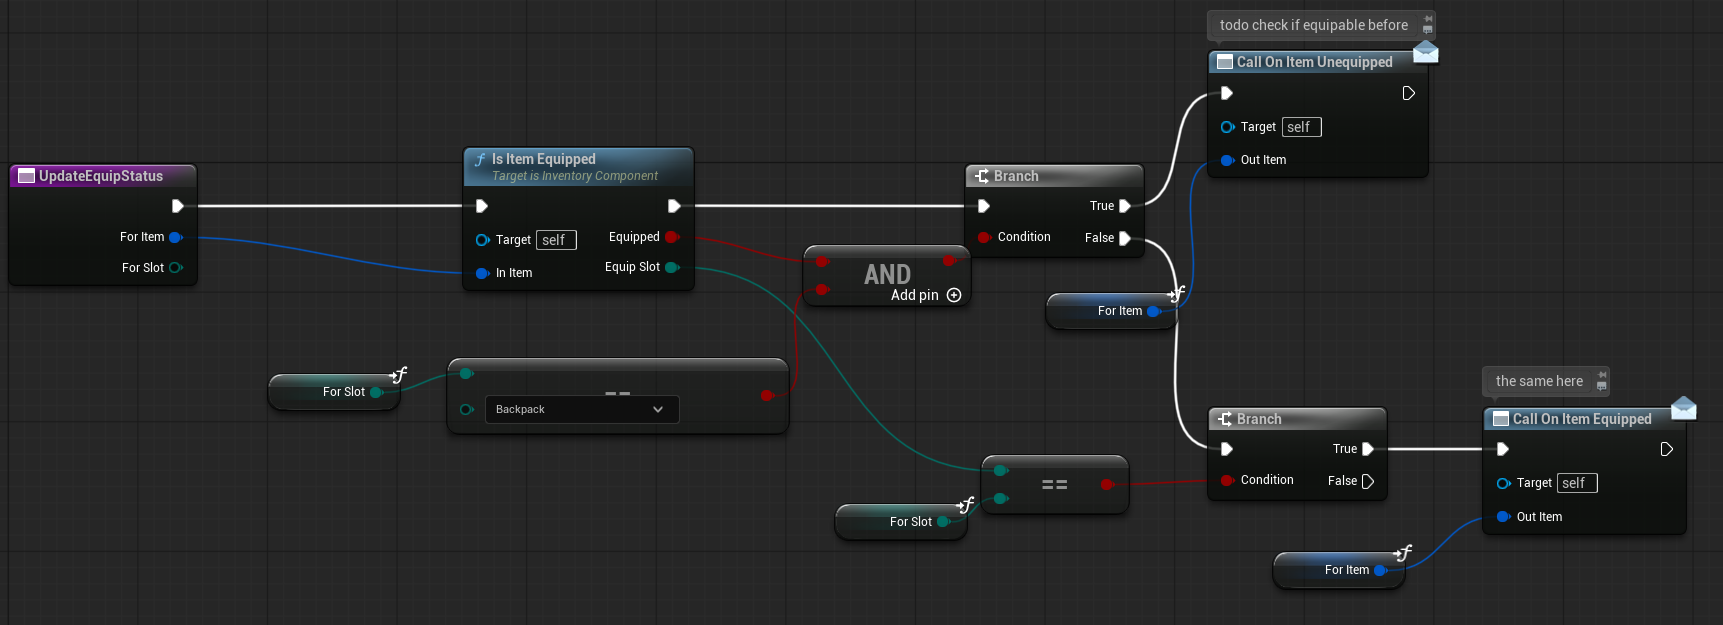
These equip and unequip functions are called directly from the inventory UI and triggered by inventory actions such as equip, use, or similar interactions.
💡 Note: Weapon equipping and unequipping will follow the same flow but include some additional logic, which will be described later.
Functions – Use
Please refer to the item usage graph below.
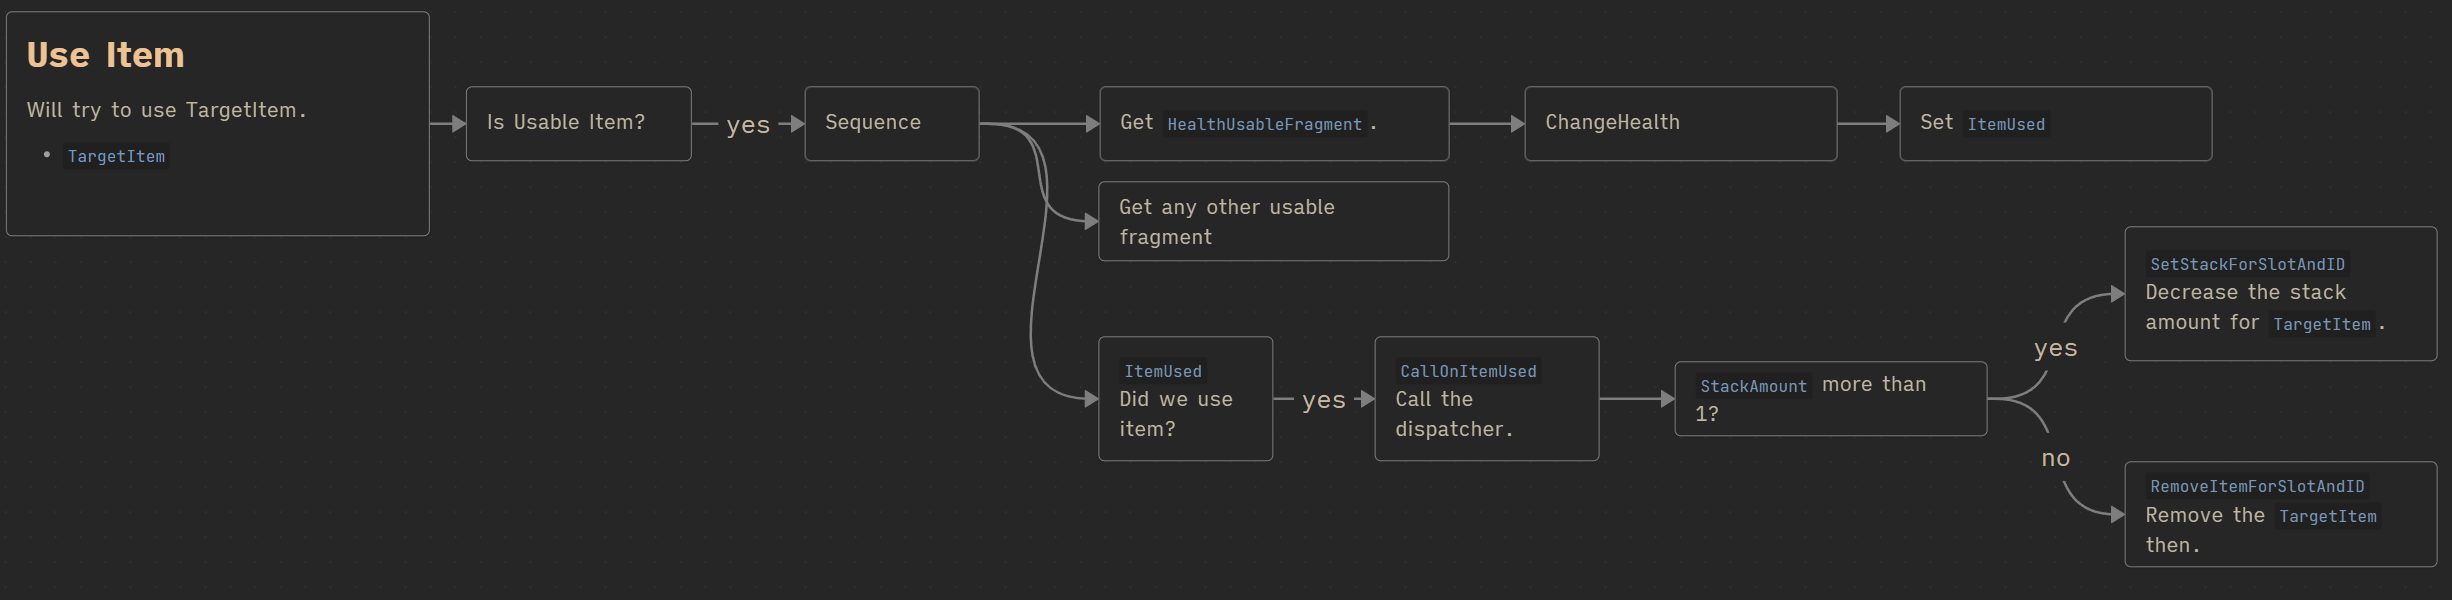
The flow is straightforward:
- If the item is usable, retrieve the corresponding usable fragment (e.g., health restoration, ammo increase).
- Perform the use logic based on the fragment’s data.
- If the item was consumed, decrease its stack count or remove the item entirely if it was the last stack.
Here’s where the magic of Fragments comes into play. Since data and logic are separated, you can easily add new usable fragments with additional functionality without changing the core inventory system.
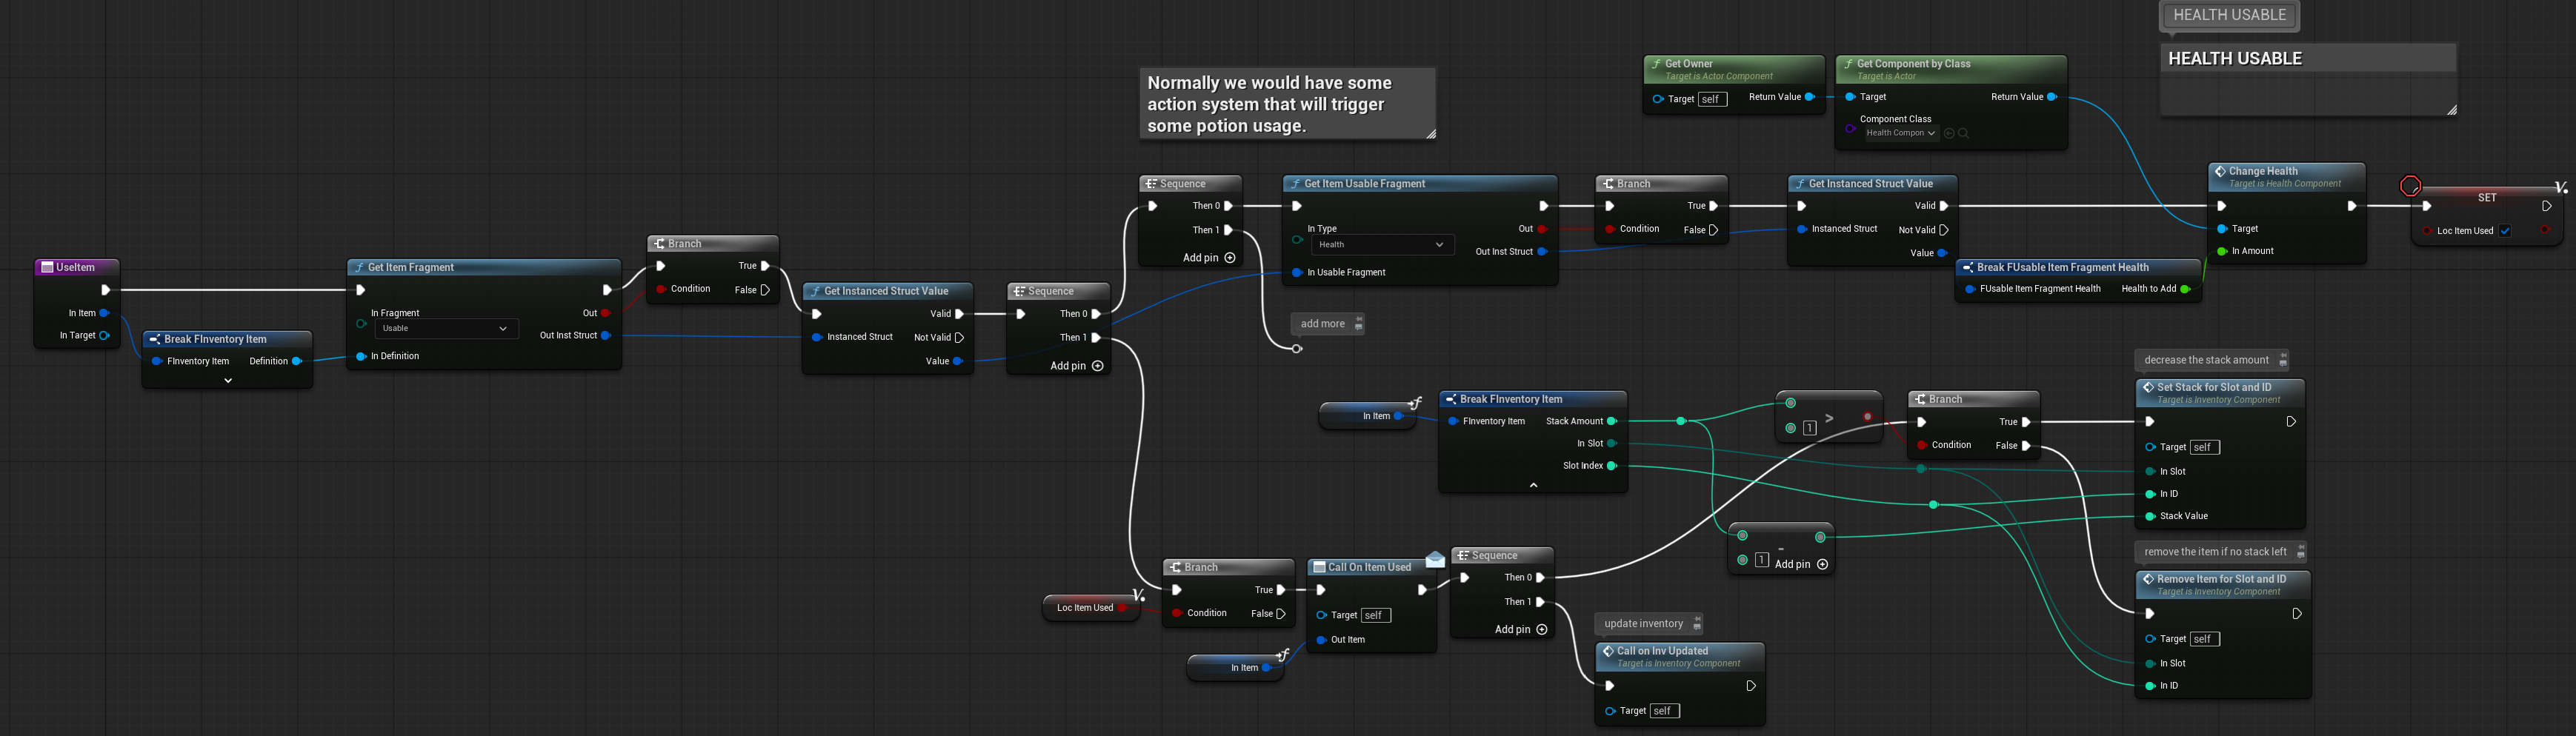
UseItem ( link )
This function executes the logic described in the item usage graph above, applying the usable fragment’s effect and updating the item’s stack or removing it if necessary.
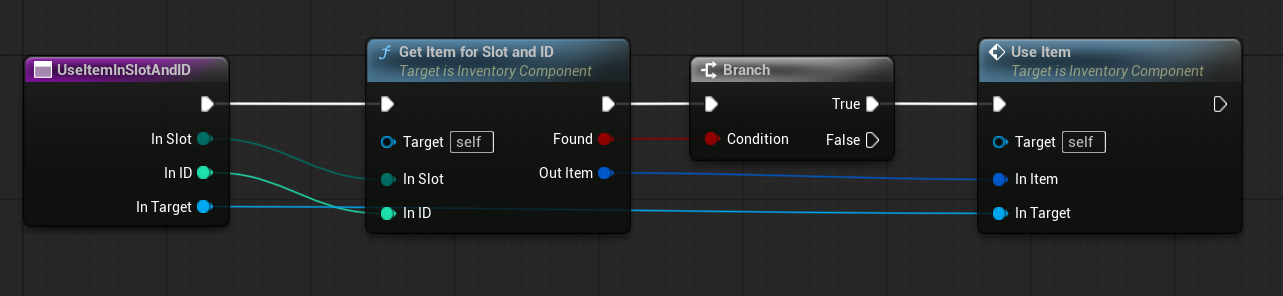
UseItemInSlotAndID ( link )
This function is just getting the item for slot and ID and call UseItem function above.
Functions – Stack
SplitStack ( link )
This function splits the stack of a target item by a specified amount.
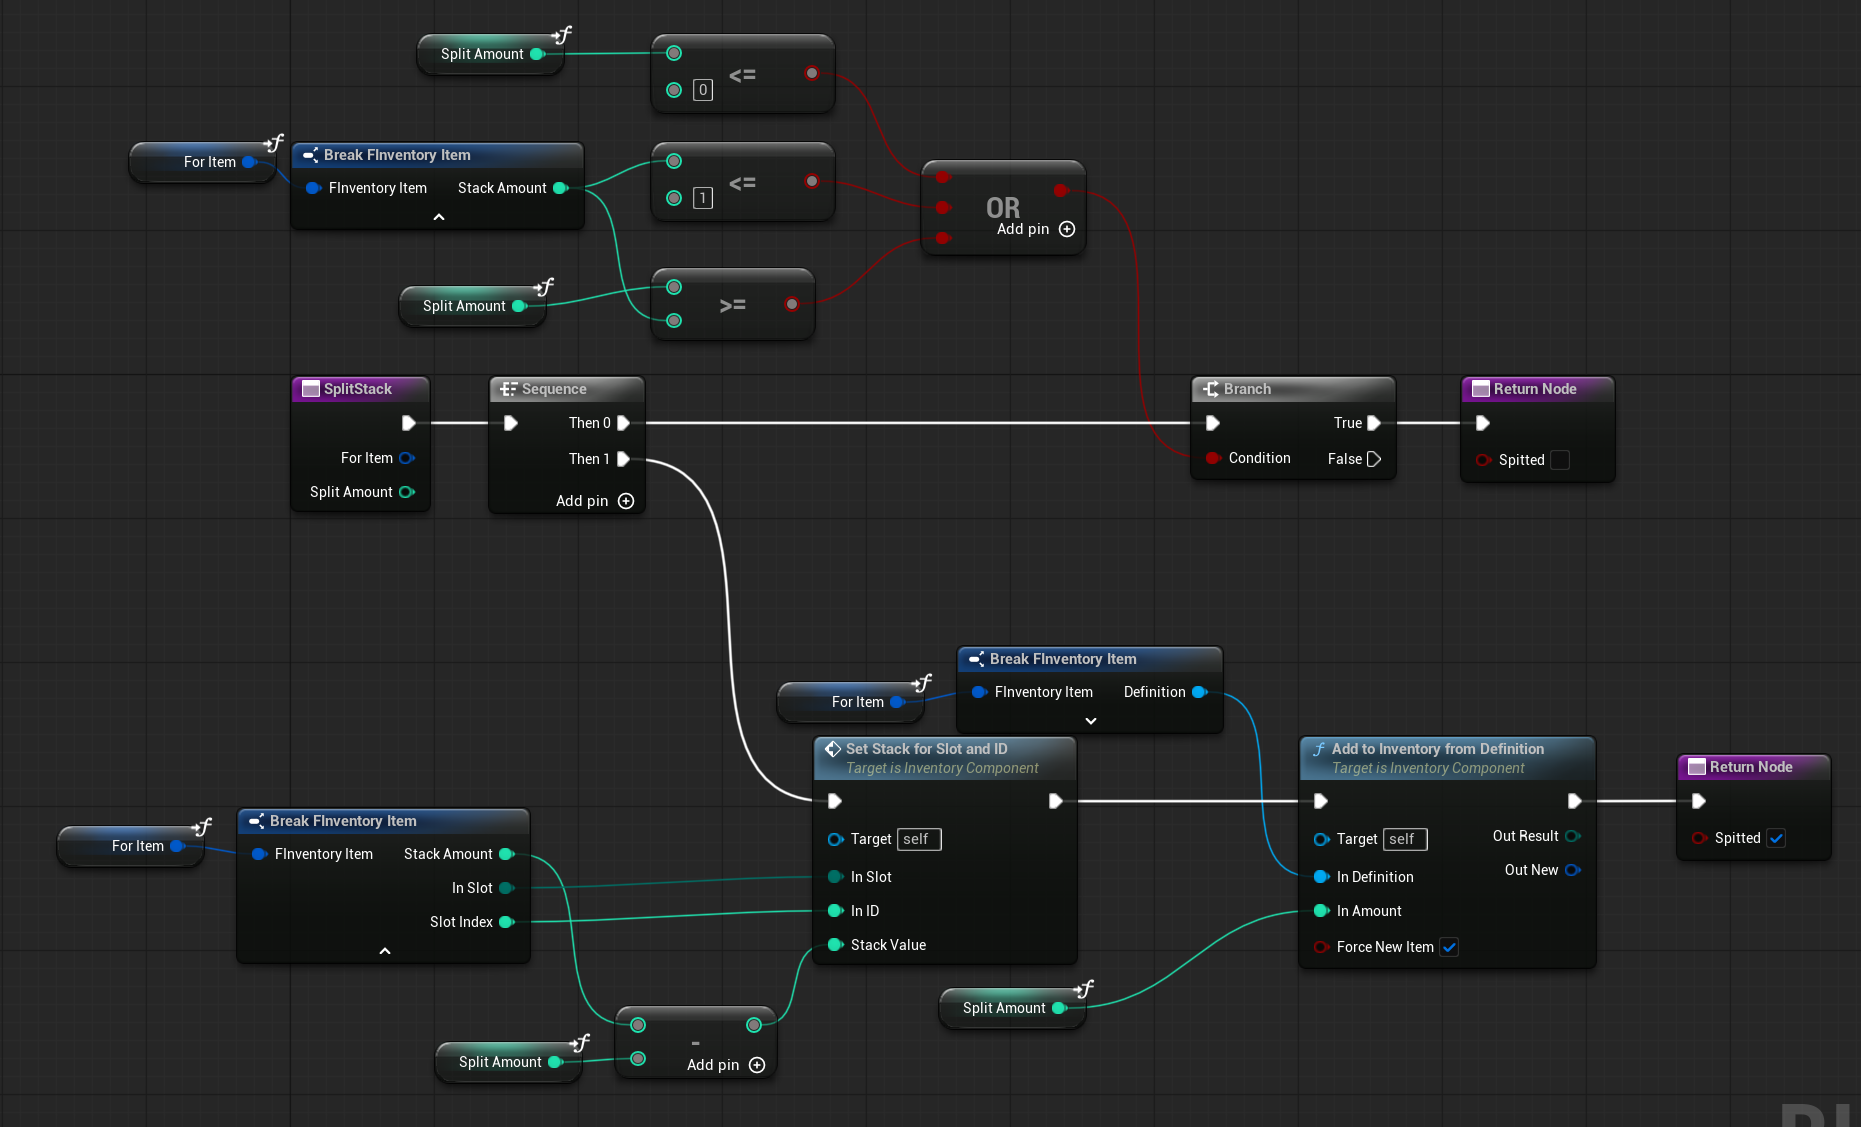
It reduces the stack count of the original item and creates a new item with the specified split amount.
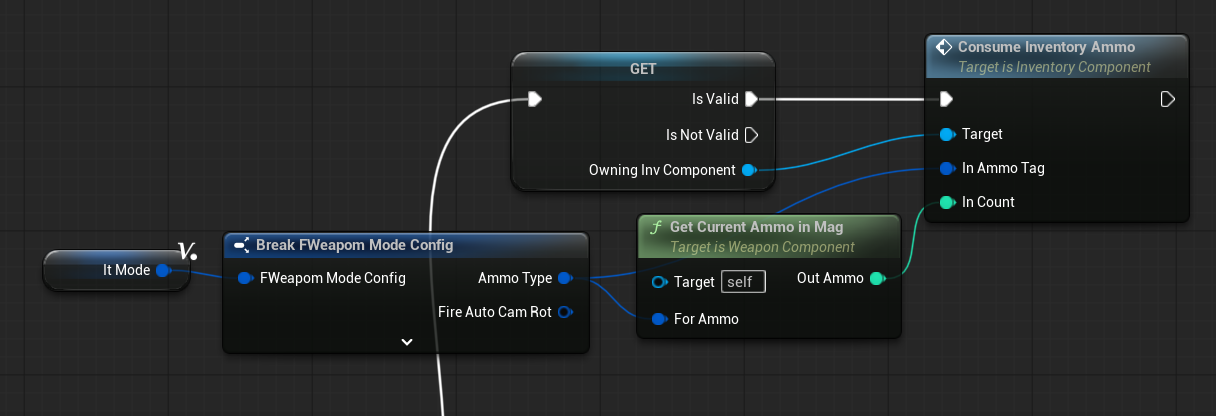
Functions – Ammo
Now, the inventory is responsible for holding ammo instead of the weapon component. This means we need a system for consuming ammo and retrieving ammo counts directly from the inventory.
ConsumeInventoryAmmo ( link )
This function consumes ammo for a given ammo tag and amount.

It works by iterating over the held ammo items with a for loop (to get references). When an ammo item matching the specified tag is found, its value is decreased by the required amount, and the loop stops.
GetHoldingAmmouCount ( link )
This function returns the current amount of ammo for a given ammo tag.

It works by iterating through the ammo items and returning the stack amount of the first item that matches the specified tag.
💡 Note: This is where separating items into different arrays becomes effective. Instead of iterating over all items, we only need to iterate through the ammo array, making the lookup more efficient.
Functions – Weapon
Since we are using weapons and want to manage them through quick slots (as well as equipping/unequipping from the UI), we need some additional functions.
The diagram below illustrates how the equip and dequip logic is handled.
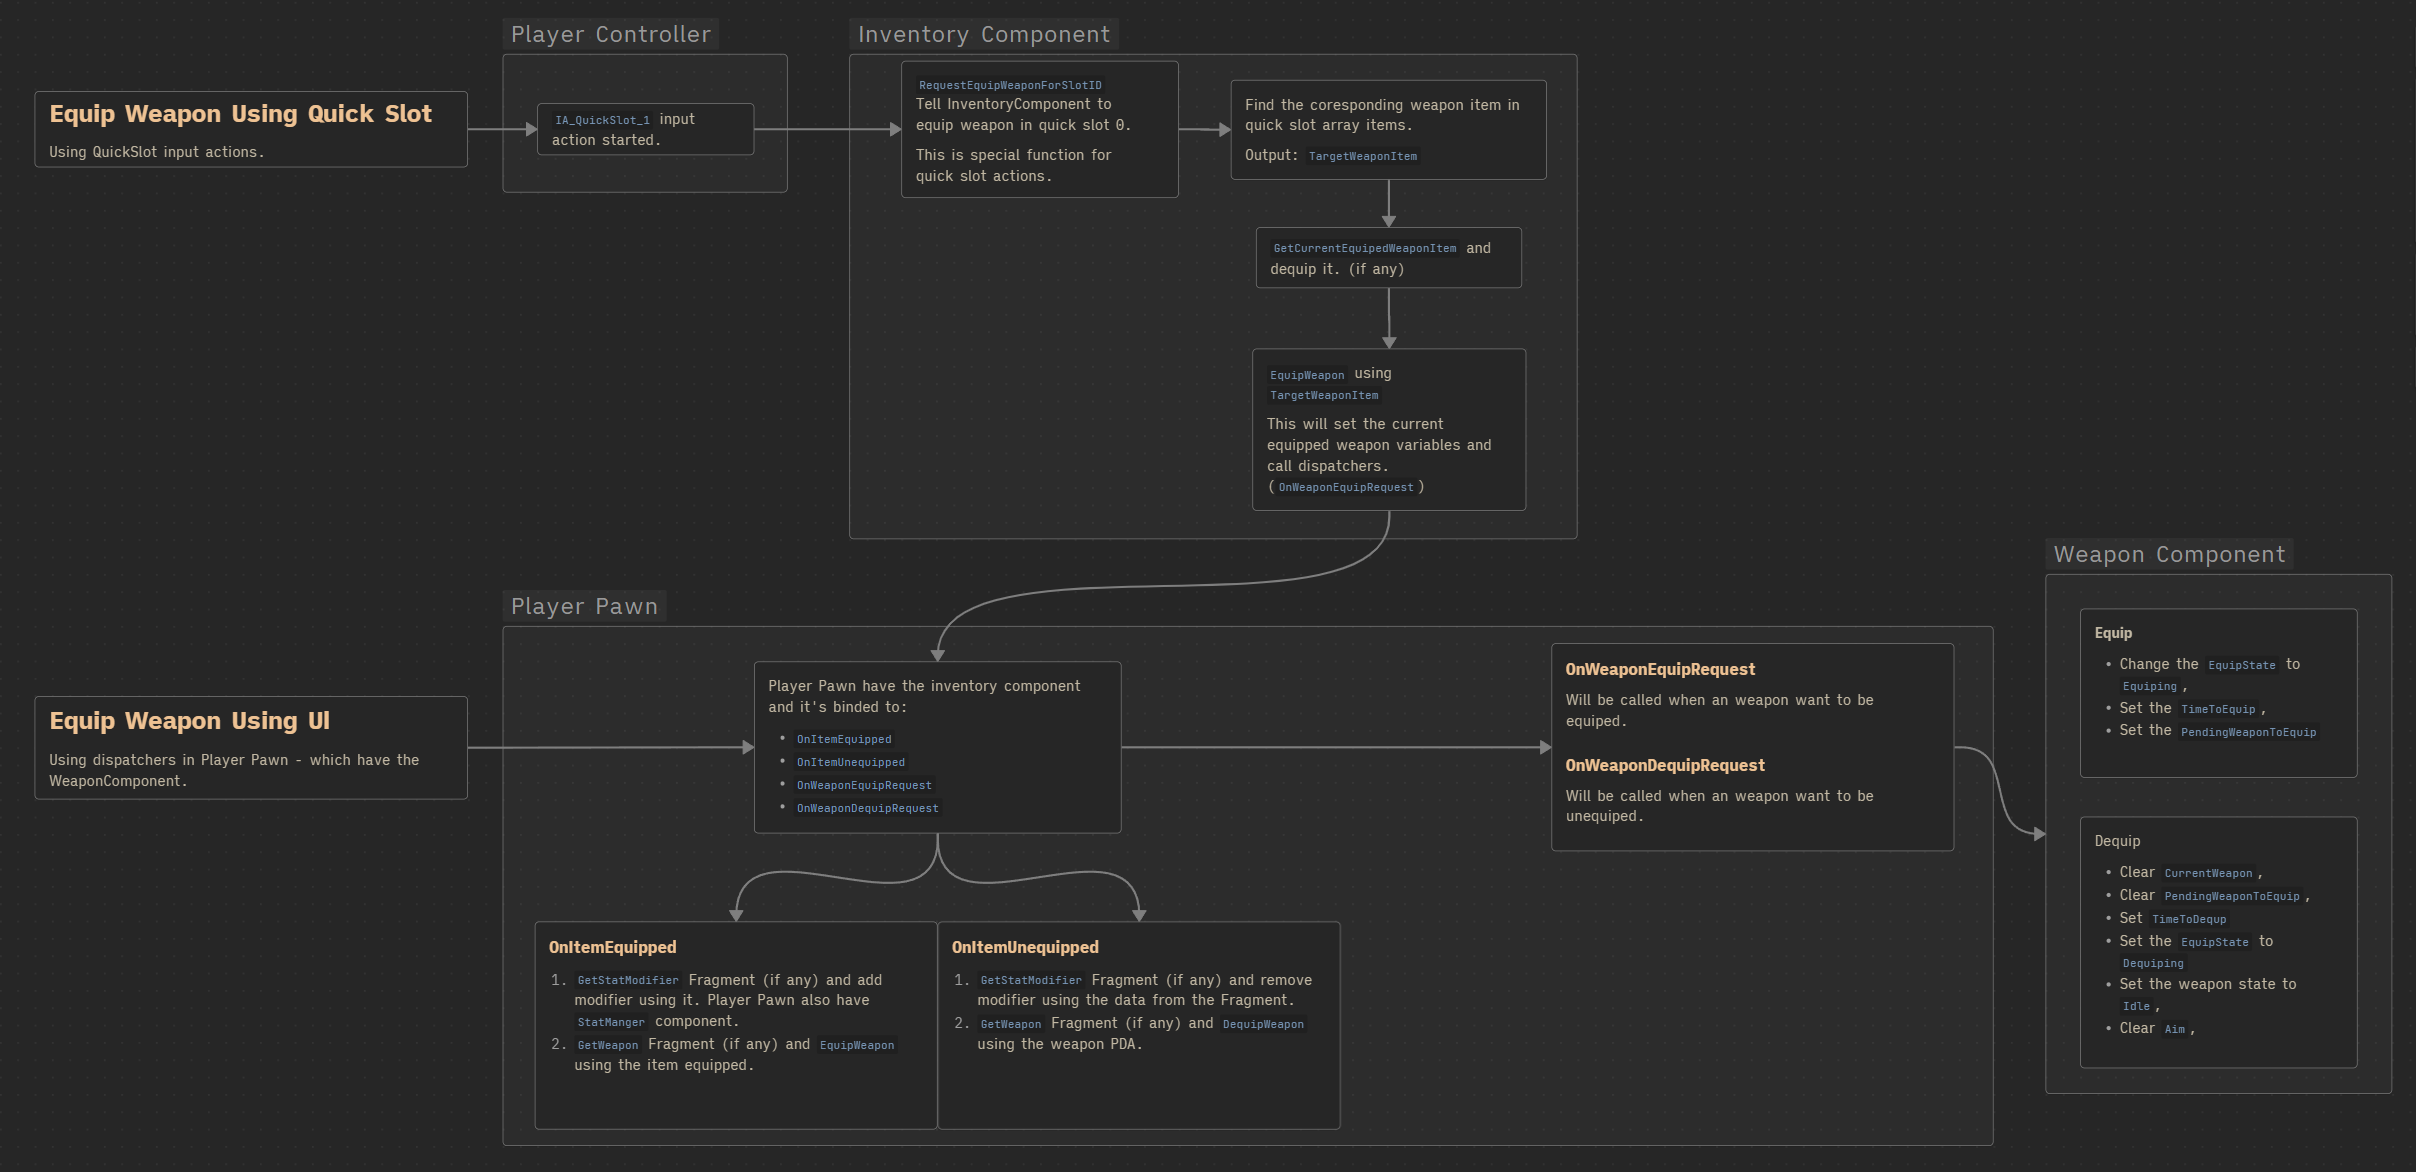
There are two main ways to equip or dequip a weapon:
- QuickSlot input actions – These trigger special functions in the
InventoryComponent. - PlayerPawn events – The
PlayerPawnowns theInventoryComponentand listens for events such asOnItemEquipped,OnItemUnequipped,OnWeaponEquipRequest, andOnWeaponDequipRequest.
The responsibilities are split as follows:
- PlayerController → Handles input.
- InventoryComponent → Handles item management.
- PlayerPawn → Manages communication between the
InventoryComponentand theWeaponComponent. - WeaponComponent → Updates the weapon state (equip / dequip).
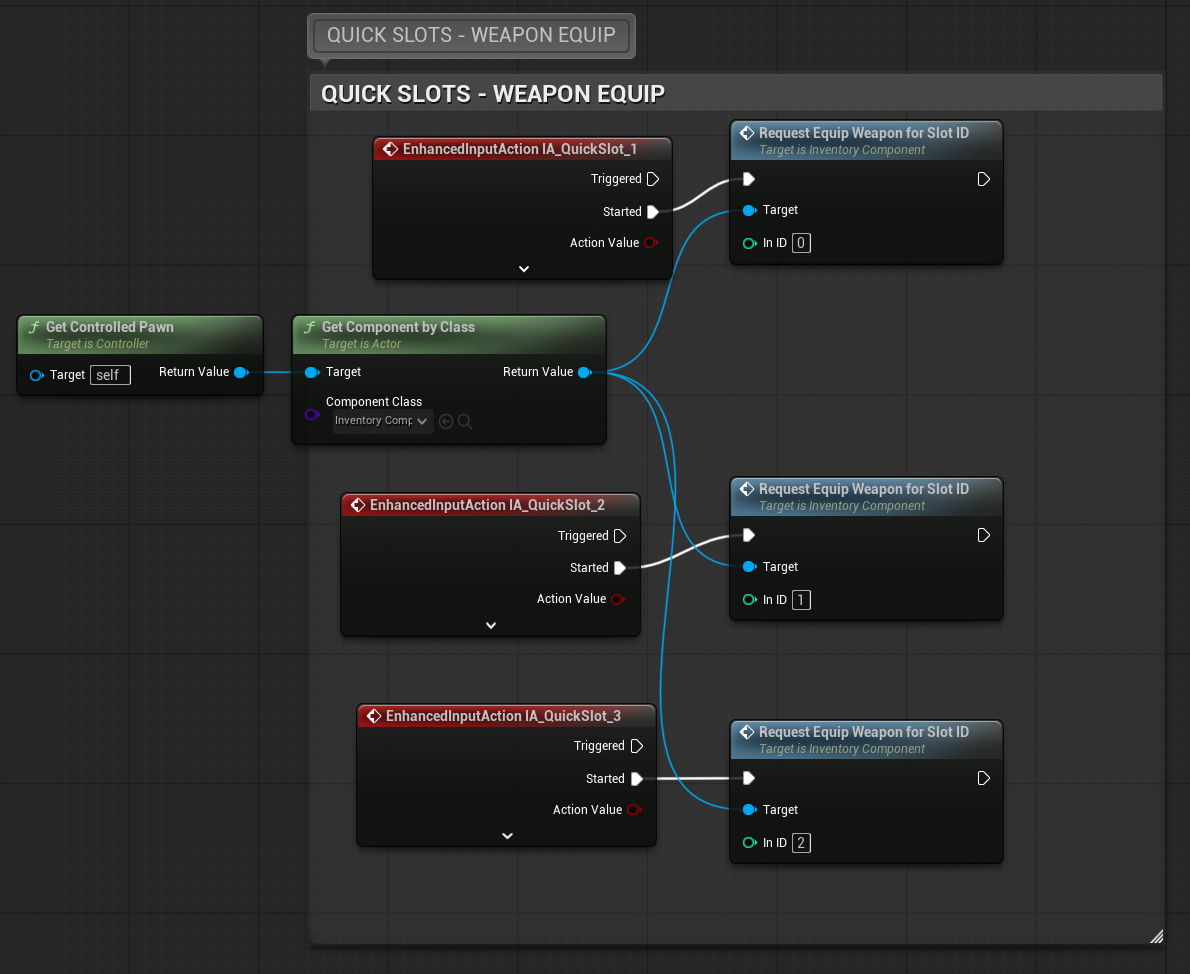
RequestEquipWeaponForSlotID ( link )
This function handles equipping a weapon via a QuickSlot input action.

- It searches for the corresponding weapon to equip.
- If another weapon is already equipped, it unequips it before equipping the new one.
DequipWeapon ( link )
This function handles unequipping a weapon. It clears the currently equipped weapon and triggers the unequip dispatcher.

EquipWeapon ( link )
This function handles equipping the target weapon item. It sets the current equipped weapon and calls the equip dispatcher.

StorePerWeaponData( link )
This important function is called after adding a new weapon item to the inventory. It ensures that weapon-specific state data is properly tracked. The inventory now handles:
- Current ammo in the magazine
- Current overheat level
- Current accumulated overheat time
To store this data, the system uses the item’s GUID together with the FSingleWeaponItemState struct.
With this approach, you can have multiple copies of the same weapon (e.g., 15 pistols), each with its own correct ammo count, overheat state, and any additional state data you decide to include in the struct.
💡 Note: Storing per-weapon state data could also be handled differently. For example, if each weapon existed as its own actor, you could store the state there. In this design, however, the inventory is responsible for both item and weapon data, which simplifies things later—especially when implementing a save system, since each item has a unique GUID.
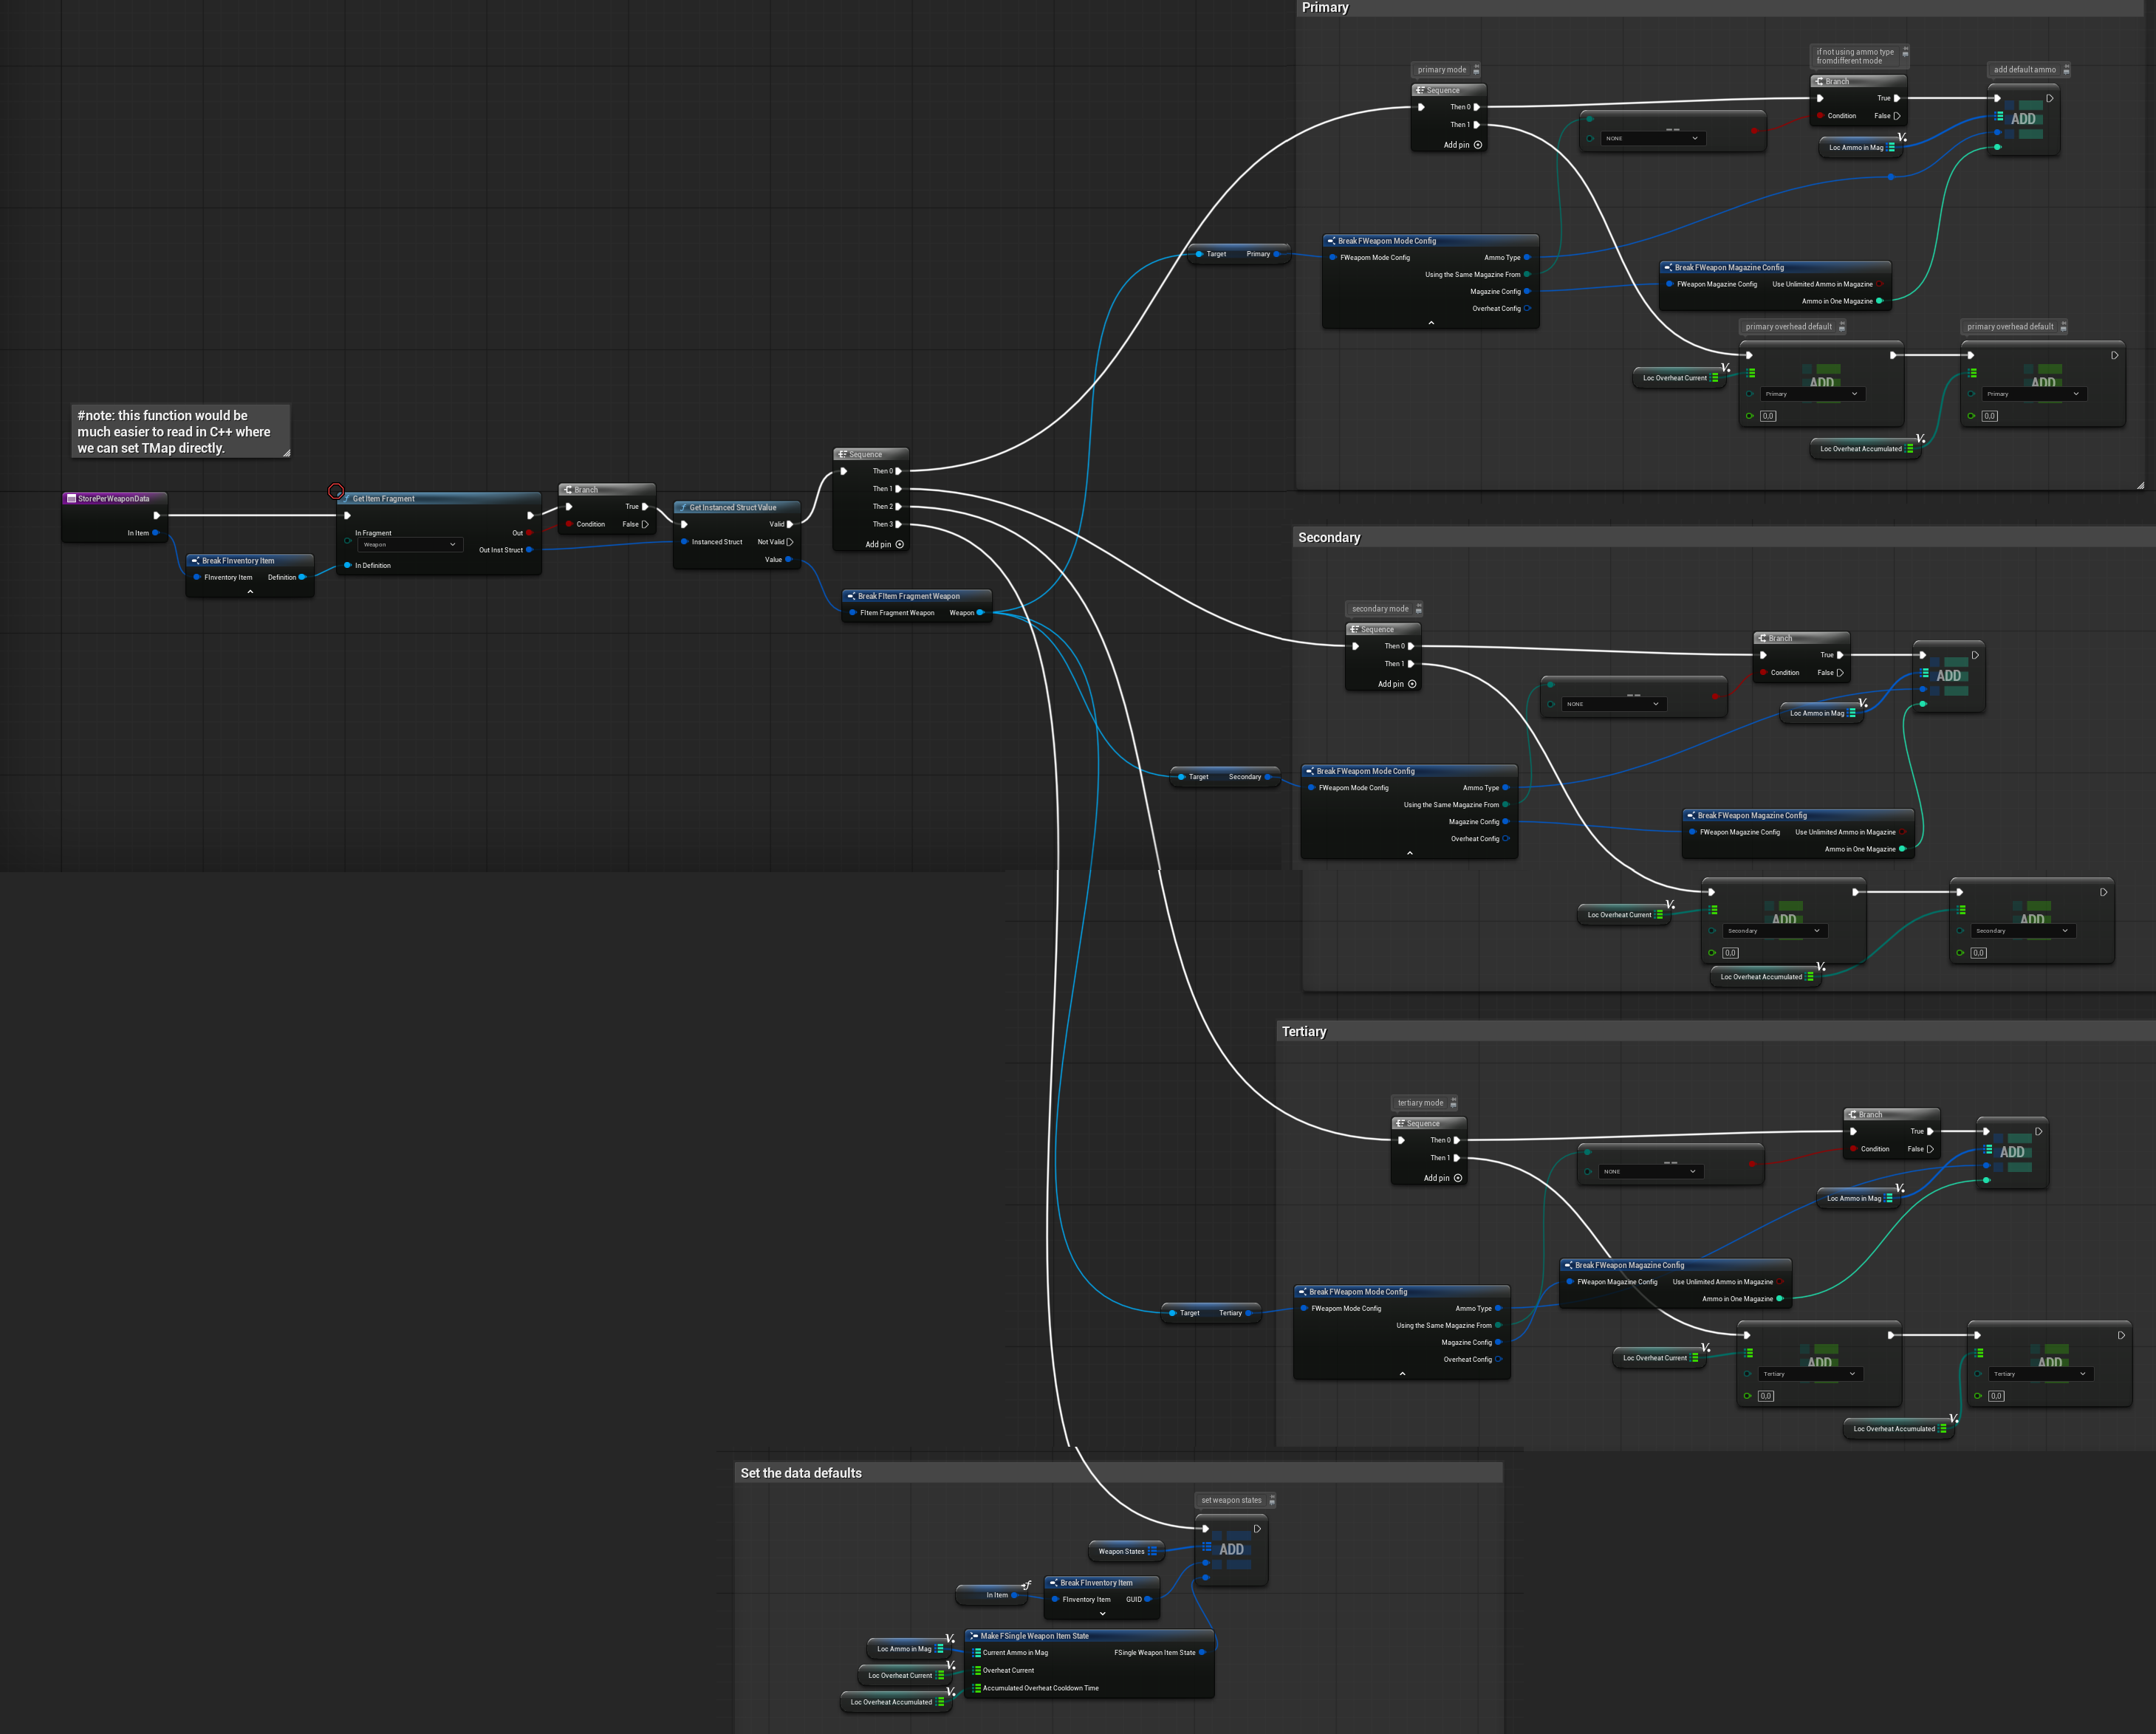
💡 Note: This is another example where C++ is much better suited for handling TMaps and structs. The same logic would be much easier to implement and read in C++.
Weapon Magazine Ammo
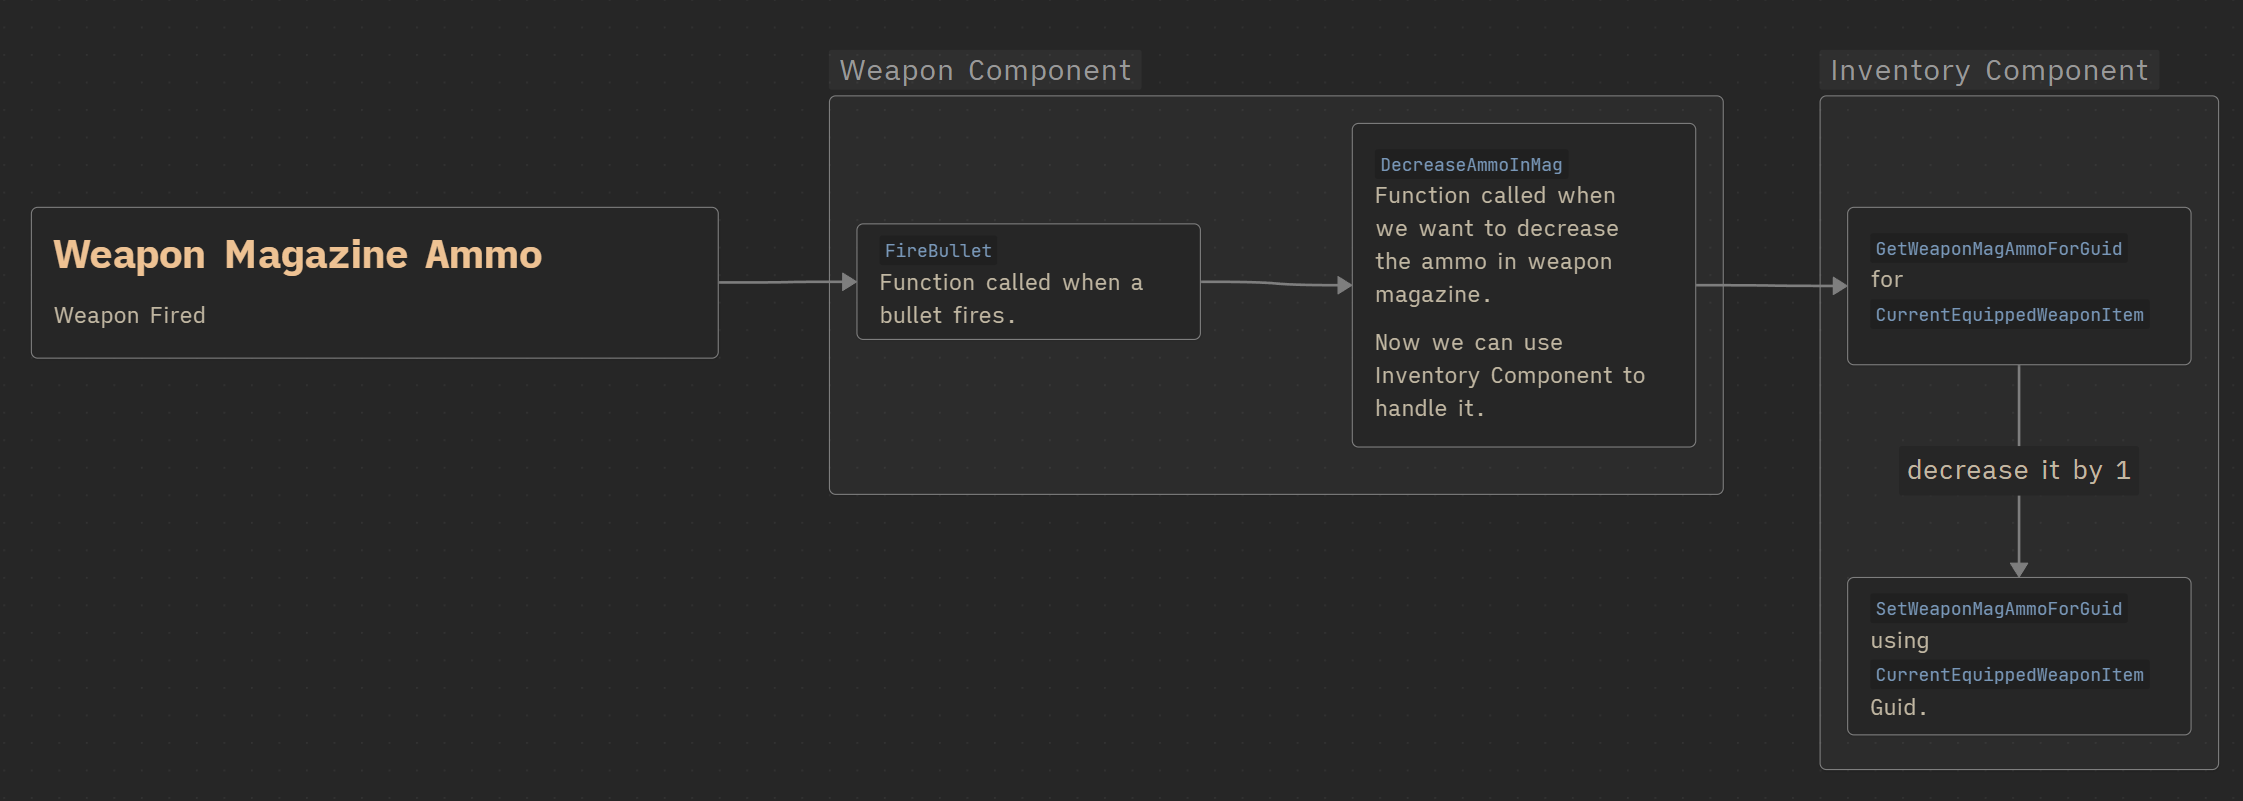
SetWeaponMagAmmoForGuid( link )
This function updates the magazine ammo for a specific weapon item, identified by its GUID.
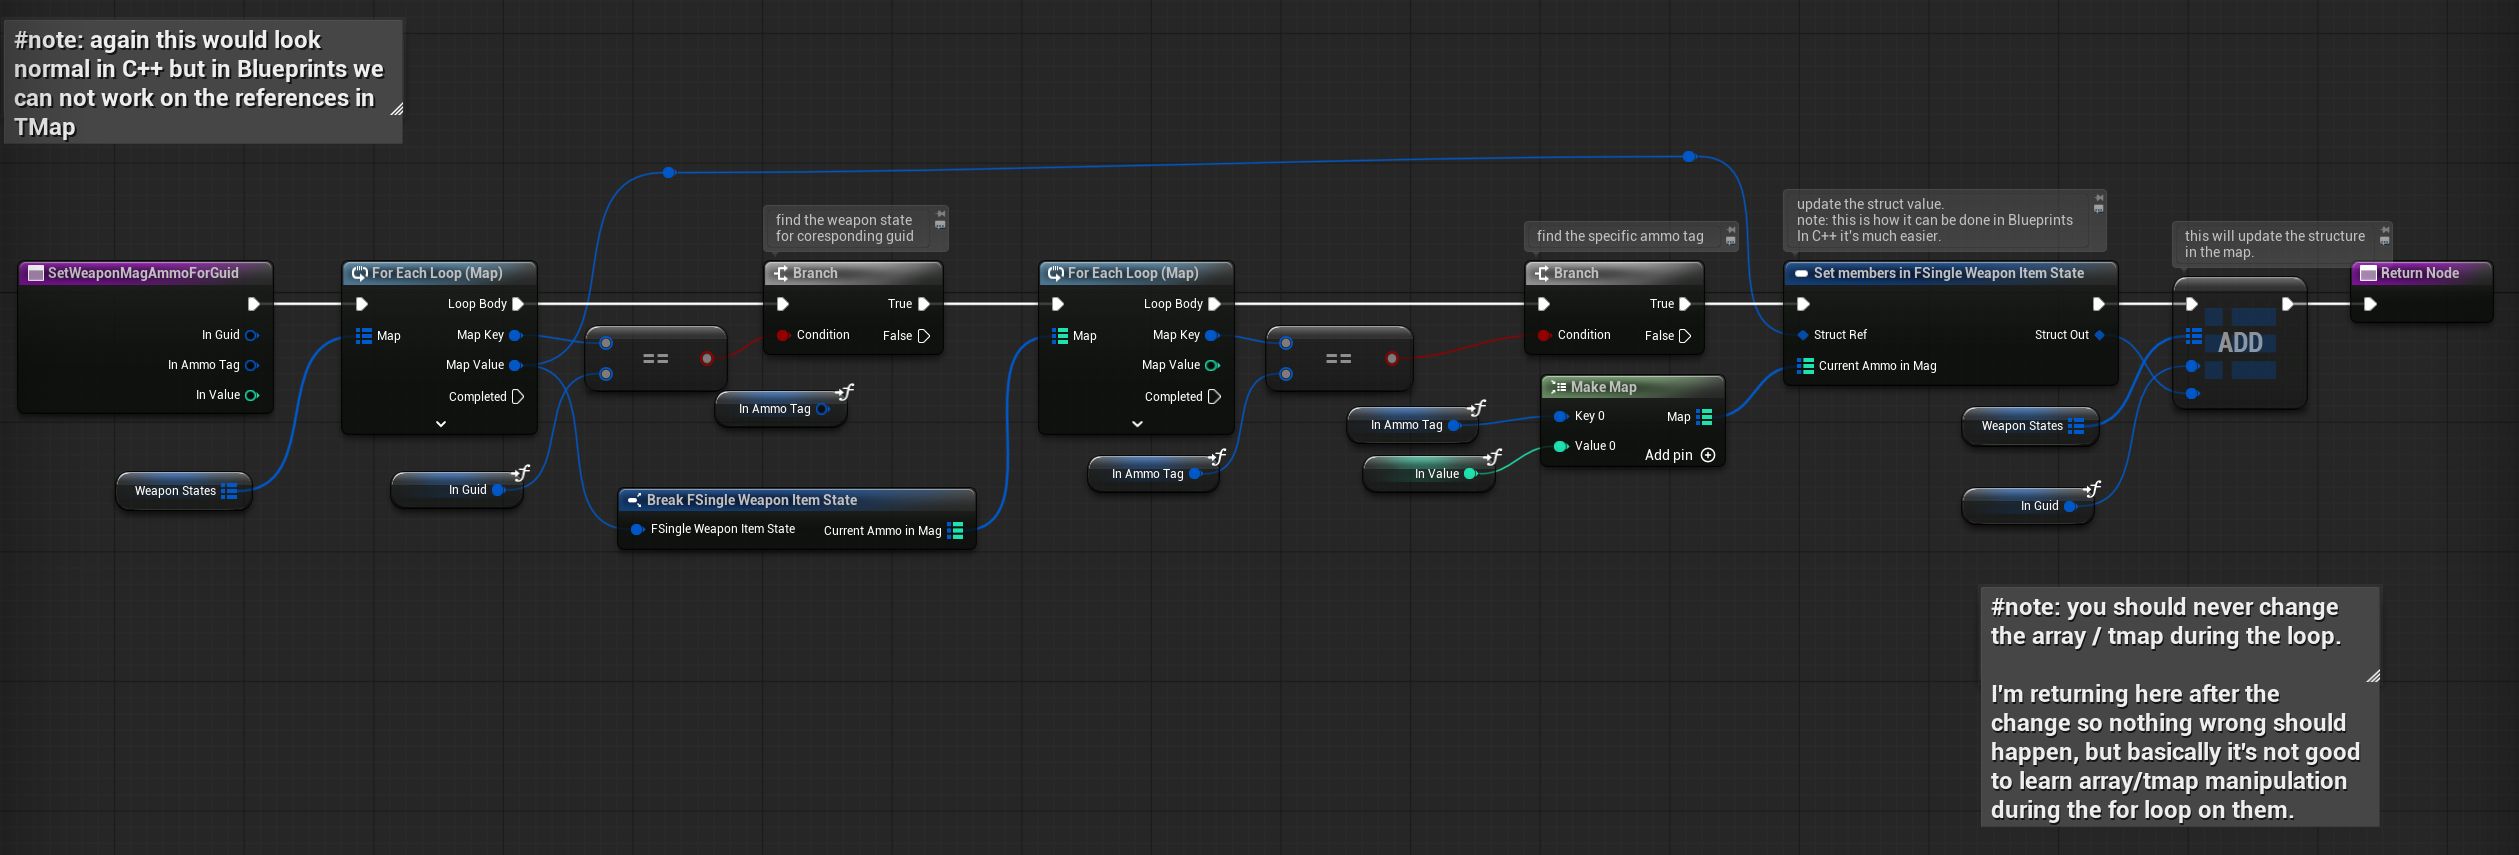
- It locates the corresponding weapon state using the target weapon’s GUID.
- It retrieves the associated ammo tag.
- It updates the struct value and then refreshes the
TMap. (Add on TMap = update the map for a key in Blueprints)
💡 Note: As with the previous function—and any function that relies on WeaponState—this logic would be much cleaner in C++. I’m intentionally using TMaps here because in C++ you will work with them often, and it’s worth learning how to handle them properly.
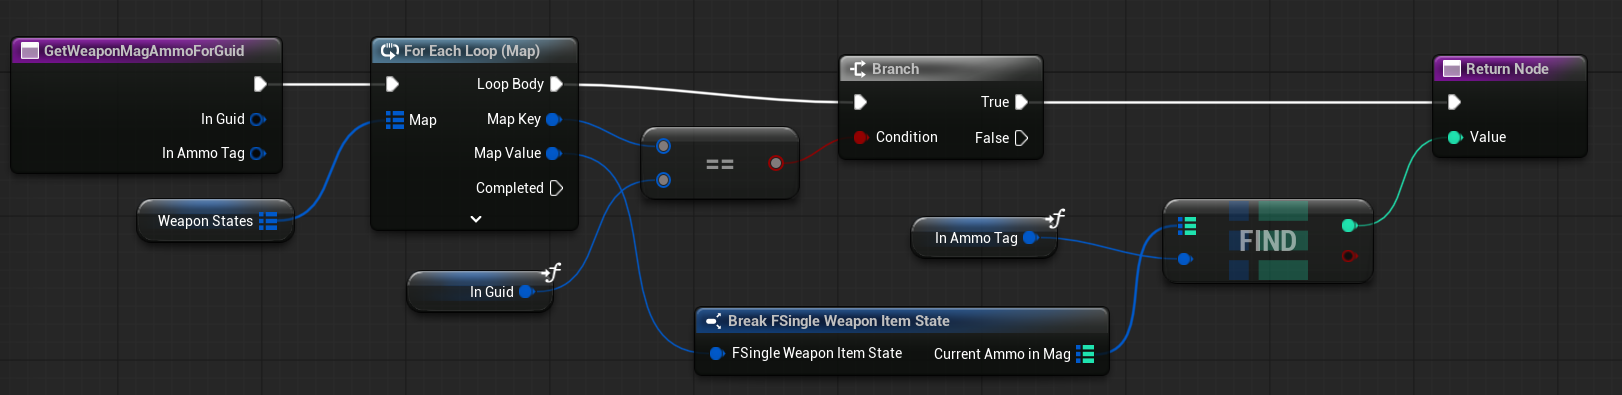
GetWeaponMagAmmoForGuid( link )
This function returns the current magazine ammo for a weapon identified by its GUID.
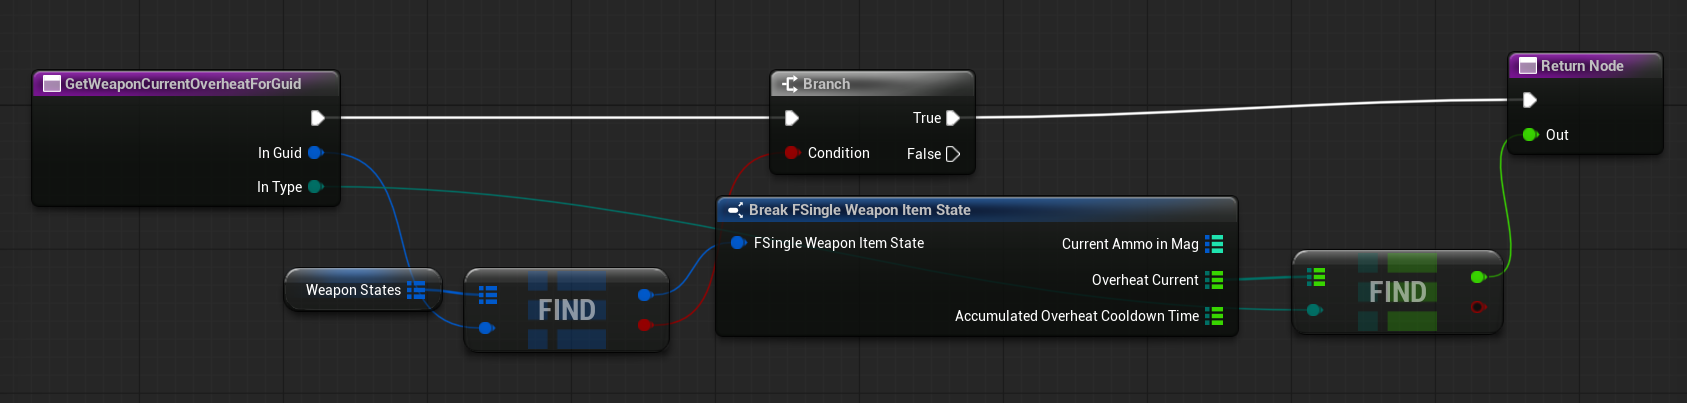
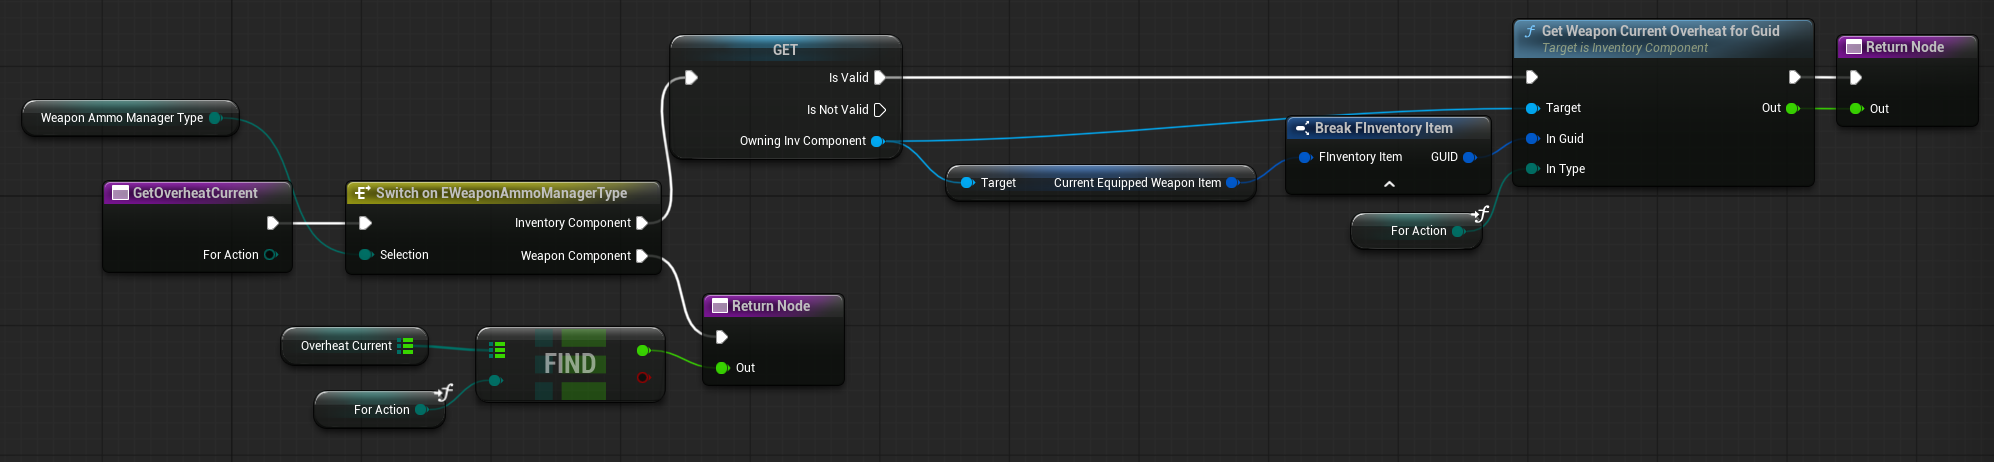
GetWeaponCurrentOverheatForGuid( link )
This function returns the current overheat value for a specific weapon, identified by its GUID and weapon mode.
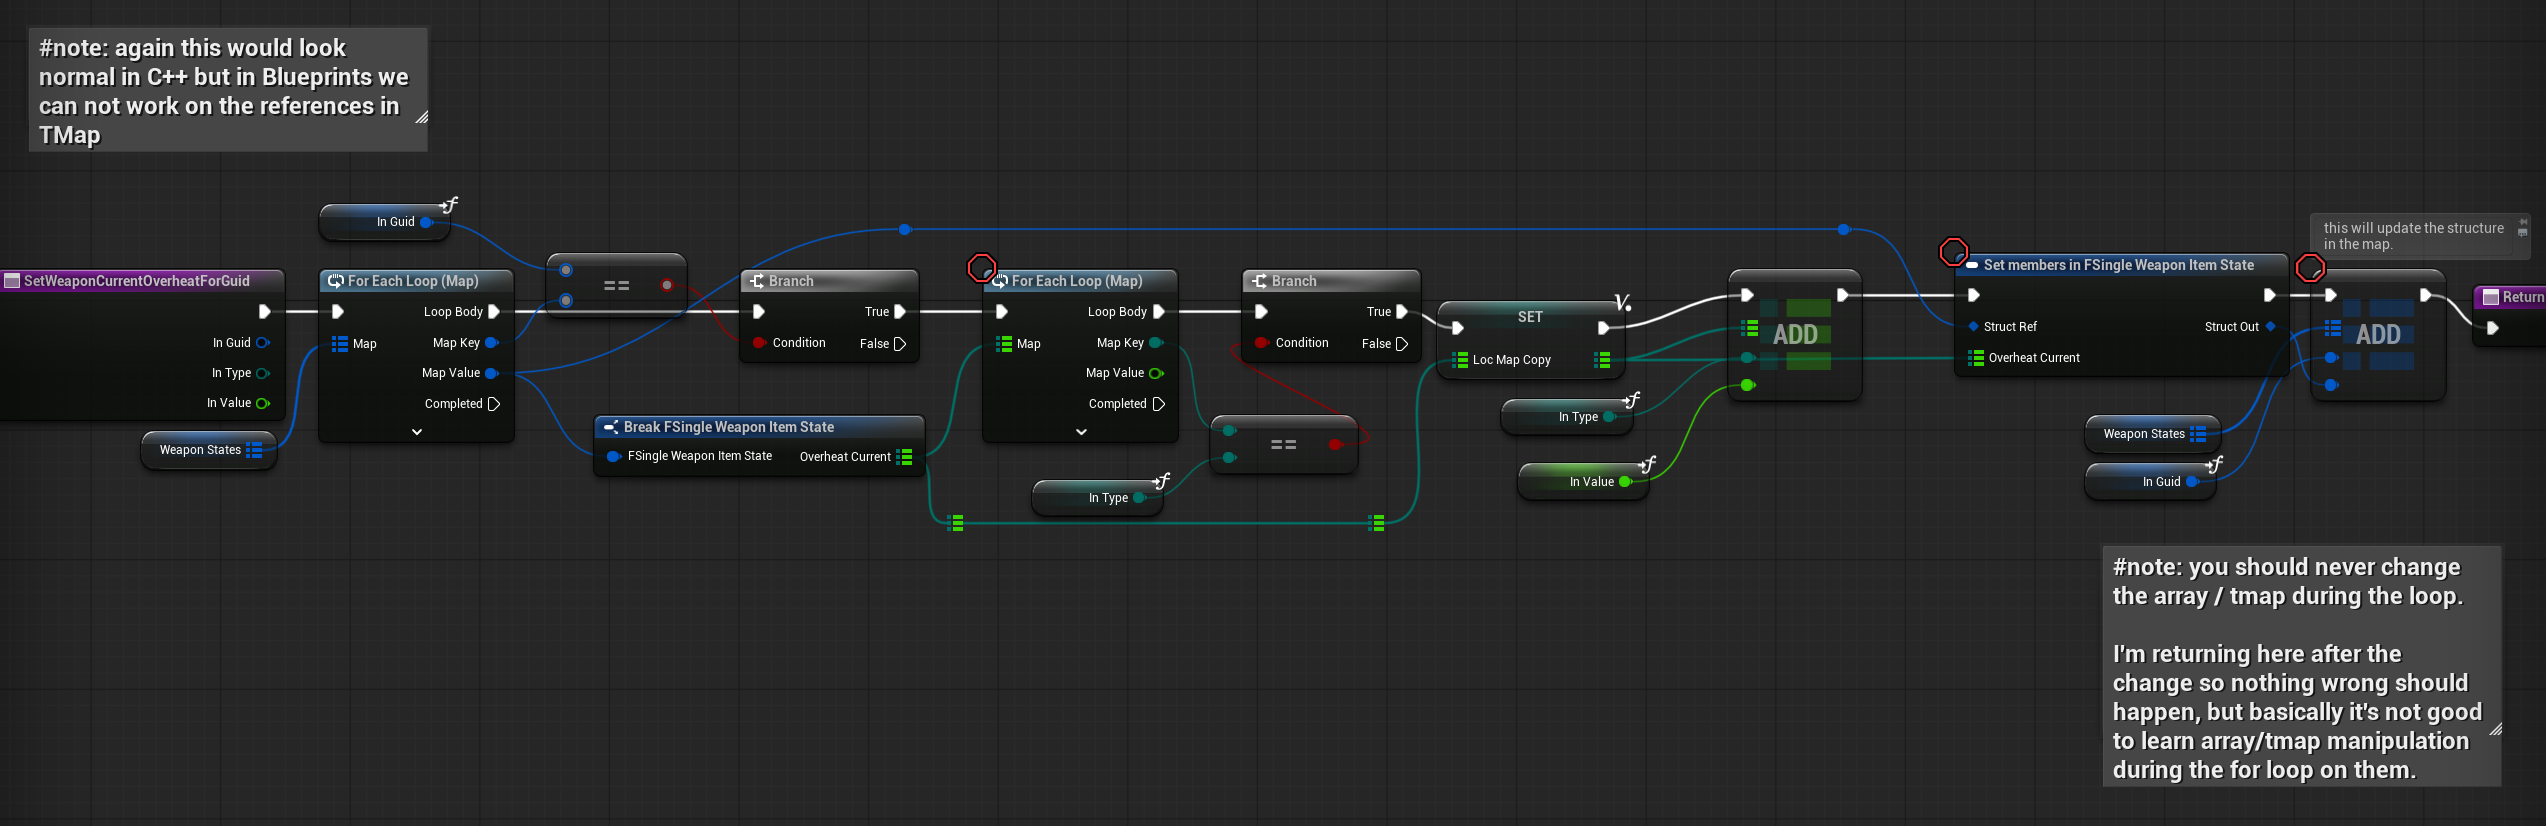
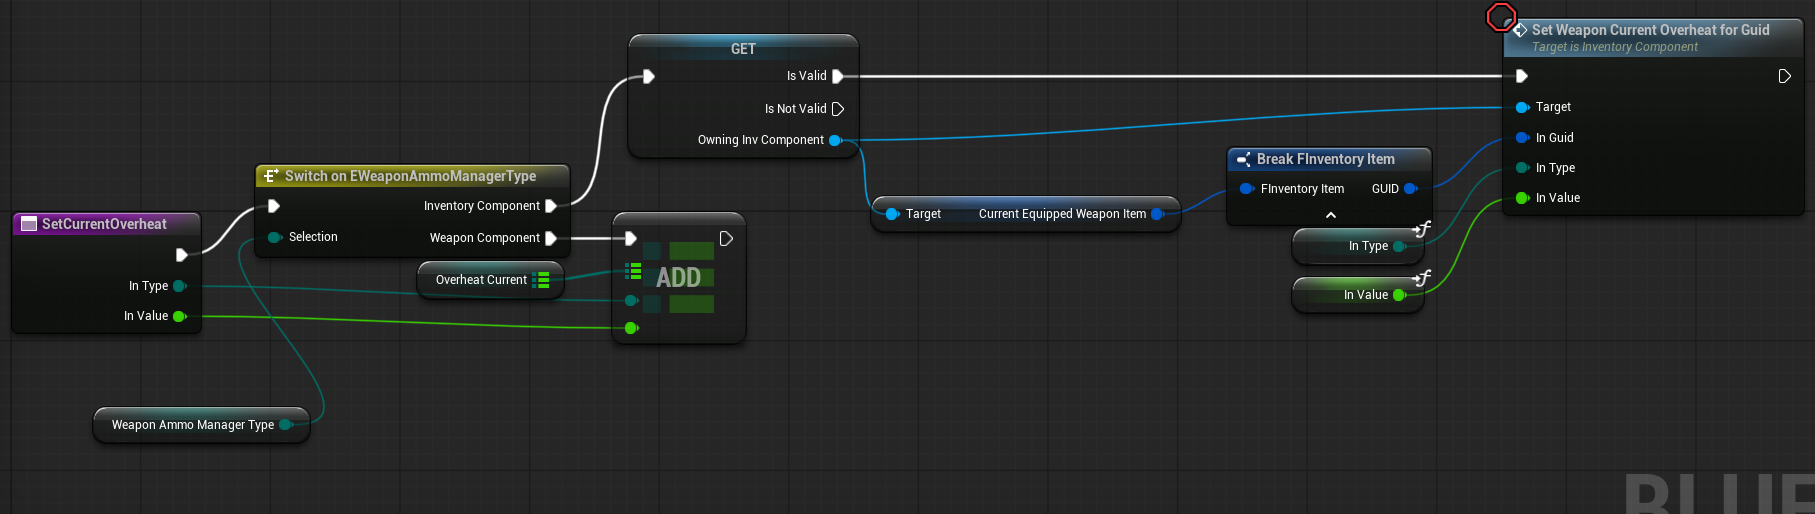
SetWeaponCurrentOverheatForGuid( link )
This function sets the current overheat value for a specific weapon, identified by its GUID and weapon mode.
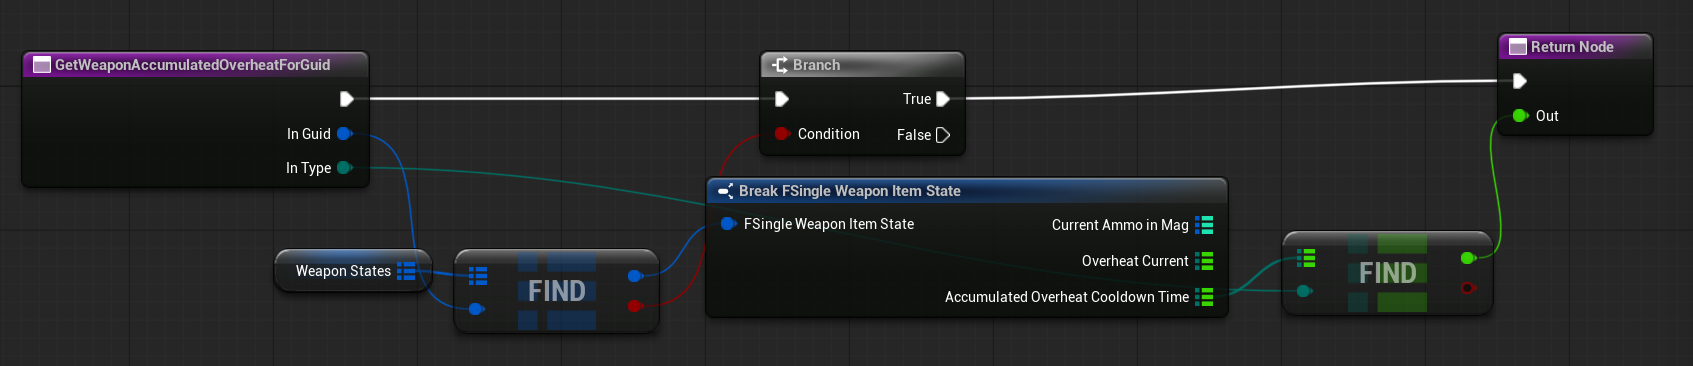
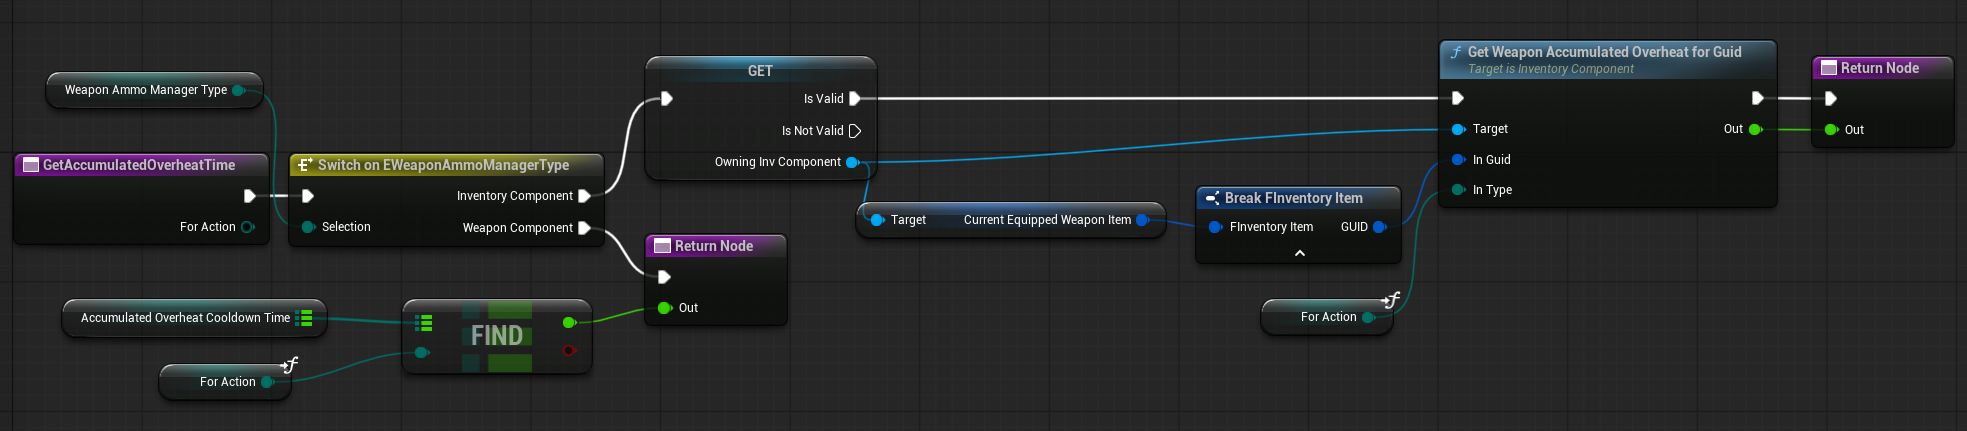
GetWeaponAccumulatedOverheatForGuid( link )
This function returns the accumulated overheat for a specific weapon, identified by its GUID and weapon mode.
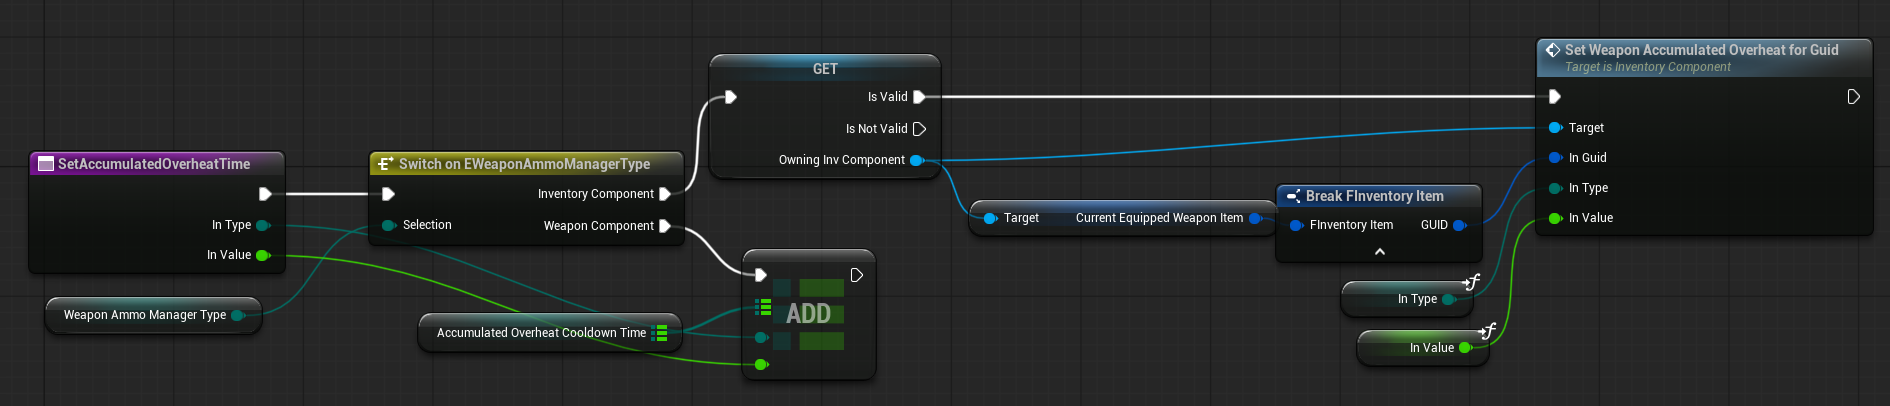
SetWeaponAccumulatedOverheatForGuid( link )
This function sets the accmulated overheat value for a specific weapon, identified by its GUID and weapon mode.

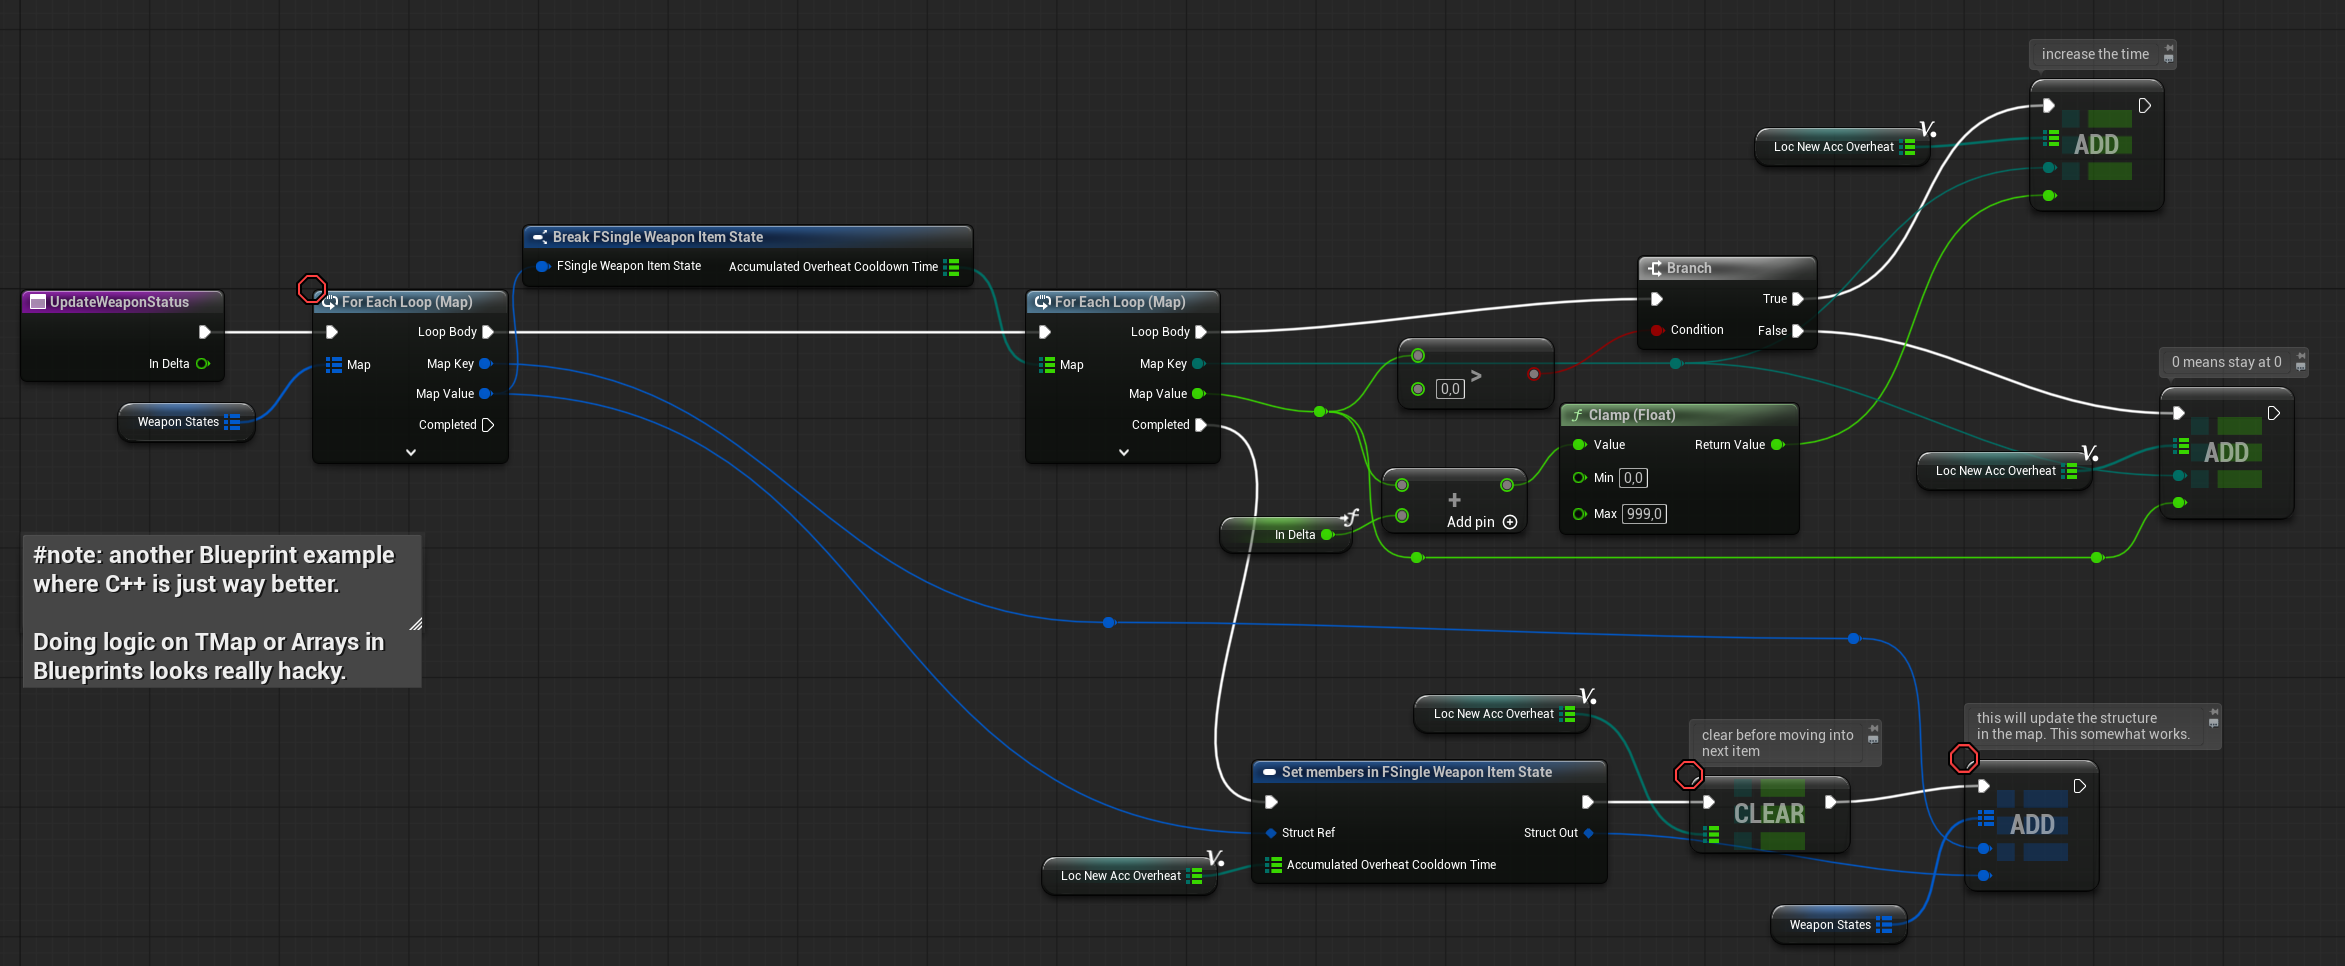
UpdateWeaponStatus( link )
This function is called every tick and updates weapon states. Currently, it decreases the overheat value over time, but it can be extended in the future for other time-based updates or mechanics.
Inventory Function Library
These helper functions aren’t necessary in C++, but in Blueprints they’re handy for retrieving the specific instanced structs you need.
GetItemFragment ( link )
Returns the item fragment struct that corresponds to a given enum value.
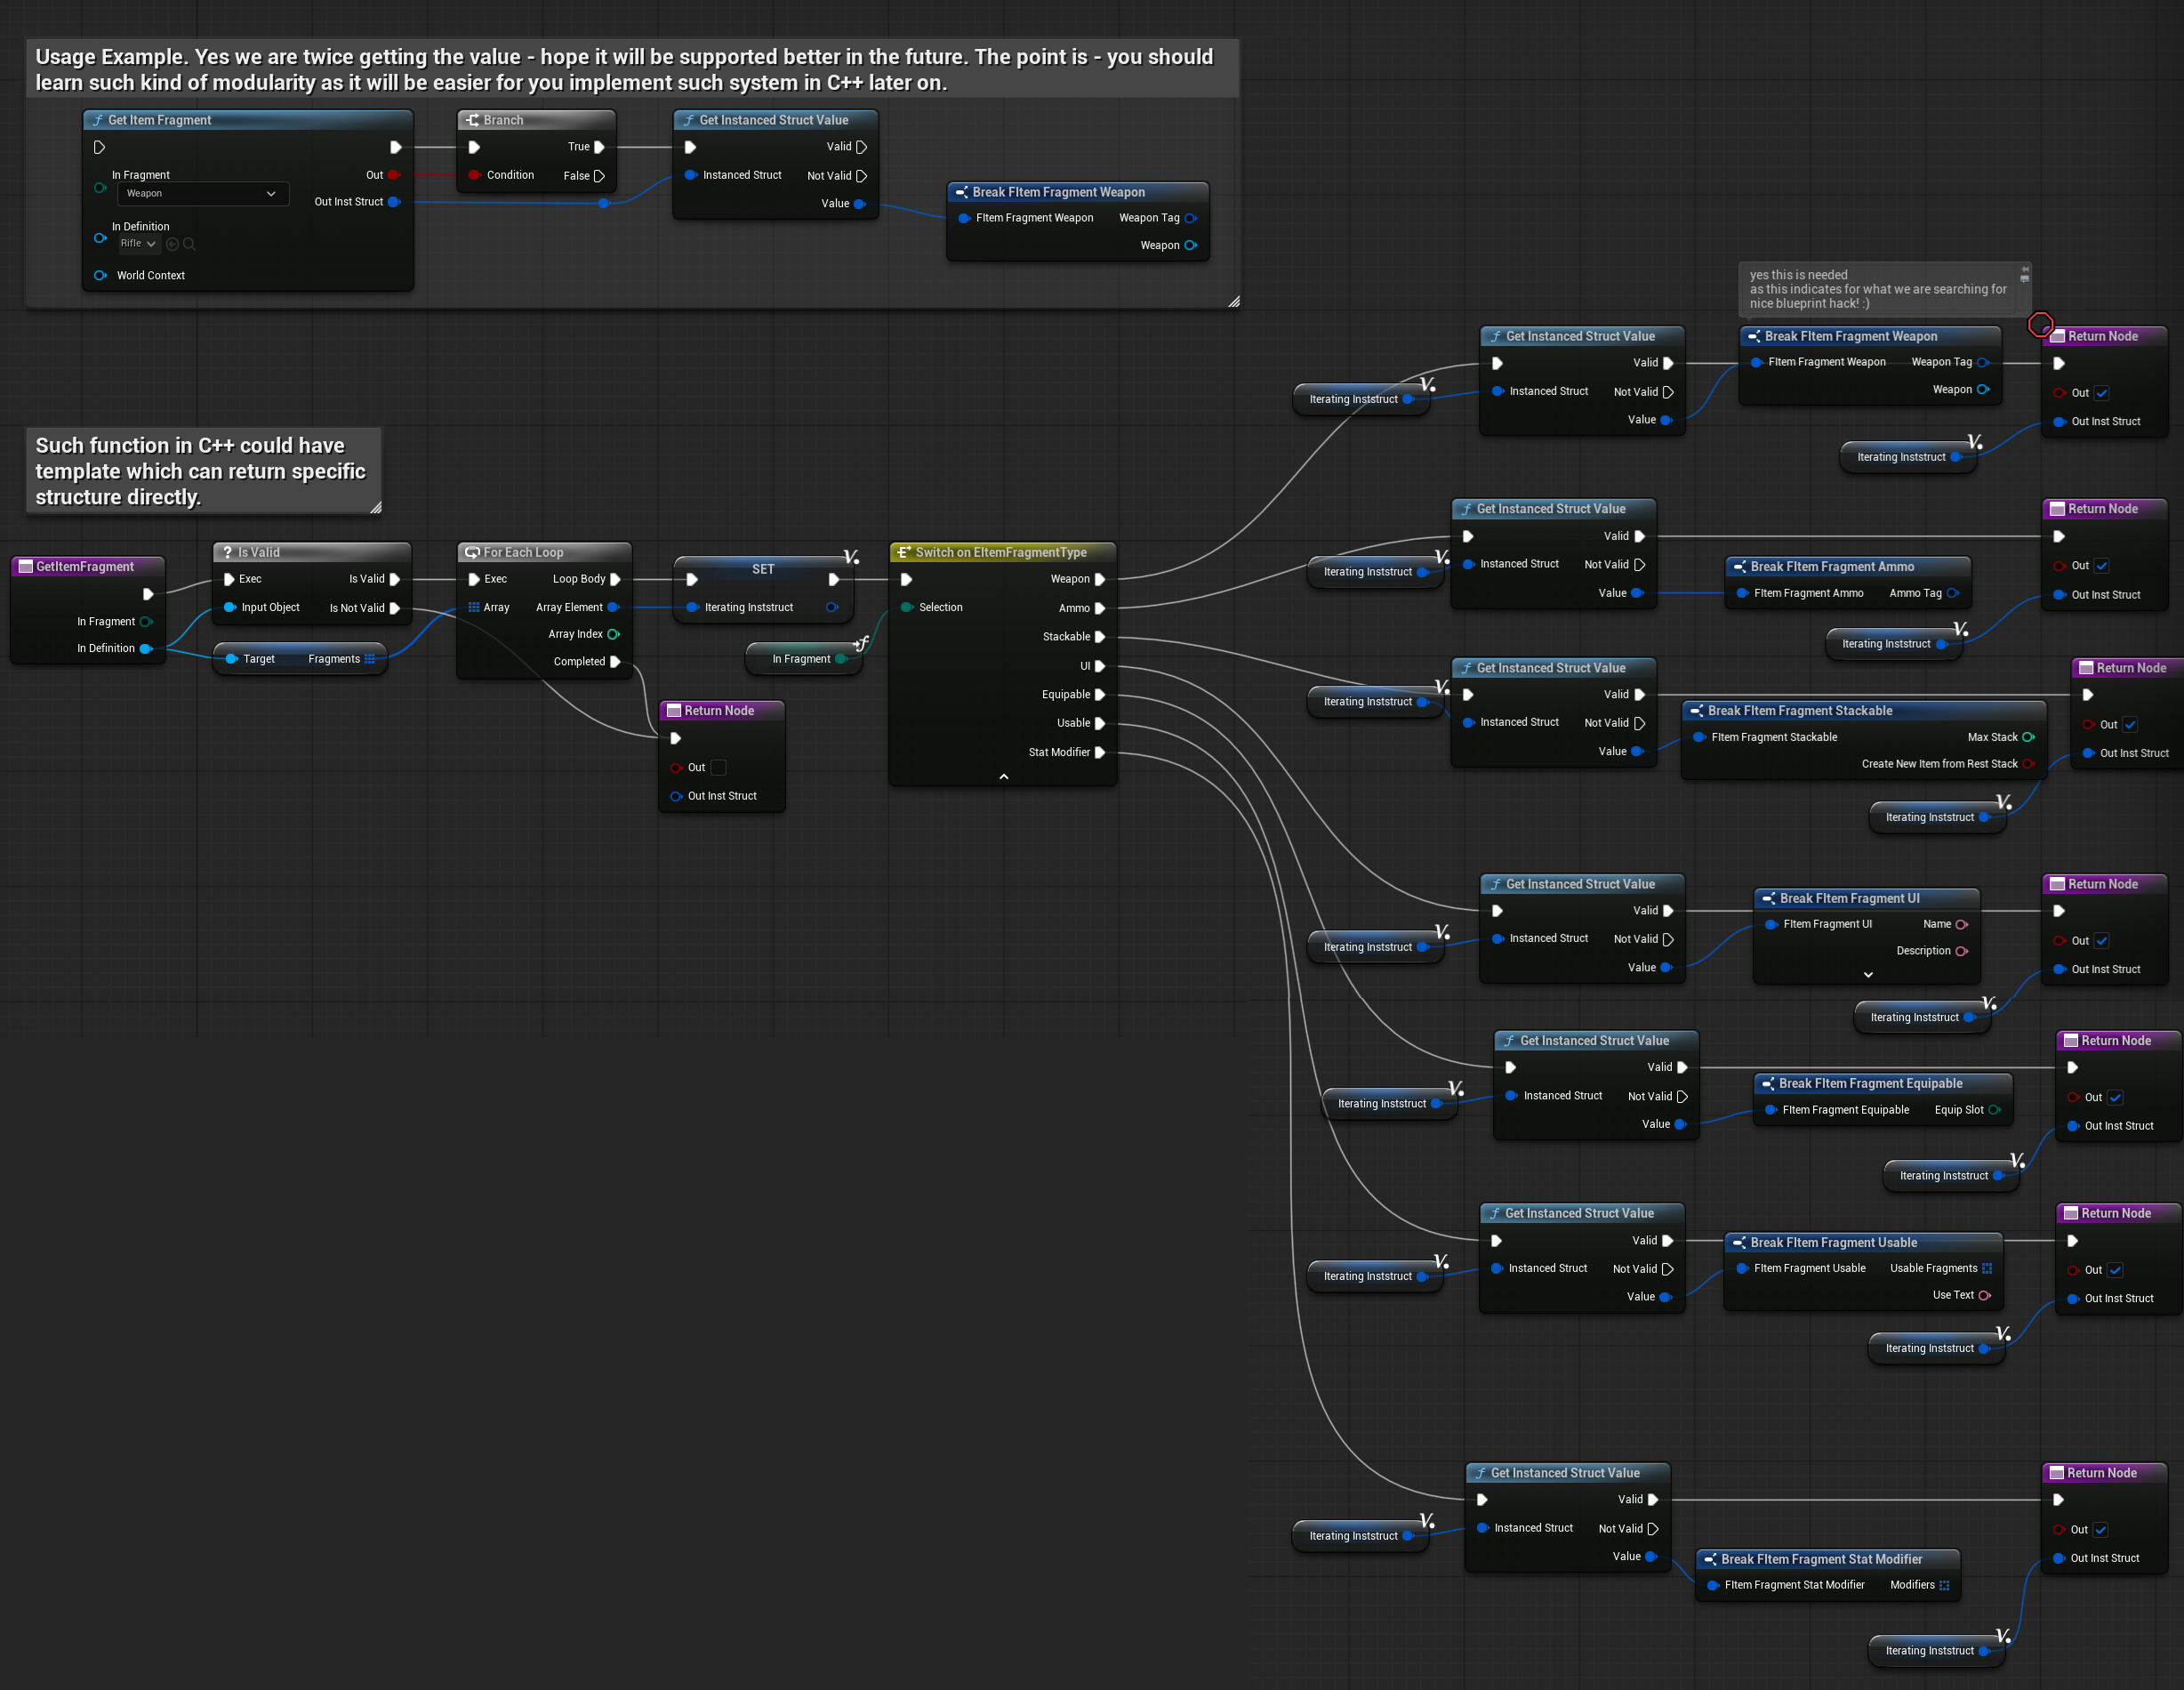
What it does
- Takes an enum that identifies the fragment type.
- Switches on the enum and returns the matching fragment struct.
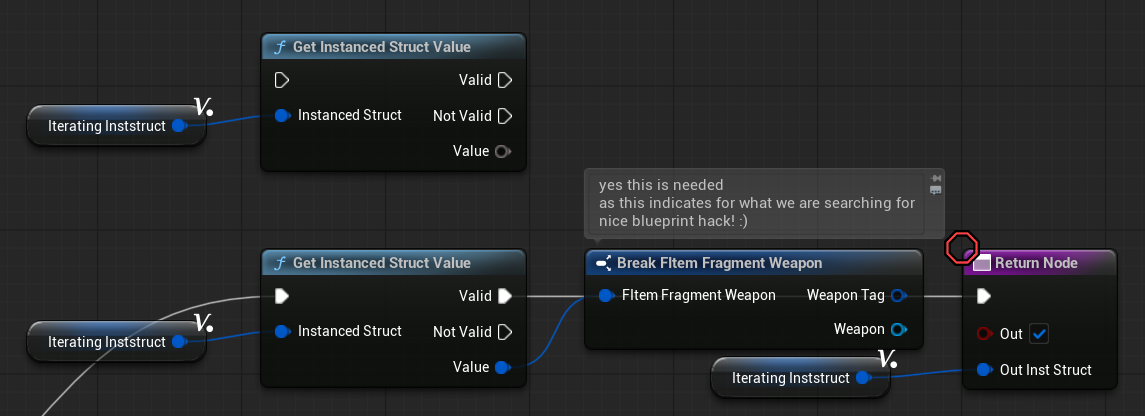
💡 Note: You need to break the specific struct into the struct you want to return—even if it isn’t connected to the return value. I don’t know why but it’s Blueprint related.
Take a moment to analyze this function in your project—the enum-to-struct mapping and the “break struct” node are the key parts.
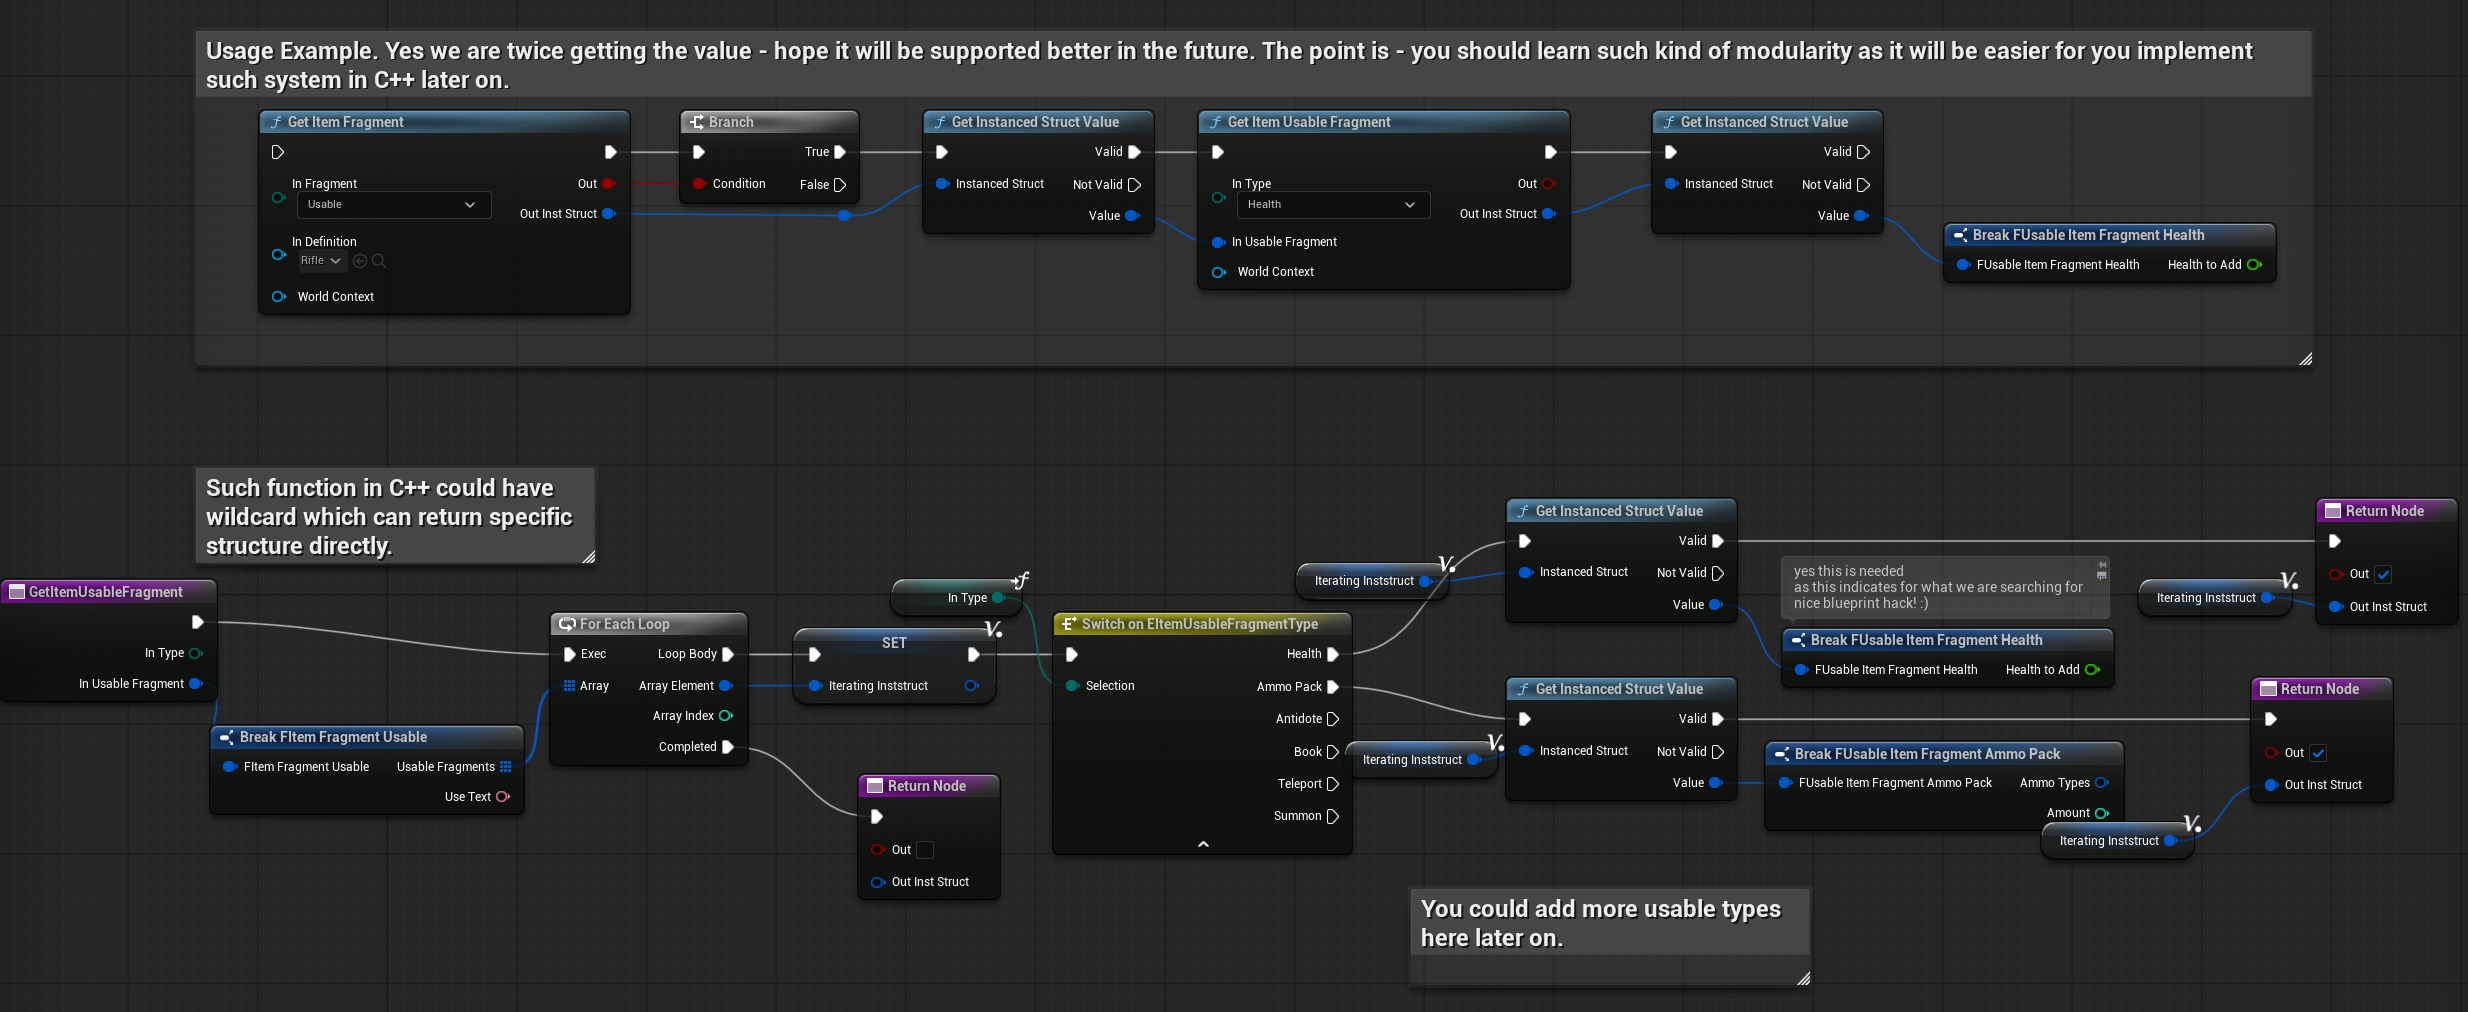
GetItemUsableFragment ( link )
This function retrieves the usable fragment from an item. First, it gets the general Item Usable fragment, and from there it extracts the specific usable fragment—for example, a health-usable fragment. The function works similarly to the previous one.
IsItemDefinitionStackable ( link )
This simple function quickly checks whether an item is stackable by verifying if the target item contains a stackable fragment.

You can add more static functions to the function library to keep your Blueprints cleaner and easier to maintain.
Weapon Component
We’ve made several changes to the weapon system:
- Ammo is now handled by the inventory.
- Weapon state is stored in the corresponding inventory item.
- Ability to show and hide the weapon.
- Ability to equip and unequip the weapon.
Let’s go through each of these changes in detail.
HaveAmmoInInventory ( link )
This function now checks the Inventory Component (instead of the Weapon Component) when determining ammo availability.
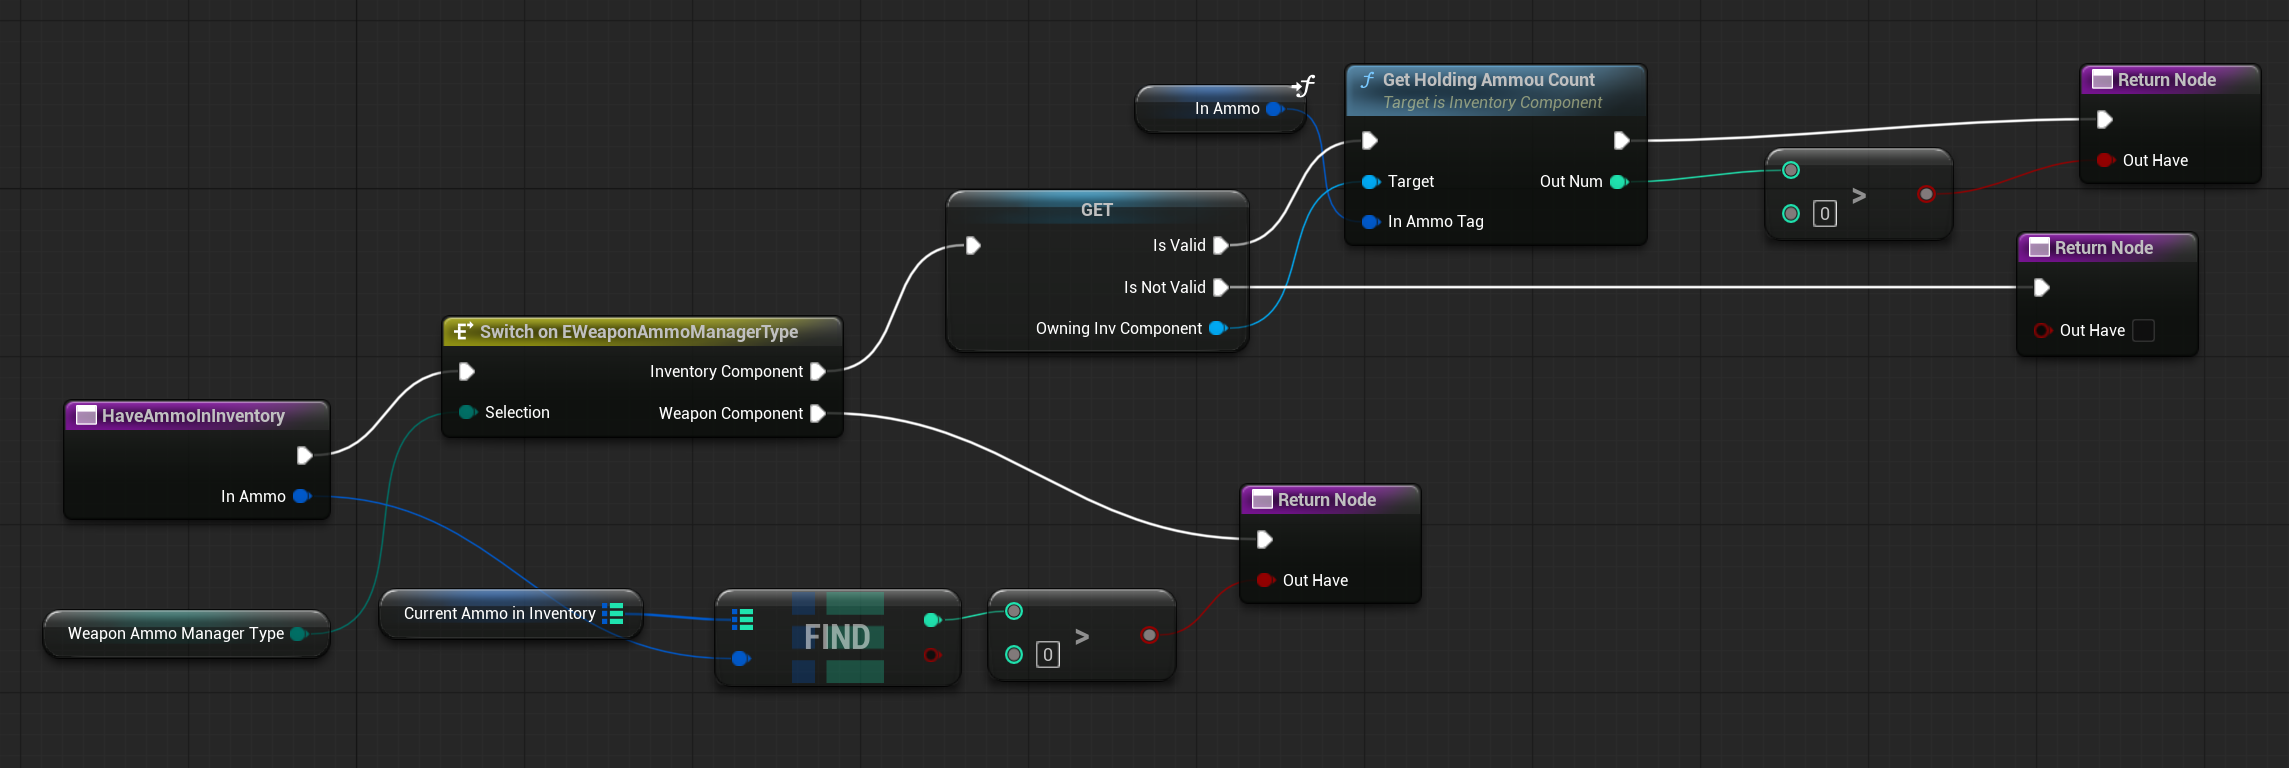
💡 Note: The option to bypass the Inventory Component still exists for AI or other simpler weapon “users.”
GetCurrentAmmoInInventory ( link )
Similar to the previous function, this one now checks the Inventory Component to determine the current ammo count.

GetOverheatCurrent ( link )
This function now retrieves the current overheat value from the Inventory Component instead of the Weapon Component.
SetCurrentOverheat ( link )
Similarly, instead of setting the overheat value in the Weapon Component, this function now uses the Inventory Component to manage it.
GetAccumulatedOverheatTime ( link )
SetAccumulatedOverheatTime ( link )
WeaponTick ( link )
The WeaponTick function now uses the EquipState to manage equipping and unequipping weapons.
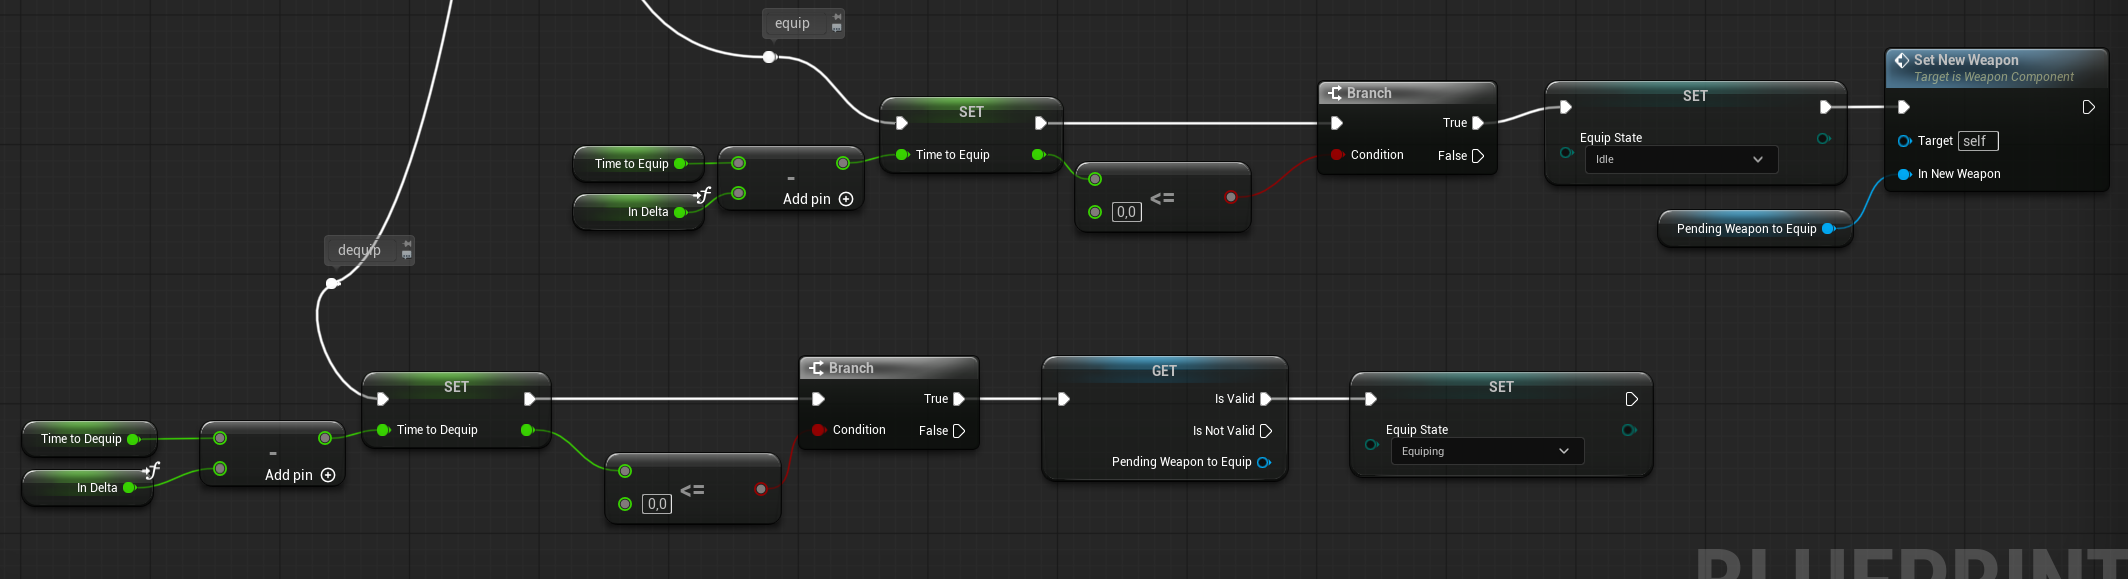
- If a weapon is being unequipped, the new weapon in
PendingWeaponToEquipwill be equipped automatically. This design allows a singleWeaponComponentto handle multiple weapons. TimeToDequipandTimeToEquipare also used in the animation blueprint to control when the weapon is hidden or shown.- The overheat logic has been updated to include the weapon component’s overheat state.
💡 Note: You could redesign the system to use one WeaponComponent per weapon actor instead. This way you could have less complicated WeaponTick function. The choice depends on your specific requirements and design preferences.
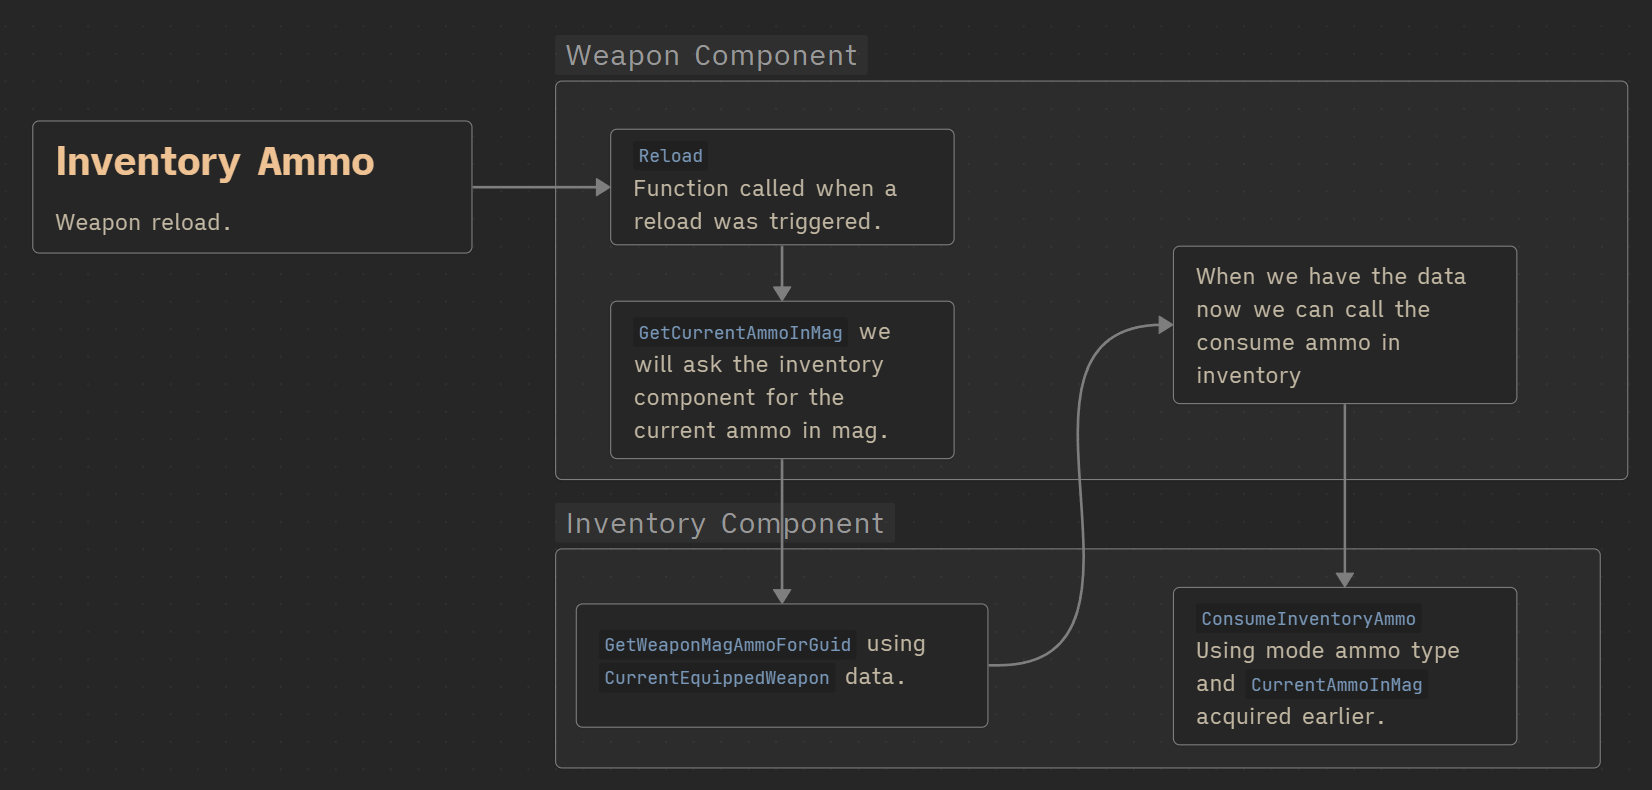
Reload ( link )
The Reload function now uses the Inventory Component to retrieve ammo and update the ammo count for the specific weapon mode.
Player Pawn
We added the Inventory Component to the player pawn.c
AddDefaultItems ( link )
This function is responsible for adding default items to the inventory.

💡 Note: A better approach would be to create a Primary Data Asset (e.g., DefaultInventoryItems) and configure the default items there. This way, you can update the default inventory by modifying data instead of recompiling the pawn blueprint. Something you could think about.
Next, let’s take a look at how the Inventory Component manages its equip and unequip dispatchers.
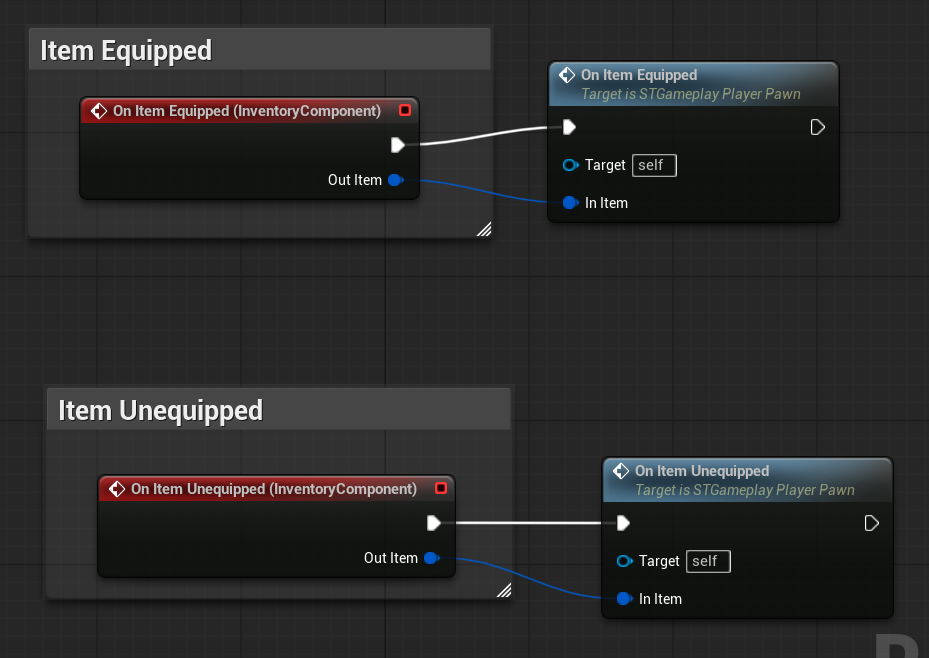
OnItemEquipped ( link )
This function is called whenever an item is equipped.
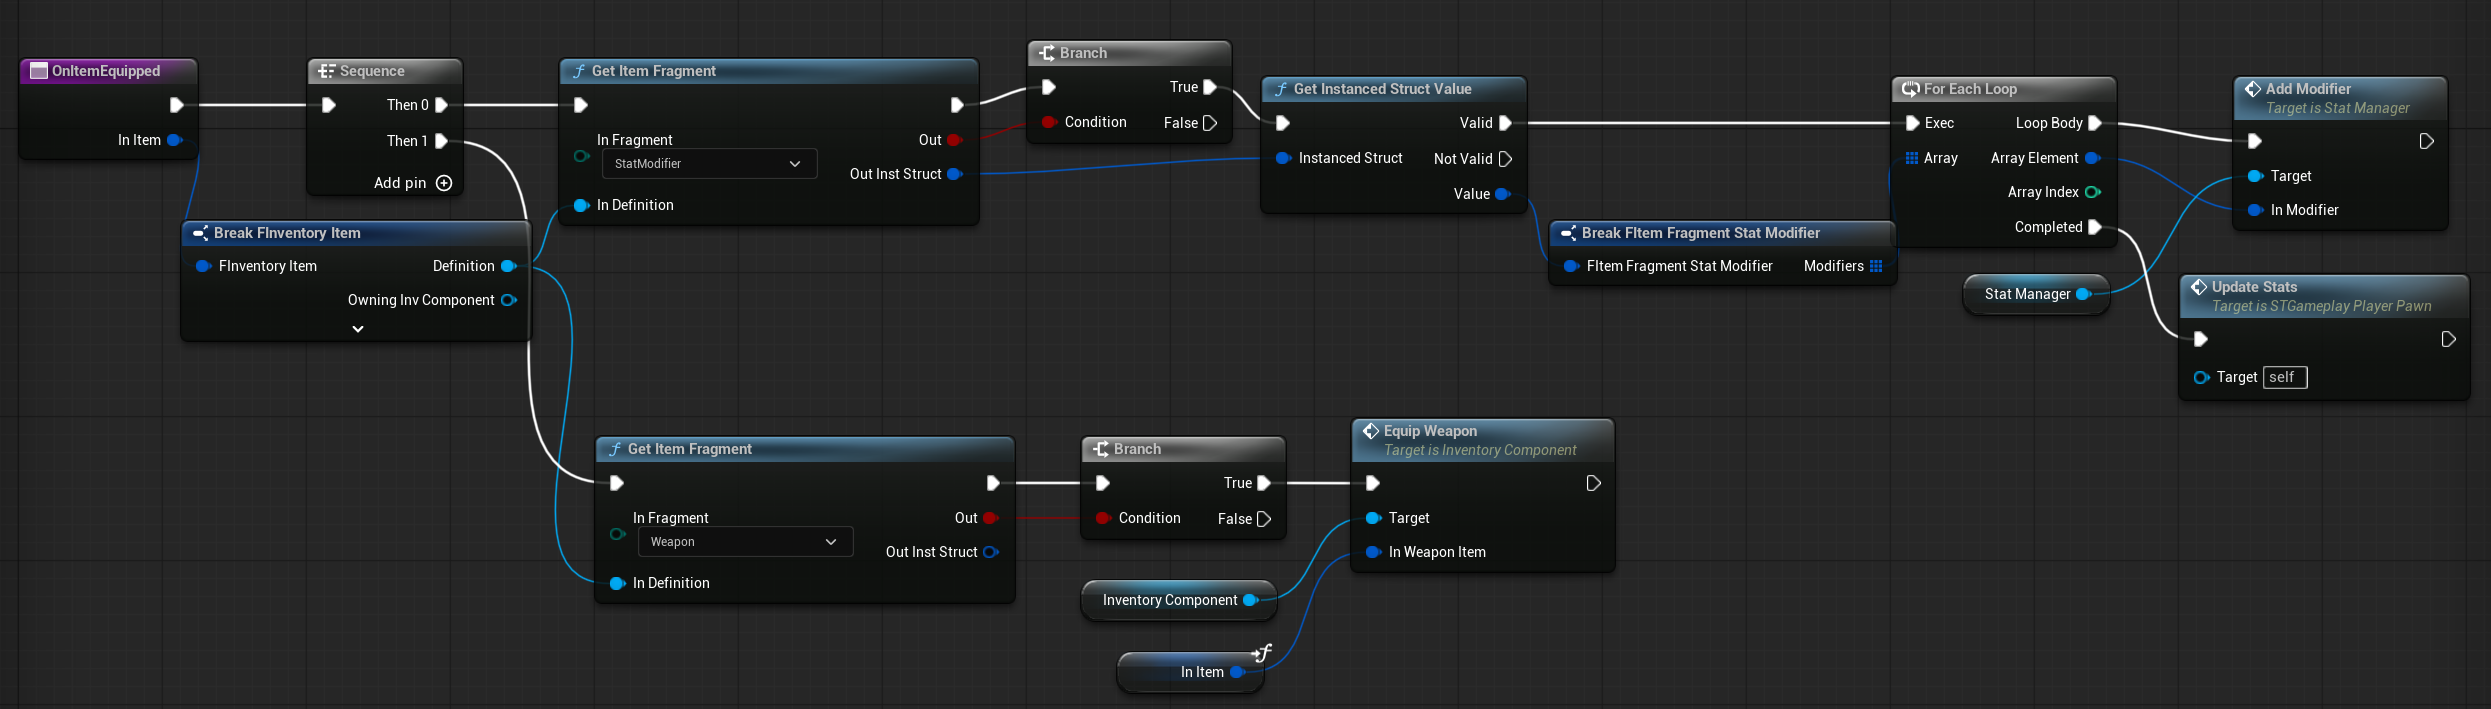
- If the item has a StatModifier fragment, the function updates the Stat Manager (described later).
- If the item has a Weapon fragment, the function attempts to equip the weapon.
This is also the place where you can add more fragment types and handle their activation or deactivation.
OnItemUnequipped ( link )
This function is called whenever an item is unequipped.
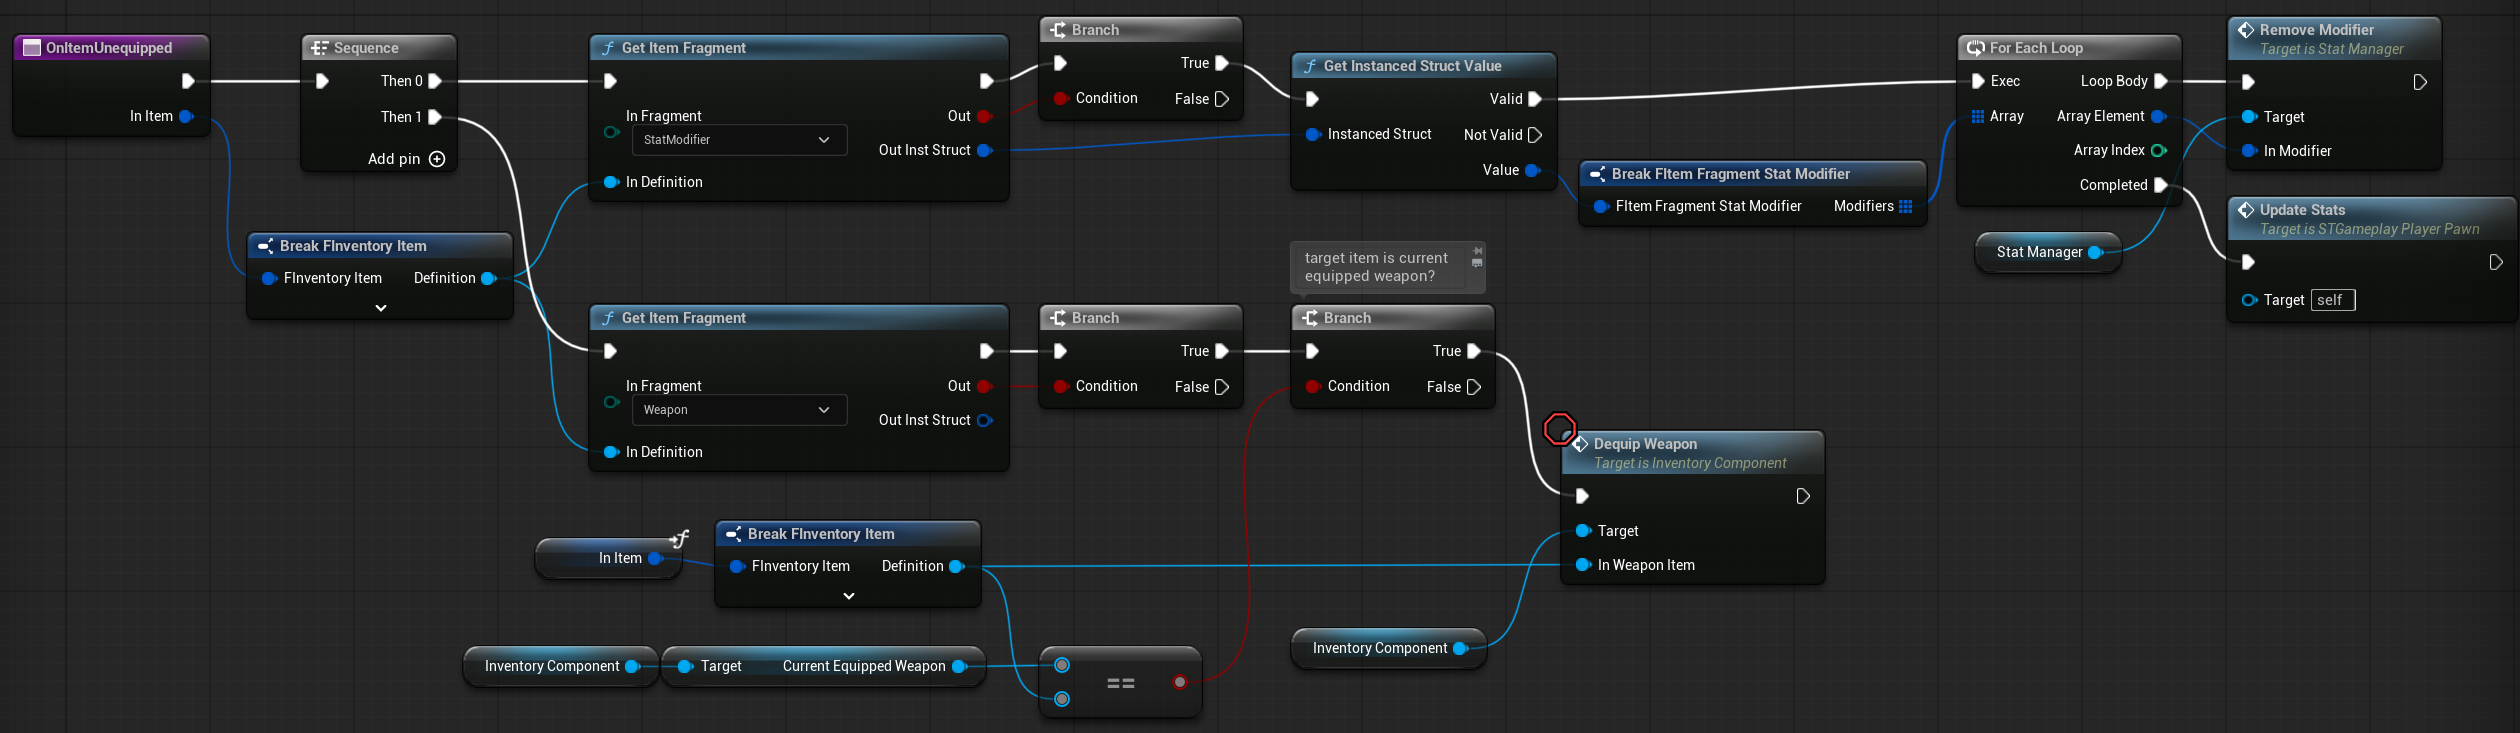
Similar to OnItemEquipped, but it deactivates the item’s fragments instead. If the unequipped item is the currently equipped weapon, the weapon will also be unequipped.
Player Controller
Our Player Controller get new input actions.
Quick Slots Input
Requesting to equip a weapon for a specific slot ID.
Inventory and Potion Input
The inventory input will push the inventory widget (described later) onto the Menu layer.
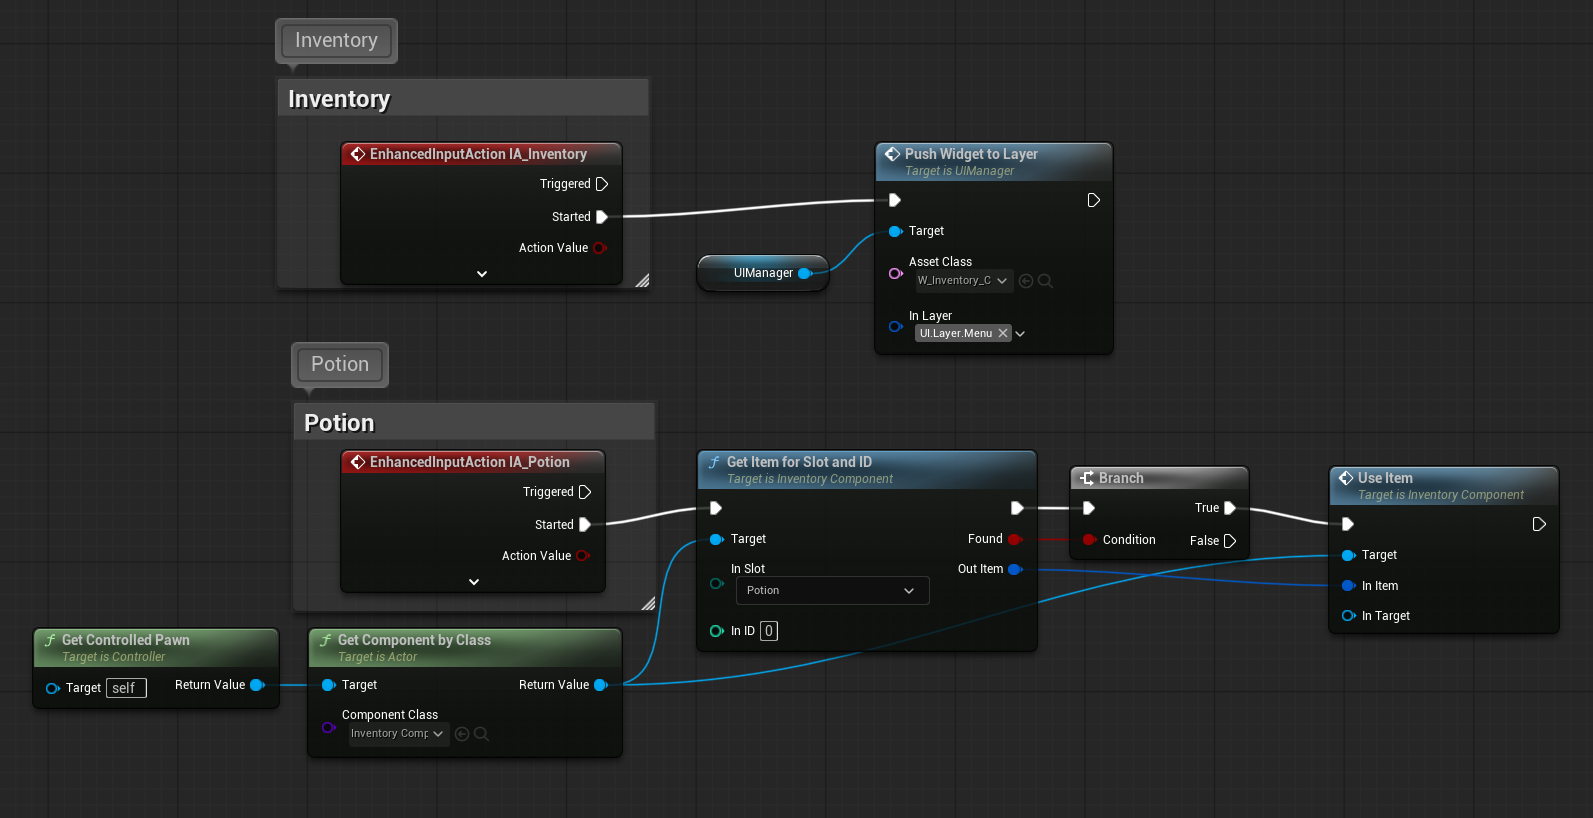
The potion input retrieves the potion item from the potion slot and attempts to use it. Simple as that!
Stat Manager
To complete the inventory and item system, I also implemented a simple Stat Manager. Its role is to create character stats such as armor, max health, damage multipliers, or any other stat you wish to add.
Items can include a Stat Modifier Fragment, which integrates with the Stat Manager to modify these stats.
Data
EStatType. We need a way to identify each stat, and this enum serves that purpose.
| NONE | Default value, no stat. |
| Health | Increases maximum health. |
| Armor | Increases maximum armor. |
| DamageMultiplier | Modifies the final damage multiplier. |
FStatModifier. To modify stats, we need a structure that specifies which stat to modify and how.
| StatType | | The stat that should be modified. |
| Value | float | The amount by which the stat is modified. This can be a positive or negative value. |
| IsMultiplier | bool | Indicates whether the value is a multiplier (true) or an additive value (false). |
Variables
StatManager is an ActorComponent that can be added to any Actor.
| ActiveModifiers | | Holds the current active stat modifiers. When a new modifier is applied, it is added to this array. |
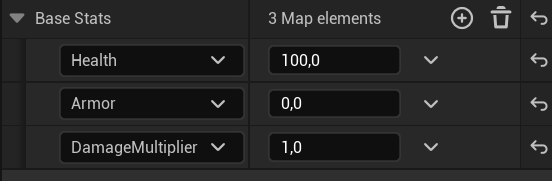
| BaseStats | TMap<EStatType, float> | Stores the starting (base) stats for the actor, such as initial health or armor. These values are necessary to know how to apply modifiers correctly. |
This is how the BaseStats are configured in the Pawn’s StatManager component.
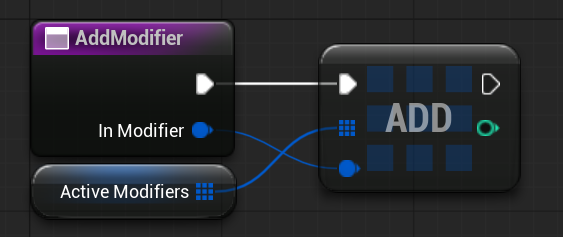
AddModifier ( link )
This function adds a new stat modifier. It’s straightforward—simply appending the new modifier to the ActiveModifiers array.
RemoveModifier ( link )
This function removes a specific stat modifier. First, it searches the ActiveModifiers array to ensure the modifier to be removed is present. Once confirmed, the modifier is removed from the array.
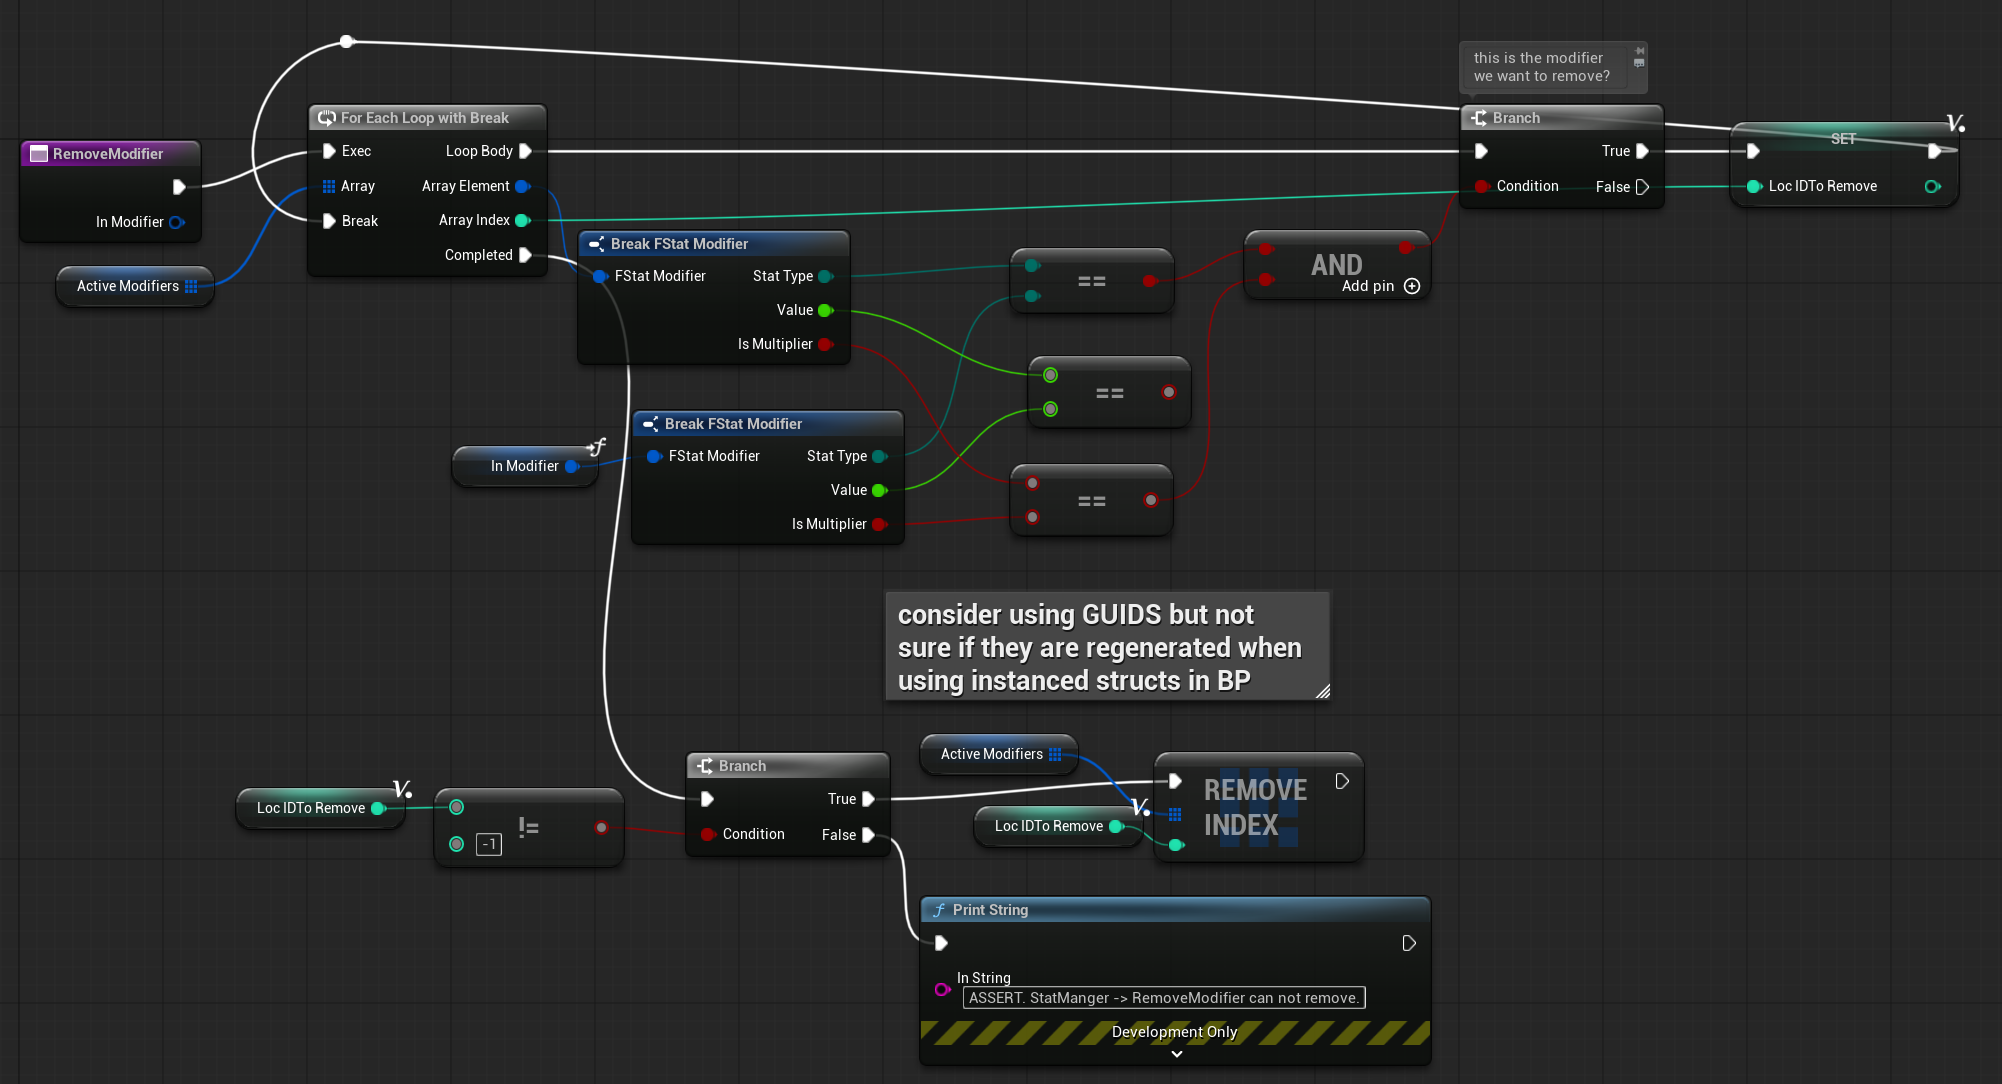
💡 Note: In C++, you can define == operators for structs to implement a custom comparison method. Finding the exact modifier isn’t always trivial, especially if multiple identical modifiers are active at the same time.
GetStatValue ( link )
This function returns the current value of a stat based on the EStatType enum input.
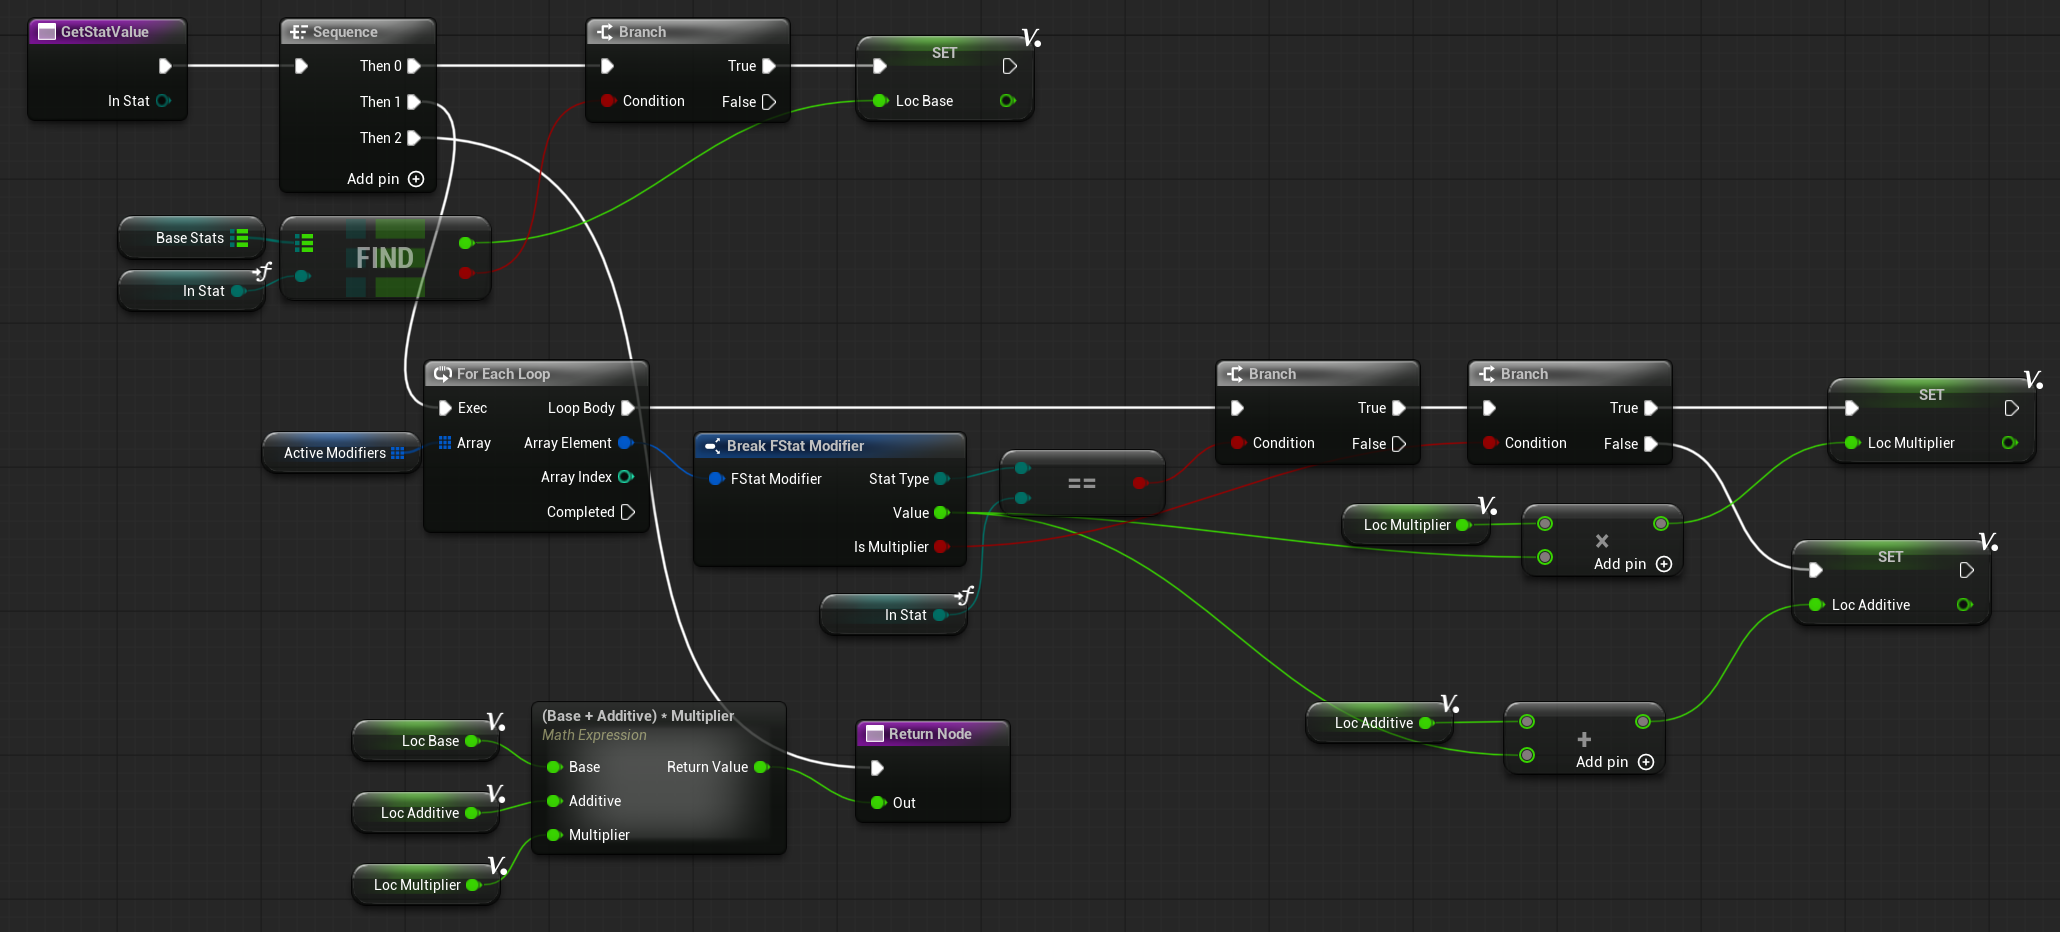
Flow is straightforward:
- Retrieve the base stat from the
BaseStatsvariable. - Get the corresponding modifiers for that stat from
ActiveModifiers.- For each modifier, add its value to a local Additive or Multiplier variable.
- Return the final value by applying the combined Additive and Multiplier values to the base stat.
💡 Note: Handling additive vs. multiplicative modifiers can be tricky, as the order and type of operations significantly affect the final result. That’s why we first combine all additive and multiplier values and apply them at the end to calculate the final stat value.
Pawn – UpdateStats ( link )
In the Player Pawn, which includes the StatManager component, the UpdateStats function retrieves the current stat values and updates attributes such as maximum health, armor, or damage multiplier.

This function is called:
- On pawn initialization.
- When equipping or unequipping an item with a Stat Modifier fragment.
- Whenever stats need to be recalculated.
As you can see, this function acts as a bridge between the StatManager and the actual stat values, such as health or armor.
Gamepad UI Input
This tutorial also covers the UI, and in my opinion, it’s best to consider gamepad support from day one.
Goals:
- Dynamically switch input between keyboard and gamepad.
- Display the appropriate input descriptions and icons depending on the current input type (keyboard or gamepad).
- Implement everything from scratch without relying on external plugins.

💡 Note: Normally, I would use Common UI from the Lyra Example, which already handles gamepad inputs and dynamic switching between keyboard and gamepad.
Data
EInputDeviceType. Identifies the type of input device the player is using.
| MouseAndKeyboard | Using a mouse and keyboard setup. |
| Gamepad | Using a gamepad controller. Later, we can also check which specific gamepad is in use. |
| Touch | Using a touch interface, e.g., on a phone. |
EInputDeviceKeySetType. Sometimes you want to categorize inputs, e.g., “Movement Keys” or “Left/Right Keys.” This enum identifies those input types.
| NONE | Default value, no specific input type. |
| LeftRight | Represents left and right inputs (e.g., left/right arrow keys on keyboard or triggers on a gamepad). |
| UpDown | Represents up and down inputs (e.g., up/down arrow keys on keyboard or triggers on a gamepad). |
| Movement | Represents general movement input (e.g., WSAD on keyboard). |
FInputDeviceIdentifierPair. A helper structure used to identify a specific gamepad controller type (e.g., XSX, DualSense, Switch Pro).
| InputDeviceName | | Unique name for the input device. |
| HardwareDeviceIdentifier | name | Unique identifier for the hardware device. |
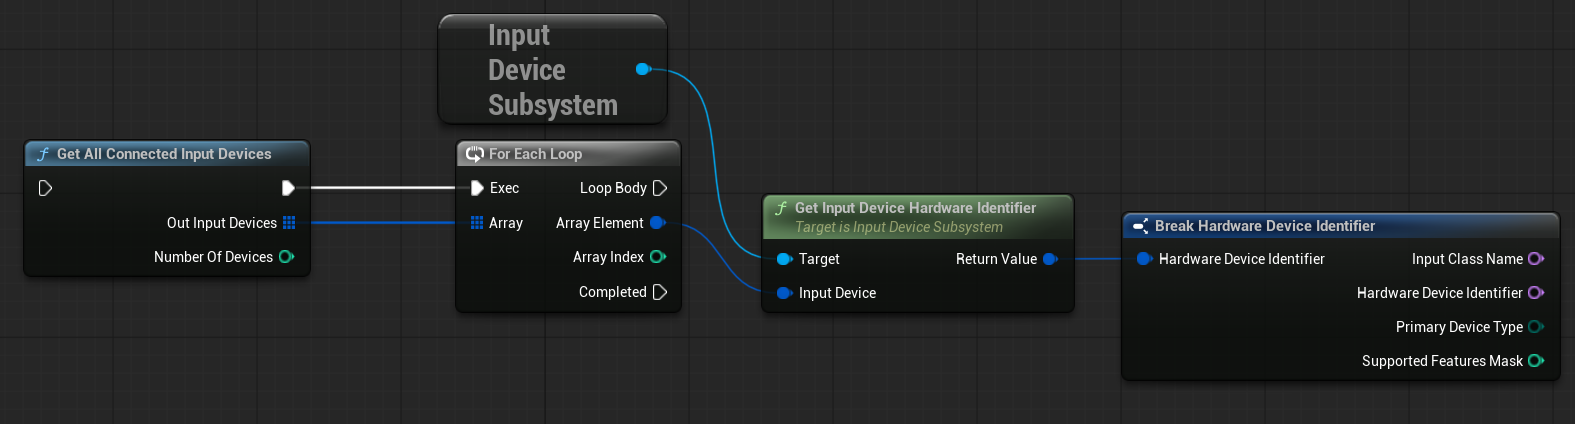
This is how the engine identifies hardware input devices. When a new device is connected, you can use these fields to check the InputClassName and HardwareDeviceIdentifier to determine the exact controller type.
This struct is used to determine which PDA_InputType (described later) to use. Different files can be assigned for XSX or PS controllers, as they have different icons.
FInputKeyTextureConfig. This structure defines the relationship between an input key and its corresponding icon texture. It allows you to assign a specific icon for each input key.
| Key | | The input key. |
| Texture | Texture2d Soft | A Texture2D or soft reference to the icon for that key. |
PDA_InputType
This is a Primary Data Asset that stores the configuration for device icons.
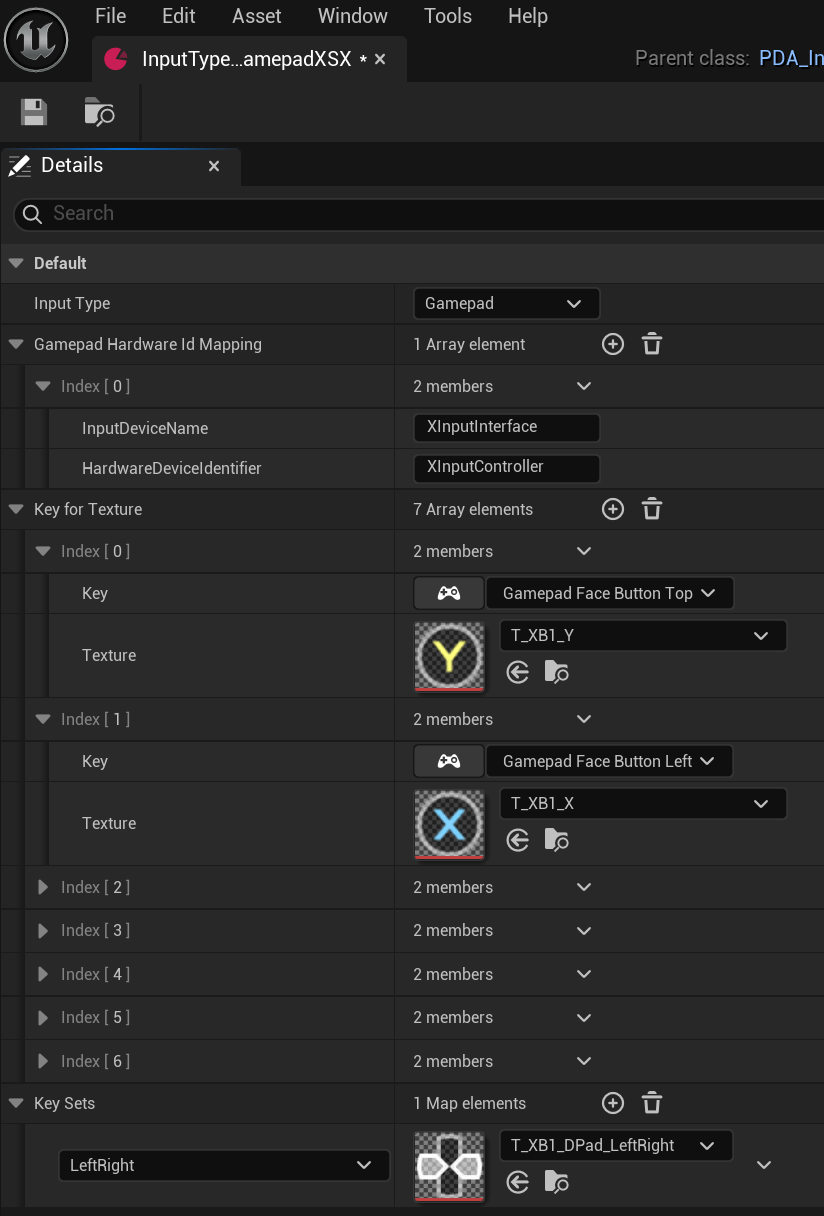
Variables
| InputType | | Holds the current input type (Controller, Touch, or Mouse and Keyboard). |
| GamepadHardwareIdMapping | FInputDeviceIdentifierPair Array | Stores identifiers for specific input hardware, allowing the system to select the correct PDA based on the connected device. |
| KeyForTexture | FInputKeyTextureConfig Array | Maps individual input keys to their corresponding textures/icons. |
| KeySets | TMap<EInputDeviceKeySetType, Texture2D soft> | Stores texture mappings for grouped key sets, such as Movement or Left/Right inputs. |
GetTextureForKey ( link )
This function returns the soft Texture2D associated with a given input key.
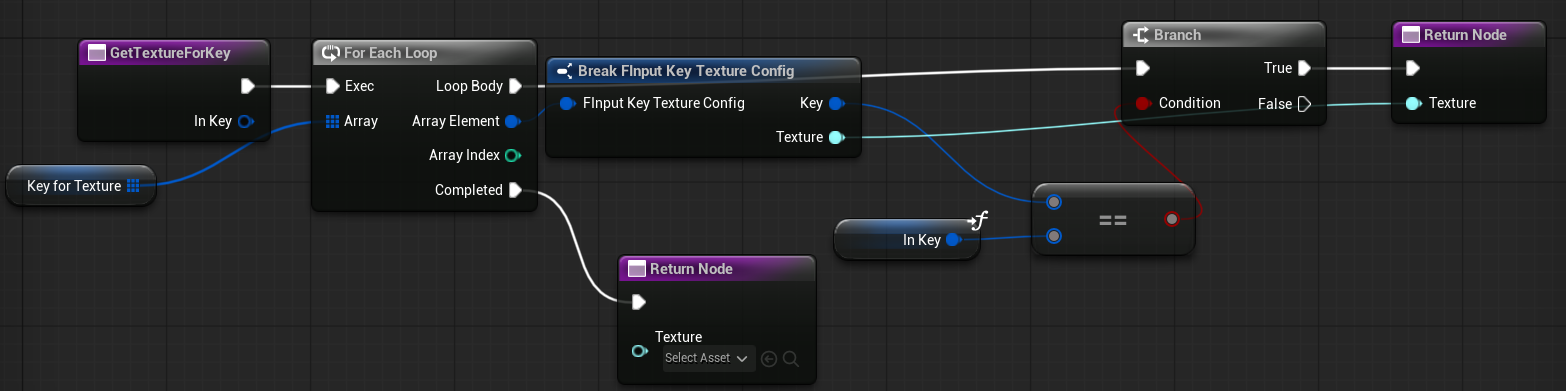
Flow
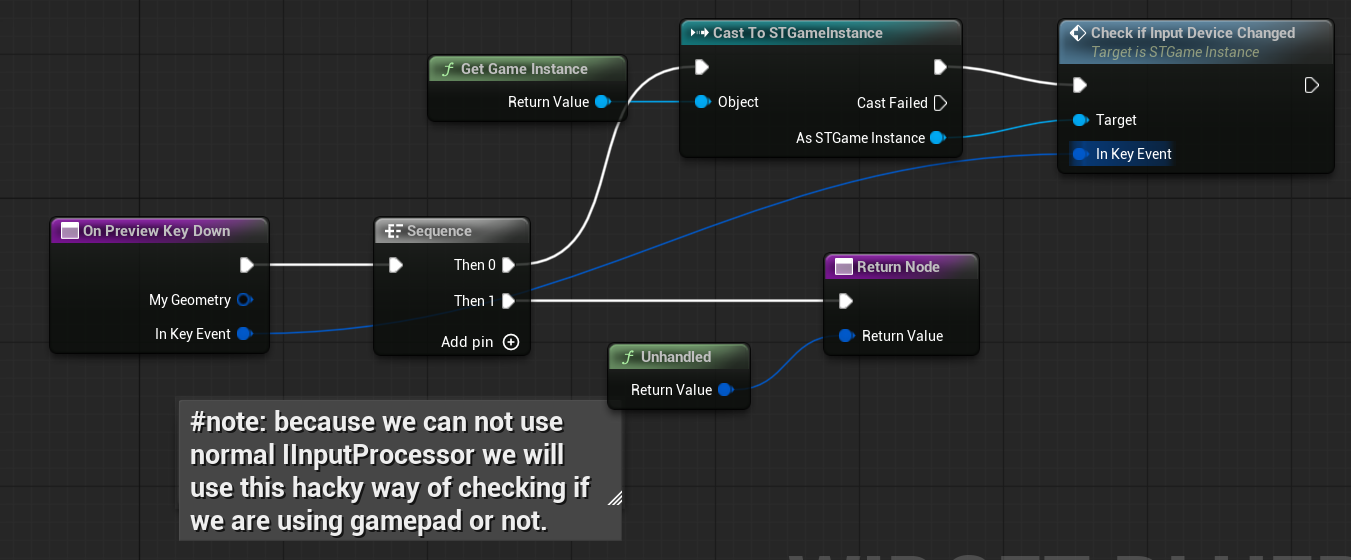
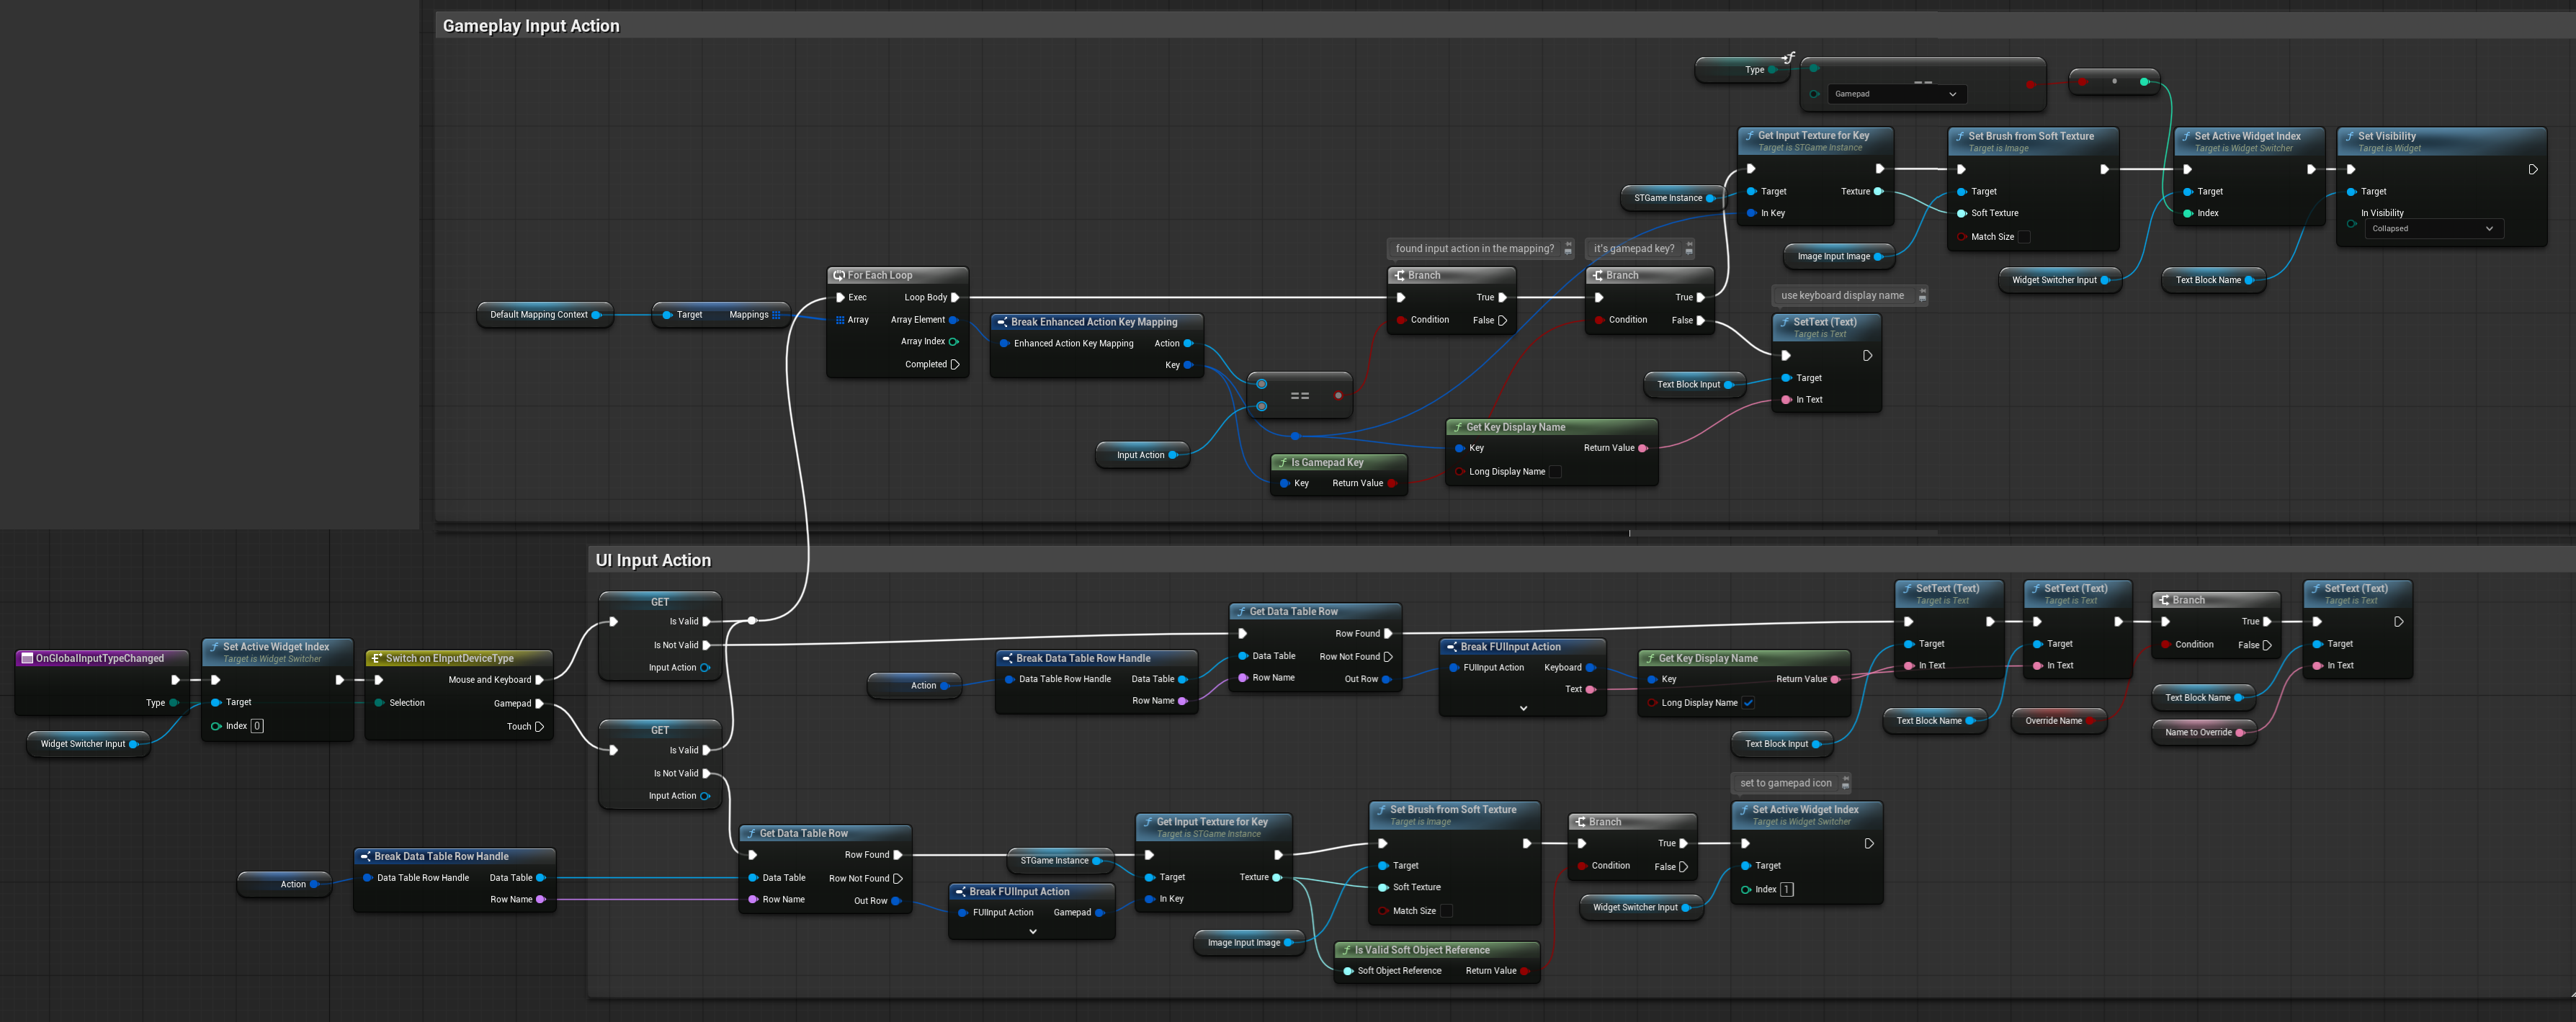
Check the graph below showing how input device changes update the input widget.
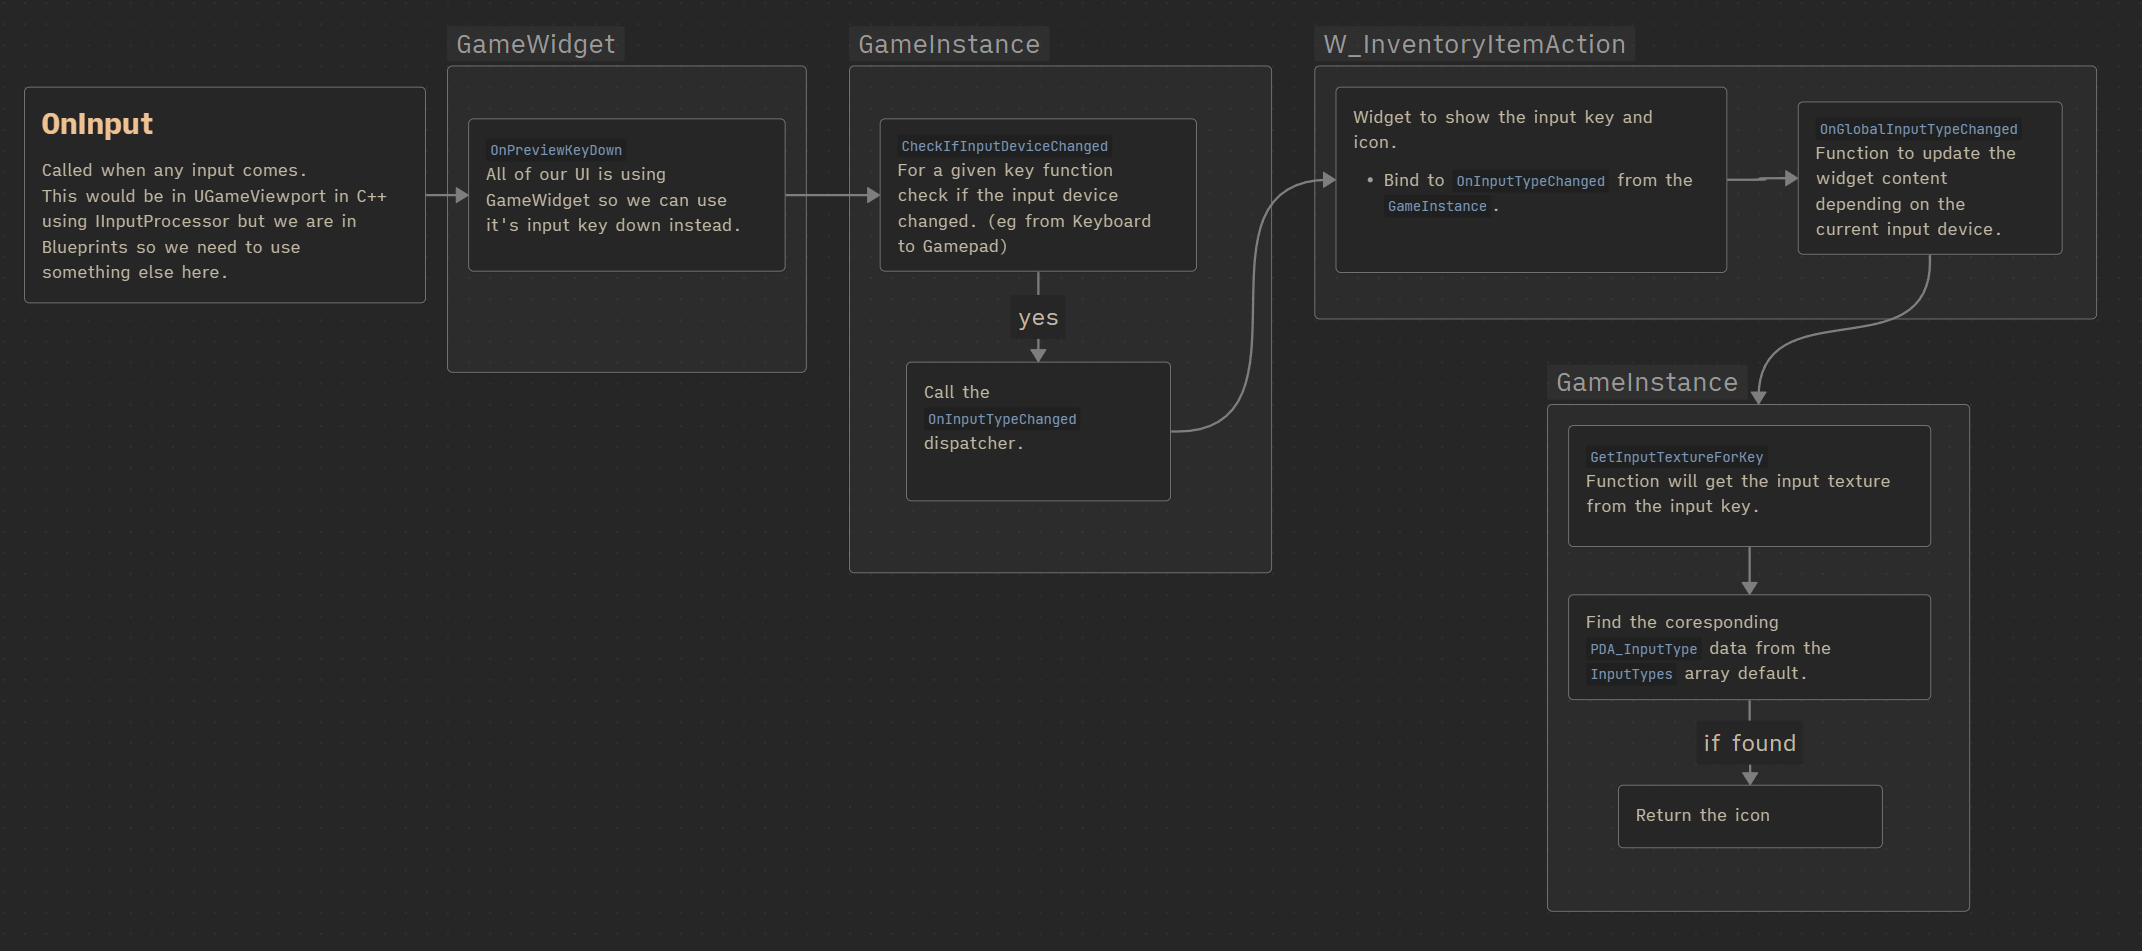
As you can see:
- GameWidget
OnPreviewKeyDownis called whenever any input is received.- 💡 Note: In C++, you would typically use
UGameViewportandIInputProcessorinstead.
- 💡 Note: In C++, you would typically use
- It calls
GameInstance::CheckIfInputDeviceChanged, which triggers a dispatcher if the input device has changed (e.g., switching from keyboard to gamepad).
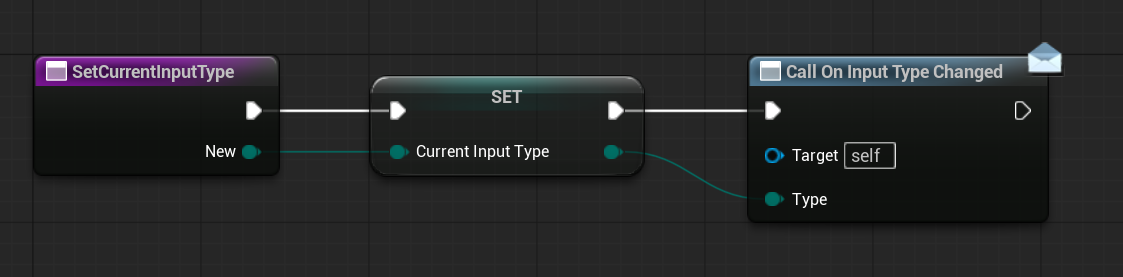
The W_InventoryItemAction widget is the input widget that displays the current input type and reacts to input device changes:
- The
W_InventoryItemActionwidget, which handles input display, binds toOnInputTypeChangedin the GameInstance. - Finally, it calls
OnGlobalInputTypeChanged, which updates the widget’s appearance based on the current input type.
Game Instance
Now let’s go to GameInstance and check what was done there.
Variables
| InputTypes | | Stores all input type configurations. |
| CurrentInputType | EInputDeviceType | Holds the currently active input type (Controller, Mouse, or Touch). |
Dispatchers
| OnInputTypeChanged | | Called whenever CurrentInputType changes. The dispatcher also passes the new EInputDeviceType as a parameter. |
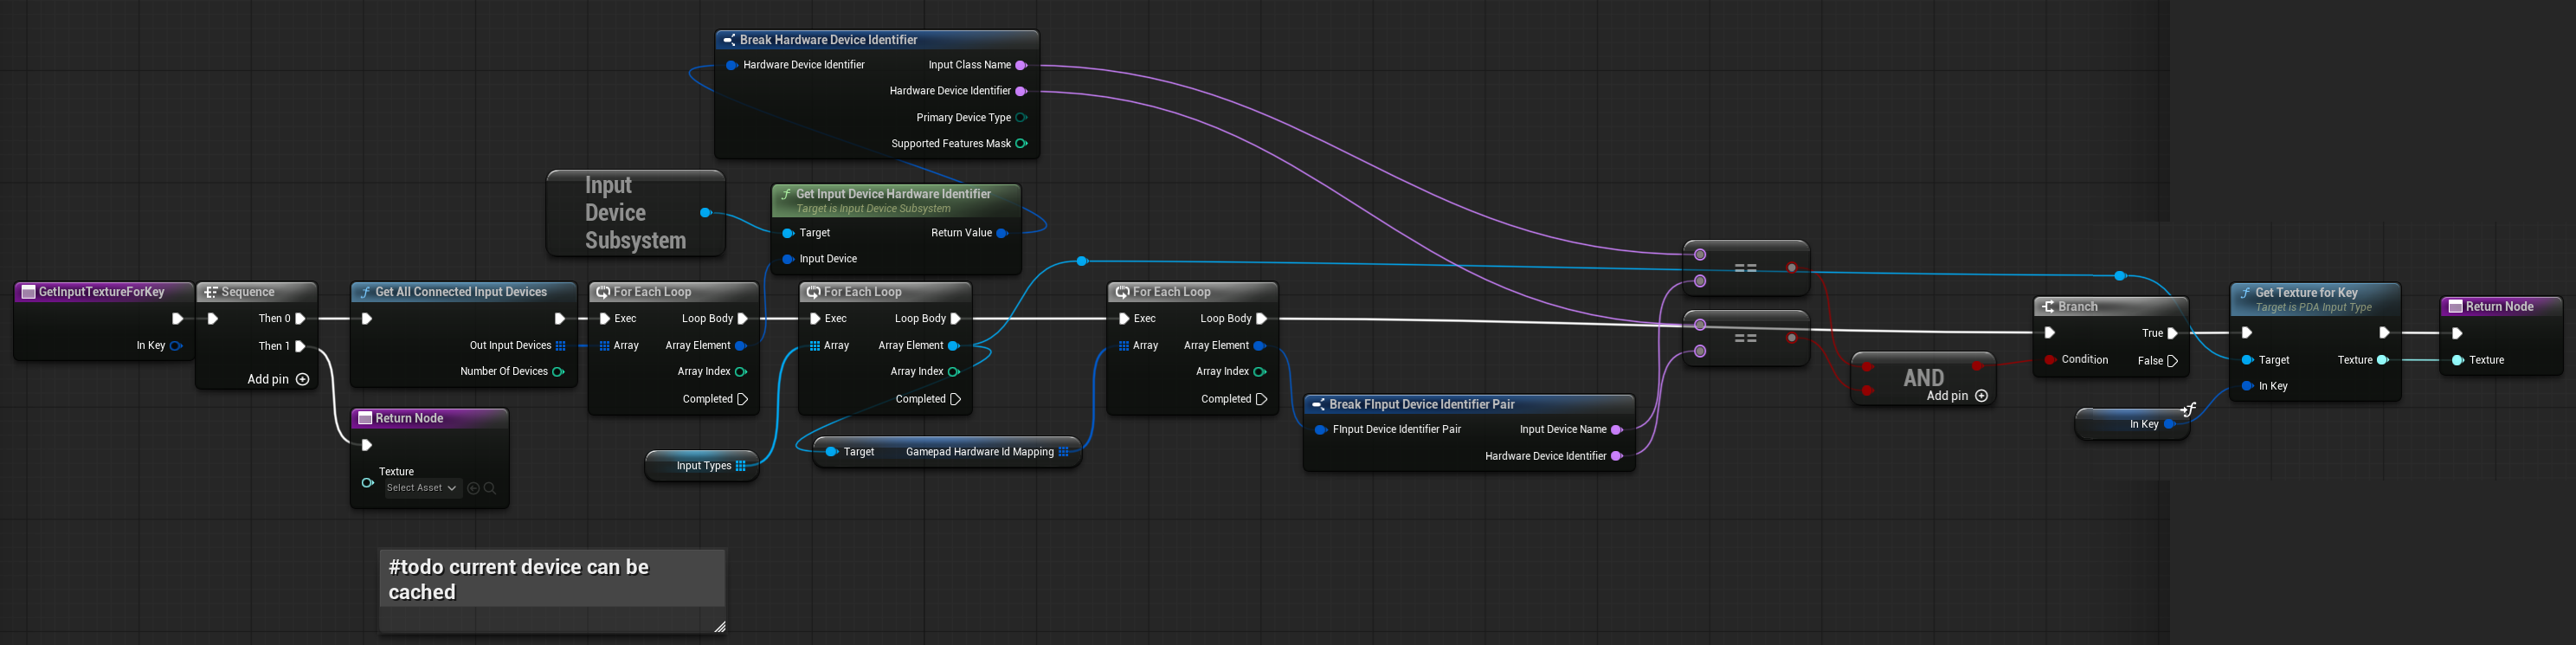
GetInputTextureForKey ( link )
This function retrieves the texture for a specific input key. It iterates through all InputTypes PDAs and returns the corresponding icon for the key.
CheckIfInputDeviceChanged ( link )
A simple function that checks whether the input represents a new input device. If so, it calls SetCurrentInputType.
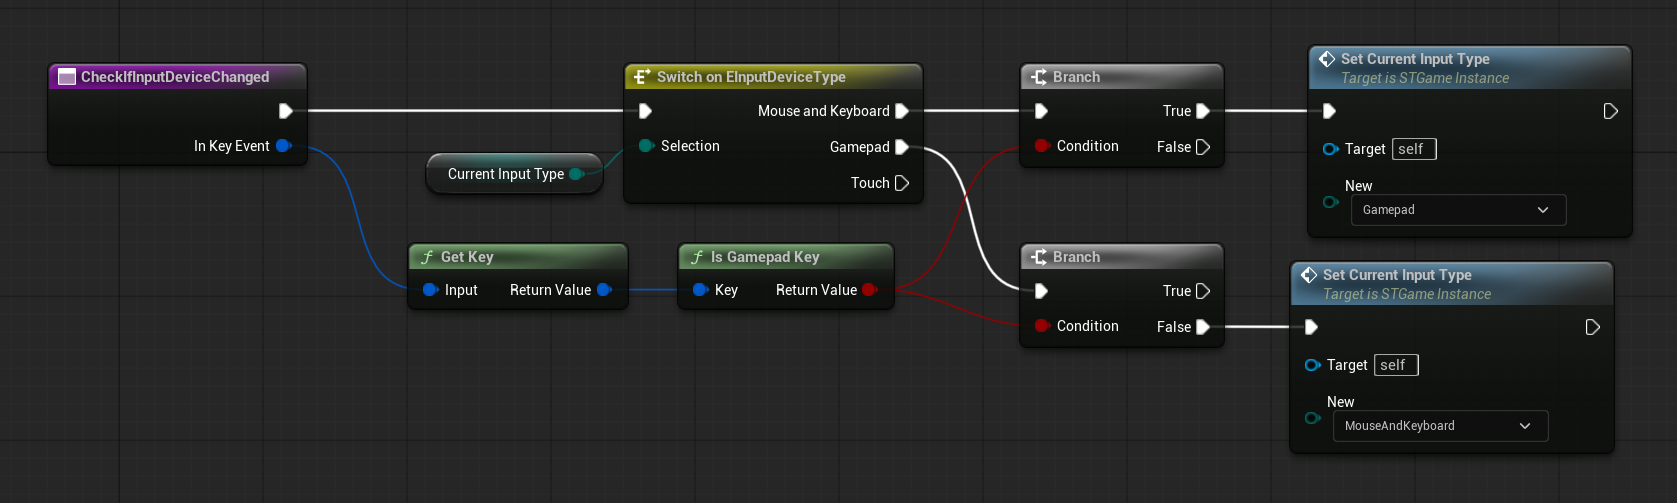
This function sets a new input type and calls the OnInputTypeChanged dispatcher.
GameWidget
Since all of our game user widgets (HUD, inventory, layouts) inherit from GameWidget, we use its OnPreviewKeyDown ( link ) function to monitor input through the GameInstance.
💡 Note: Normally, in C++ you would use UGameViewport with an IInputProcessor instead.
Inventory UI
Now we can move on to the Inventory UI, which isn’t so easy since we’ll be building everything from scratch. Take a break and have a coffee like I’m doing 😀
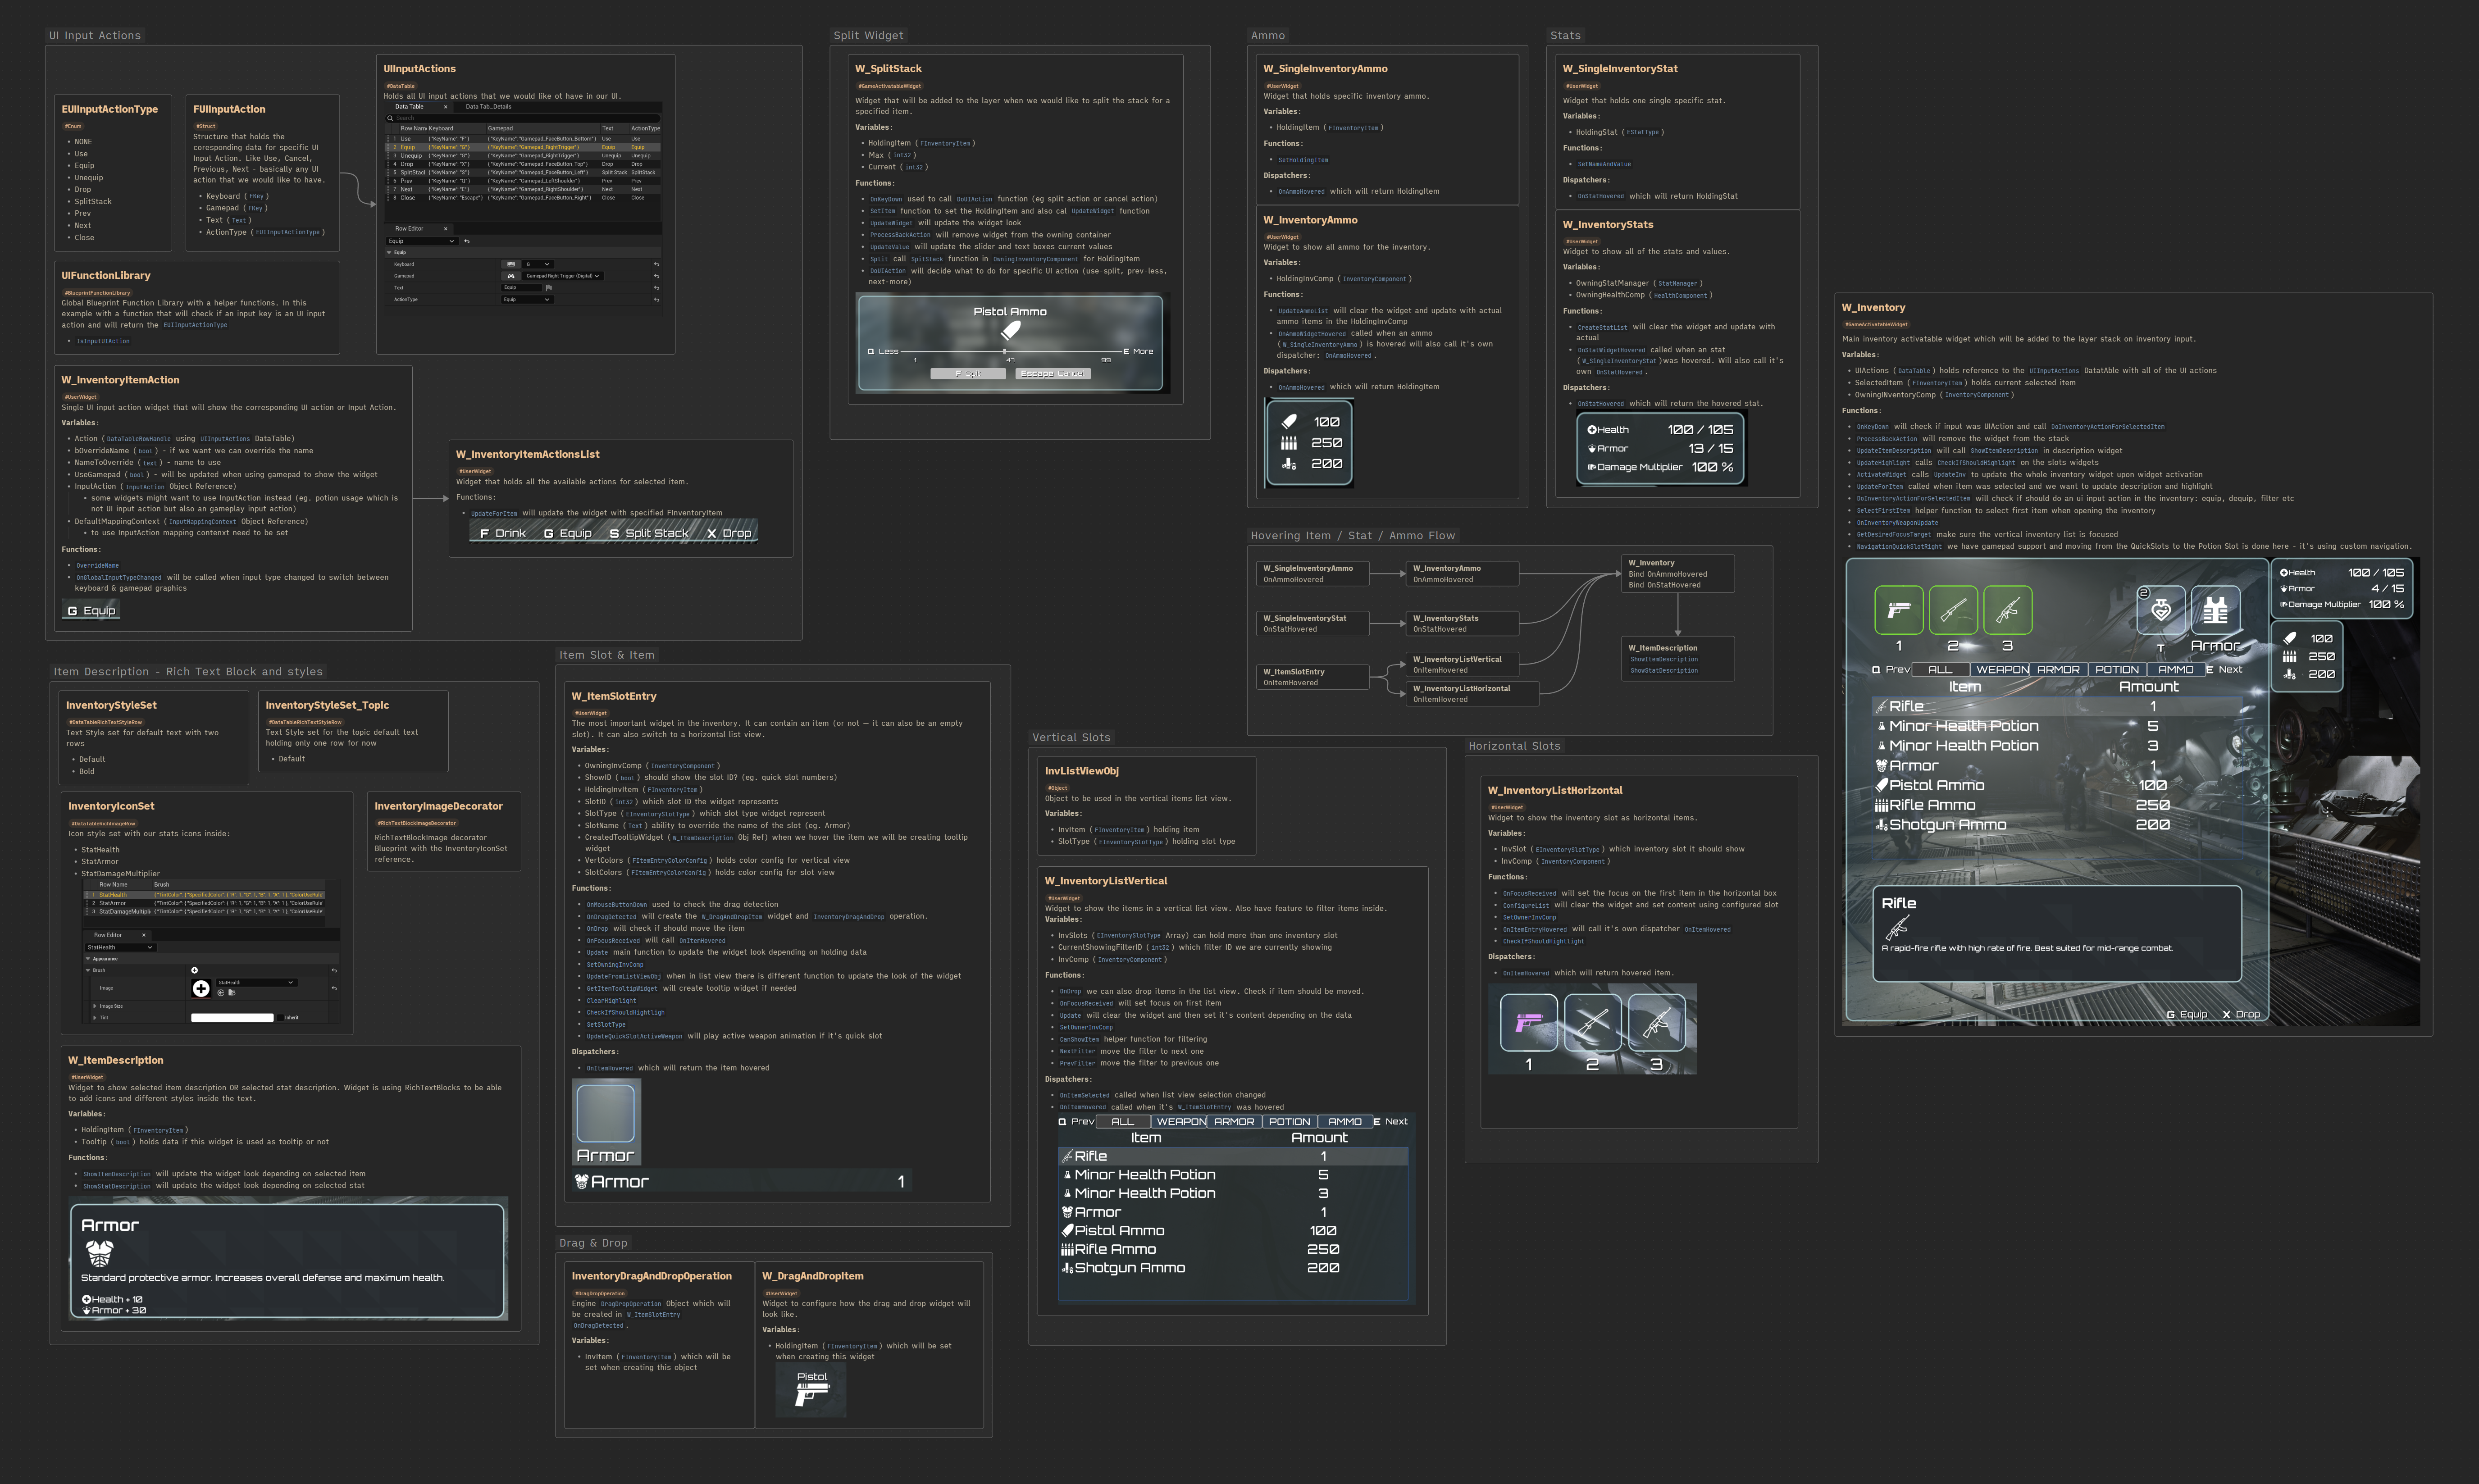
Hi Level
Take a look at the Inventory UI classes and data diagram. It contains all of the data, objects, and widgets used in the inventory.
Data
EUIInputActionType. Defines the types of input actions available in the UI.
| NONE | No action. |
| Use | Use the selected item. |
| Equip | Equip the selected item. |
| Unequip | Unequip the selected item. |
| Drop | Drop the selected item. |
| SplitStack | Split the item stack. |
| Prev | Navigate to the previous option (filtering items, previous tab, etc.). |
| Next | Navigate to the next option (filtering items, next tab, etc.). |
| Close | Close or exit the UI. |
💡 Note: We want to separate UI input actions from gameplay input actions. UI input actions cannot be rebound—they are static across the entire game and apply only to the UI. This ensures consistency when interacting with menus and inventory.
FUIInputAction. A structure that holds data about a specific UI input action.
| Keyboard | Key | The keyboard key assigned to this action. |
| Gamepad | Key | The gamepad key assigned to this action. |
| Text | Text | The display name of the action (can be localized/translated). |
| ActionType | EUIInputActionType | The corresponding EUIInputActionType for this action. |
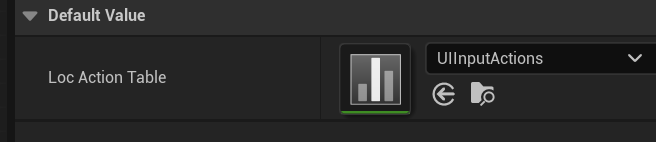
UIInputActions. A DataTable that stores an array of FUIInputAction structs, containing all configured UI input actions for the game.
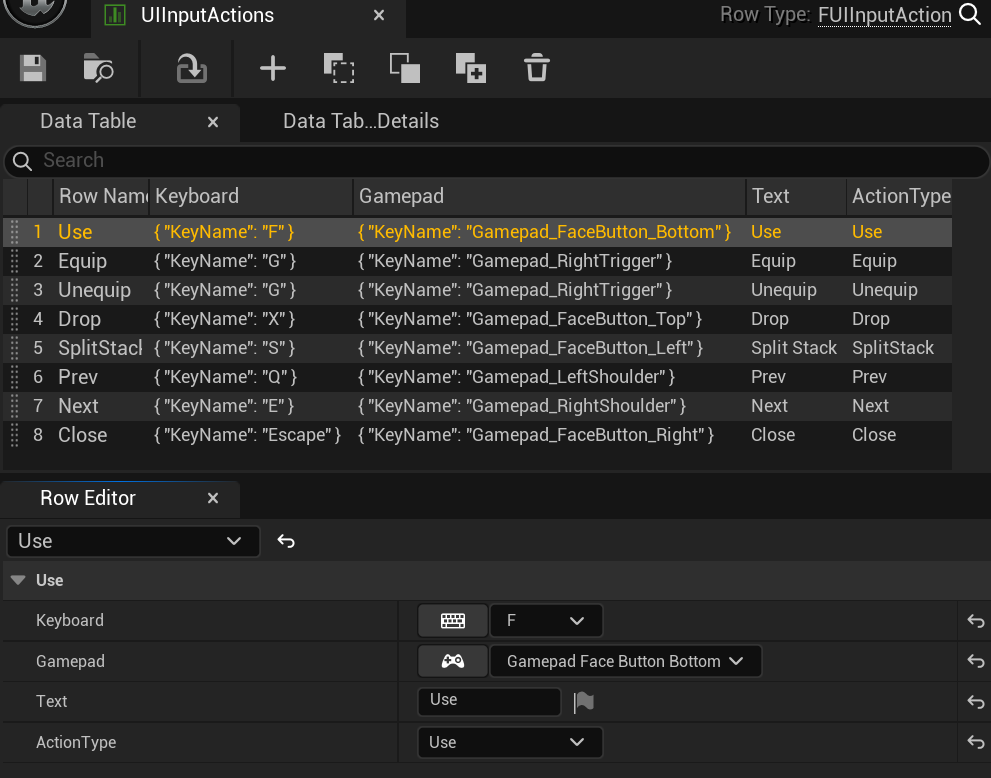
Serves as the main data source for UI input actions. Widgets reference this DataTable and specific rows to determine their assigned actions.
InventoryStyleSet & InventoryStyleSet_Topic. Since our description widget uses RichTextBlock instead of a regular TextBlock, we need to define a TextStyleSet.
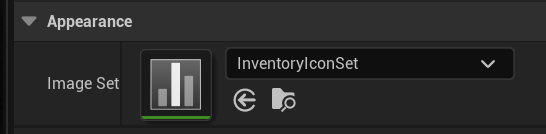
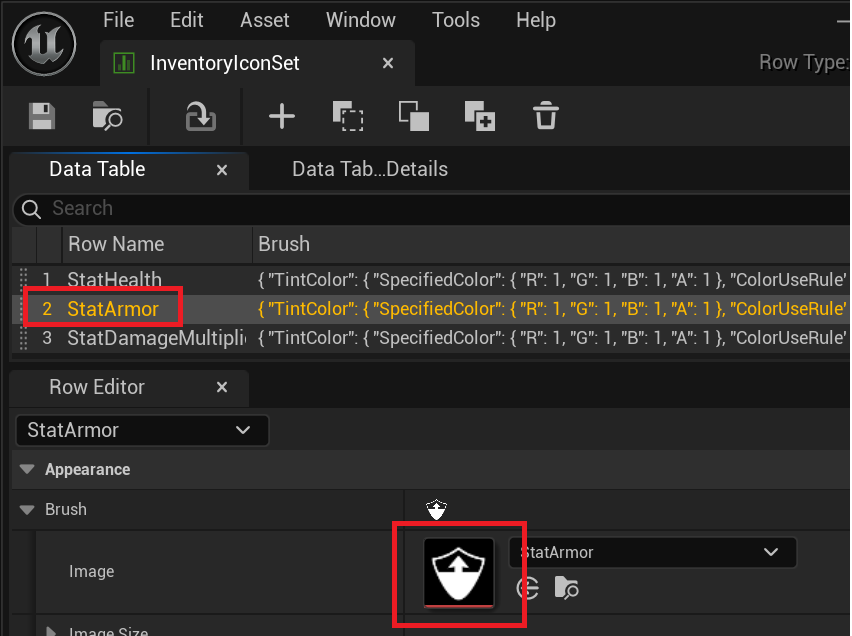
InventoryIconSet. The same applies to icons. We want to display icons inside the RichTextBlock using RichImageRow.
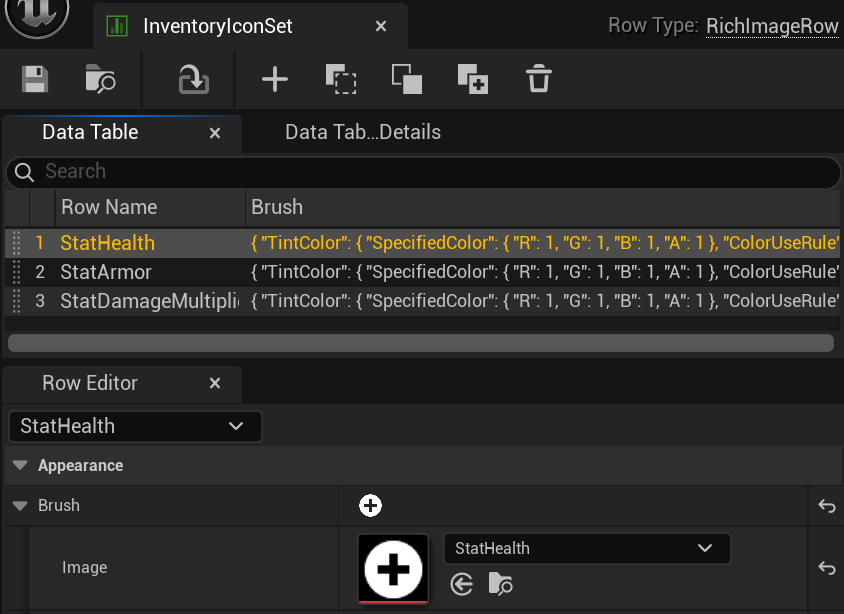
InventoryImageDecorator. A RichTextBlockImage decorator Blueprint with a reference to the InventoryIconSet. It will be used as one of the RichTextBlock decorators to include icons inside the text.
FItemEntryColorConfig. Helper structure used to manage colors for an item slot.
| Selected | LinearColor | The color used when the slot is selected. |
| Normal | | The default (normal) color. |
| Highlight | | The color used when the slot is highlighted. |
| Current | | Holds the slot’s current color state. |
UIFunctionLibrary
We currently have one function in the function library.
IsInputUIAction ( link )
This function checks if the given InInputKey is a valid UIInputAction and returns the corresponding input action. The LocActionTable is already set up to use our UIInputActions DataTable.
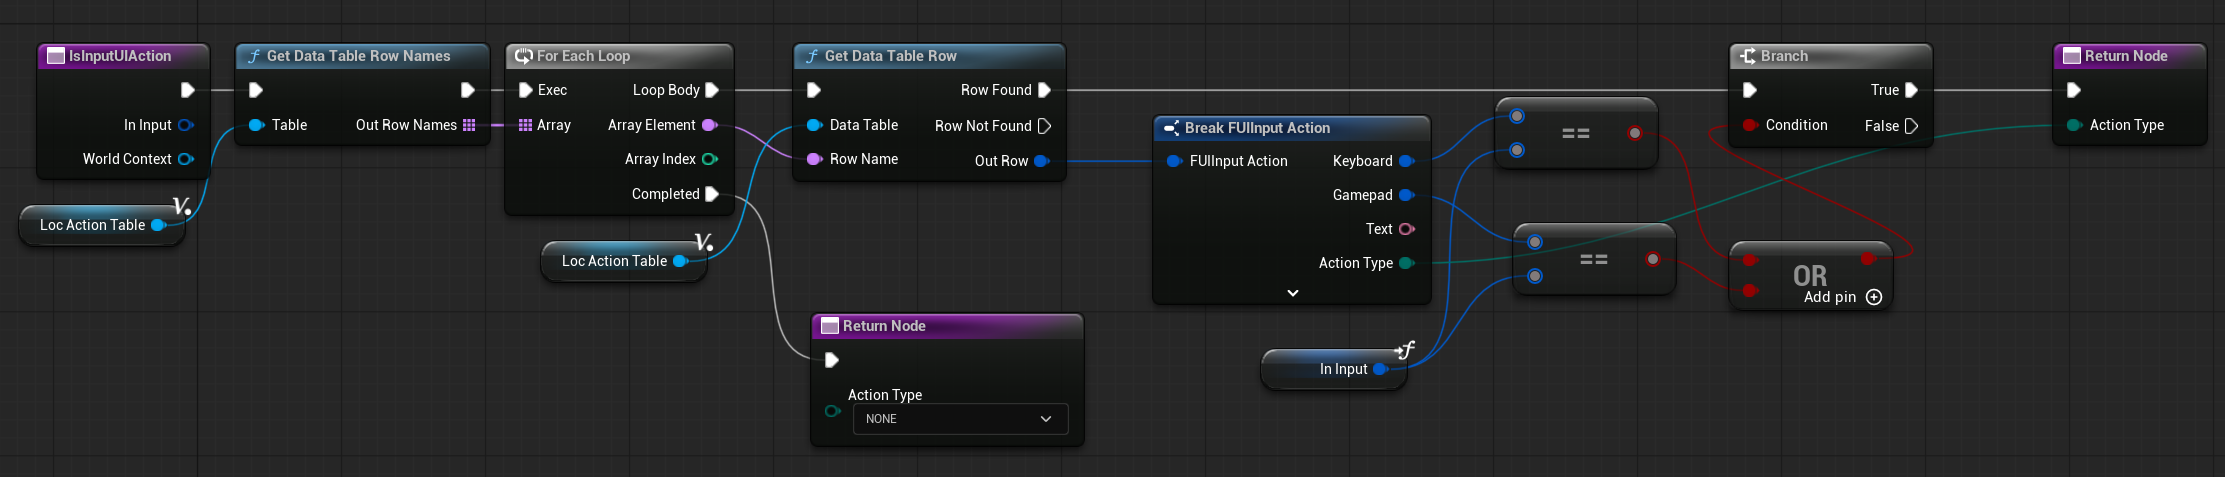
It simply checks if the corresponding input key exists in the DataTable, matching either the configured keyboard or gamepad input keys.
W_InventoryItemAction
A single UI input action widget that displays the corresponding UI action or Gameplay Input Action.

It always shows the action name (which can optionally be overridden) and dynamically switches between keyboard (text) and gamepad (icon) depending on the current input device type.

Variables
| Action | DatTableRowHandleUsing UIInputActions DataTable | Reference to the UIInputActions DataTable. Holds the corresponding UI input action. |
| bOverrideName | | Determines whether to override the action name with a custom one. |
| NameToOverride | | Custom name used when overriding the default action name. Example: The Use action can be displayed as Split depending on the UI context. (Normally, the same input may trigger different UI actions depending on where the player is in the UI.) |
| InputAction | | Allows you to display a Gameplay Input Action instead of a UI input action. Useful when you don’t want to use the UIInputAction system. (for example Potion Input) |
| DefaultMappingContext | InputMappingContext | Should be set to the project’s DefaultInputMapping so the InputAction will work correctly. |
Functions
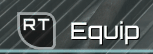
EventConstruct. Called when the widget is created.
- Caches the GameInstance reference.
- Binds to OnInputTypeChanged so it can respond to input device changes.
- Updates itself using the current input type from the GameInstance.
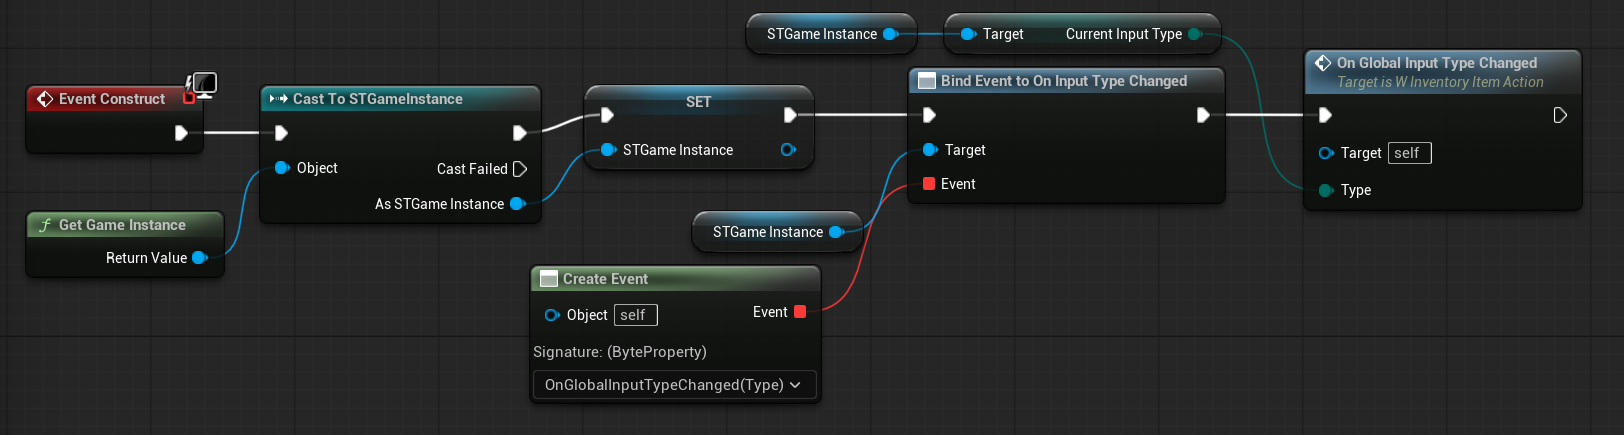
OverrideName ( link )
Used to manually override the input action name.
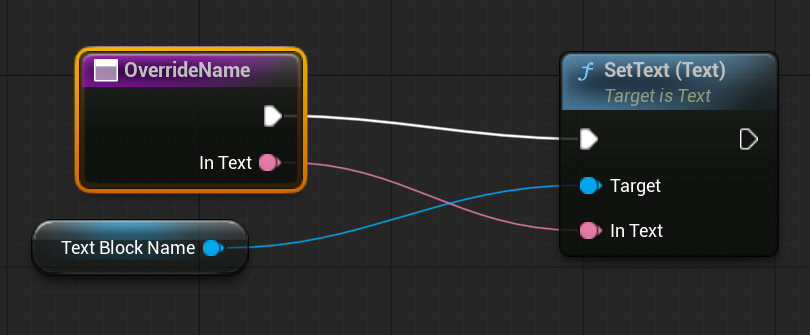
OnGlobalInputTypeChanged ( link )
An important function that updates the widget according to the current state:
- Determines whether the widget should display a Gameplay Input Action.
- Checks if the current input device is keyboard or gamepad.
- Applies a custom action name if the override is enabled.
W_InventoryItemActionsList
A widget that displays all available actions for the selected item.
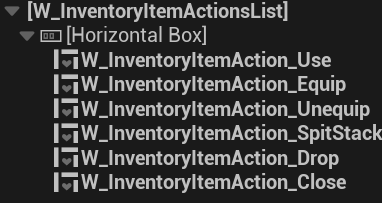
It contains all available actions and will collapse any actions that aren’t applicable based on the selected item type.
UpdateForItem ( link )
This function updates the widget for a specified item and collapses actions that aren’t applicable based on the item.
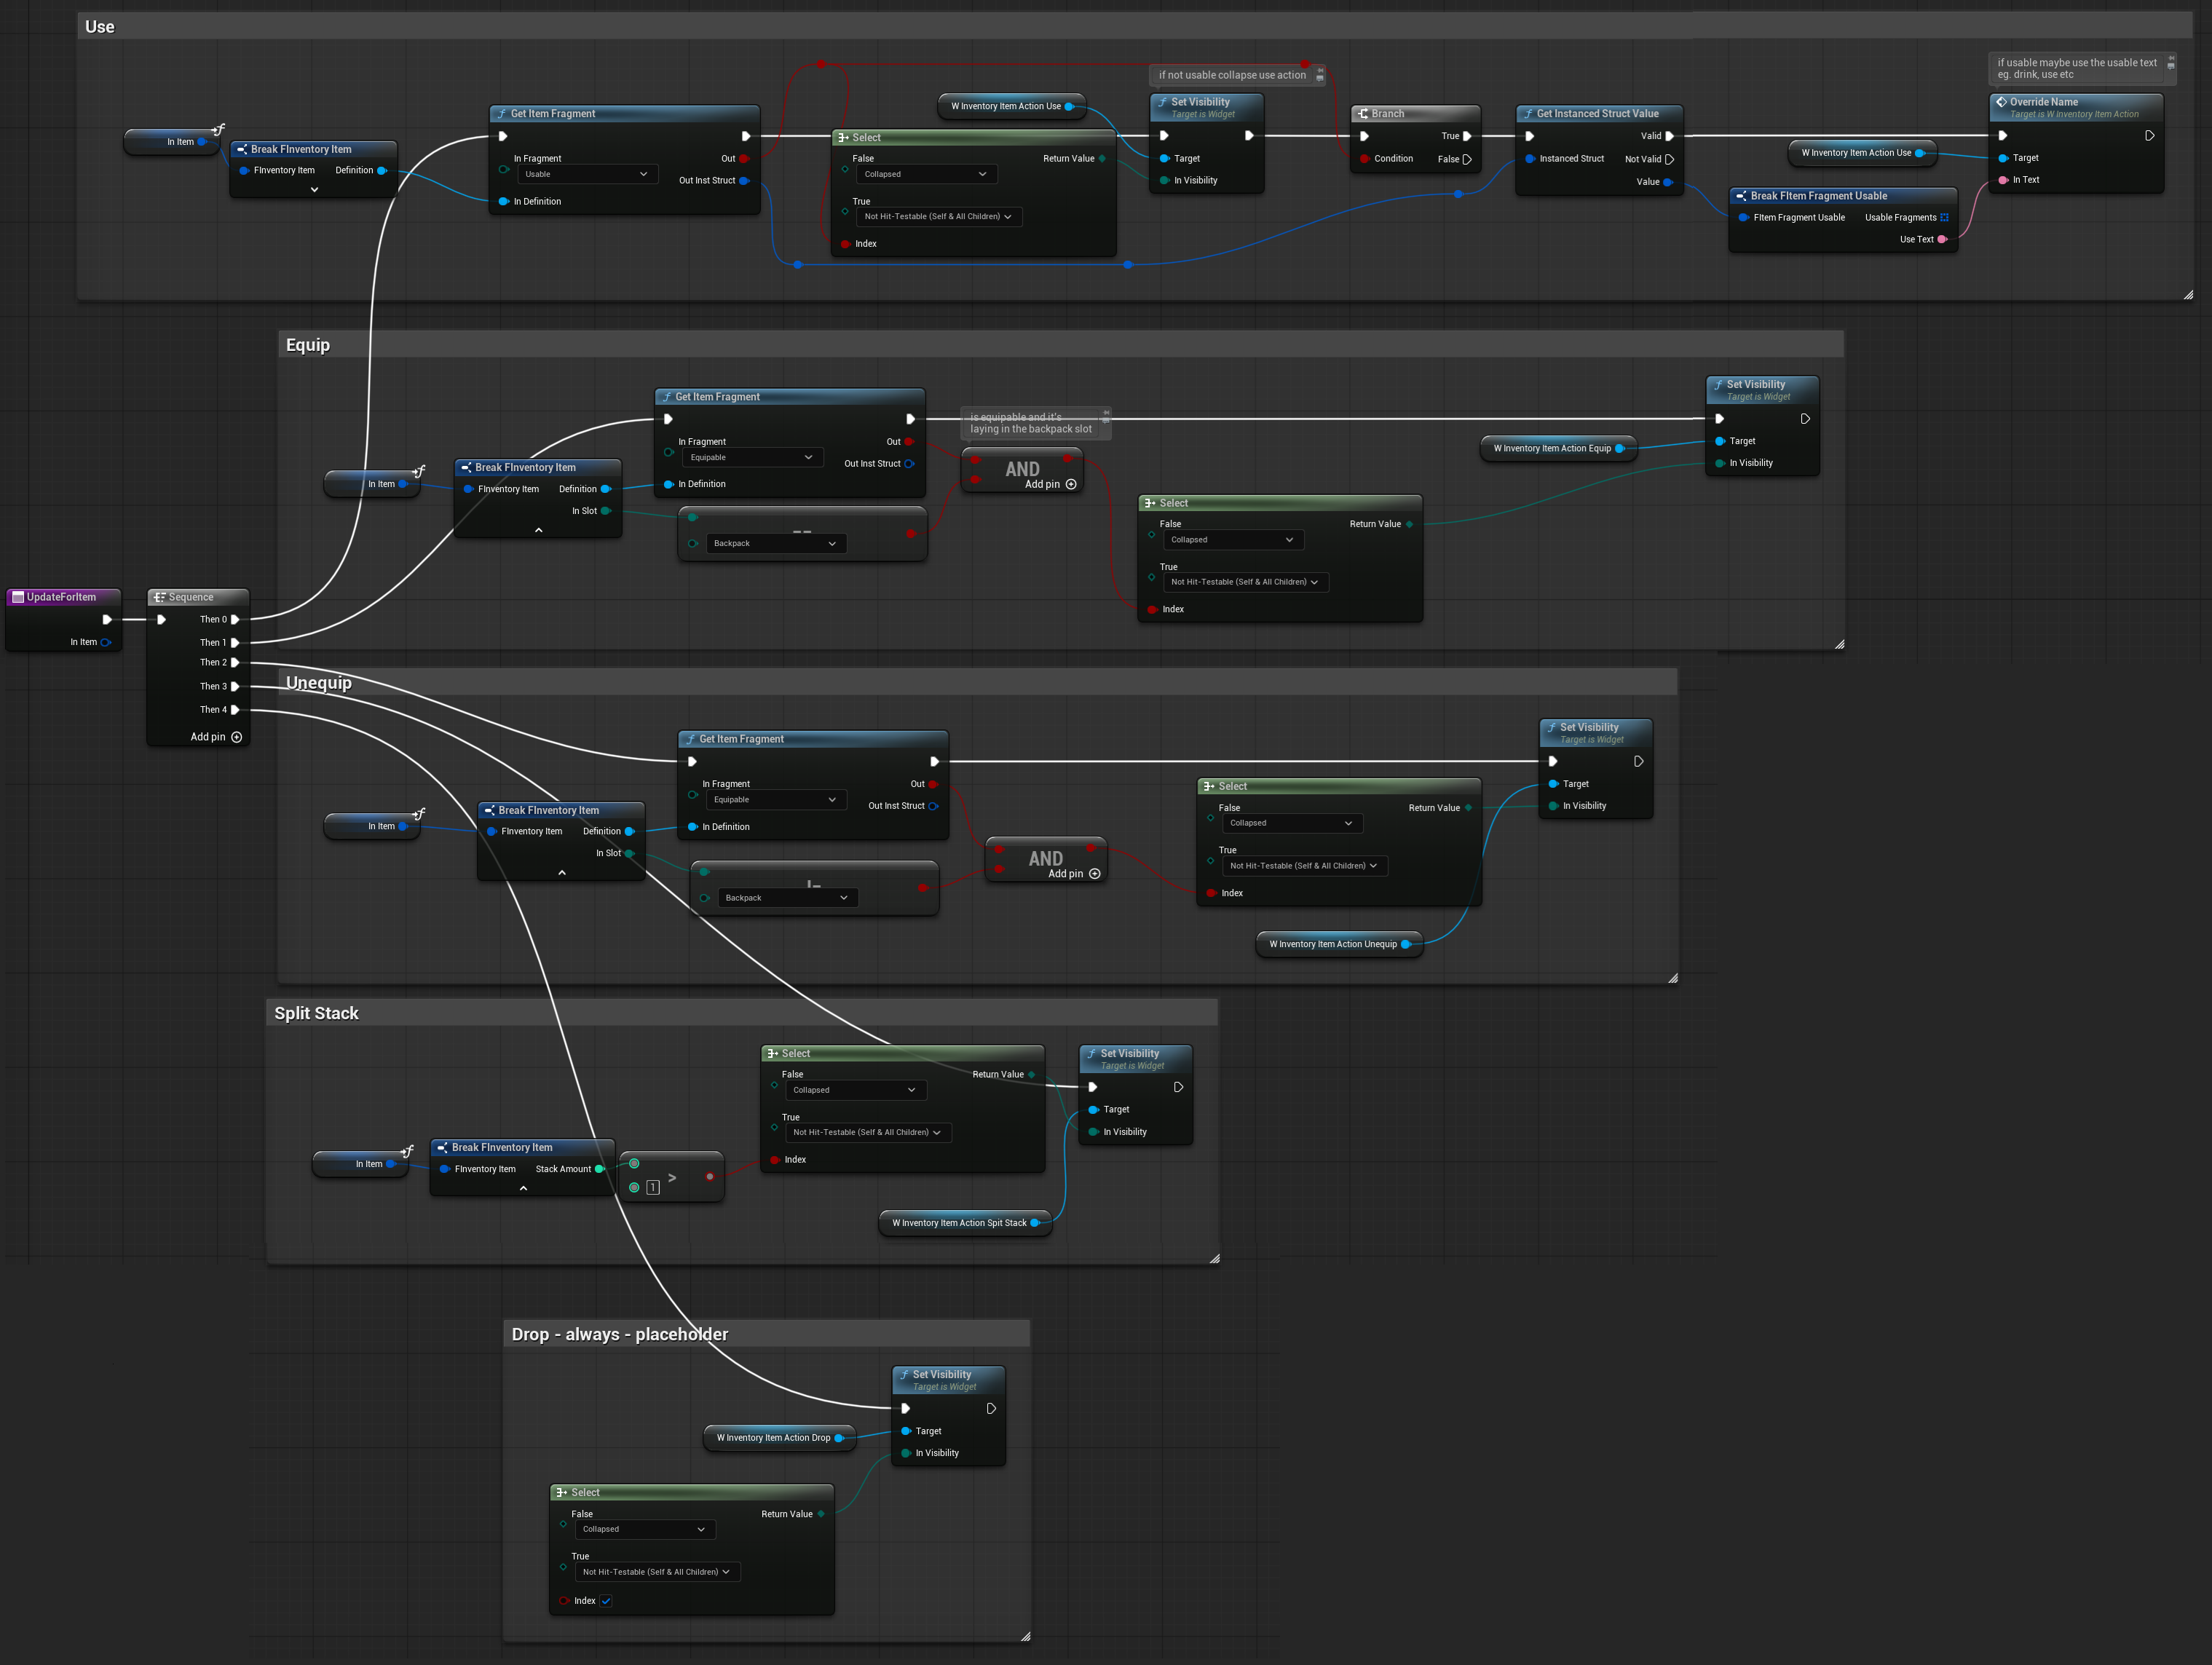
💡 Note: This is another example of how useful fragments are for determining whether an item can perform a specific action.
W_SingleInventoryAmmo
A widget that represents a specific inventory ammo type.
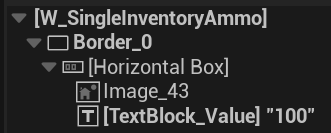
It’s simple: displays an ammo icon and the ammo stack count.
Variables
| HoldingItem | FInventoryItem | The inventory item to display. In this case, it will be an ammo item with a specific stack count and a UI fragment containing the ammo icon. |
| CallOnAmmoHovered | Dispatcher returning FInventoryItem | Dispatcher triggered when an ammo item is hovered. This allows the description widget to display the hovered item’s details. |
SetHoldingItem ( link )
This function is called by the W_InventoryAmmo widget that displays all ammo.

Function Updates the stack amount, indicating how much ammo is available and updates the ammo icon, which is retrieved from the item’s UI Fragment.
W_InventoryAmmo
A widget that displays all ammo in the inventory.
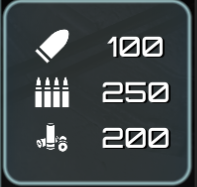
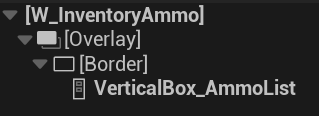
It will add all ammo item types to a VerticalBox using the W_SingleInventoryAmmo widget.
Variables
| HoldingInvComp | InventoryCompomnent | Reference to the inventory component associated with this widget. |
| OnAmmoHovered | Dispatcher returning FInventoryItem | This widget will bind to W_SingleInventoryAmmo CallOnAmmoHovered and call it’s own dispatcher. |
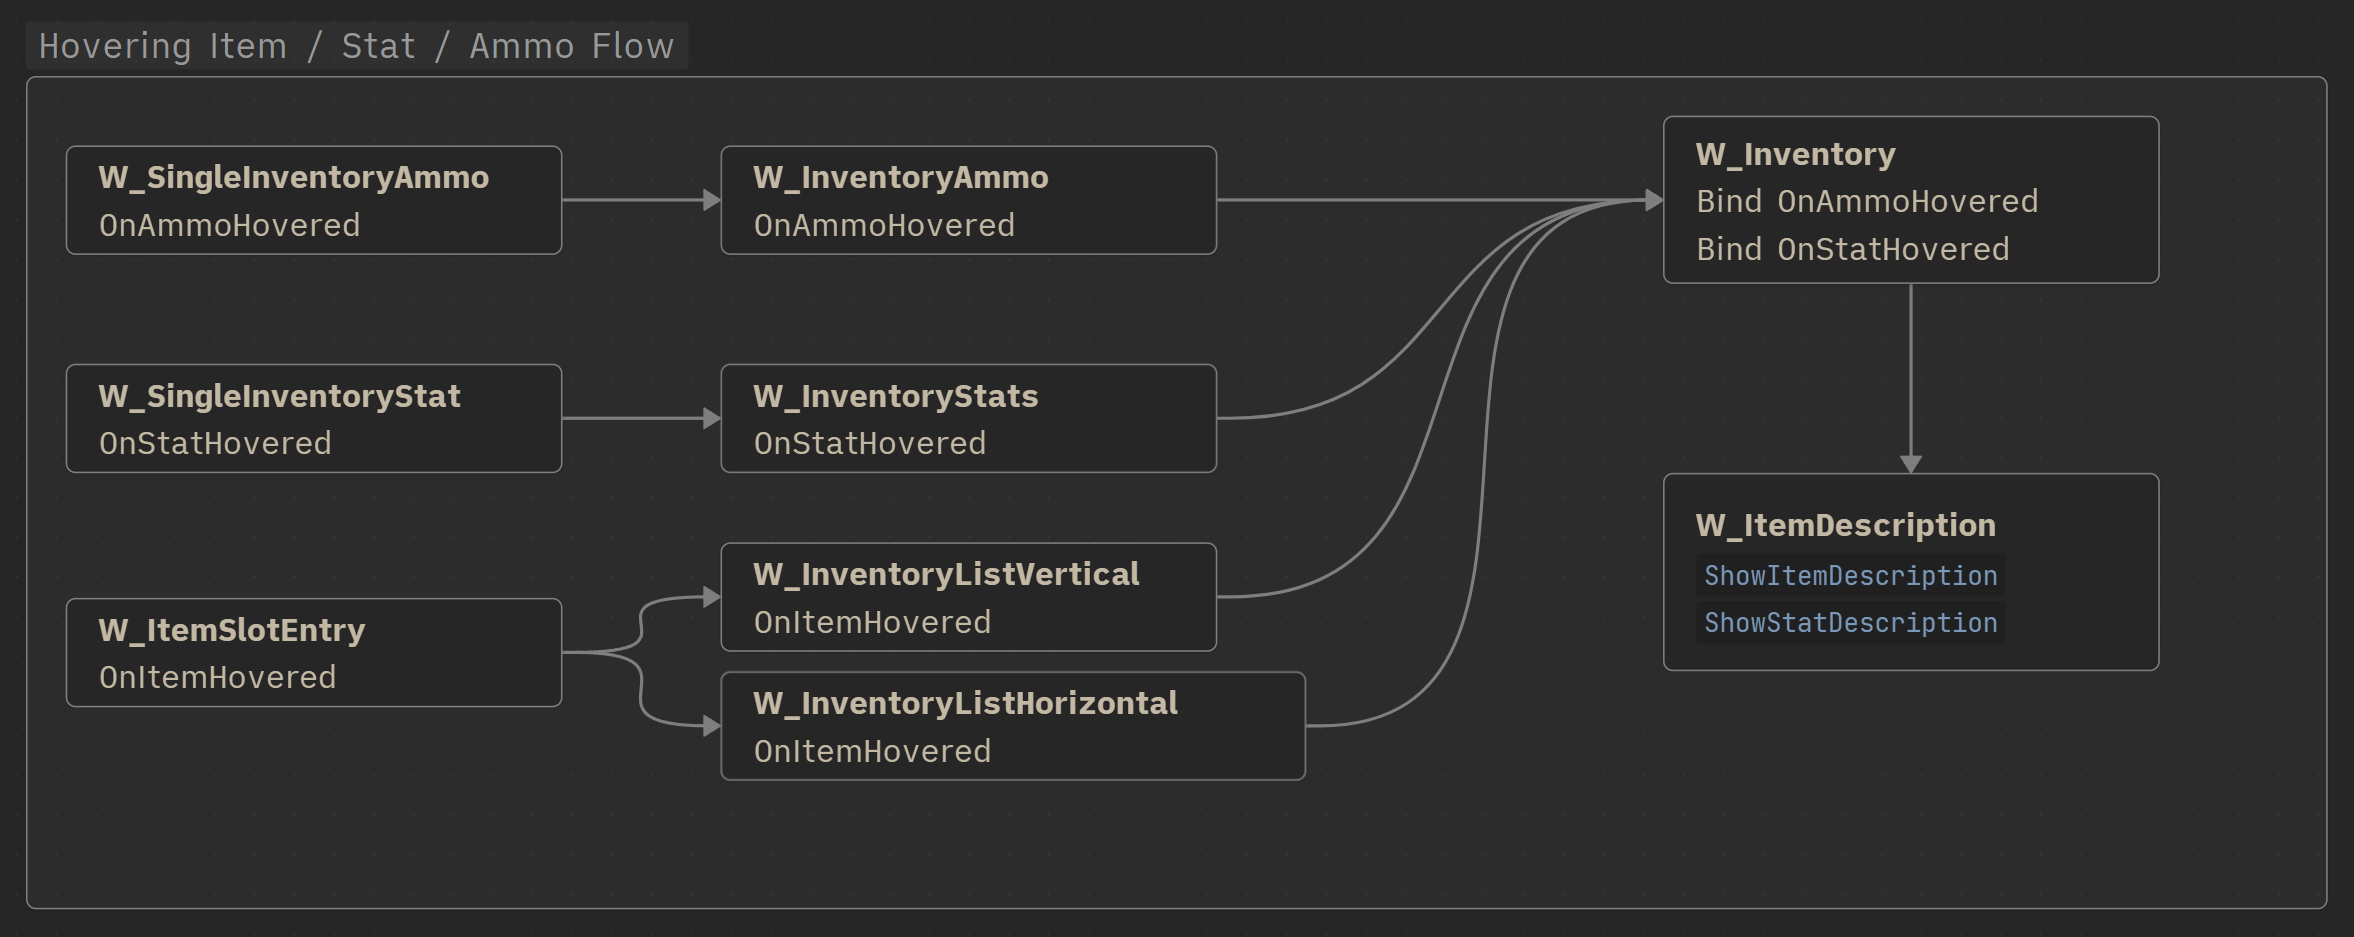
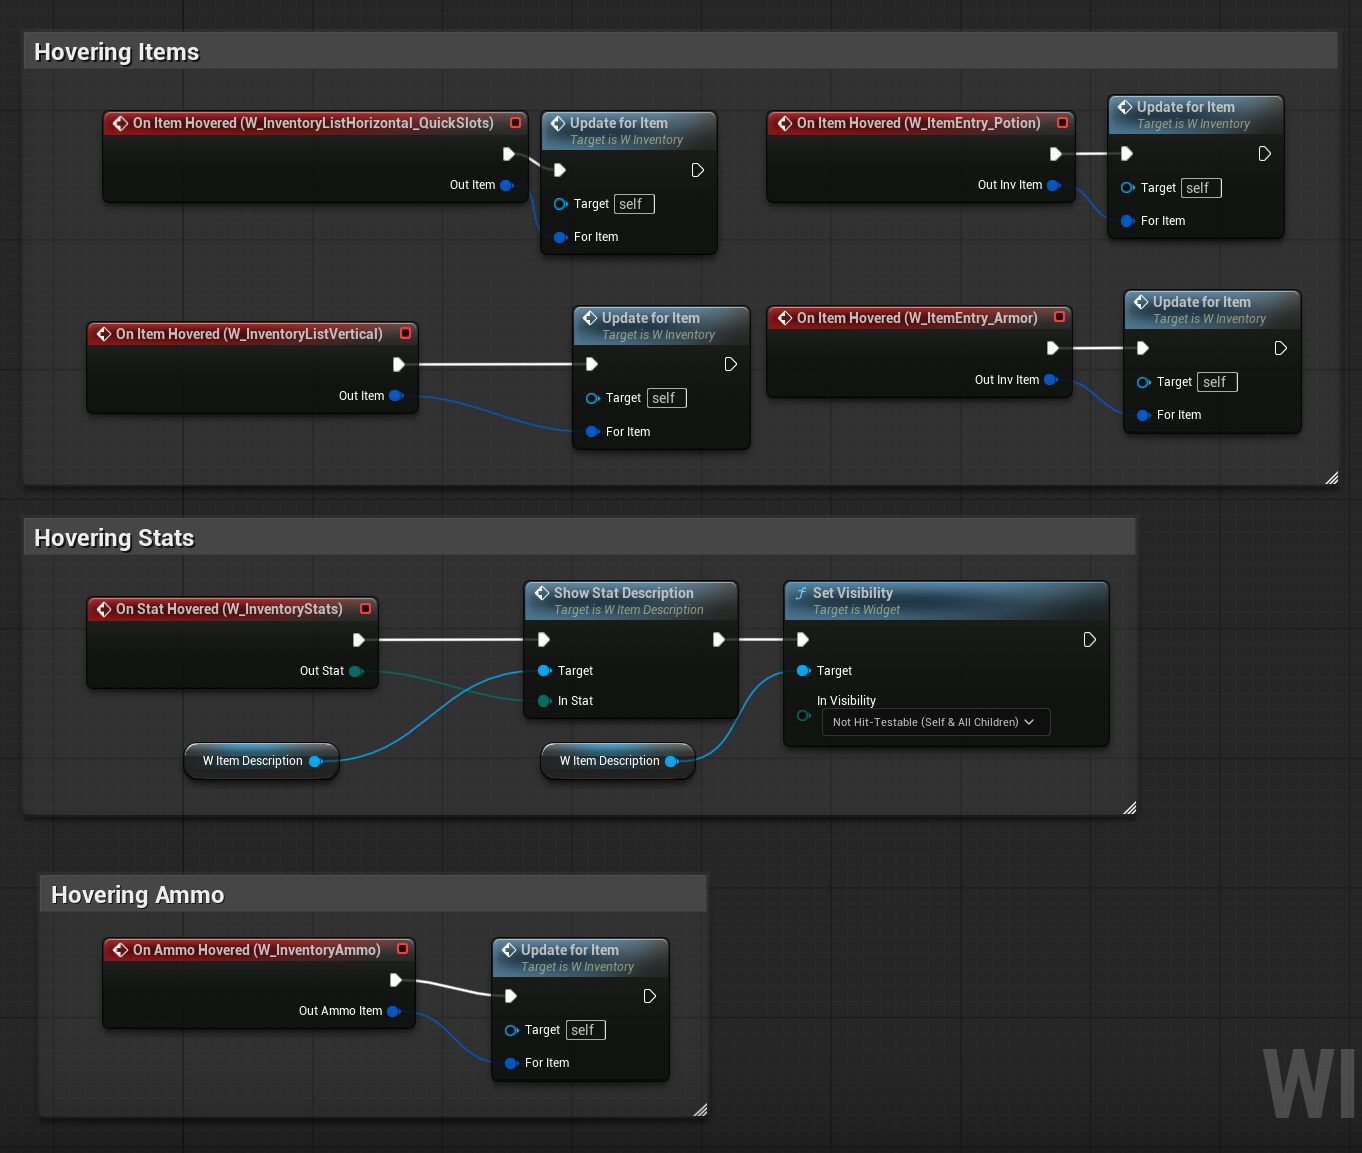
As for the hovering dispatcher here’s the breakdown.
W_SingleInventoryAmmocalls its ownCallOnAmmoHoveredW_InventoryAmmobinds toW_SingleInventoryAmmo->CallOnAmmoHoveredW_Inventorybinds toW_InventoryAmmo->OnAmmoHovered- and can call a function in the W_ItemDescription widget about the hover.
UpdateAmmoList ( link )
The main function to refresh the widget and display all ammo items.

It’s simple:
- Clear the VerticalBox.
- Retrieve all ammo items from the inventory.
- For each ammo item:
- Create a W_SingleInventoryAmmo widget.
- Set the item for the widget to display.
- Bind to the widget’s OnAmmoHovered event.
- Add the widget to the VerticalBox.
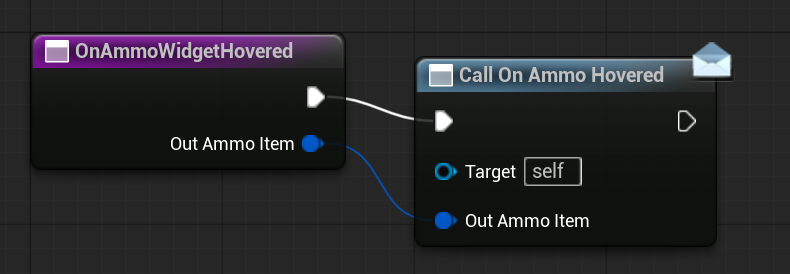
OnAmmoWidgetHovered ( link )
It will just call it’s own OnAmmoHovered dispatcher.
W_SingleInventoryStat
Similar to W_SingleInventoryAmmo, but this widget represents a single, specific stat.
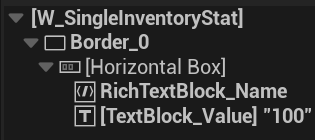
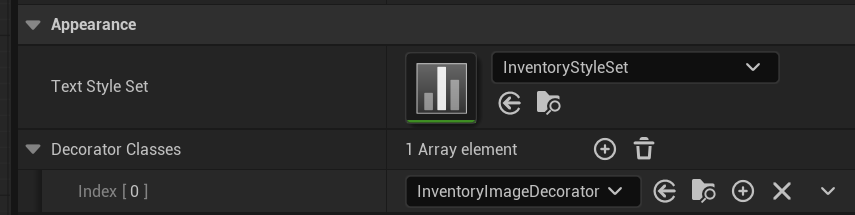
It also contains a RichTextBlock configured to use the inventory StyleSet and ImageDecorator.
Unlike ammo (which only displays an icon), this widget displays the stat icon embedded within the text, demonstrating how icons can be integrated into text using RichTextBlock.
Variables
| HoldingStat | EStatType | Which stat type it’s holding. |
OnStatHovered | Dispatcher returning | Our description widget will also be able to show the stat description so we somehow need to pass the stat we are hovering. |
SetNameAndValue ( link )
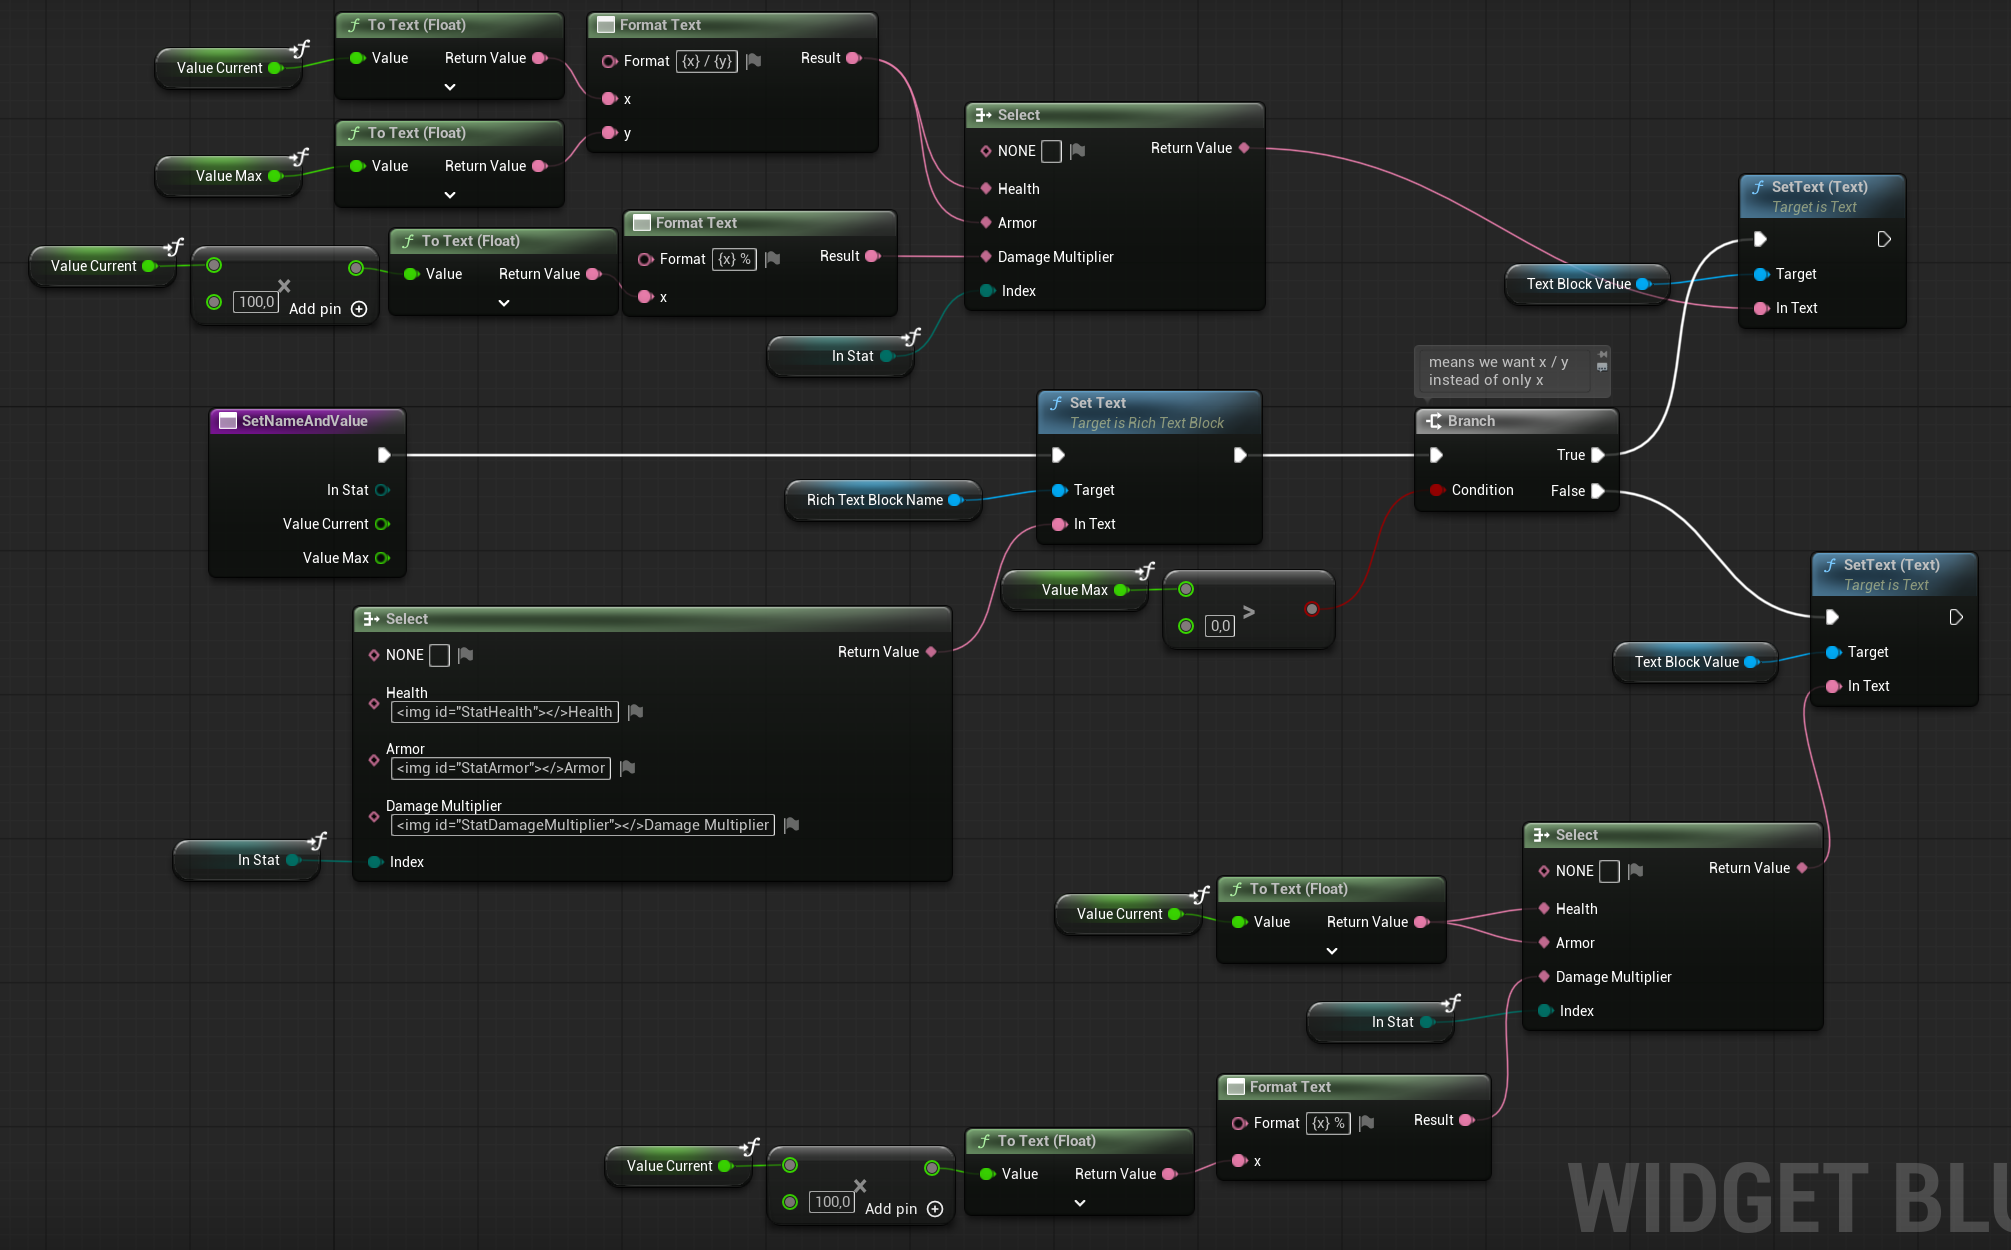
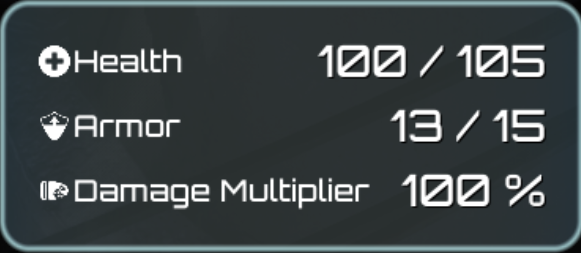
Stats can be displayed in three different formats:
- X – Single value (e.g., temperature).
- X / Y – Minimum and maximum values (e.g., health 80 / 100, armor 50 / 100).
- % – Percentage (e.g., damage multiplier 100%).
💡 Note: The text for health, armor, and damage multiplier is stored in the String Table: Strings_Stats. This is very helpful for localization. You should always separate localized text into dedicated string tables and use them wherever you have Text fields. Trust me—it will save you a lot of work later when localizing your game.
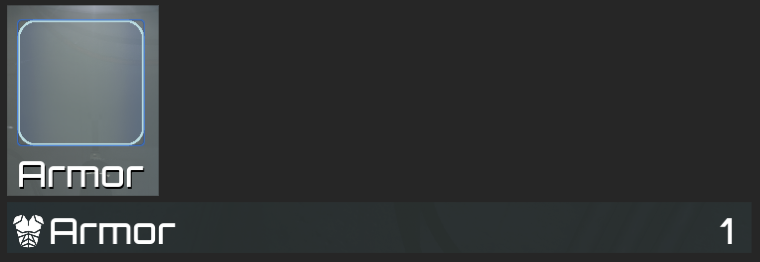
How to show the images inside the RichTextBlock?
- RichTextBlock have the
InventoryImageDecorator InventoryImageDecoratorhave link toInventoryIconsSetInventoryIconsSethave an list of rows whereStatArmoris located- Text is using StatArmor inside <img id=”StatArmor”></> which will display the icon
<img id="StatArmor"></>Armor

It’s really simple but you just need to get use to it.
W_InventoryStats
Widget to show all of the stats and their values.
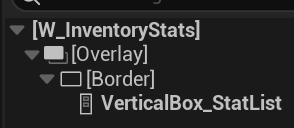
Stats will be shown inside the VerticalBox.
| OwningStatManager | StatManagerComponent | Reference to the owning Stat Manager component, used to retrieve stat values. |
OwningHealthComp | HealthComponent | Reference to the owning Health component, used to retrieve health values. |
| OnStatHovered | Dispatcher returning | Dispatcher that triggers when a stat is hovered. |
CreateStatList ( link )
Called (on EventConstruct) to create the stat widgets and add them to the VerticalBox. Binds each stat widget to the OnStatHovered dispatcher to handle hover events.
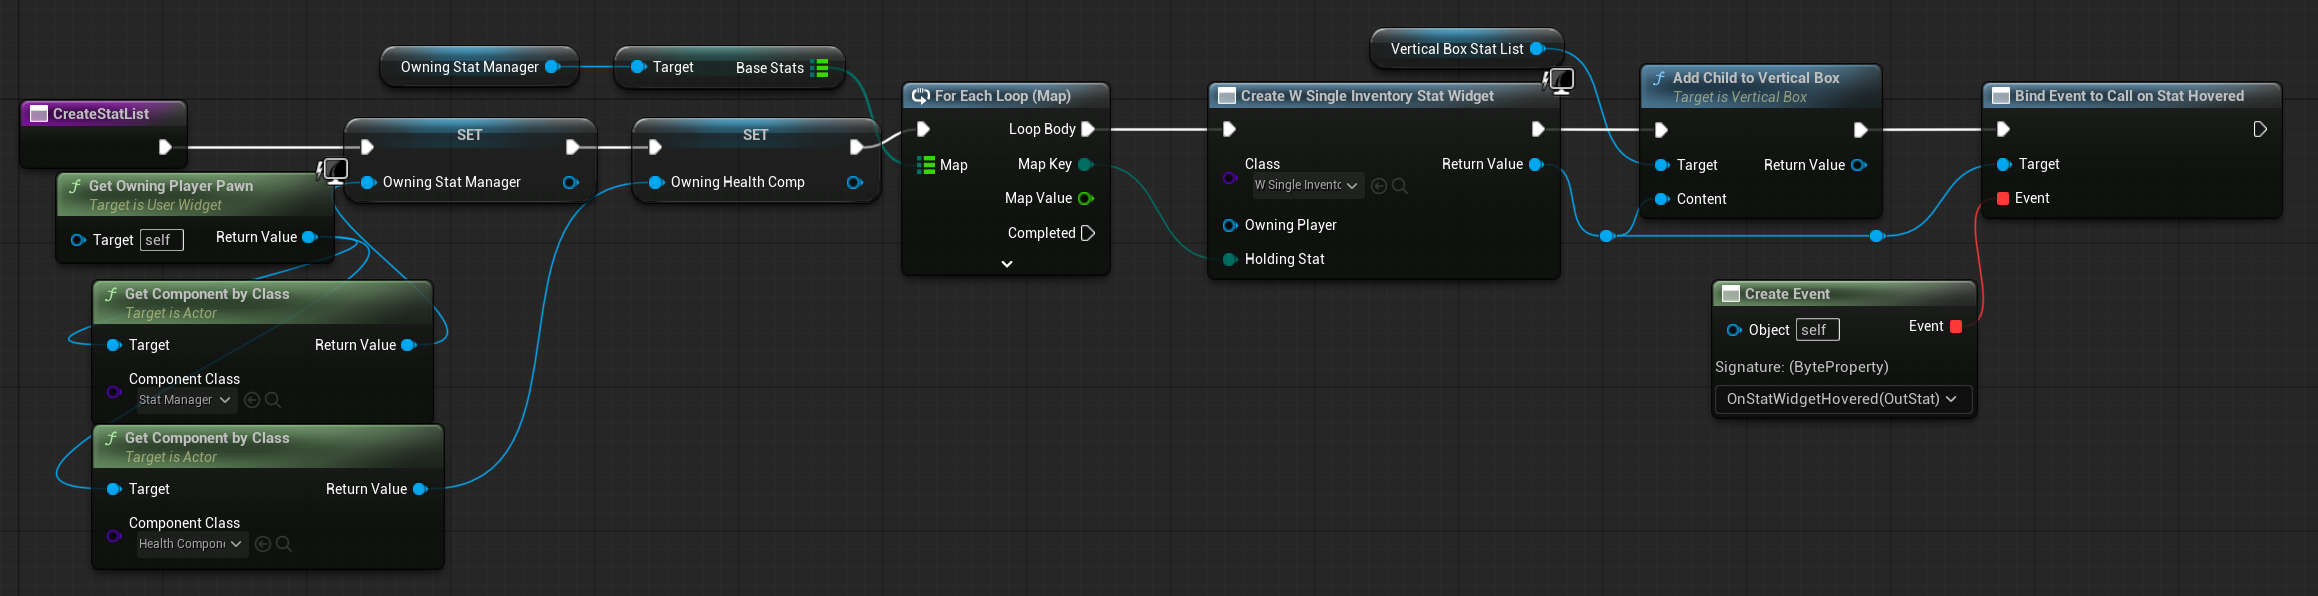
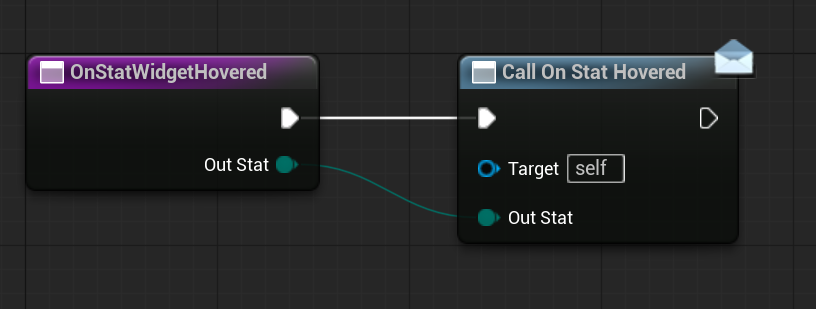
OnStatWidgetHovered ( link )
Function will just call the OnStatHovered dispatcher.
EventTick ( link )
The tick function is used to update the stat values.
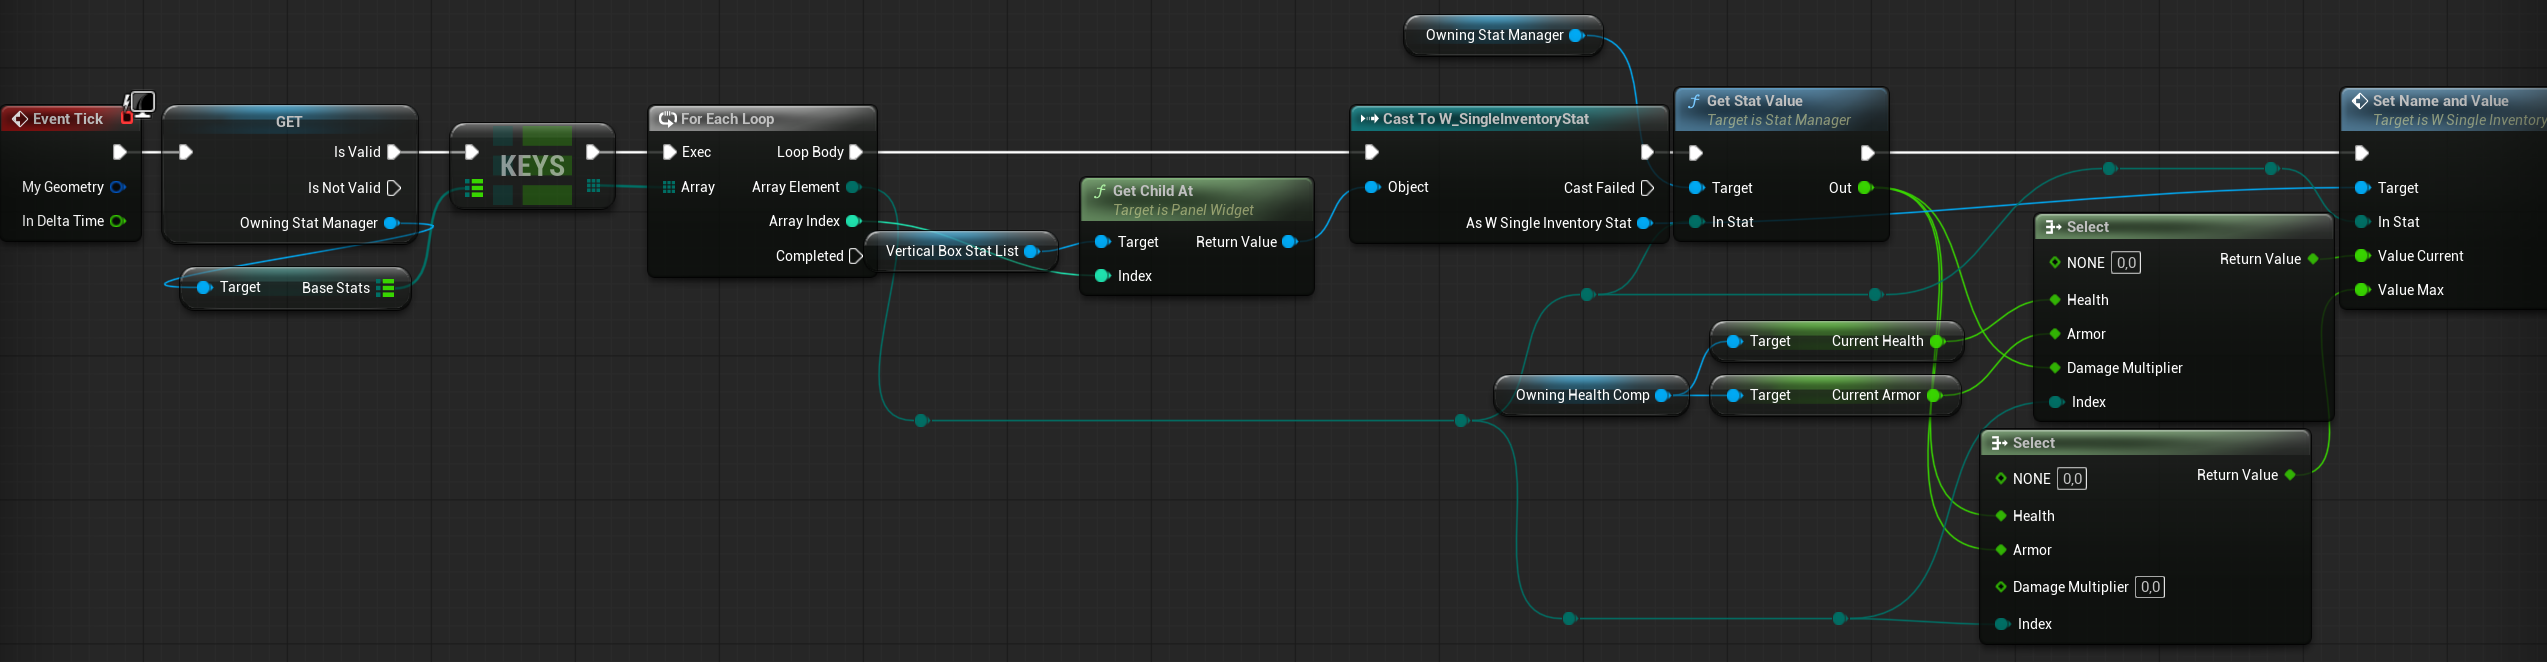
💡 Note: We could use a tick inside W_SingleInventoryStat, but that would create multiple ticks. Using a single tick here updates all stat widgets at once.
💡 Note: You could avoid using a tick entirely if your StatManager component had an OnStatChanged dispatcher. In that case, you would only update the widgets when a stat actually changes.
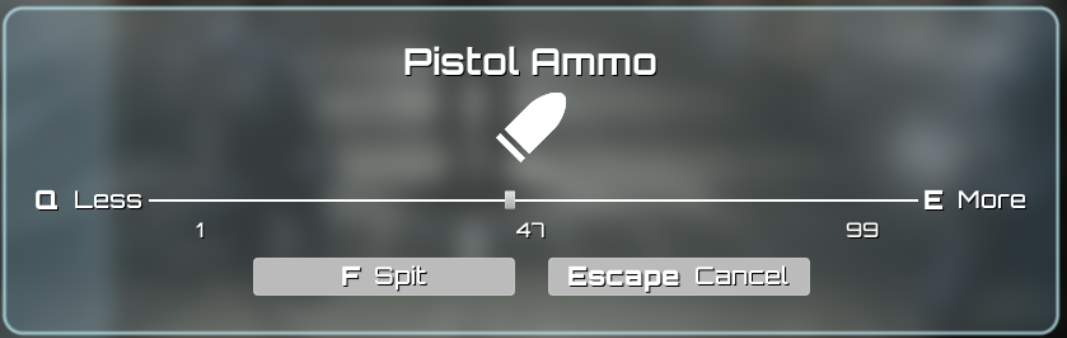
W_SplitStack
A GameActivatableWidget that is added to the layer when you want to split the stack of a specified item.
Hierarchy
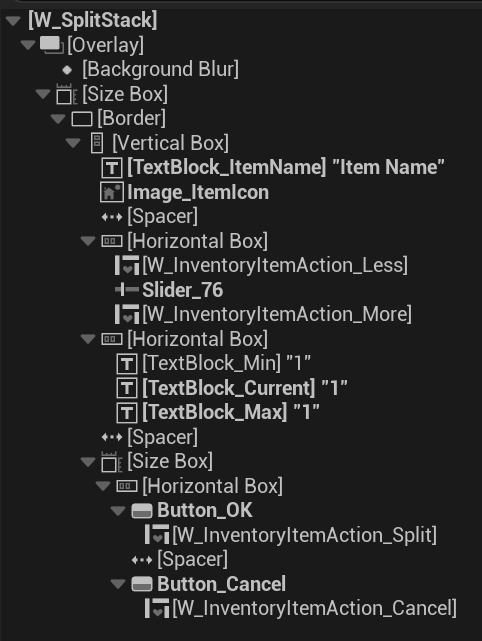
Variables
| HoldingItem | FInventoryItem | The item whose stack you want to split. |
Max | int32 | The maximum stack value. |
| Current | int32 | The current stack value to split. |
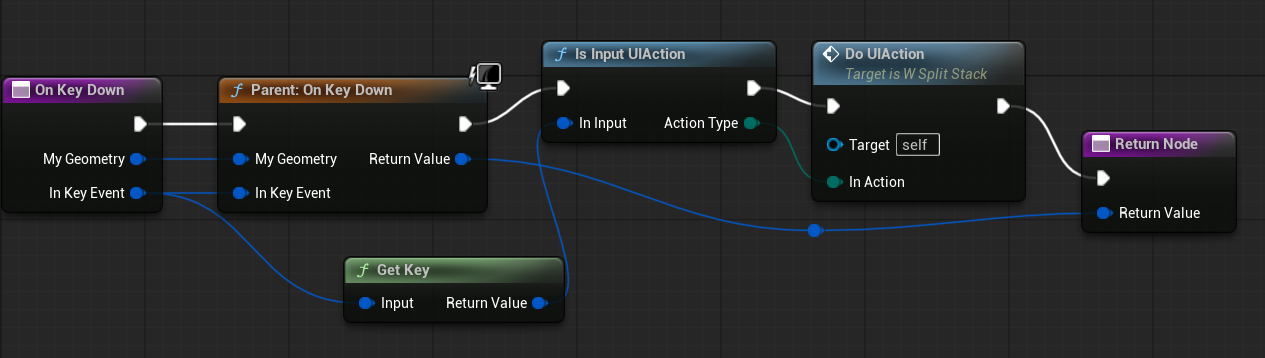
OnKeyDown ( link )
This function passes the input key to the function library, which determines the corresponding UI action. The determined UI action is then used to call DoUIAction. ( Examples of actions include Split or Cancel. )
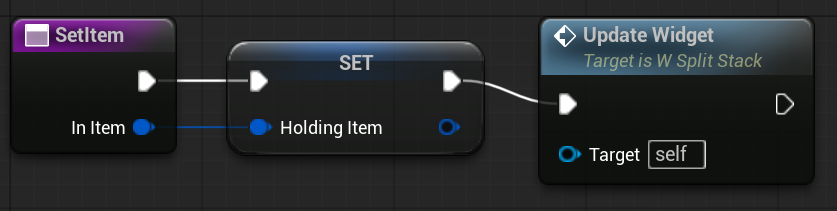
SetItem ( link )
This function sets the HoldingItem and calls UpdateWidget to refresh the widget’s appearance.
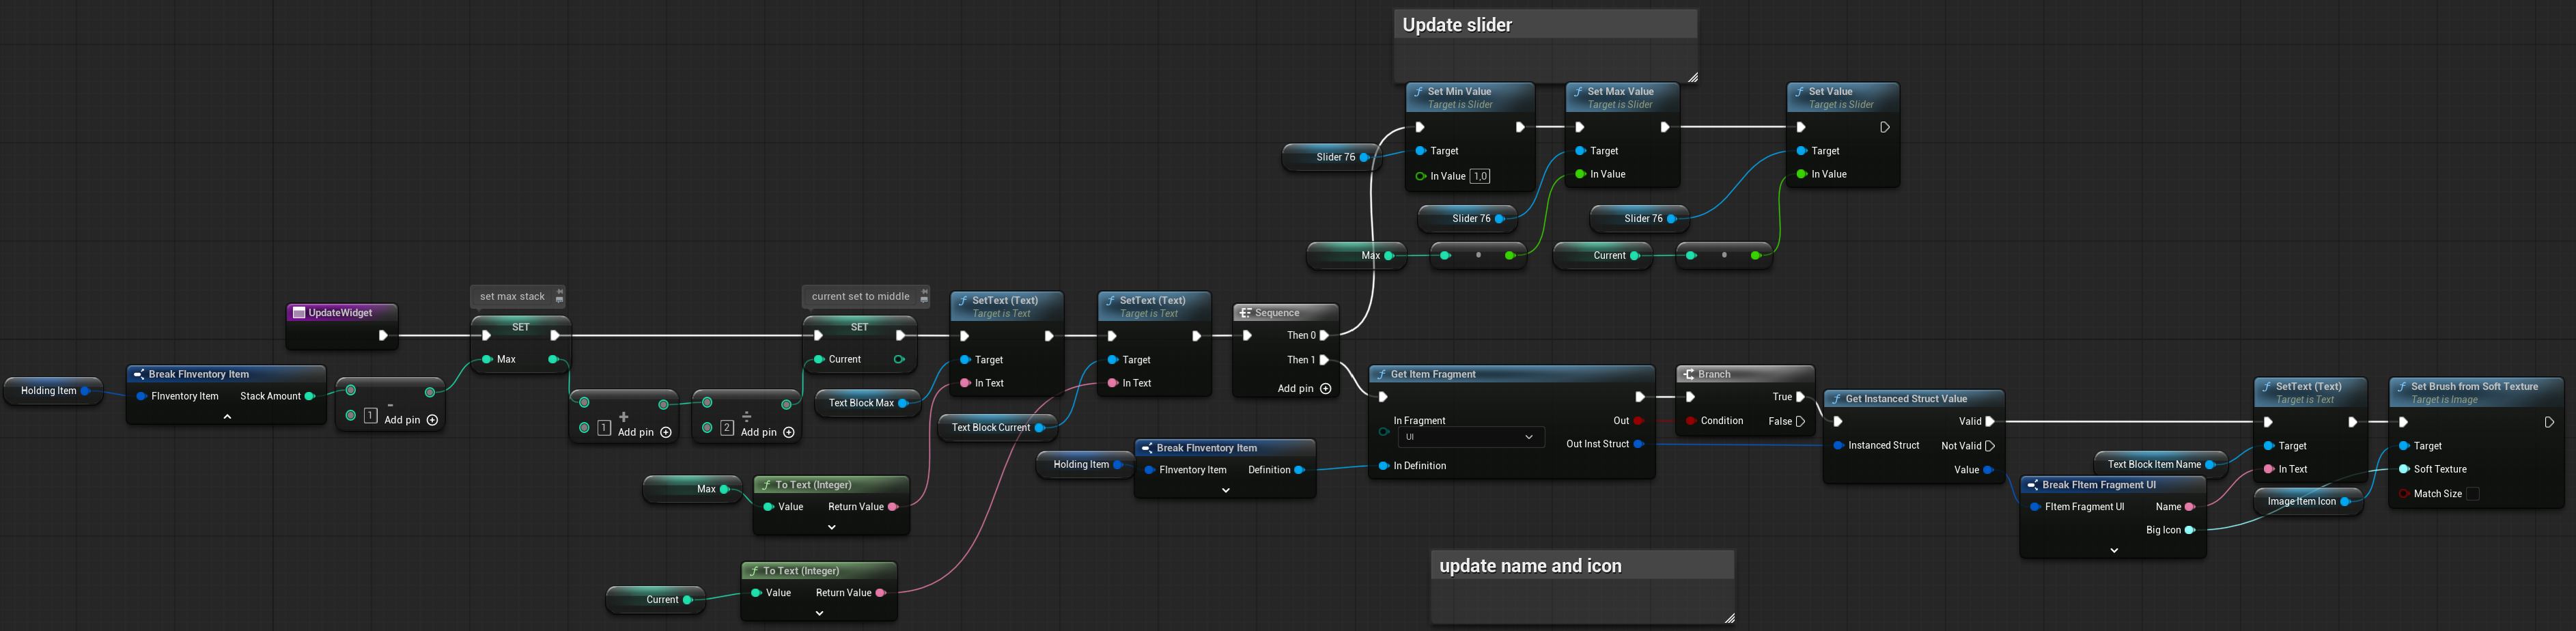
UpdateWidget ( link )
This function updates the widget’s appearance based on HoldingItem.
- Sets the item name and icon.
- Updates slider values.
- Updates current and maximum stack variables.
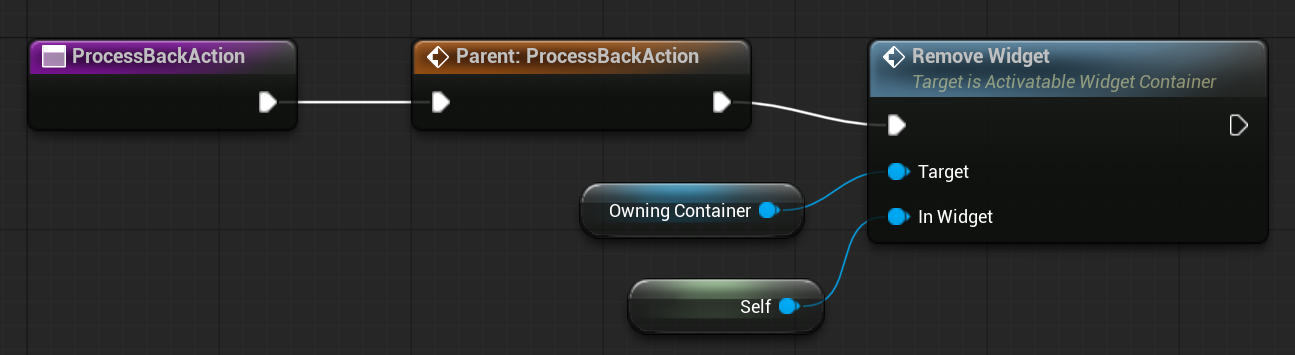
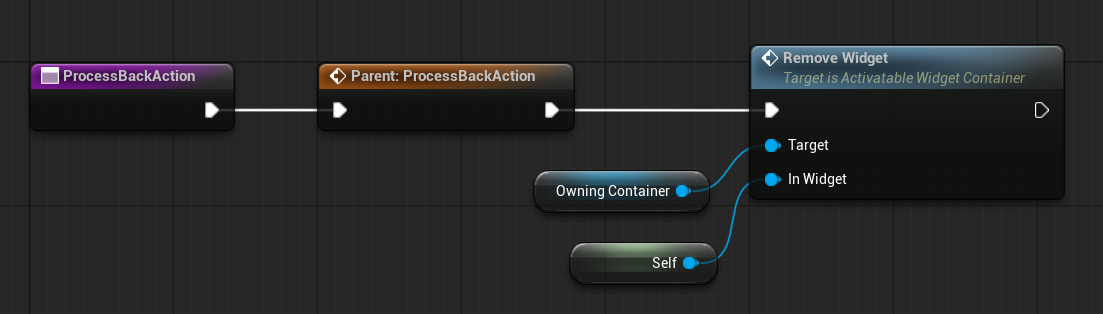
ProcessBackAction ( link )
It simply deactivates the widget and removes it from the screen. Refer to our previous tutorial on the UI system for more details.
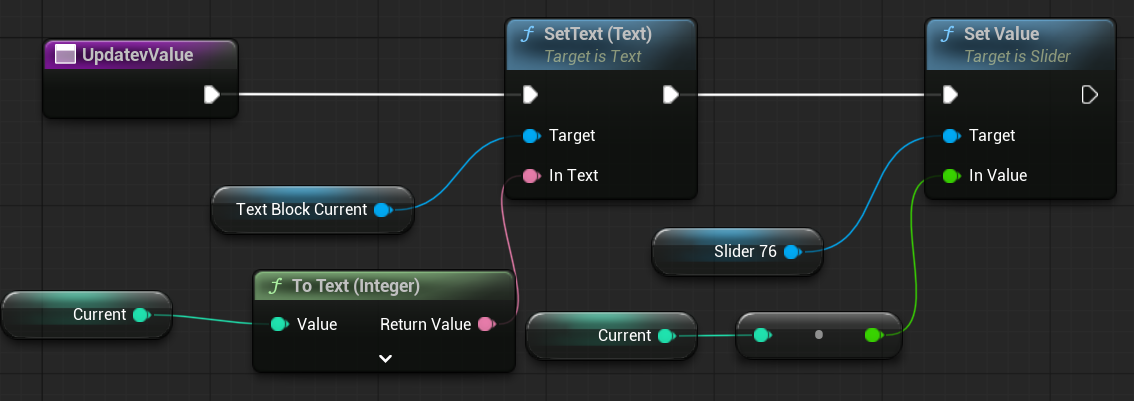
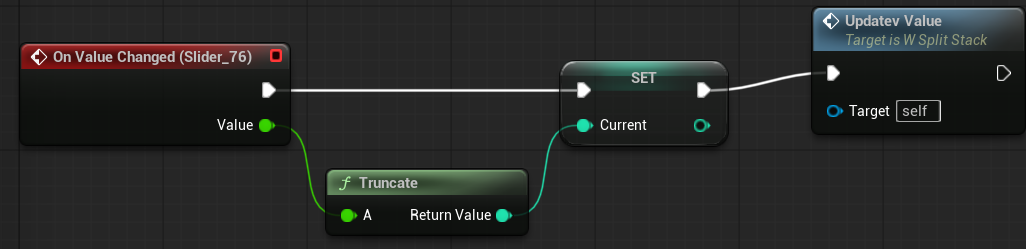
UpdatevValue ( link )
Function to update the current value displayed on the text widget and the slider.
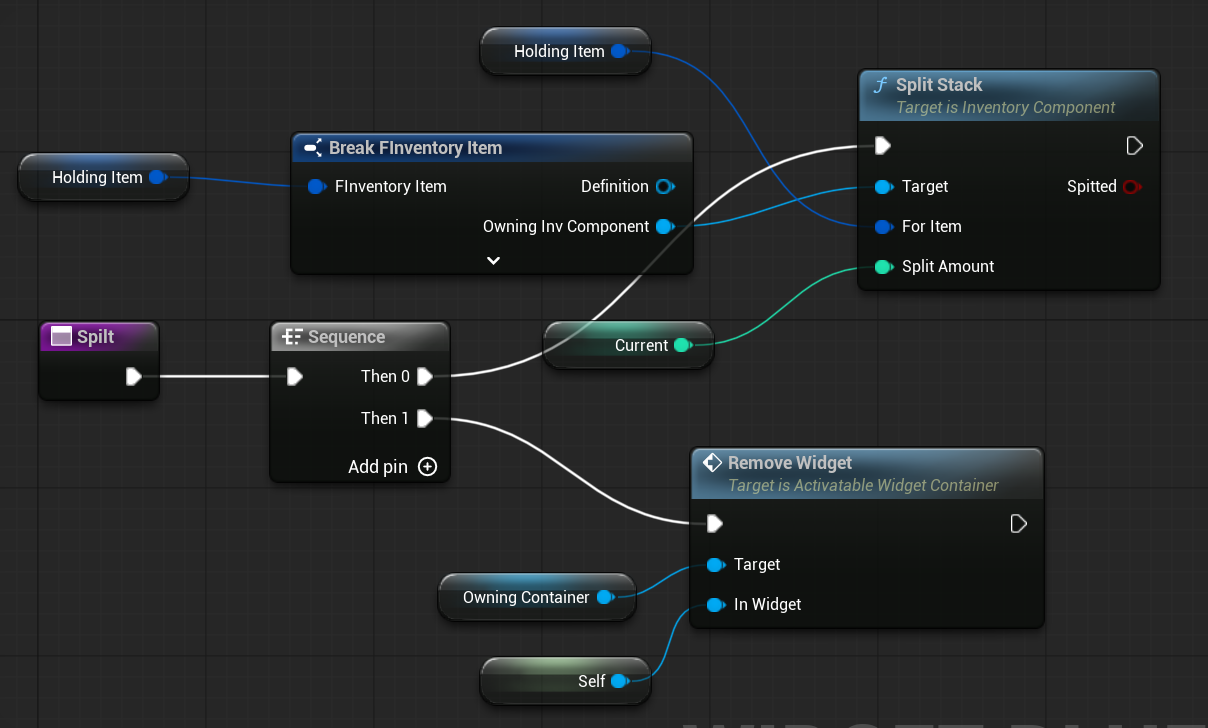
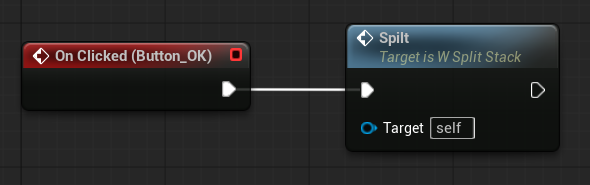
Spilt ( link )
Function that performs the actual stack split and then removes the widget.
DoUIAction ( link )
Function called from OnKeyDown to determine the action to perform, such as: Increasing or decreasing the stack split value or executing the stack split.
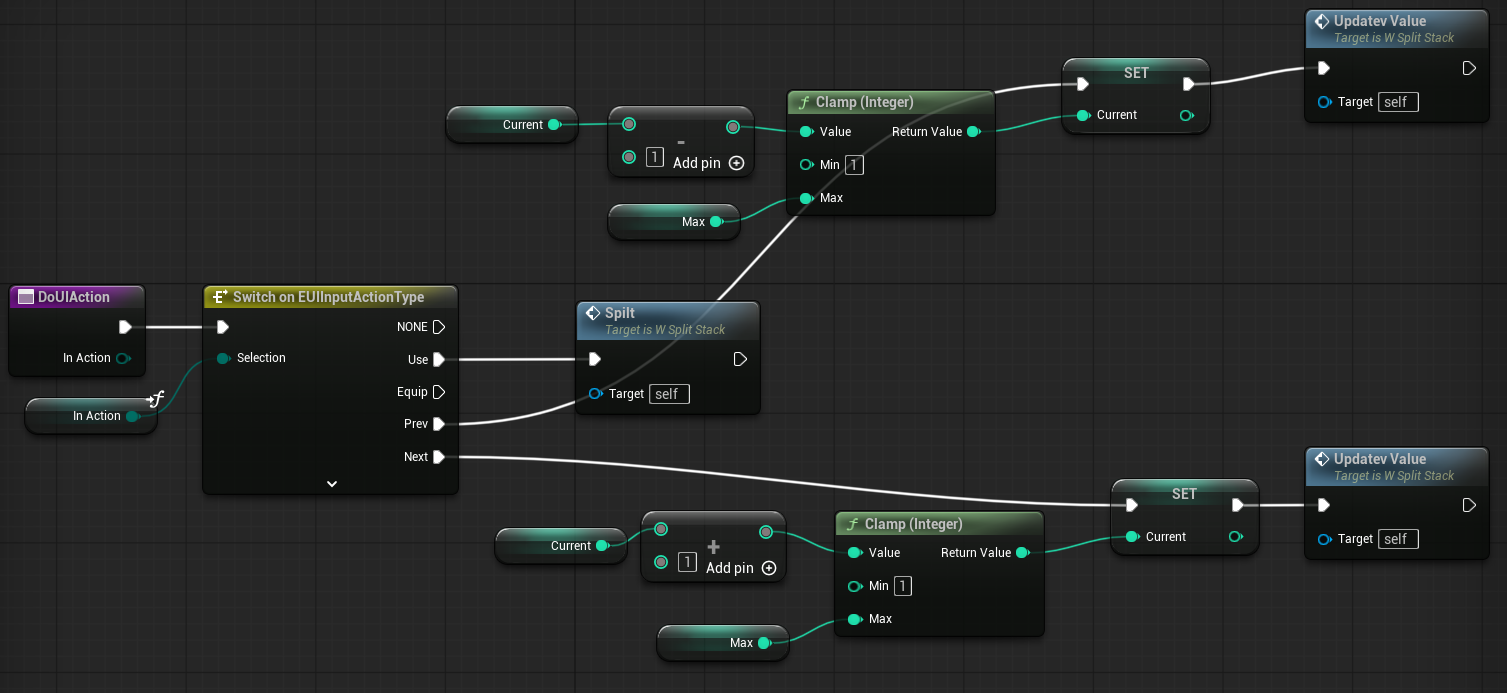
💡 Note: This is an example of how to use UIActions.
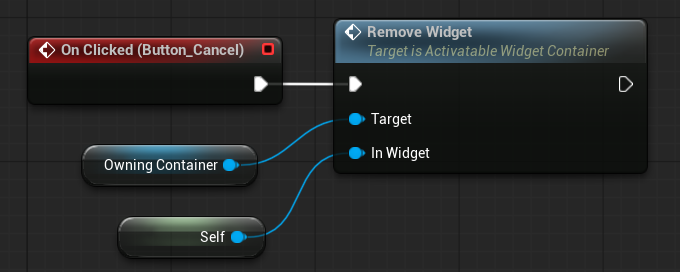
OnClicked–ButtonCancel ( link )
When the cancel button is clicked, we simply want to deactivate this widget.
OnClicked-ButtonOK ( link )
When the OK button is clicked, we want to split the stack.
OnValueChanged–Slider ( link )
When the slider value changes, we update the current split amount and refresh the values displayed on the widget.
W_ItemDescription
This widget displays the description of the selected item or selected stat. It uses RichTextBlocks, allowing icons and different text styles to be included directly within the description.
Hierarchy
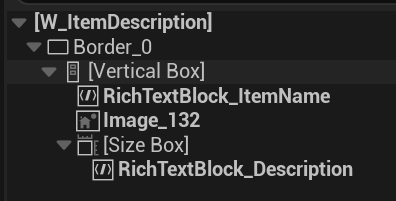
The hierarchy of the W_ItemDescription widget is straightforward. At the top, it shows the item’s name together with its image. Below that, it displays the description text.
Variables
| HoldingItem | FInventoryItem | The item currently being displayed in the description widget. |
Tooltip | bool | Indicates whether the widget is being used as a tooltip instead of a full inventory description. |
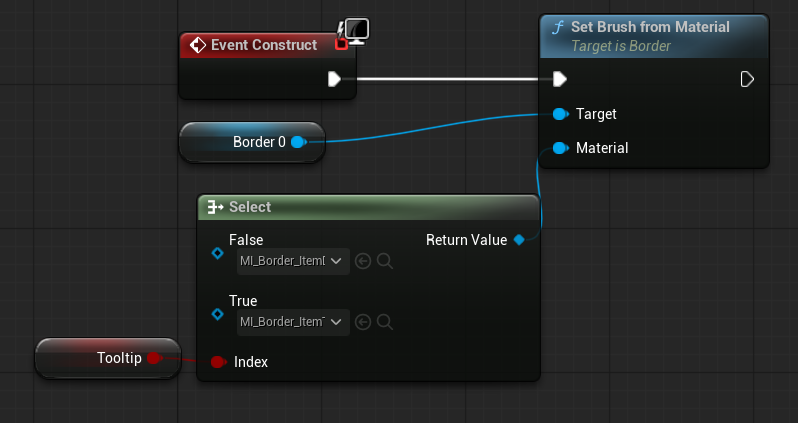
Event Construct ( link )
When the widget is used as a tooltip, its border is changed to a different style to visually distinguish it from the regular inventory description.
ShowItemDescription ( link )
This function updates the widget’s appearance based on the item it needs to display.
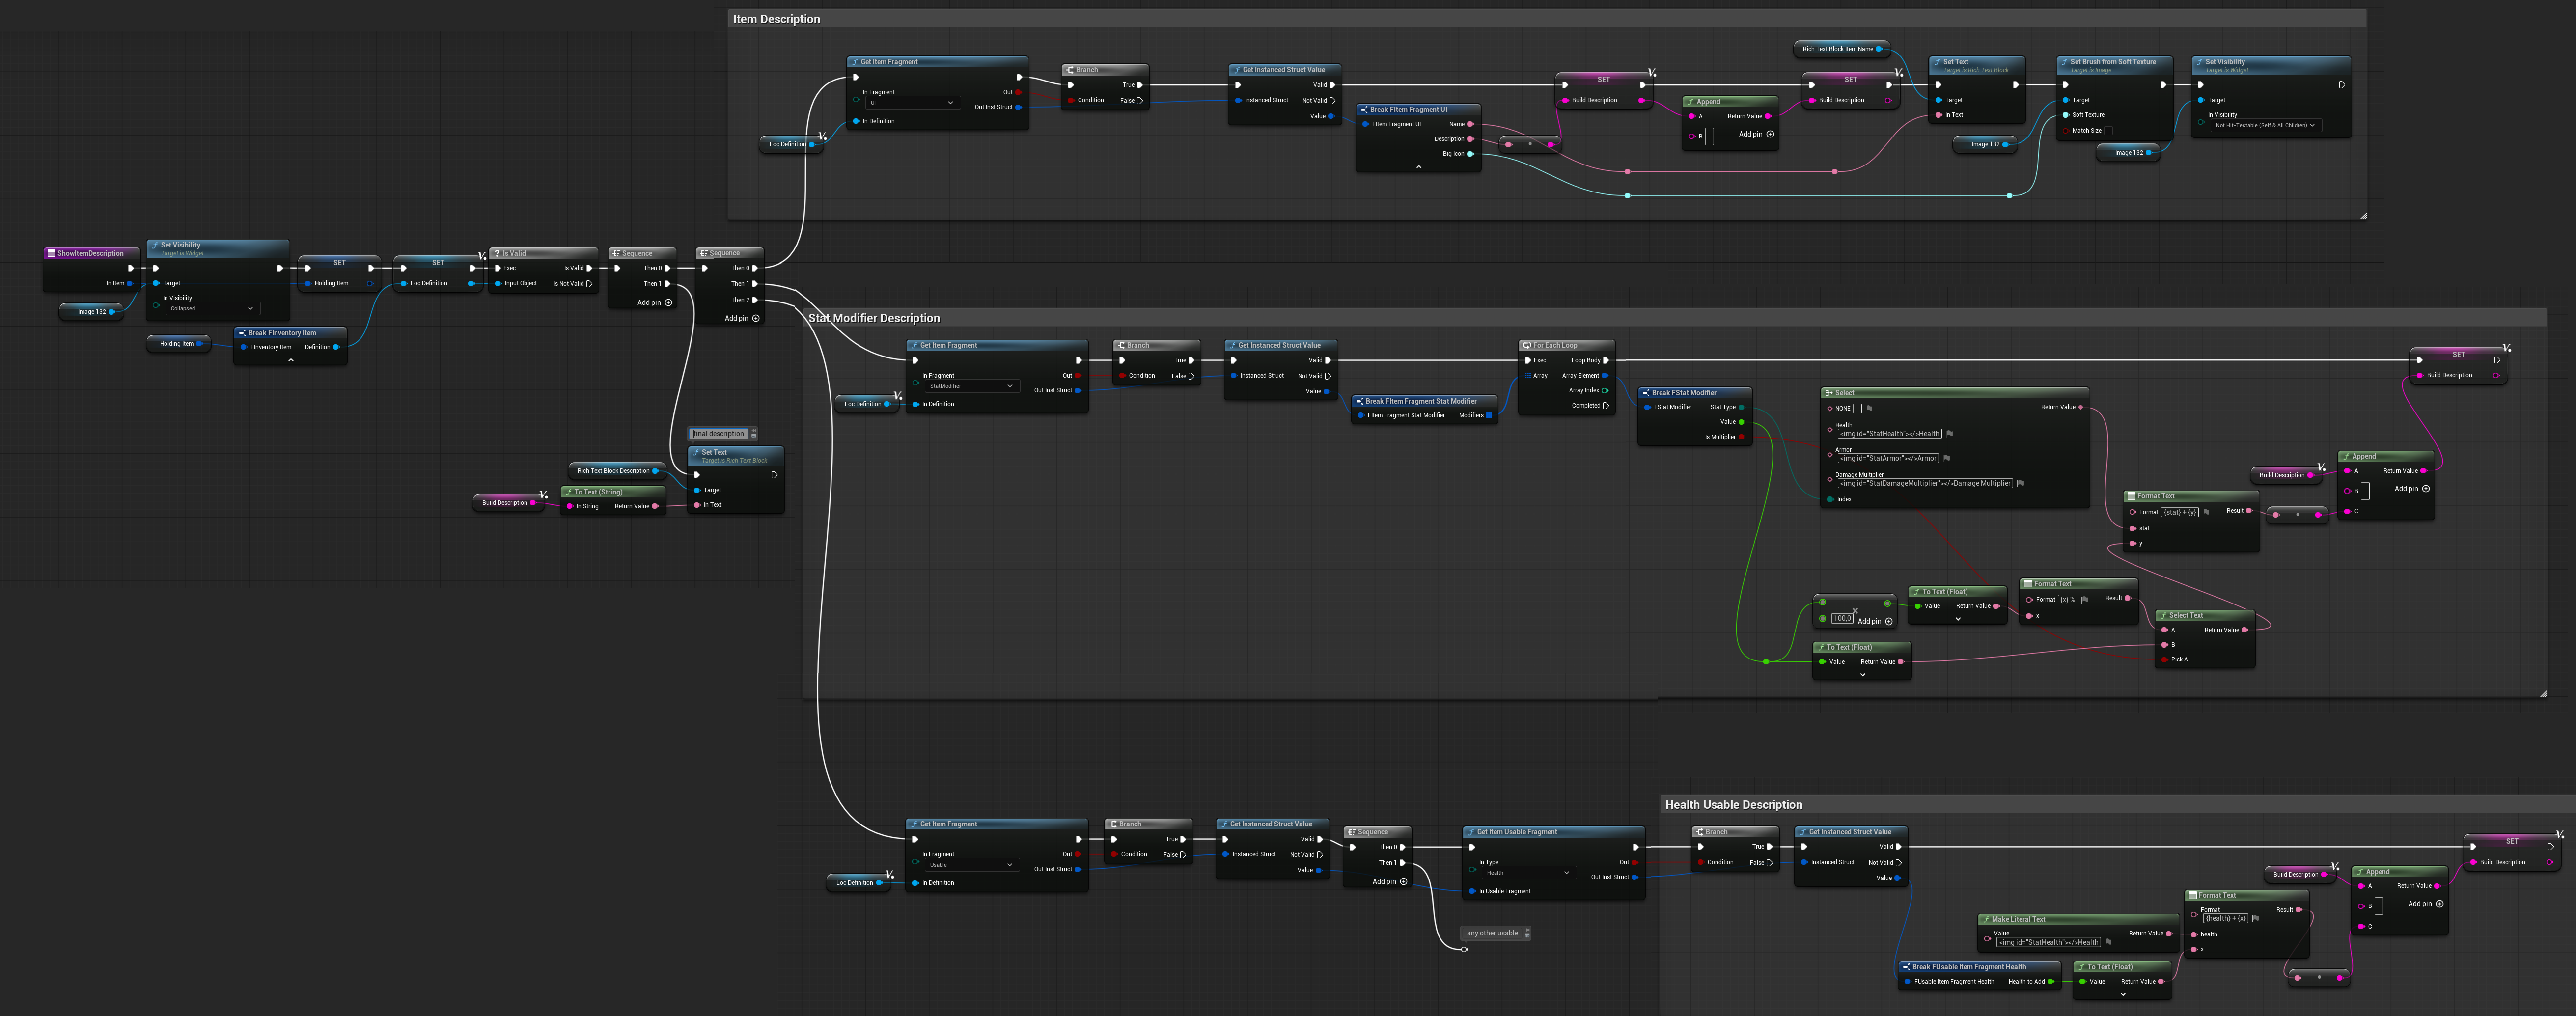
It will build a description string depending on several conditions:
- The item description comes from the UI Item Fragment.
- If the item has a Stat Modifier Fragment, it adds the stat modifier description along with its icons.
- If the item has a Usable Fragment, it can add a usable description as well (for example, health restoration).
💡 Note: By utilizing fragments this way, you can extend item descriptions dynamically with extra details.
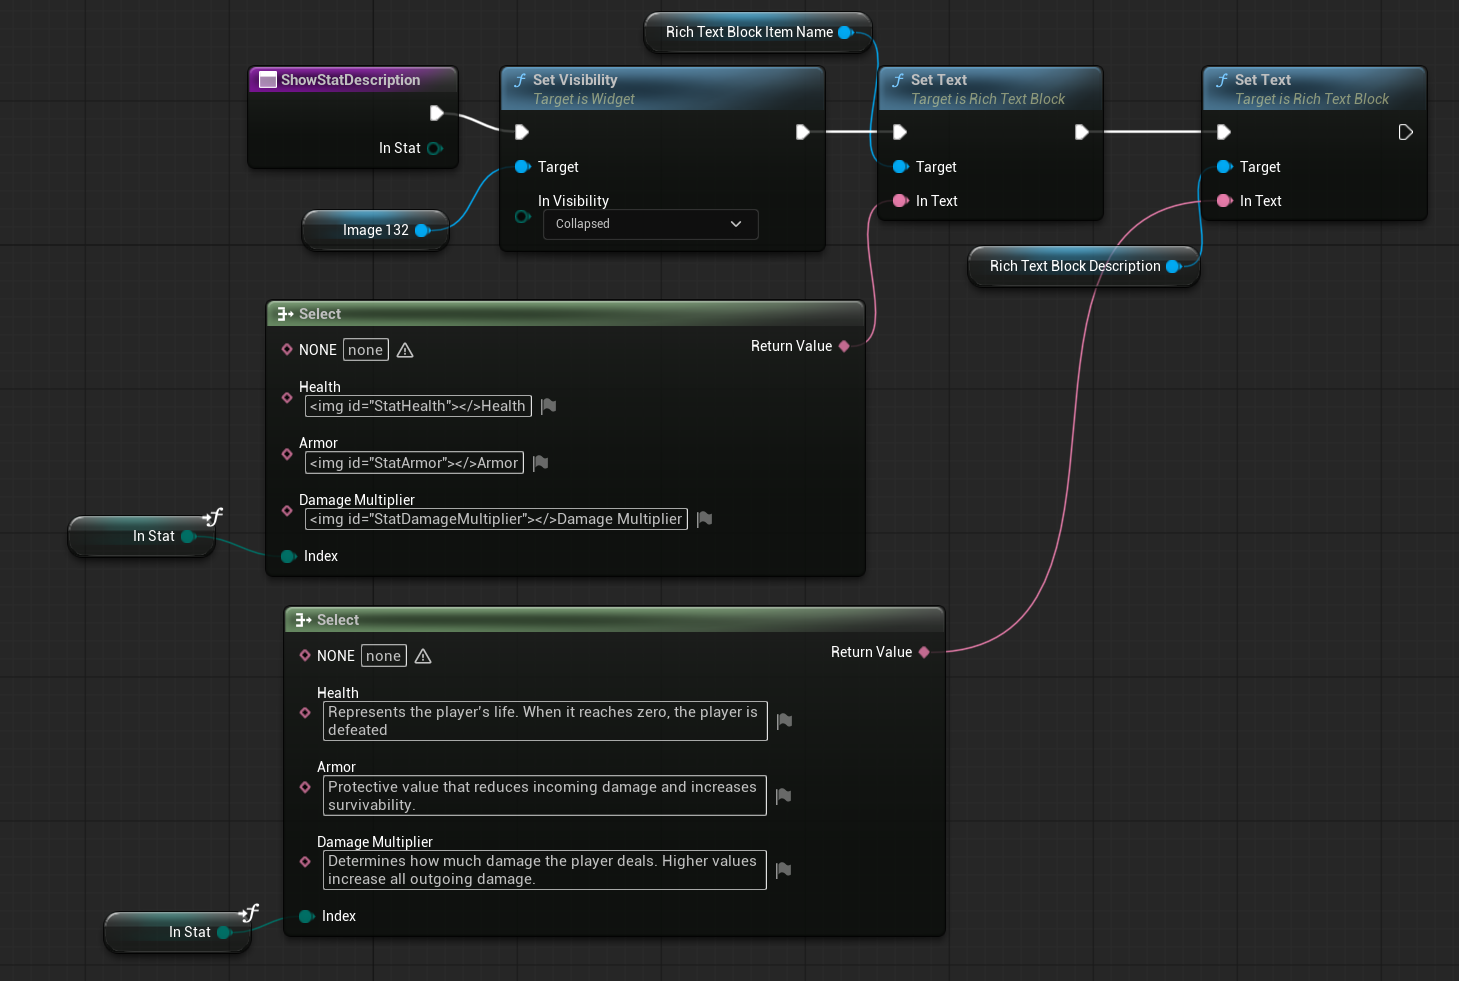
ShowStatDescription ( link )
This function is responsible for displaying a stat description inside the description widget. As mentioned earlier, the widget isn’t limited to item descriptions—it can also present stat information.
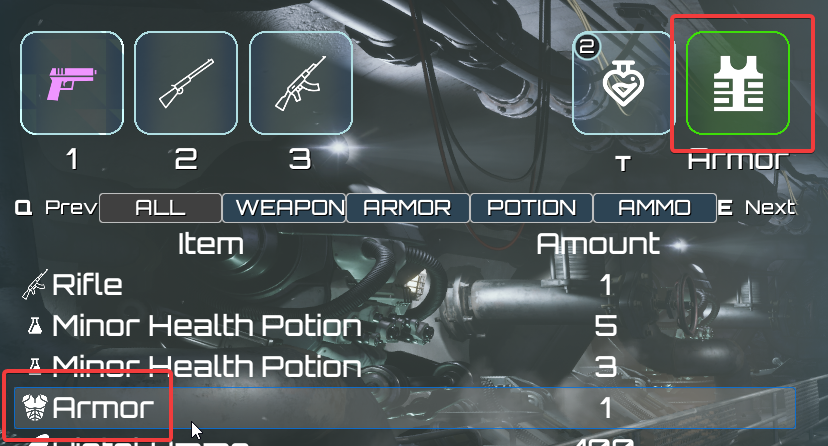
W_ItemSlotEntry
This is the core widget of the inventory system. It represents a single slot, which may contain an item or remain empty. In addition to the standard slot view, it also has the ability to switch into a horizontal list view, allowing more flexible display and interaction depending on the inventory layout.
Hierarchy
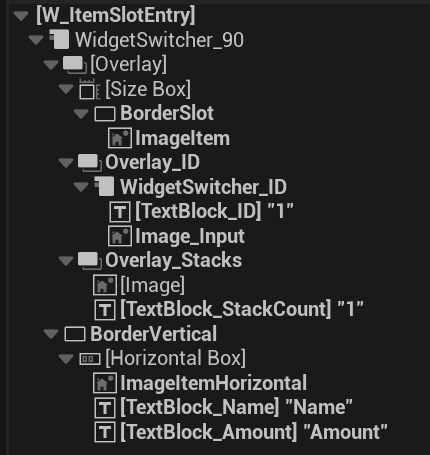
There are two display modes for the slot, each with its own appearance and purpose.
Rectangle Slot:
- Slot Border
- Item Image
- Overlay ID (e.g., quick slot numbers 1, 2, 3) — can be shown or hidden
- Input indicator (e.g., potion usage) — can be shown or hidden
- Stack amount — can be shown or hidden
Horizontal List View
- Item Image
- Item Name
- Item Amount
Let’s take a look at the variables.
| OwningInvComp | InventoryComponent | Reference to the owning inventory component. |
ShowID | bool | Determines whether to display the slot ID (e.g., quick slot numbers). |
| HoldingInvItem | FInventoryItem | The item currently held by the slot. Can be null to indicate an empty slot. |
| SlotID | int32 | The ID of the slot this widget represents. |
| SlotType | EInventorySlotType | The type of slot the widget represents. |
| SlotName | Text | Optional override for the slot name (e.g., “Armor”). |
| CreatedTooltipWidget | W_ItemDescription | Tooltip widget created when hovering over the item. |
| VertColors | FItemEntryColorConfig | Color configuration used for vertical view. |
| SlotColors | FItemEntryColorConfig | Color configuration used for slot view. |
| OnItemHovered | Dispatcher which will return HoldingItem. |
Interfaces
| UserObjectListEntry | Since the W_ItemSlotEntry widget can be displayed inside a ListView, it implements the UserObjectListEntry interface to integrate properly with the list system. |
EventOnListItemObjecSet ( UserObjectListEntry interface ) ( link )
This event is called when the ListView assigns an object to represent in the list. For W_ItemSlotEntry, this is where the widget is configured to properly display the assigned item within the list view.

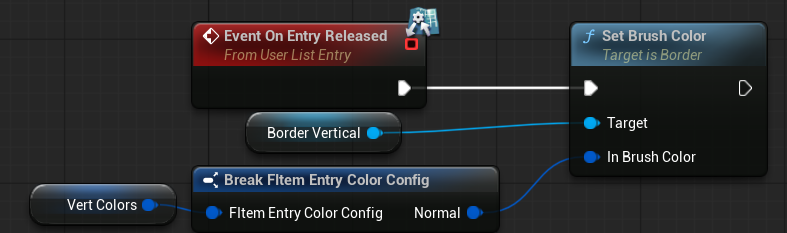
EventOnEntryReleased ( UserObjectListEntry interface ) ( link )
This event is called when an item in the ListView moves out of view. It allows the widget to reset to its normal state or perform any necessary de-initialization.
EventOnItemSelectionChanged ( UserObjectListEntry interface ) ( link )
This event is called when an item in the ListView is selected or deselected. It is used to update the widget’s colors accordingly.
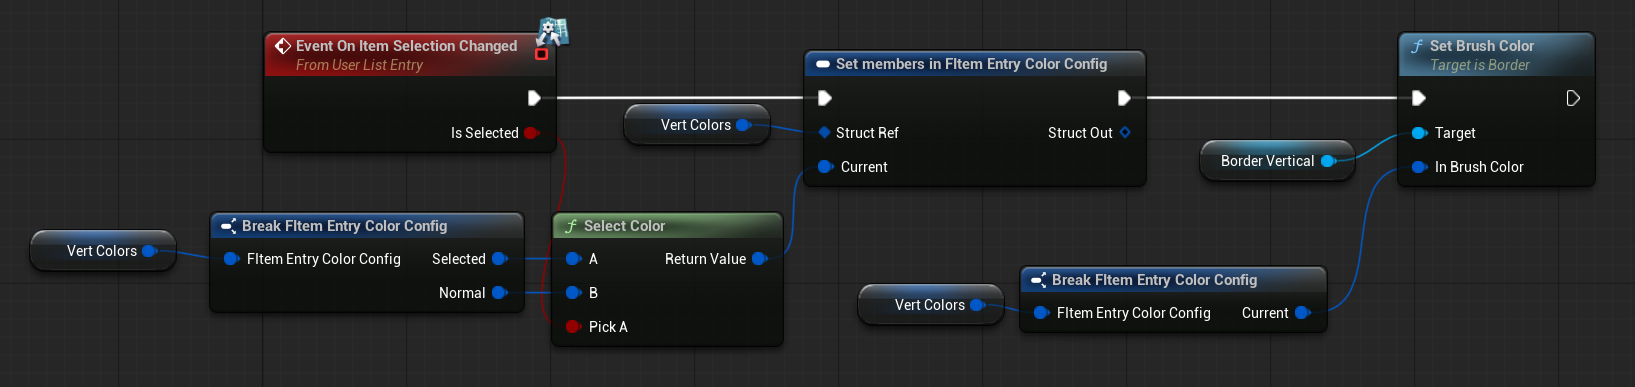
💡 Note: This illustrates why it’s good practice to store colors in a struct like FItemEntryColorConfig—you can easily apply consistent styling across widgets.
EventOnMouseEnter (function overriden) ( link )
Called when the mouse enters this widget. It updates the widget’s color and triggers the OnItemHovered dispatcher, which W_Inventory uses to update the currently displayed item description.

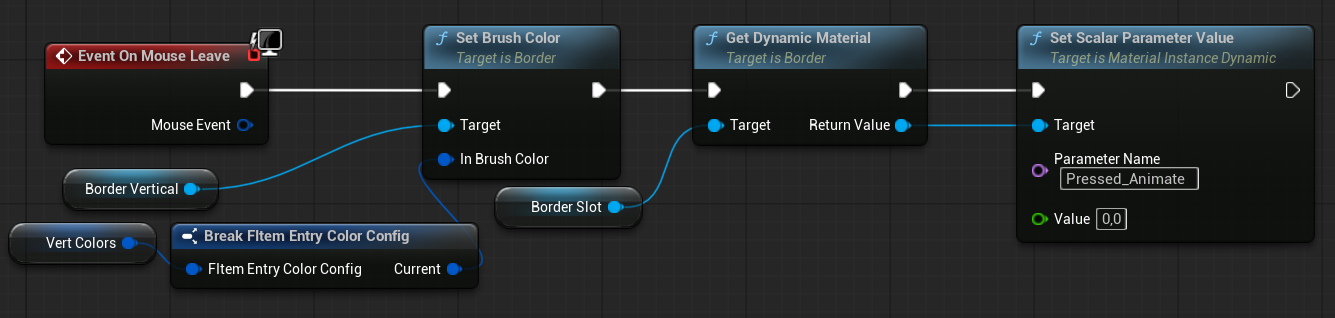
EventOnMouseLeave (function overriden) ( link )
Called when the mouse leaves this widget. It updates the widget’s appearance to reflect that it is no longer hovered.
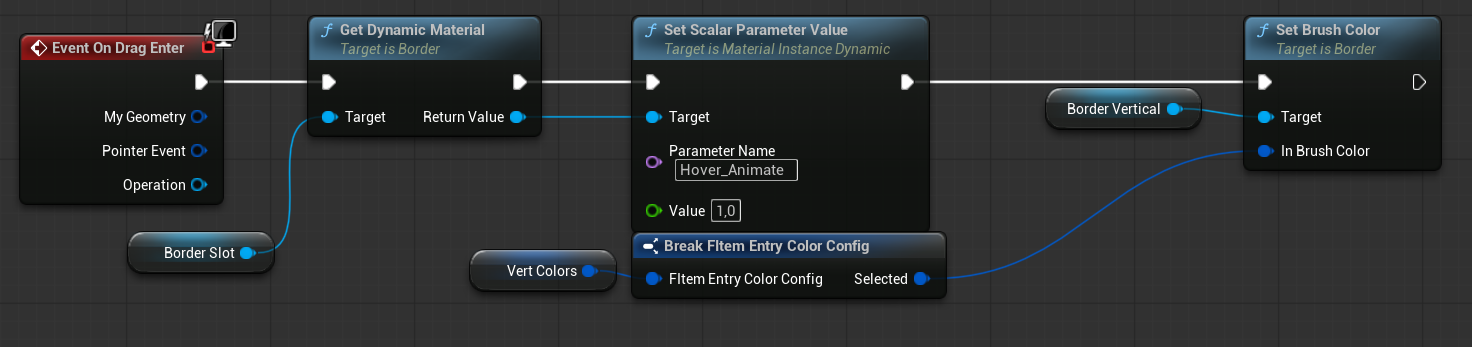
EventOnDragEnter (function overriden) ( link )
The widget supports drag-and-drop functionality. This event is triggered when a draggable item enters the widget. It updates the widget’s colors to indicate that an item can be placed here.
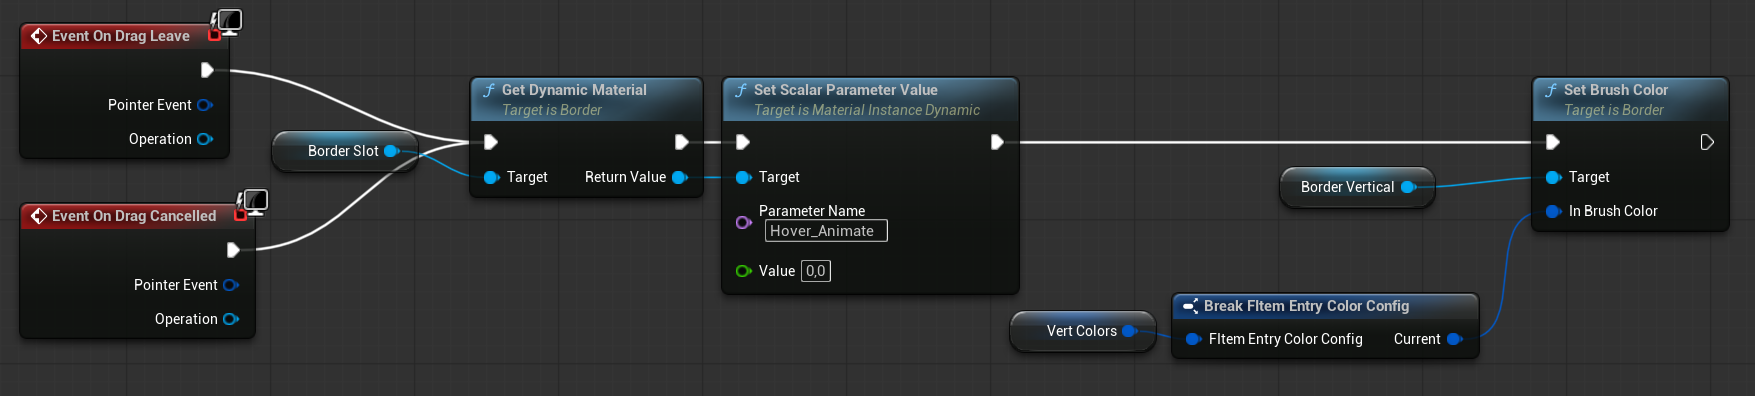
EventOnDragLeave & EventOnDragCancelled (function overriden) ( link )
These events are similar to EventOnDragEnter, but are called when a dragged item leaves the widget or the drag operation is cancelled. The widget’s colors are reset to their normal state.
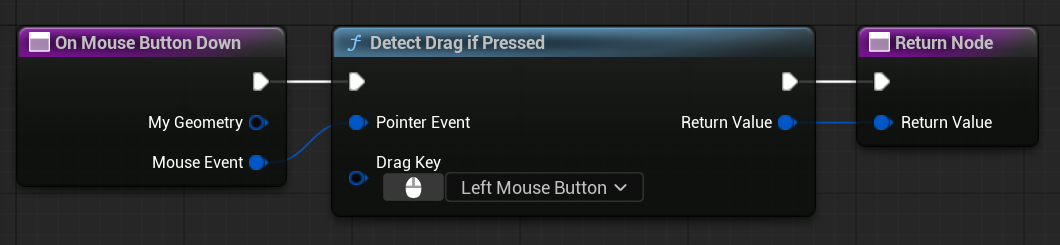
OnMouseButtonDown ( link )
This function is used to detect when a mouse button is pressed and determine whether the drag functionality should be activated.
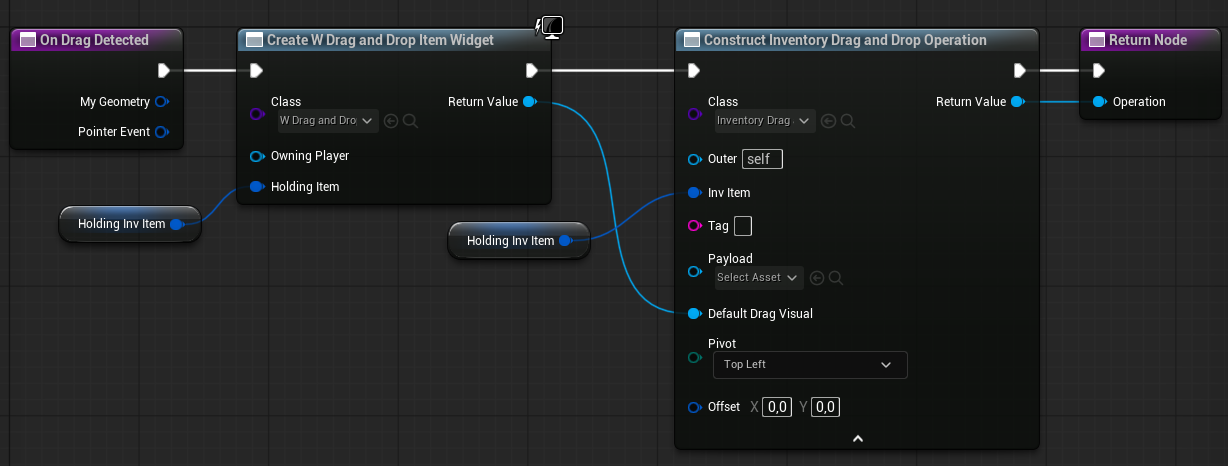
OnDragDetected ( link )
This function is called when a drag action is detected on the widget. It creates a W_DragAndDropItem widget and a DragAndDropOperation, which will be explained later.
OnDrop ( link )
This function is called when an item is dropped onto this widget via a drag-and-drop operation. It attempts to move the dragged item into this slot.

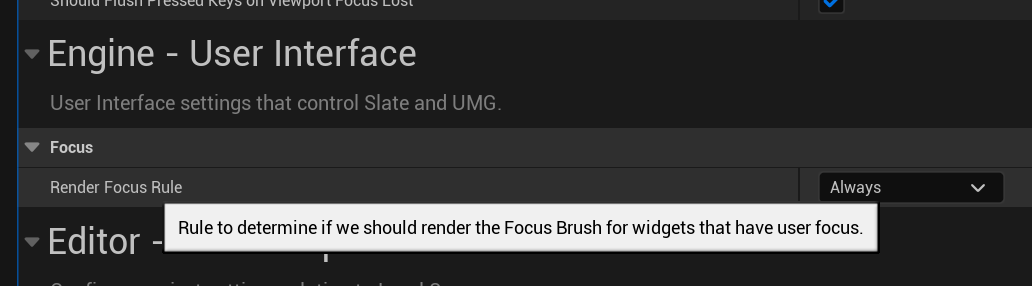
OnFocusReceived ( link )
When using a gamepad, you can set focus with SetUserFocus and handle it with OnFocusReceived. When this widget receives user focus, it triggers the OnItemHovered dispatcher, similar to when a mouse hovers over the item.
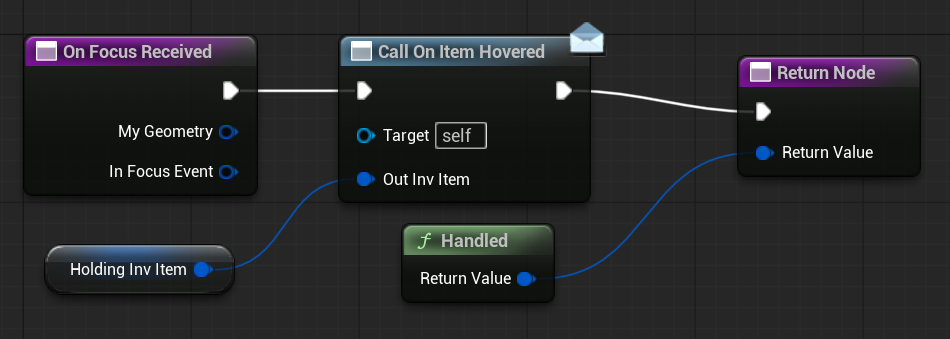
💡 Note: When developing your game, it’s a good idea to display a border around the focused widget. This helps with debugging and lets you see how focus moves between widgets. You can enable this setting in the Project Settings.
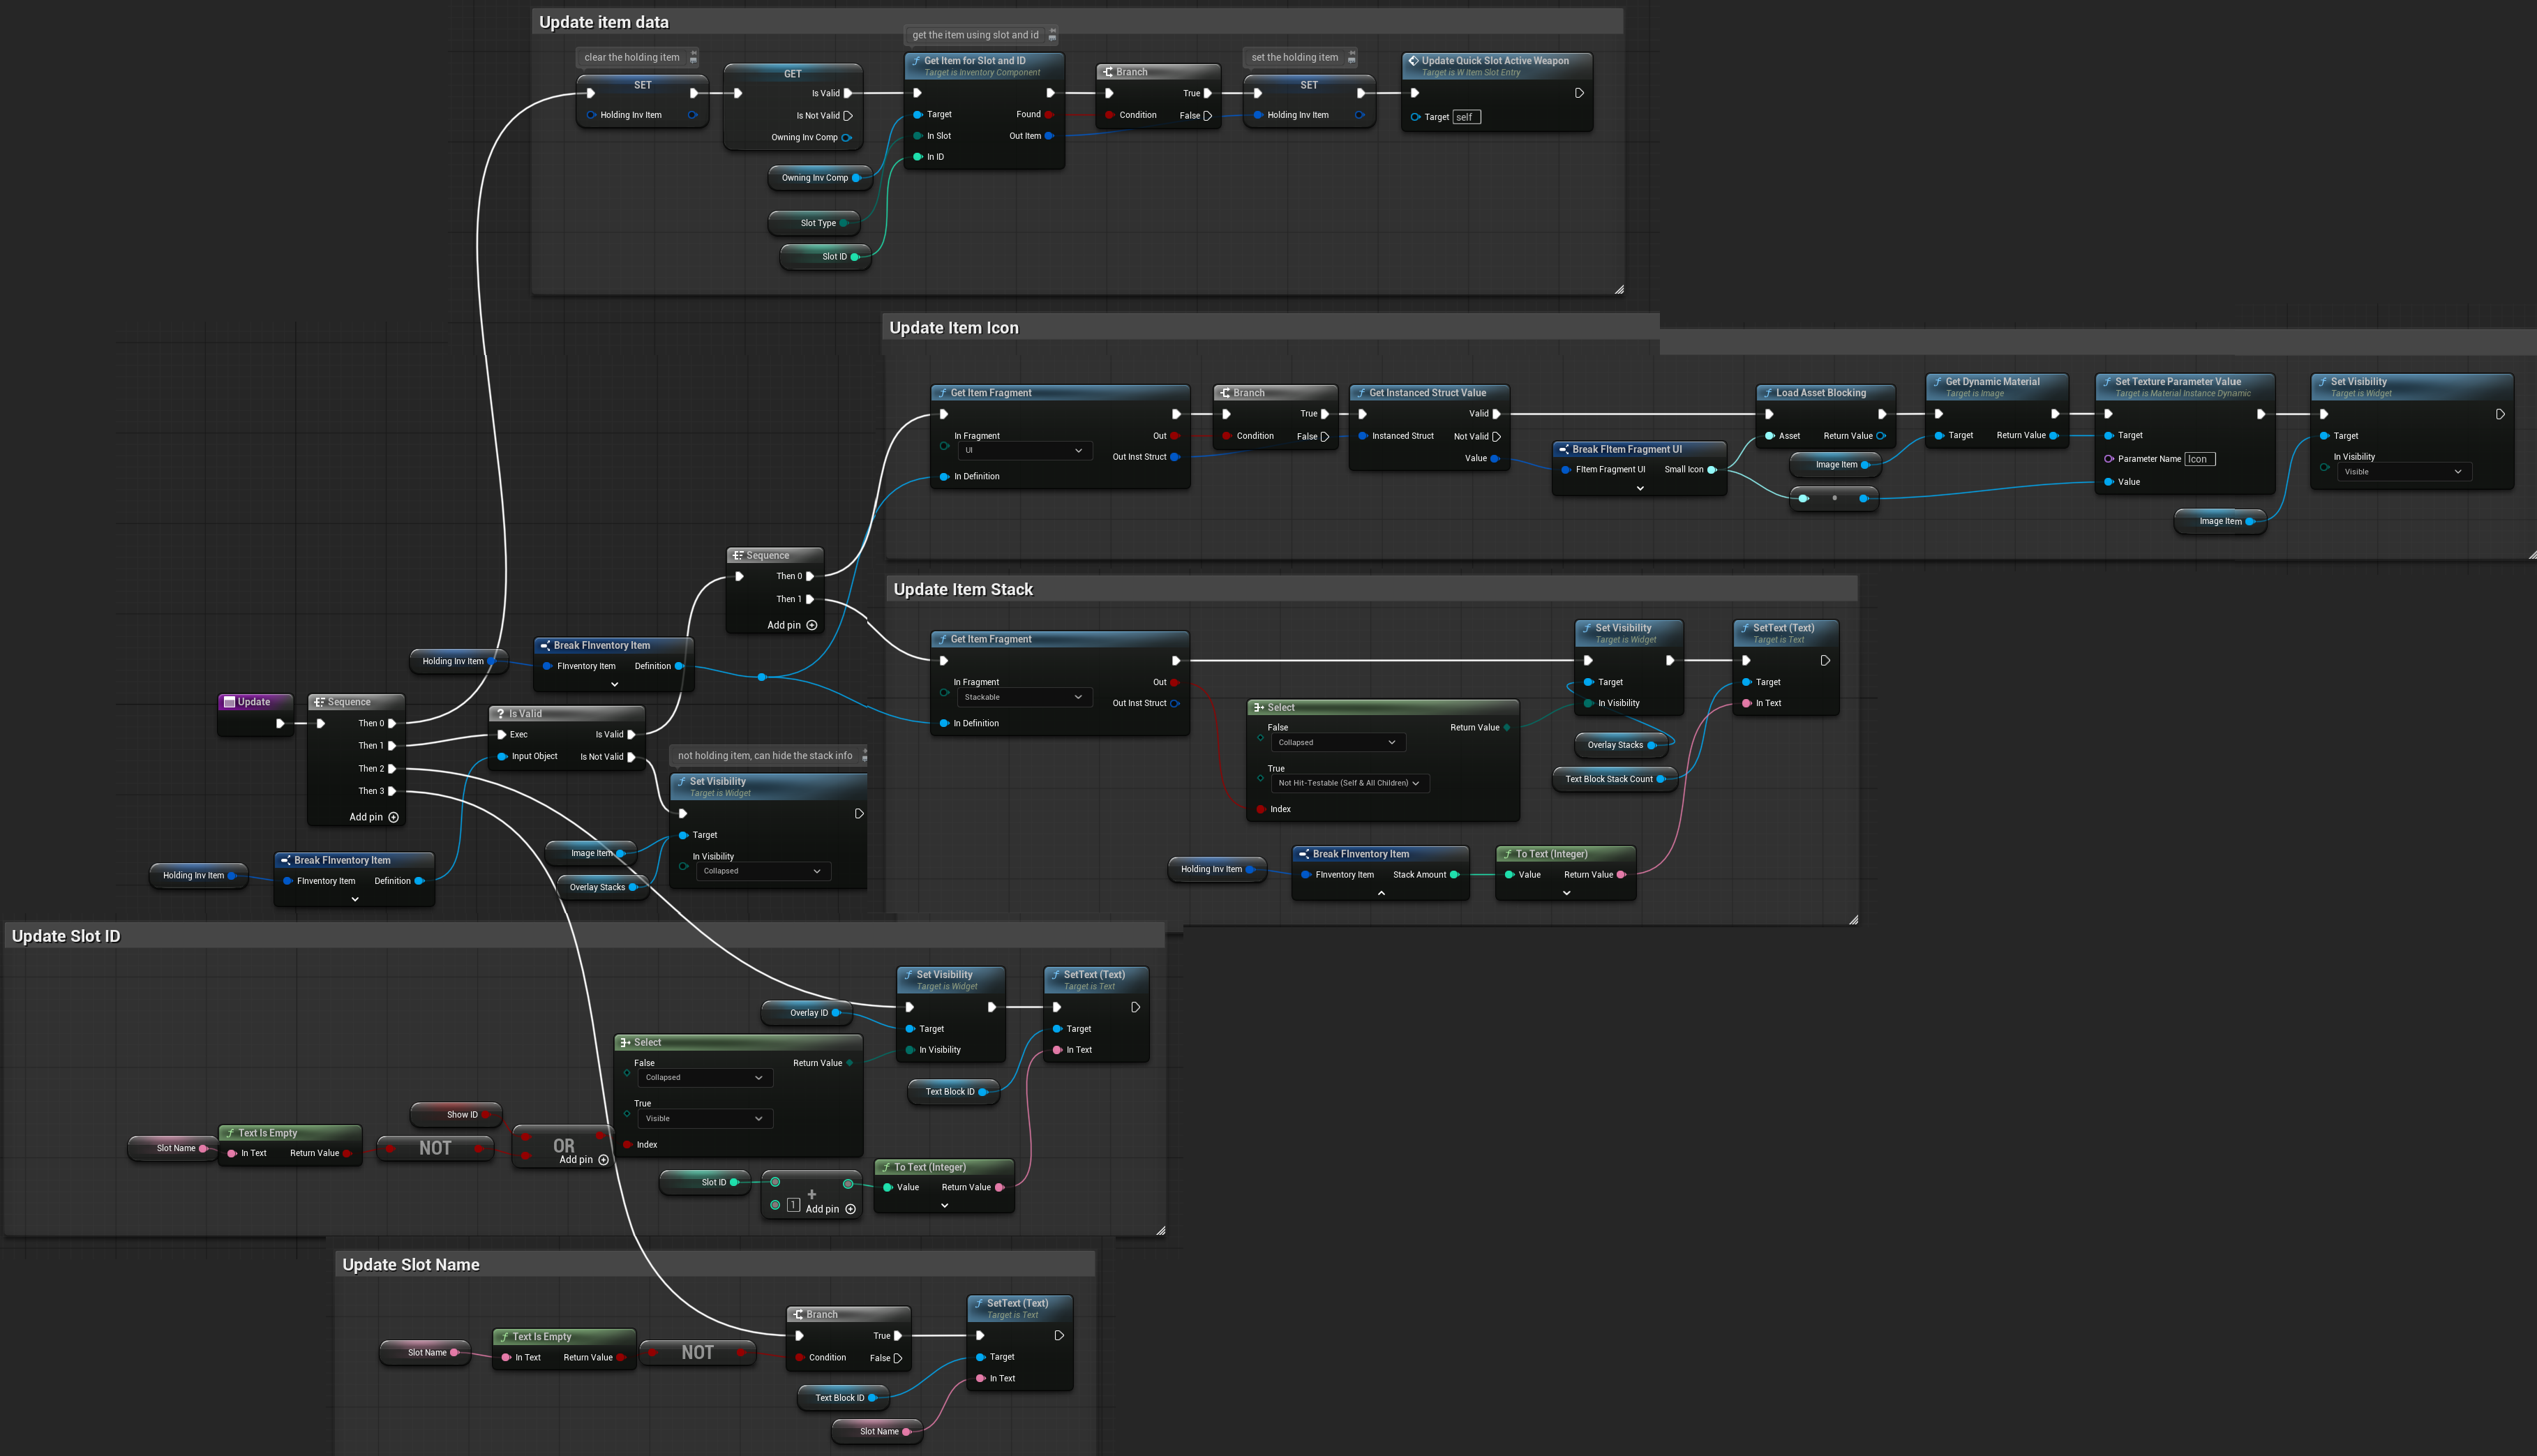
Update ( link )
This function updates the slot’s appearance. It will:
- Retrieve the holding item based on the slot type and ID.
- Get the UI fragment and set the item icon.
- Get the stackable fragment and display the stack count if applicable.
- Show the slot ID if enabled.
- Show the slot name if enabled.
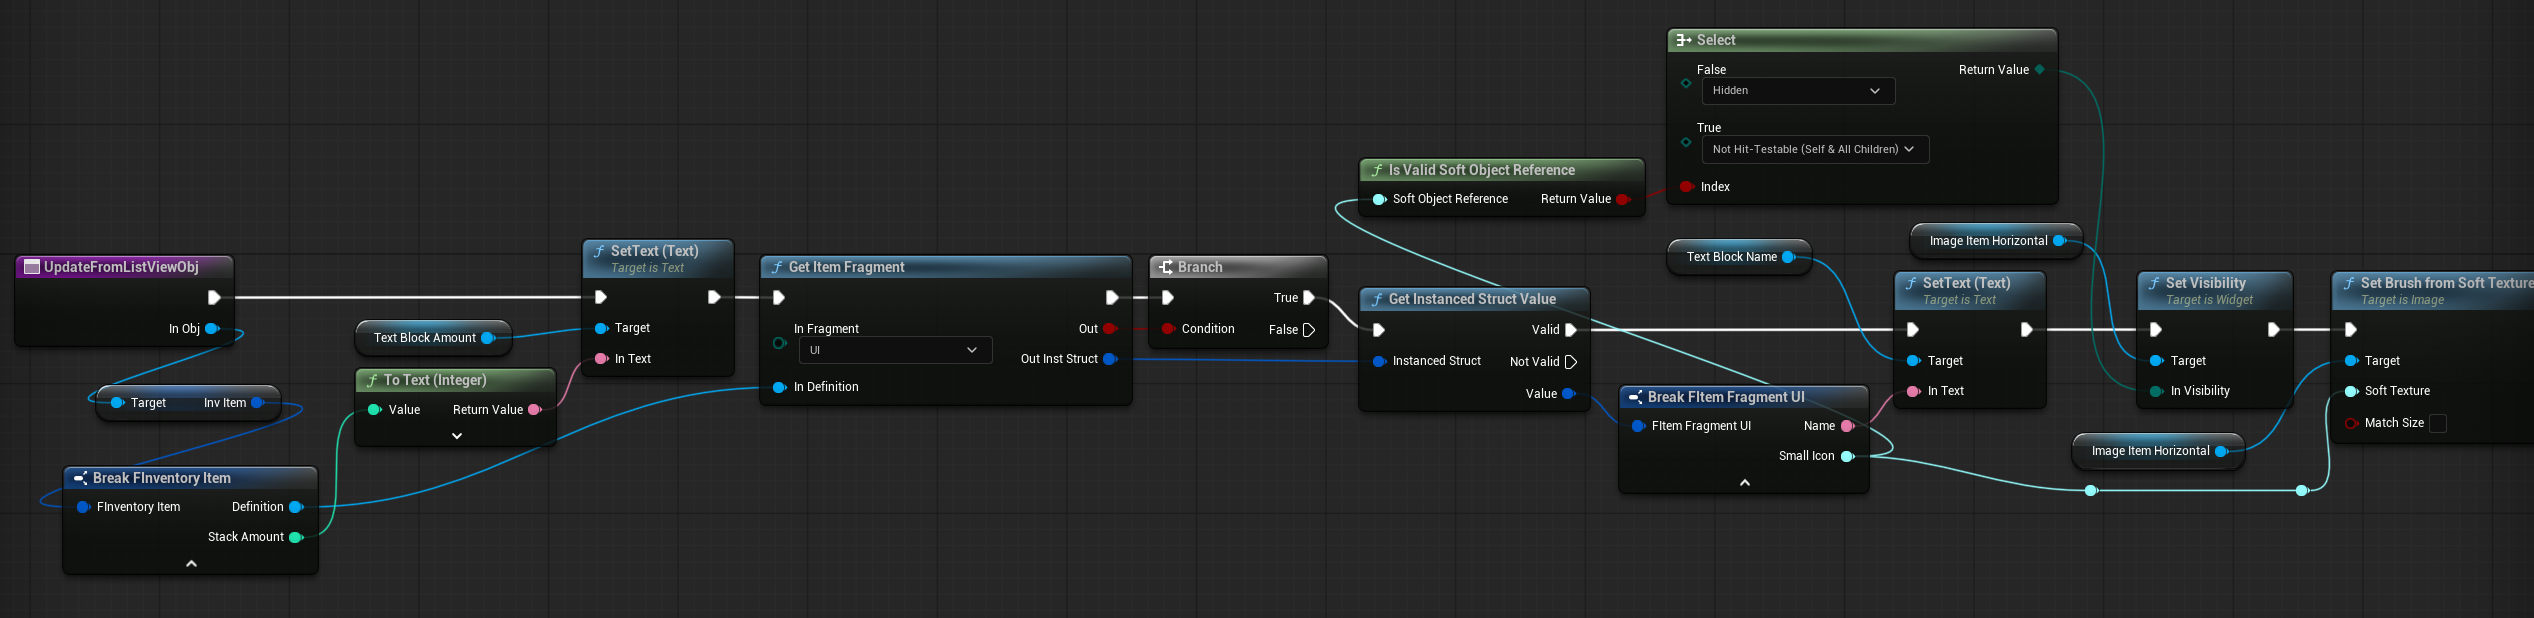
UpdateFromListViewObj ( link )
This function updates the slot when it is displayed in the list view horizontally. It simply updates the item’s name, icon, and stack count.
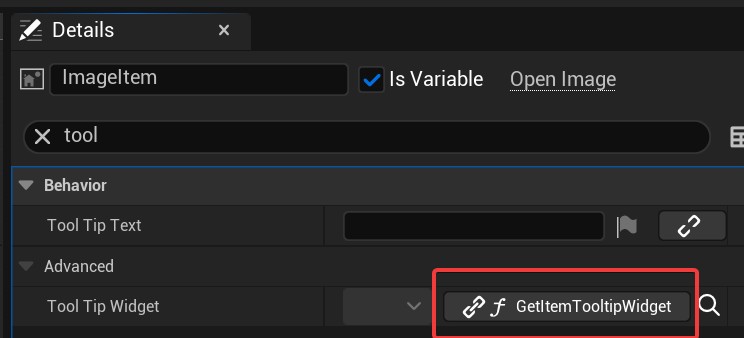
GetItemTooltipWidget ( link )
This function retrieves the tooltip widget for the slot. The widget is not created every time the tooltip needs to be shown; instead, it reuses the existing one.
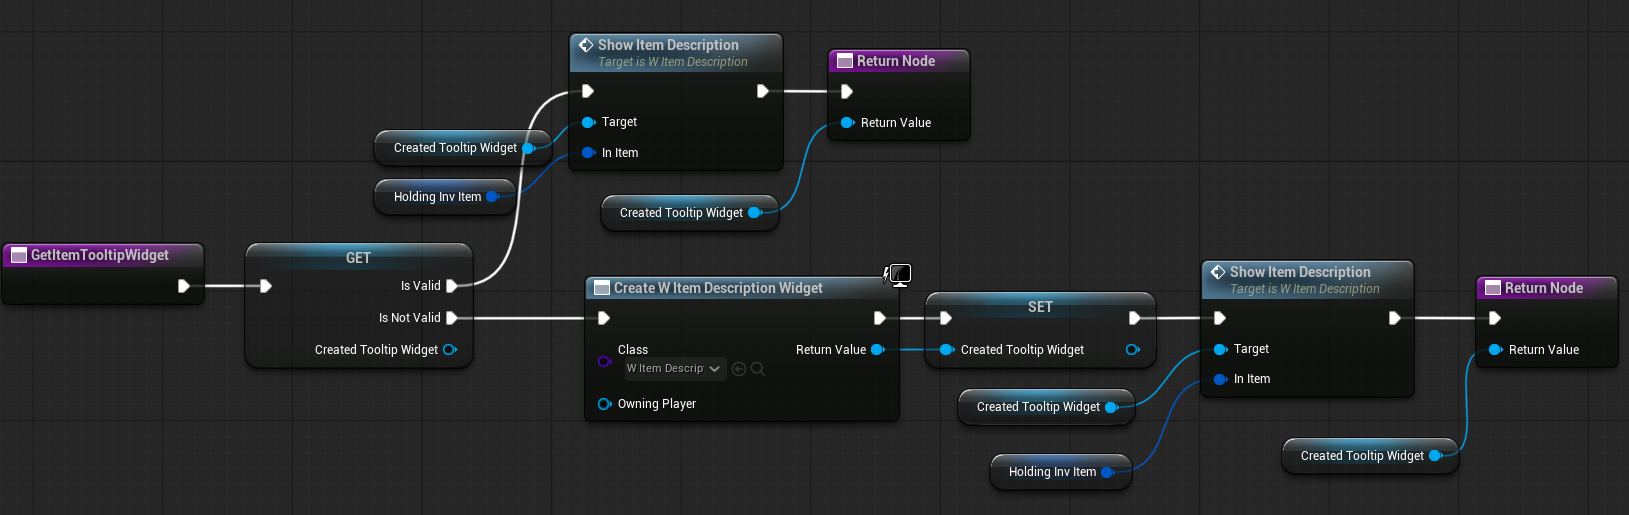
Both ImageItem and HorizontalBox have this tooltip widget function connected.
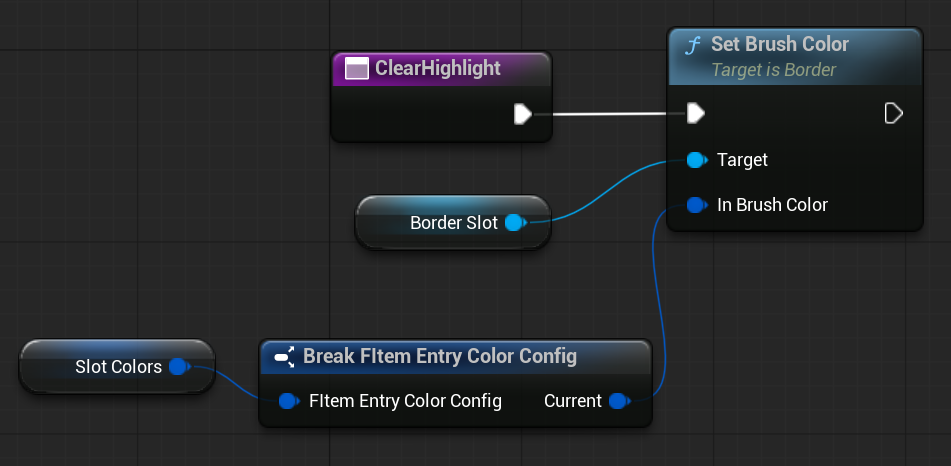
ClearHighlight ( link )
This function resets the slot’s appearance by clearing any highlight state.
CheckIfShouldHighlight ( link )
This function clears any existing highlight and sets a new highlight if the target item is compatible with the holding slot widget type.
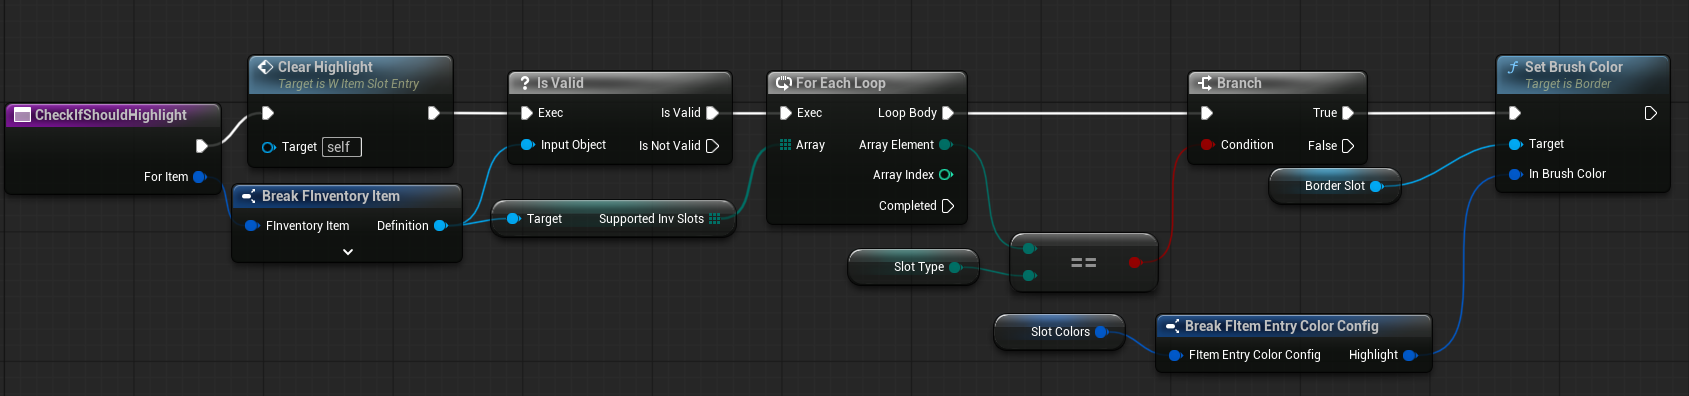
For example, if you select an armor item in the backpack, the armor slot will be highlighted to indicate that the item can be moved there.
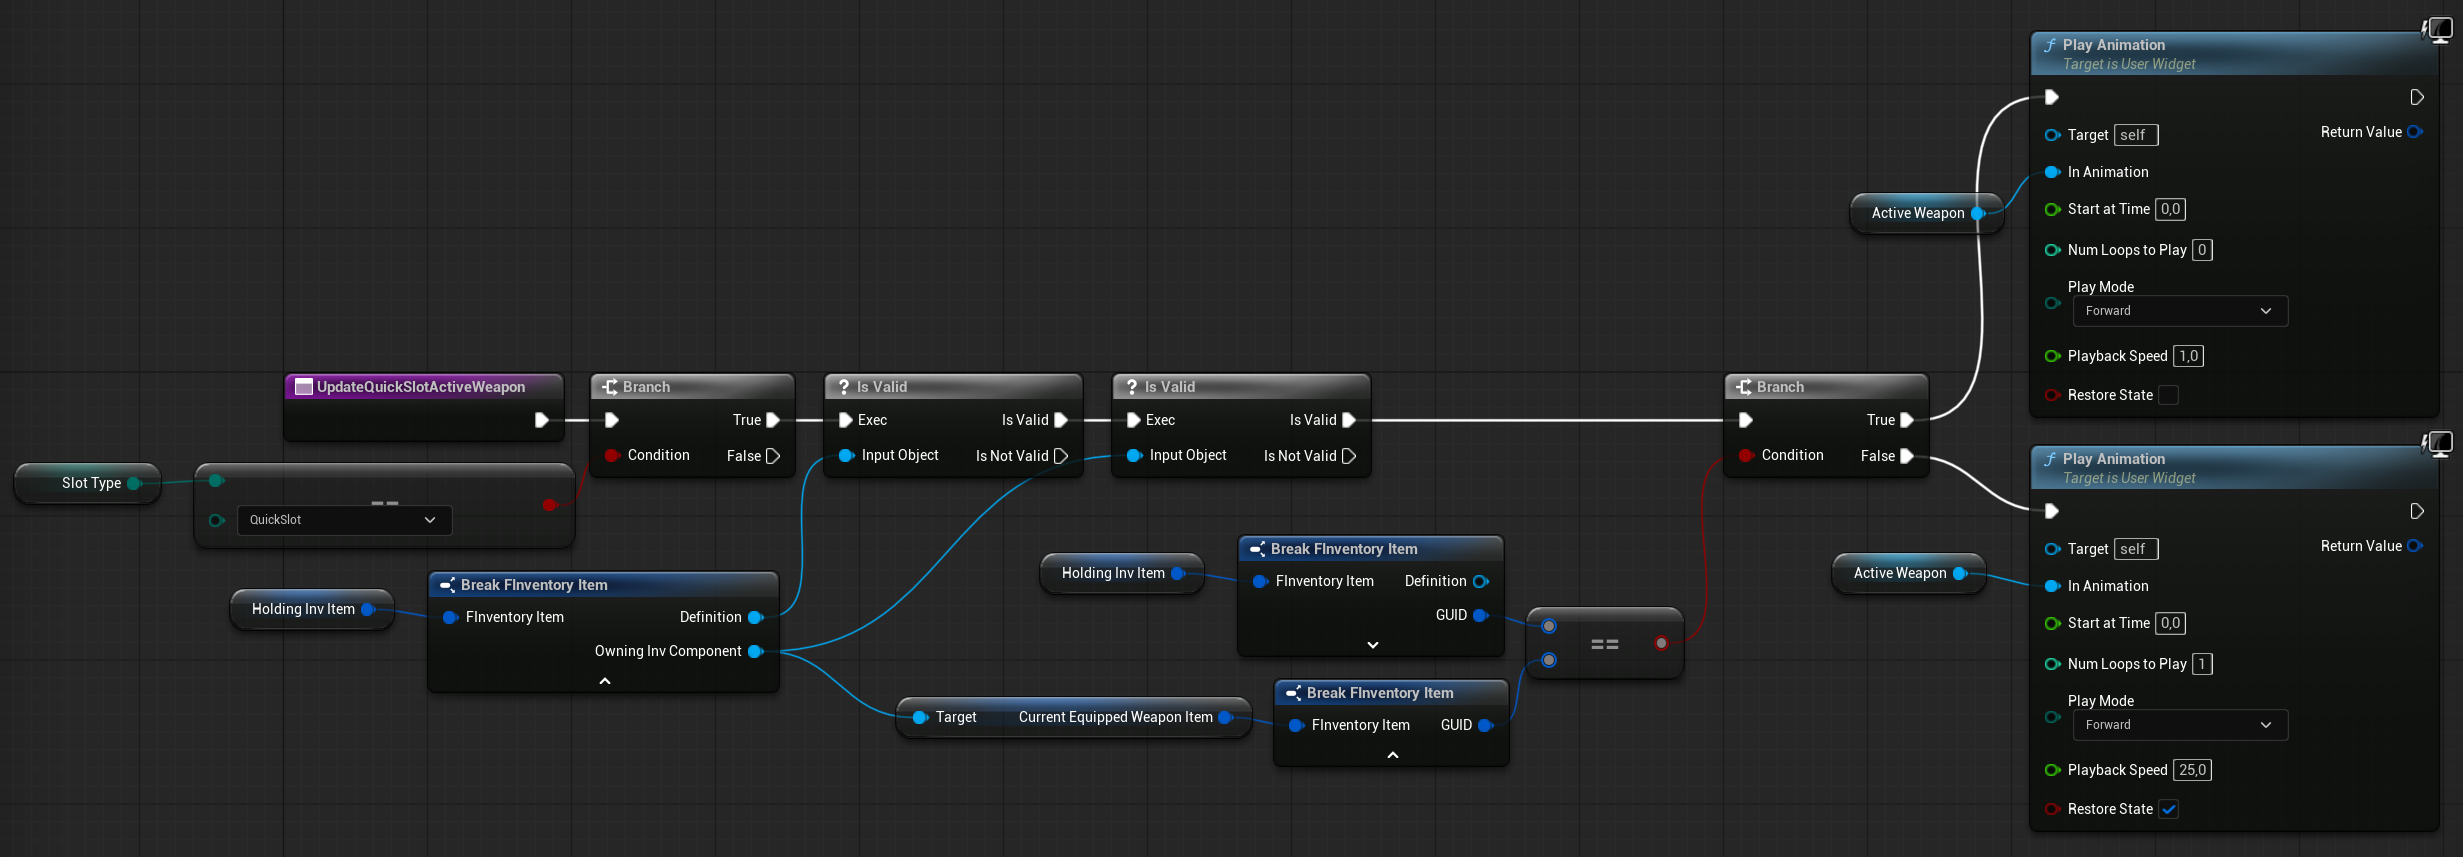
UpdateQuickSlotActiveWeapon ( link )
This function checks whether the slot is a quick slot and whether it holds the currently active weapon. If so, it triggers the active weapon animation to indicate which weapon the player currently has equipped.
W_DragAndDropItem
This widget defines the appearance and layout of the drag-and-drop item.
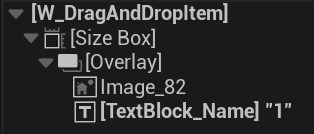
It has a simple hierarchy consisting of an item name and image. The Size Box defines the maximum size of the widget.
| HoldingItem | FInventoryItem | The item currently being displayed in the dragged item widget. |
EventConstruct ( link )
This function updates the widget to display a specific dragged item, including its name and icon.

InventoryDragAndDropOperation
For drag-and-drop functionality, a DragDropOperation blueprint is required to hold data about the dragged item. In this case, it has a single variable: InvItem, which stores the FInventoryItem being dragged.
Check OnDragDetected in the W_ItemSlotEntry widget. This is where the drag-and-drop operation is created along with the widget.
InvListViewObj
Now, let’s move on to the vertical inventory using a ListView. A ListView relies on two main components:
- An object to store the data (
InvListViewObj) - A widget to display the data (
W_ItemSlotEntry)
The W_ItemSlotEntry implements UserObjectListEntry and provides functions that use InvListViewObj to update the slot’s appearance, depending on whether it is currently displayed in the ListView or not.
| InvItem | FInventoryItem | The actual item data held by the ListView object. |
| SlotType | EInventorySlotType | Indicates which inventory slot the ListView item belongs to. |
W_InventoryListVertical
A widget that displays items in a vertical ListView. It also includes functionality to filter the displayed items.

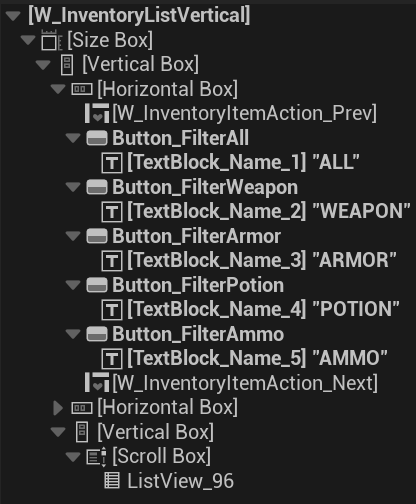
So, it not only displays the items inside ListView_96, but also provides the ability to adjust filters.
| InvSlots | | Defines which inventory slots the items should be displayed from. Can contain multiple slot types. |
| CurrentShowingFilterID | int32 | The filter ID currently being applied to the displayed items. |
| InvComp | InventoryComponent | The owning inventory component that this widget is operating on. |
| OnItemSelected | Dispatcher with FInventoryItem output. | Triggered when an item is selected in the ListView. |
| OnItemHovered | Dispatcher with FInventoryItem output. | Triggered when an item is hovered in the ListView. |
Clicking a filter button calls the Update function with the specified filter type.

EventOnItemSelectionChanged ( link, ListView)
Event from the ListView that triggers the OnItemSelected dispatcher.

💡 Note: The ListView uses the InvListViewObj to handle data communication, not the widgets themselves. This separation keeps data and presentation logic independent.
EventOnItemIsHoveredChanged ( link, ListView)
Event from the ListView that triggers the OnItemHovered dispatcher.

OnDrop ( link )
Overridden function called when an item, via drag-and-drop, is moved into free space within the ListView. This action attempts to place the item into the first available slot shown by the ListView.

💡 Note: Item-to-item interactions (such as stacking or swapping) are handled by the slot itself, since the slot knows its own contents. For these cases, see the OnDrop function in W_ItemSlotEntry.
OnFocusReceived ( link )
Function called when this widget receives focus. The focus is immediately transferred to the ListView widget.
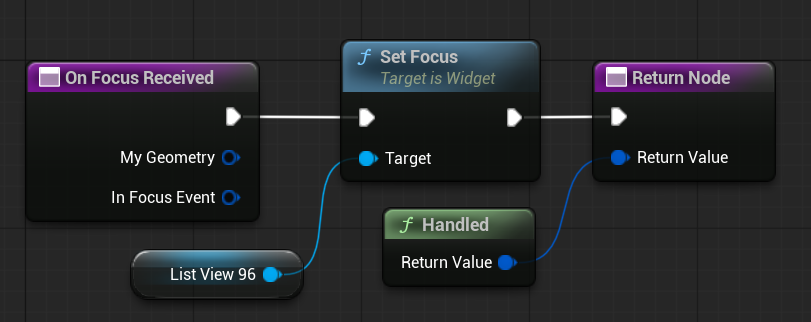
💡 Note: When working with a controller, it’s important to understand how user focus works so the player can navigate the inventory using a gamepad.
Update ( link )
Main function to refresh the ListView. Performs the following steps:
- Clears the current selection and empties the ListView.
- Updates the filter buttons colors to indicate the currently active filter.
- Iterates through all backpack and ammo items, checking which items should be displayed based on the current filter.
- Adds each eligible item to the ListView using
InvListViewObj.
- Adds each eligible item to the ListView using
- Selects the first item in the ListView.
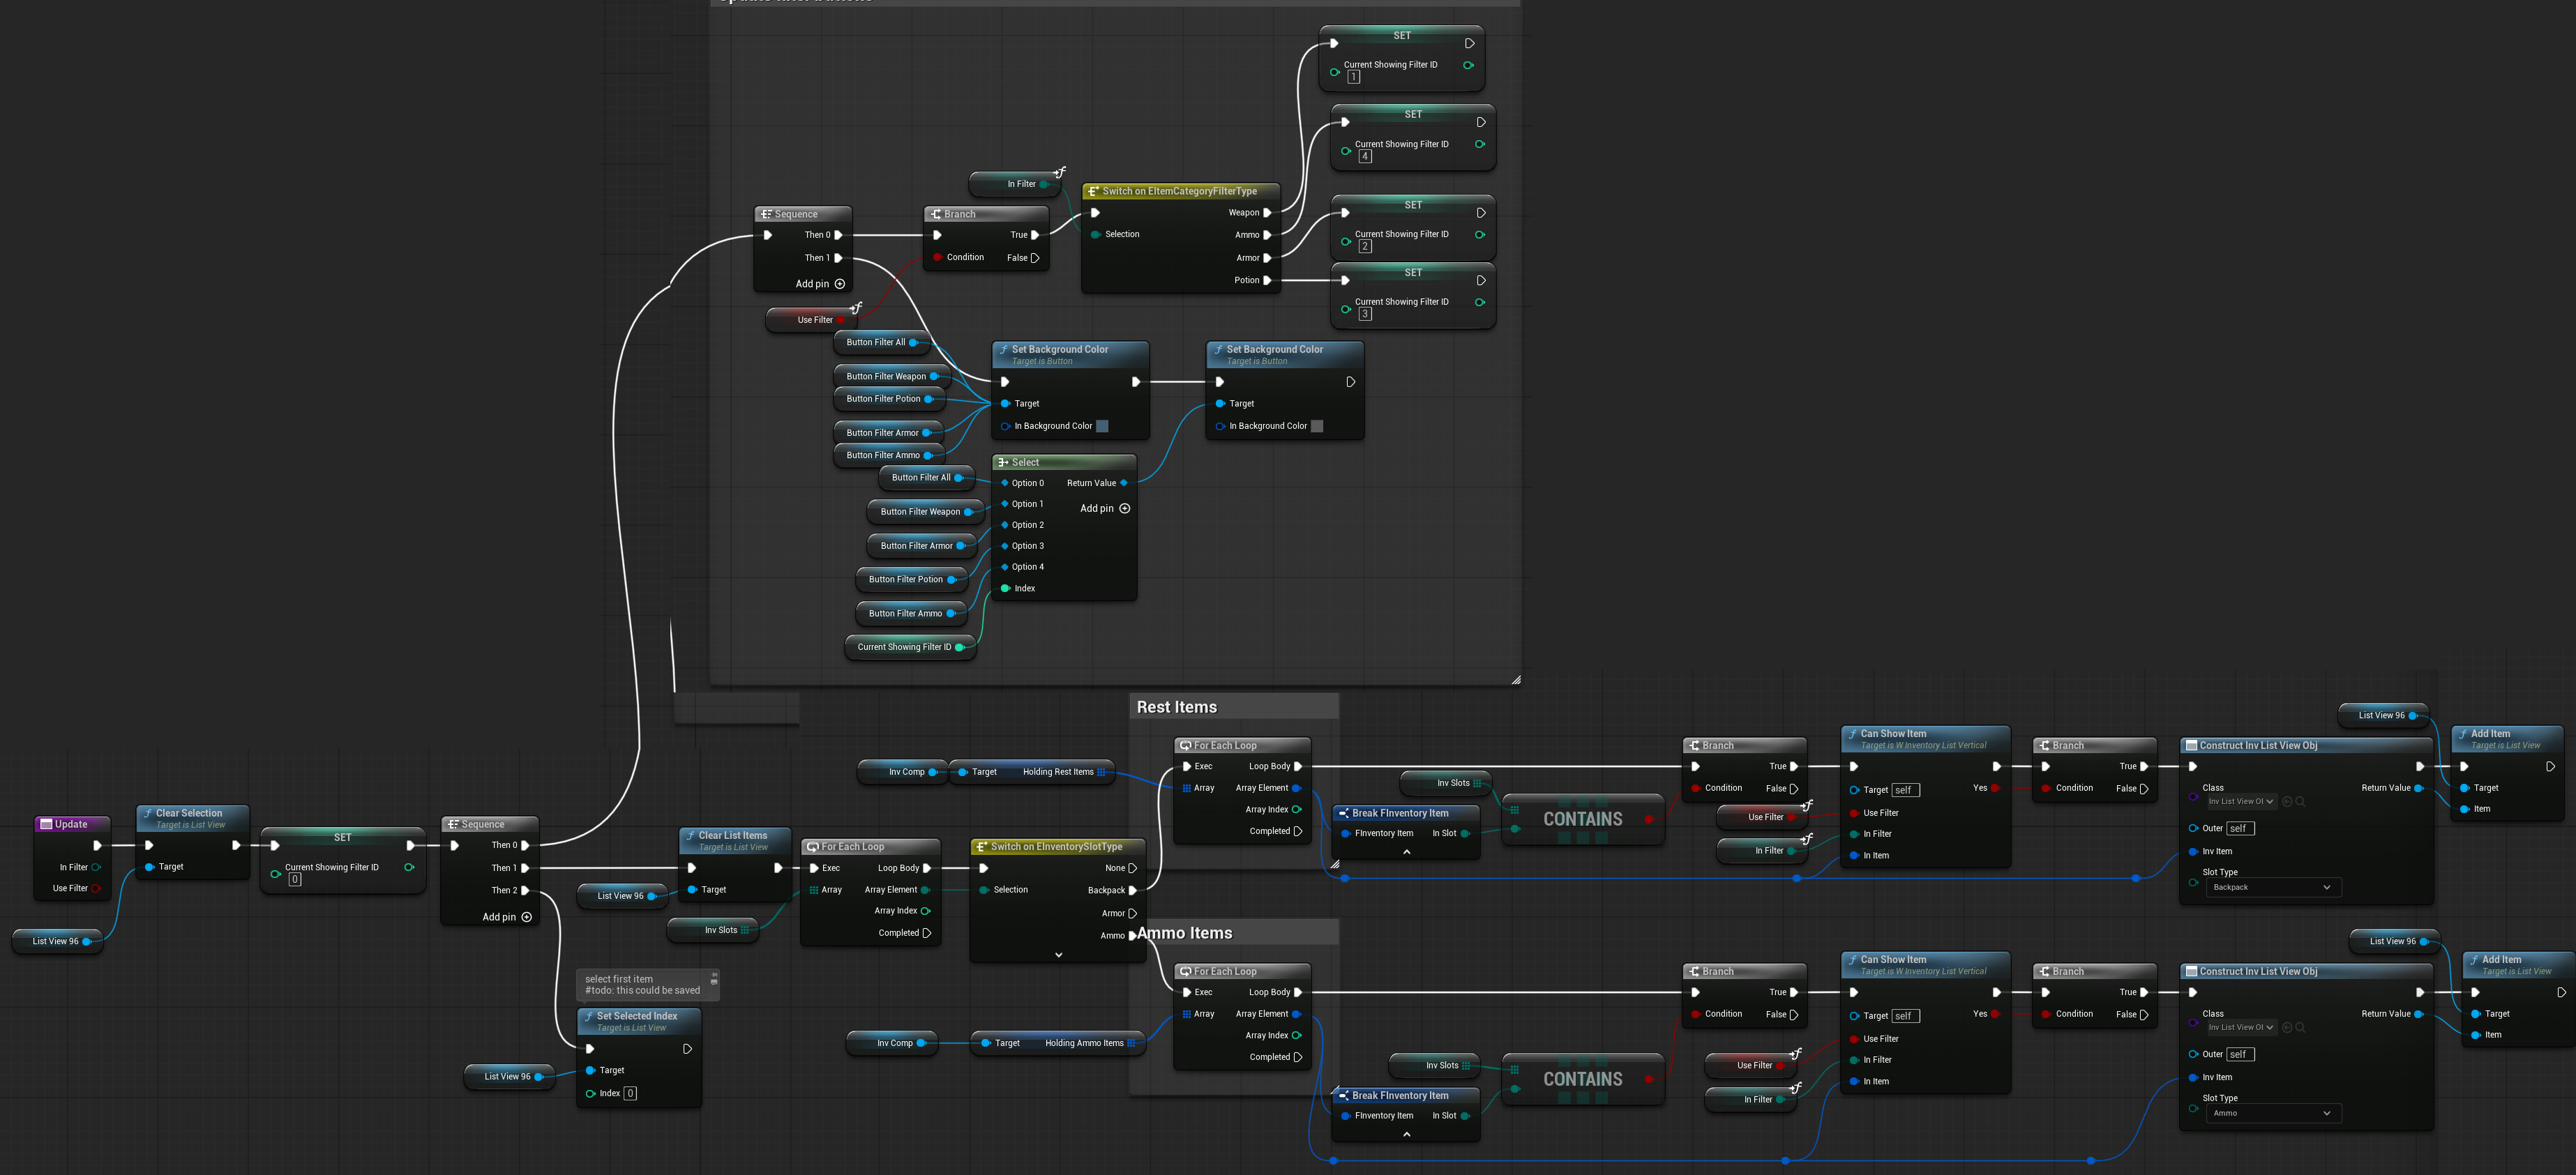
CanShowItem ( link )
Function that checks whether a specific item should be displayed in the ListView, based on the current filter type.

NextFilter ( link )
Function called to switch to the next filter. While modulo could be used to cycle through filters, this implementation enforces a specific order that differs from the filter enum order.

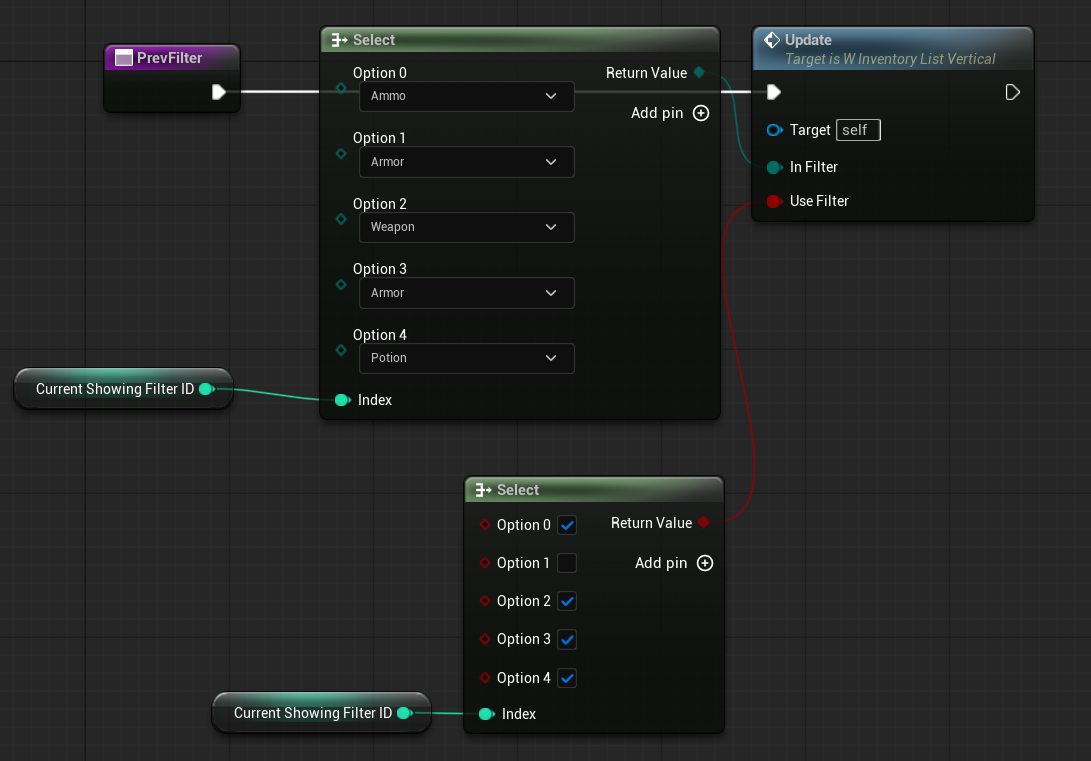
PrevFilter ( link )
Function called to switch to the previous filter. Similar to NextFilter, modulo could be used if your enum order matches the filter buttons, but this ensures a custom order.
W_InventoryListHorizontal
A widget that displays inventory slots horizontally. In our inventory system, it is used to show quick-slot weapons.
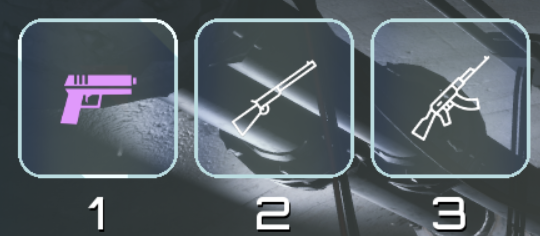
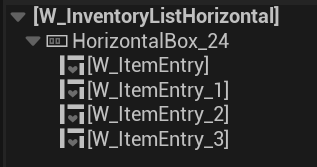
Hierarchy: A simple HorizontalBox containing multiple W_ItemSlotEntry widgets. They will be added in runtime.
| InvSlots | | Defines which inventory slot the items should be displayed from. |
| InvComp | InventoryComponent | The owning inventory component that this widget is operating on. |
| OnItemHovered | Dispatcher with FInventoryItem output. | Triggered when an item is hovered inside the HorizontalBox. |
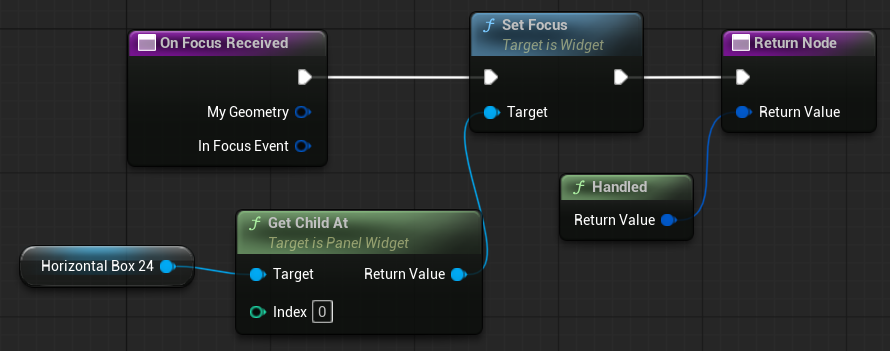
OnFocusReceived ( link )
Function called when the widget receives focus. The focus is immediately moved to the first item in the horizontal box.
ConfigureList ( link )
Main function to update the items inside the HorizontalBox. Steps performed:
- Finds the corresponding slot in the inventory component.
- Creates a
W_ItemSlotEntrywidget and calls the necessary configuration functions on it.- Adds the created widget to the
HorizontalBox, applying appropriate padding. - Binds the
W_ItemSlotEntry’sOnItemHovereddispatcher to call the widget’s own hover-handling function.
- Adds the created widget to the

OnItemEntryHovered ( link )
Calls the OnItemHovered dispatcher, allowing the root widget (W_Inventory) to be informed when an item is hovered.
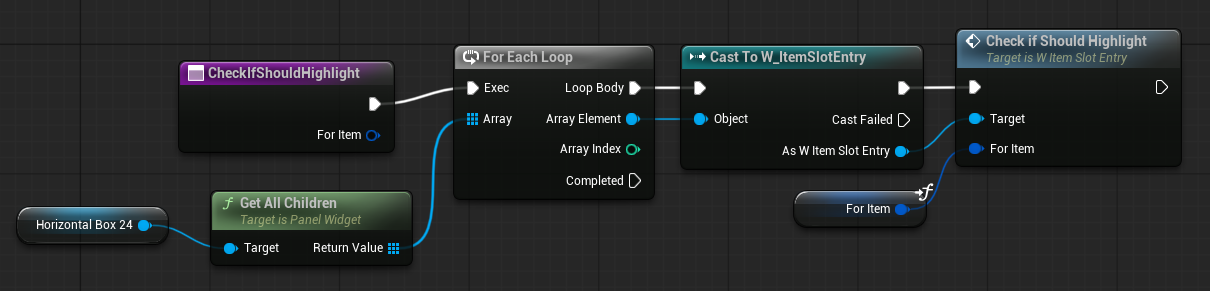
CheckIfShouldHighlight ( link )
Function that checks and updates the highlight state for each item in the horizontal box.
W_Inventory
The main inventory activatable widget, added to the layer stack when the inventory input is triggered. This widget serves as the layout container for all other inventory-related widgets.
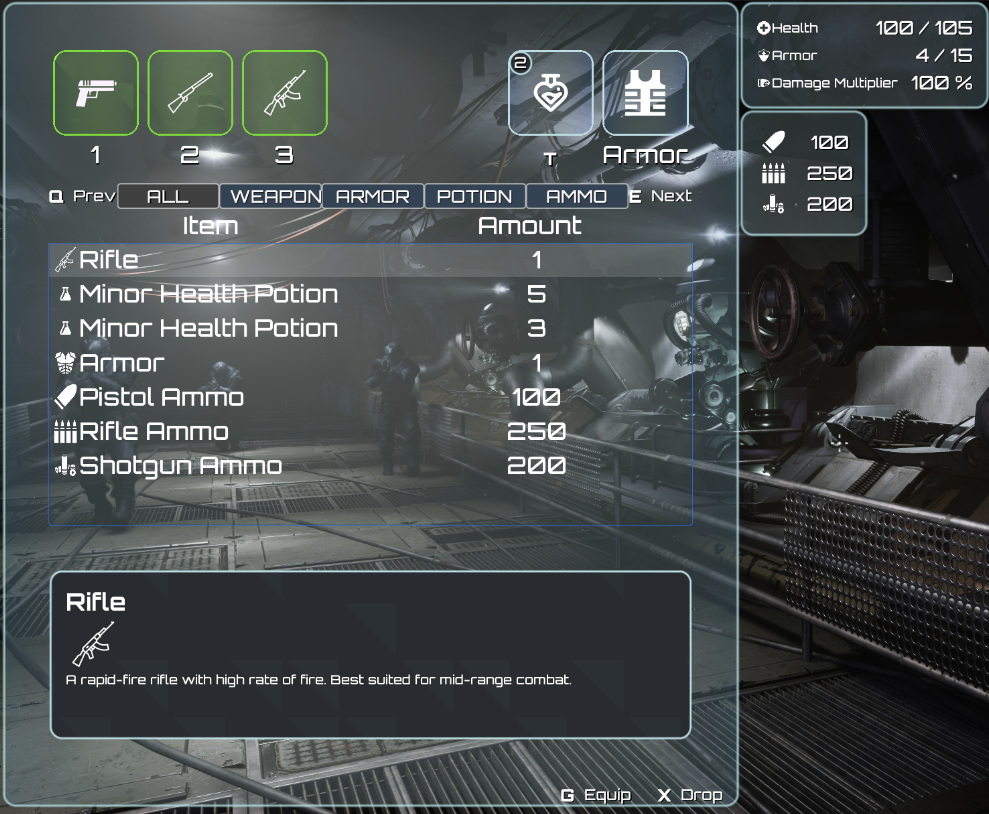
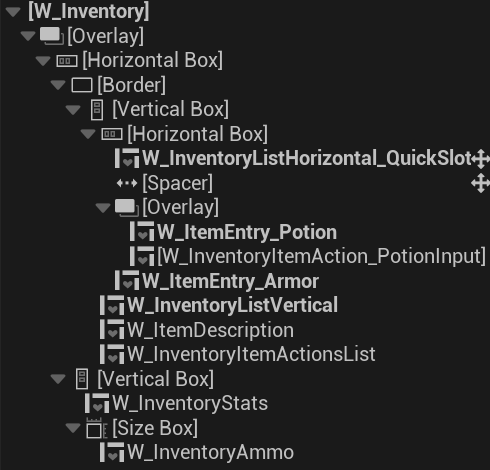
Treat the widget as the layout for the rest widgets. It contains:
- Full border
- QuickSlot items: Displayed using
W_InventoryListHorizontal - Potion Slot:
W_ItemSlotEntryconfigured for the potion slot - Armor Slot:
W_ItemSlotEntryconfigured for the armor slot - Backpack and Ammo Items: Shown using
W_InventoryListVertical(ListView) - Item Description:
W_ItemDescription - Item Actions:
W_InventoryItemActionList - Stats:
W_InventoryStats - Ammo:
W_InventoryAmmo
Note: as you can see I’,m not using canvas panel anywhere. That’s on purpose – when working on the different screen resolutions it’s always better to work without it and try to lay out your widgets using horizontal boxes, vertical boxes, overlays etc.
💡 Note: The widget intentionally avoids using a CanvasPanel. Using horizontal boxes, vertical boxes, overlays, and other layout containers instead ensures better adaptability across different screen resolutions.
| UIActions | | Holds a reference to the UIInputActions DataTable containing all UI actions. |
| SelectedItem | | Holds the currently selected item. |
| OwningInventoryComp | InventoryComponent | Holds a reference to the inventory component whose items are being displayed. |
EventConstruct ( link )
Function called when the widget is created. It performs the following tasks it configures the owning inventory component and binds to specific functions from the inventory component:
- OnInventoryUpdated
- OnWeaponEquipRequest
- OnWeaponDequipRequest
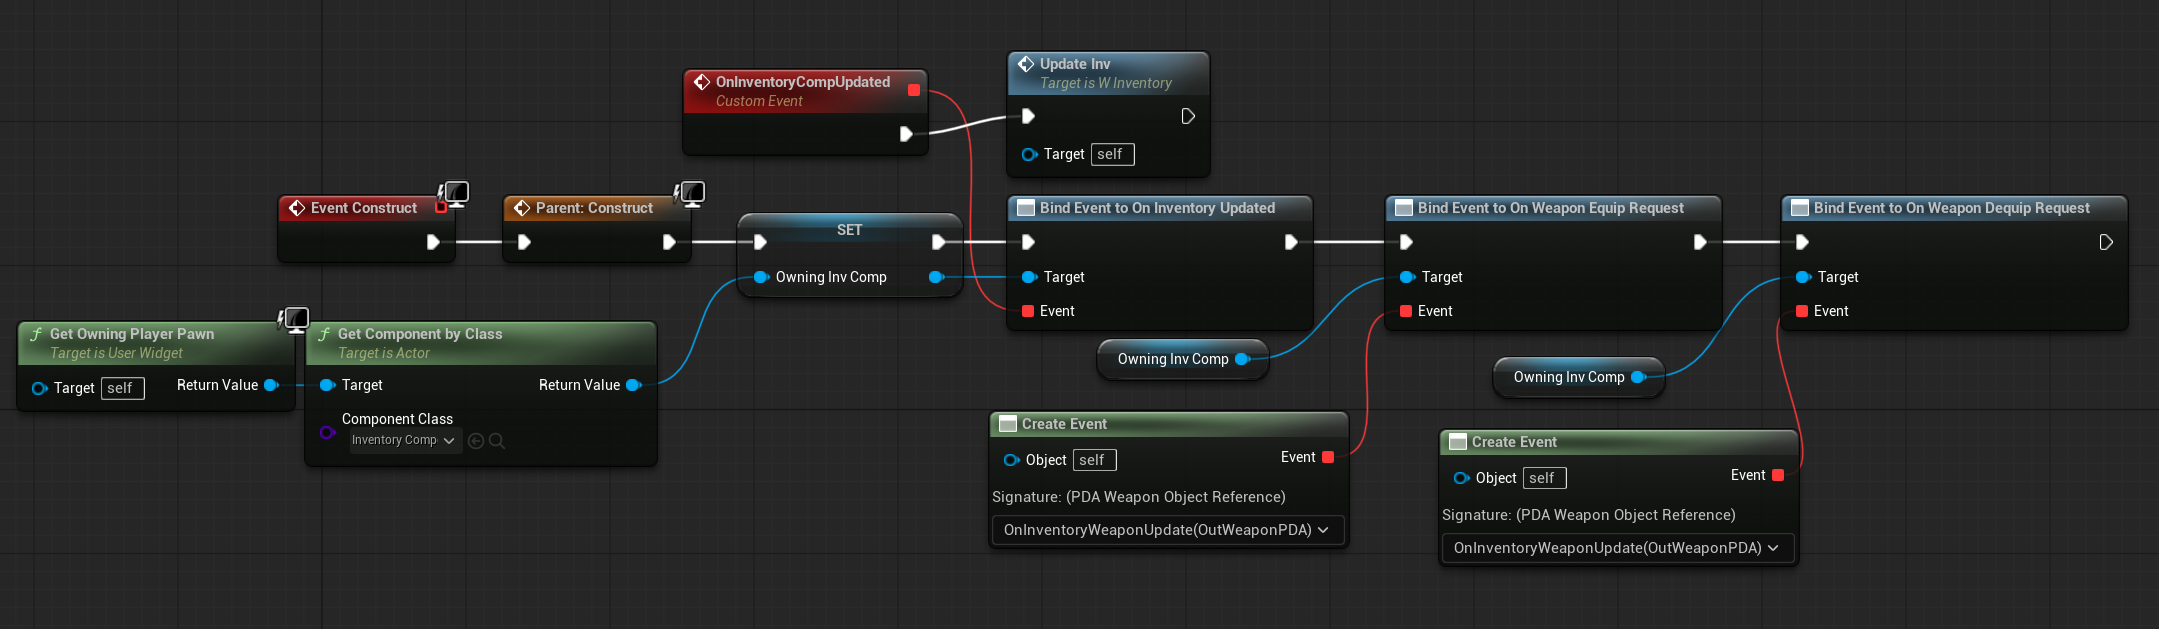
💡 Note: You can easily access the corresponding player pawn from the widget using GetOwningPlayerPawn; the same applies for the controller.
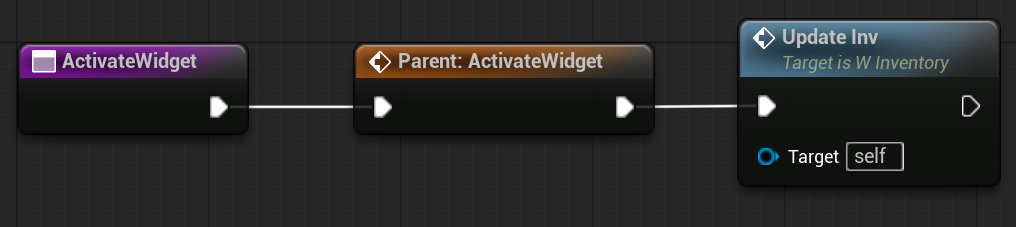
EventUpdateInv ( link )
Function that updates the entire inventory widget, refreshing all displayed items, slots, and relevant UI elements.

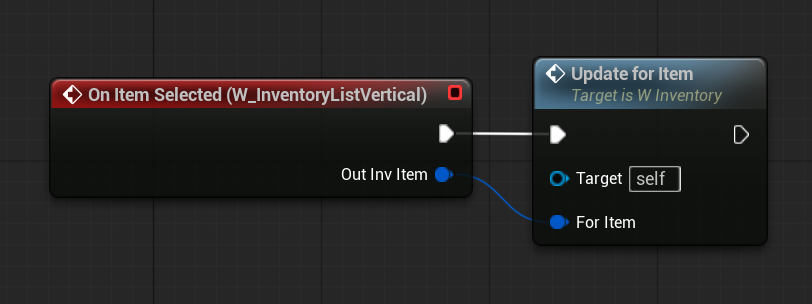
EventOnItemSelected
Uses the dispatcher from W_InventoryListVertical to update the inventory widget with the currently selected item.
EventOnItemHovered
Uses the dispatchers from the widgets to update the hovered item or stats.
OnKeyDown ( link )
Function called when a key is pressed while this widget has focus. It passes the action type to the widget’s DoInventoryActionForSelectedItem function.

ProcessBackAction ( link )
Function used to remove the widget from the screen and disable it. Part of the UI system implemented in the earlier tutorial.
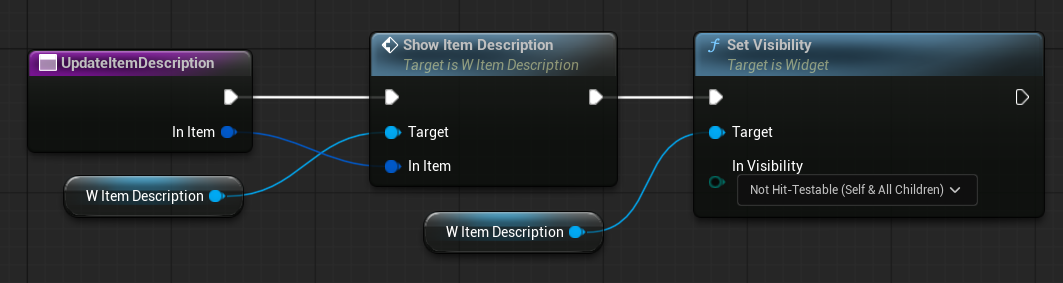
UpdateItemDescription( link )
Calls the ShowItemDescription function of the W_ItemDescription widget, updating and displaying the item description.
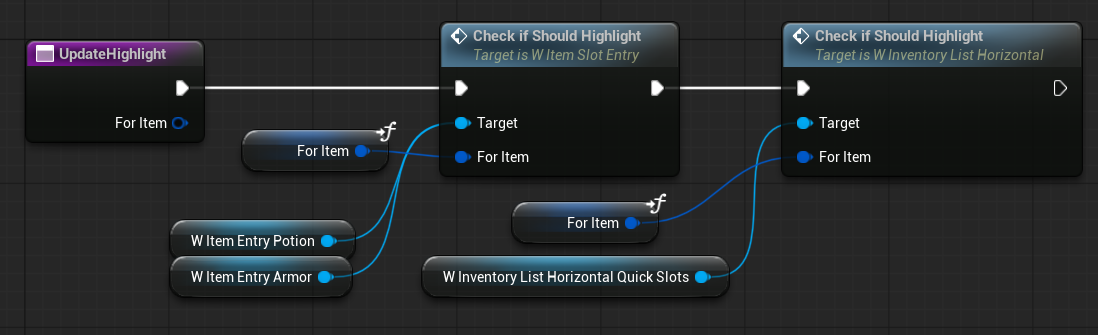
UpdateHighlight ( link )
Function that updates the highlight for all inventory slots. Used to highlight a specific slot when a corresponding item is selected or hovered (e.g., highlighting the armor slot when an armor item is selected).
ActivateWidget ( link )
Function from the UI system that is called when the widget is activated. Unlike EventConstruct, which runs only once when the widget is created, ActivateWidget is called each time the widget is brought onto the screen.
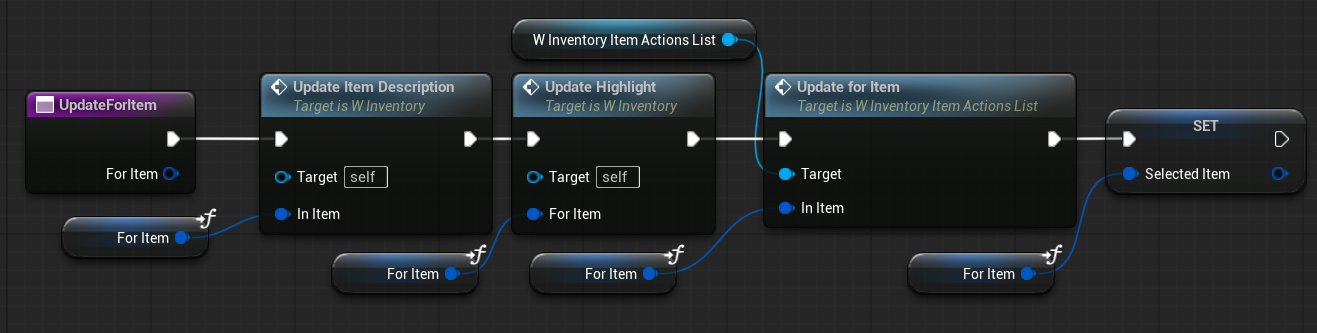
UpdateForItem ( link )
Function called via dispatchers when an item is selected or hovered. Updates the currently selected item and refreshes all related UI elements accordingly.
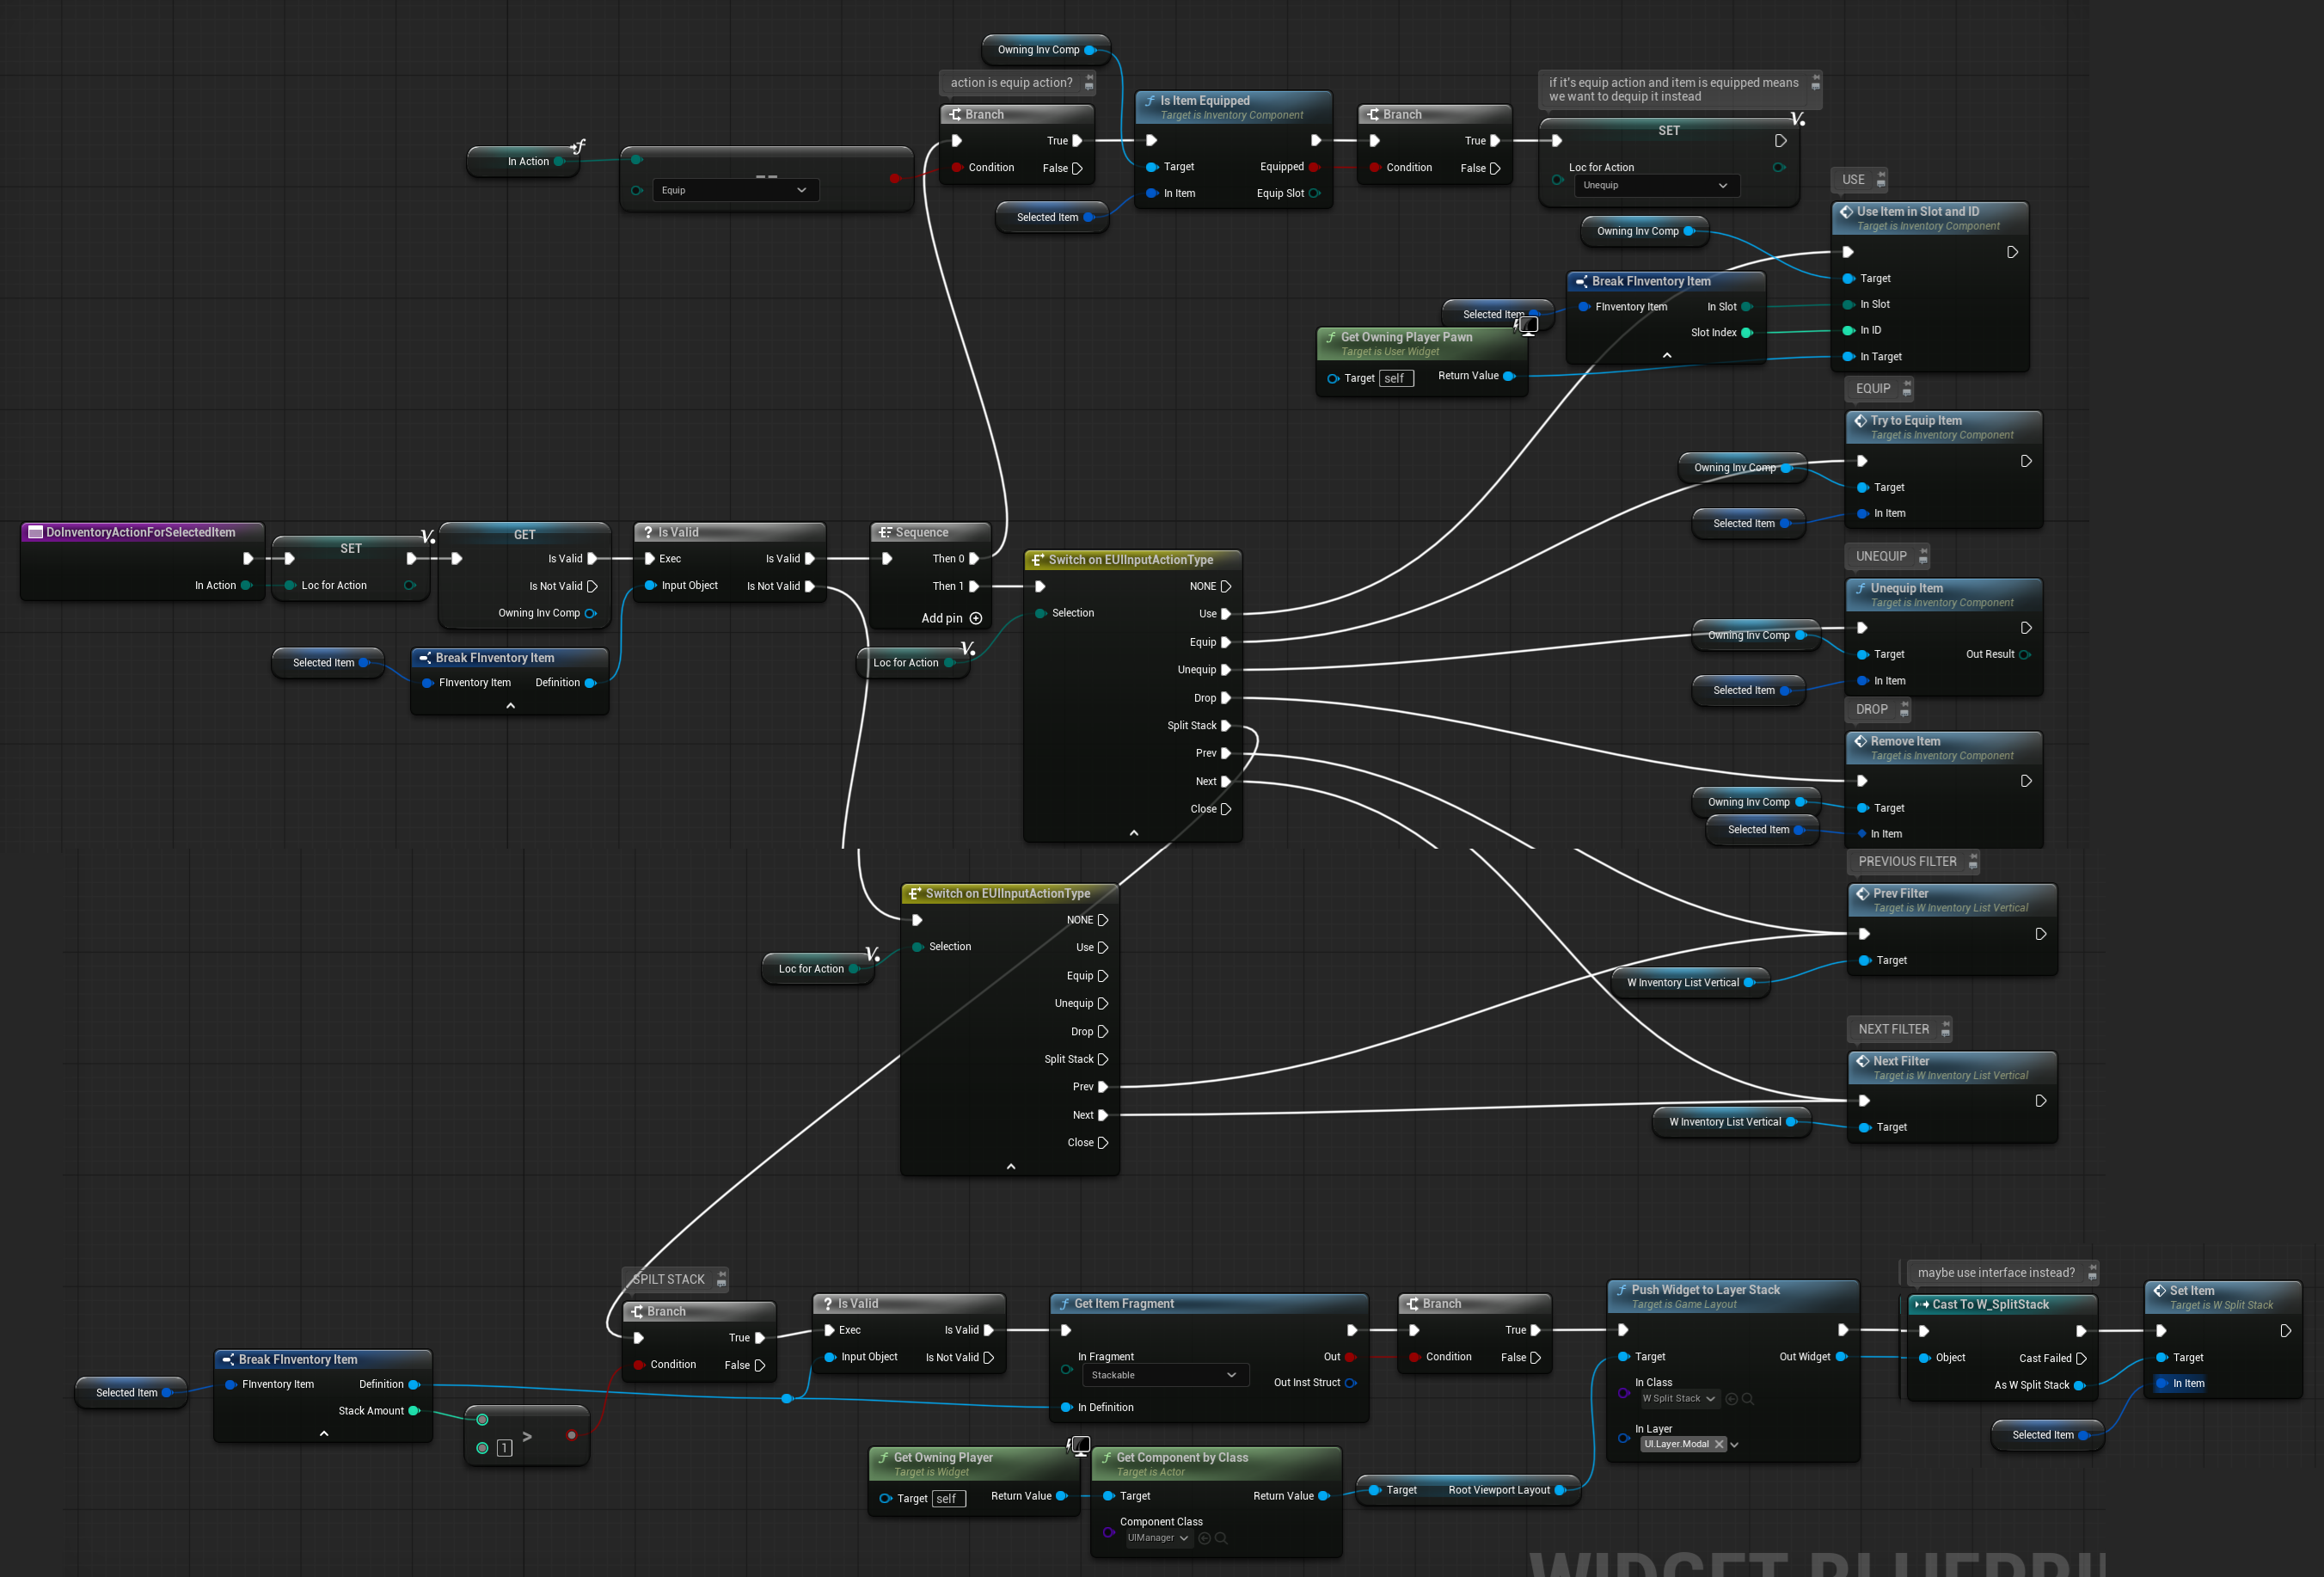
DoInventoryActionForSelectedItem ( link )
Function that determines which inventory action was triggered and executes the corresponding action for the currently selected item.
SelectFirstItem ( link )
Selects the first item in the backpack and updates the inventory accordingly. Automatically shows the item’s description and highlights the corresponding slot.
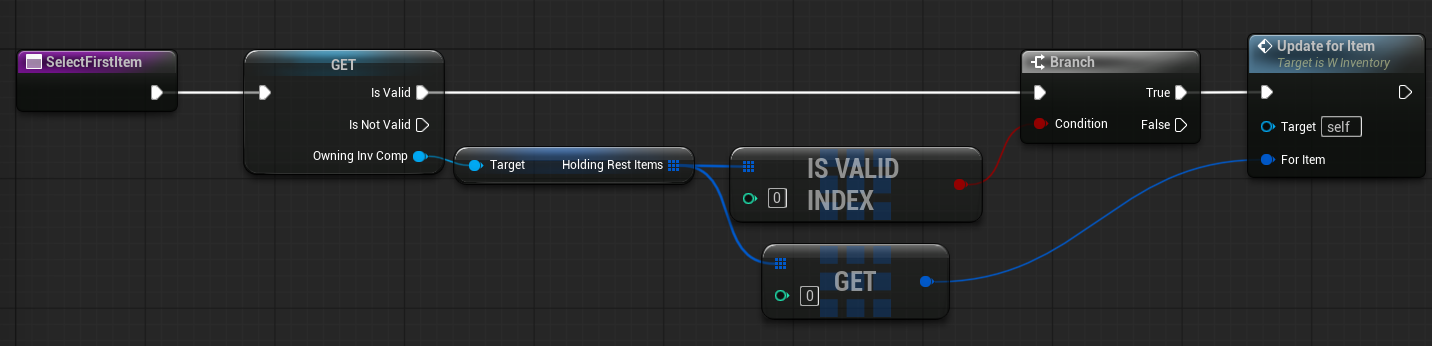
💡 Note: Functions like SelectFirstItem are necessary because item selection and highlighting aren’t automatic. When a player opens the inventory, you may want to pre-select an item—possibly the one they had highlighted previously—by saving its item ID and restoring the selection.
OnInventoryWeaponUpdate ( link )
Function called when a weapon is equipped or unequipped. Calls the UpdateQuickSlotActiveWeapon function in the quick-slot horizontal list to update the active weapon display. It’s used to show which weapon is currently equipped by the player.

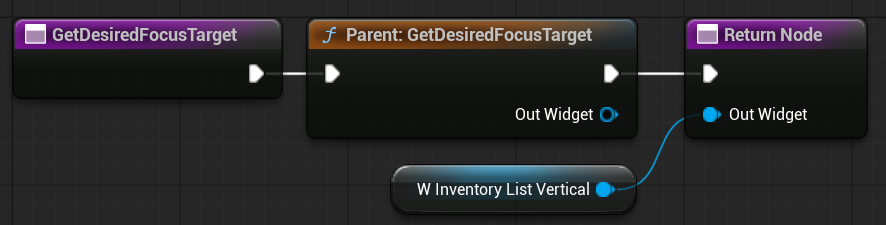
GetDesiredFocusTarget ( link )
Function from the UI system that determines which widget should receive focus when this widget is activated (e.g., brought onto the screen).
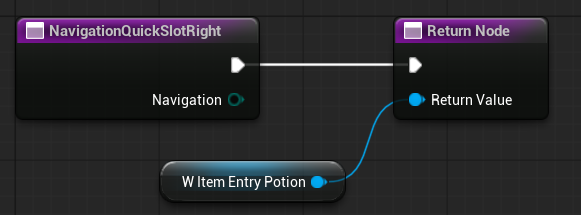
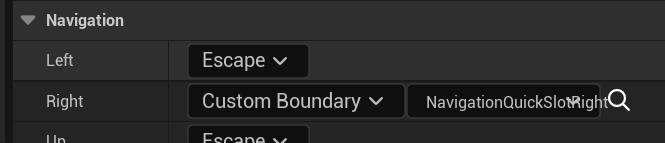
NavigationQuickSlotRight ( link )
Function used for gamepad navigation to move focus from the weapon quick slot to the potion slot. Configured in W_InventoryListHorizontal_QuickSlots as the right navigation action.
Conclusion
This was a long and time-consuming tutorial—not only for me but also for you! Take your time to fully understand:
- How the data in the inventory component was created and why.
- How the inventory component logic was designed and why.
- How the UI data was structured and why.
- How the widgets were created and why.
If you were able to create a fragment-based inventory system, you are now ready to implement something similar in C++. Understanding this system will also make it easier to grasp other inventory systems and work with them more efficiently.
Creating an inventory system is not trivial, which is why I wanted to show almost 100% of the context. Context is critical here: it’s easy to implement a simple inventory that just holds items, but it becomes much more complex when adding additional functionality—and sooner or later, you will need to. Trust me.
What’s missing from this tutorial:
- An item editor for developers to quickly find, modify, and create new items.
- A nonuniform / uniform grid panel similar to Diablo.
- Network replication. This isn’t too difficult since we are using structs.
I hope you found something useful—or even inspiring. Stay tuned for next tutorial!

You must be logged in to post a comment.