Create a Small Game from Scratch: Endless Standing First-Person Shooter
Level: Beginner
Type: Blueprint
Version: 5.6
Download Project
In the previous tutorial, we created our base classes.
You might have the impression that we’re doing very basic and trivial stuff here. Yes—it’s aimed at beginners—but it’s far from trivial. There are many ways to do things in Unreal Engine, and I’m showing you an approach that takes advantage of the engine’s architecture.
There are several ways to handle input—some easier, some more complex to set up.
We’ll use the Enhanced Input System, which provides a modular structure and supports key rebinding almost out of the box.
First, let’s create some data.
I always store my data inside the /Content/Data folder, keeping it separate from the /Blueprints folder for better organization.
Input Actions
Create three Input Action assets. These will define the types of input your game will respond to.

- IA_Look_Mouse
- IA_Primary
- IA_Secondary
Open IA_Look_Mouse and ensure that its Value Type is set to Axis2D (Vector2D).
This defines the output type for this input action. Since the mouse provides input on both X and Y axes, we use a Vector2D to capture this movement.
Input Mapping Context
Also, create an Input Mapping Context named DefaultInputMapping.
Open it and add three mappings to connect our input actions to the hardware. (keyboard and mouse)
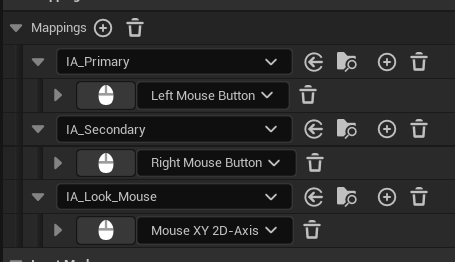
What’s cool is that you can simply click on the input field and type the desired key or mouse input directly.
Basically, this lets you easily configure which keyboard or mouse input is mapped to each action.
Input Settings
From the start, we will use an Input Settings class that allows you to customize input behavior.
For this example, we’ll implement an Invert Mouse Y option that players can change later in the settings.
Create a new Blueprint named STInputSettings, extending from EnhancedInputUserSettings.
Open it and create one variable:
- bInvertY
- private – meaning it won’t be accessible from other Blueprints
- config variable – so it can be saved to and loaded from
.iniconfiguration files. - save game – allowing it to be saved and loaded using Unreal’s save game system.

Also create function SetInvertY

And function GetInvertY
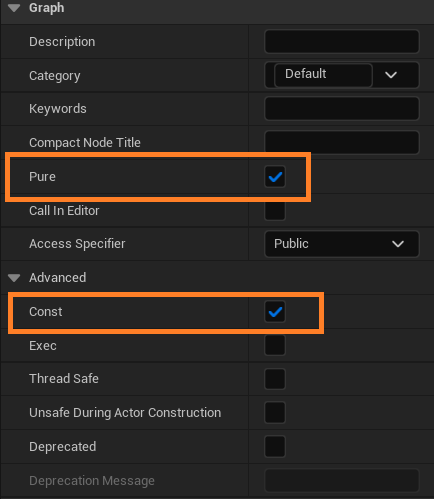
Make sure the variable is marked as Pure. This means it behaves as a strict, read-only value in Blueprints. It’s a bit tricky to explain, but essentially, pure functions or variables don’t have side effects and can be used directly in Blueprint nodes without execution pins. But you need to know some things about pure functions.
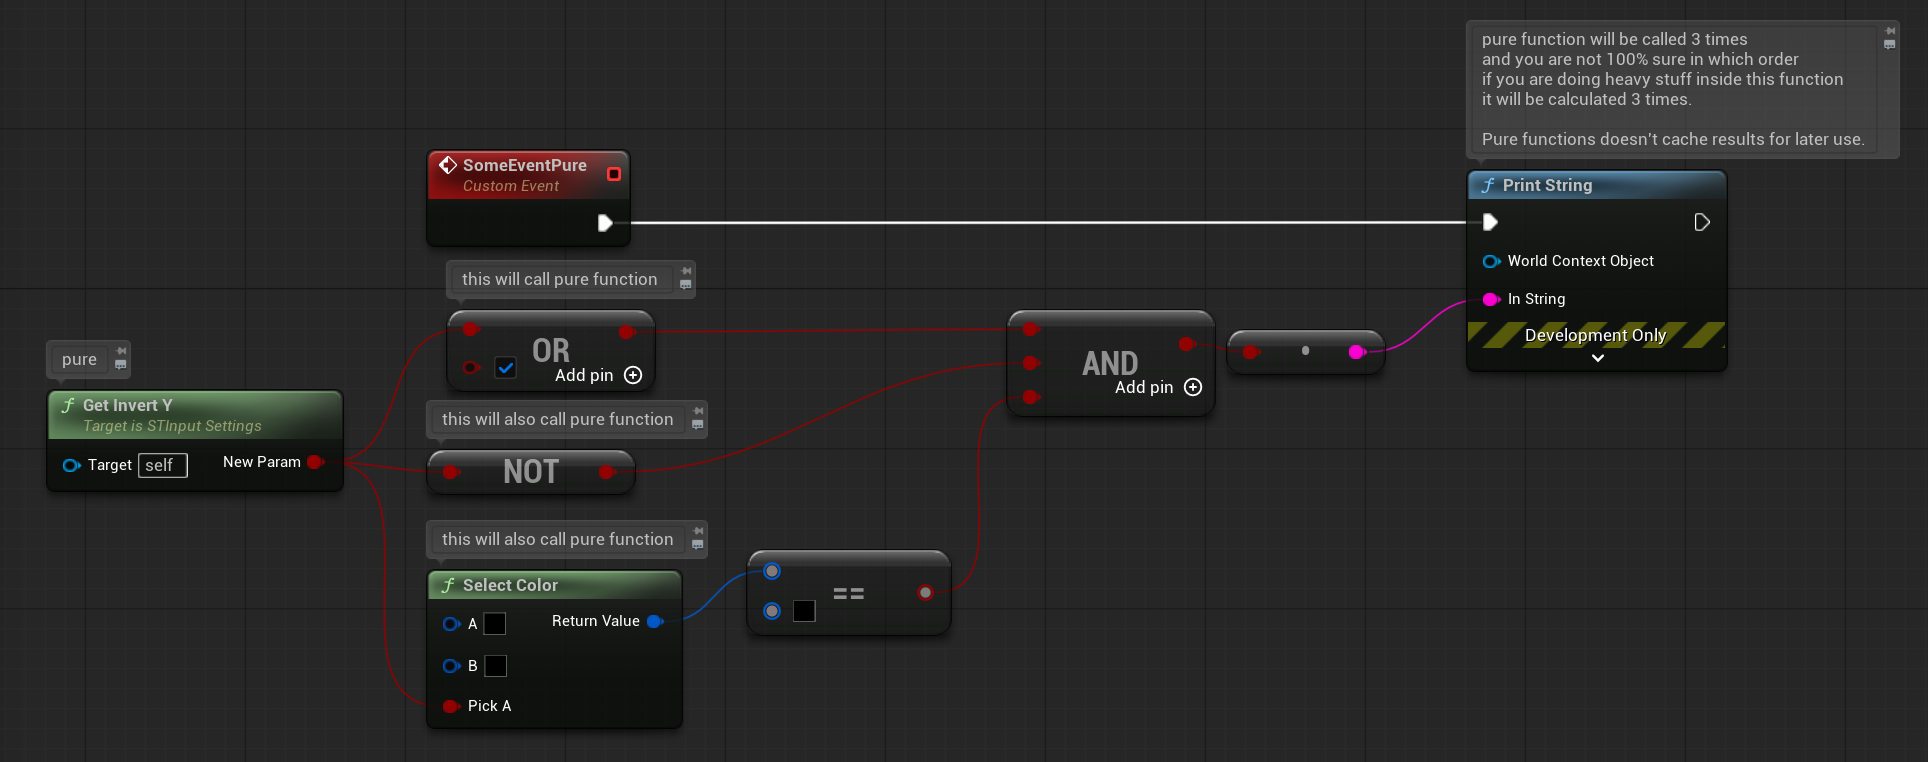
In this example, the pure function will be called three times because pure functions don’t cache their output. If your function contains heavy calculations, you should be careful about marking it as pure—since it might get called multiple times unexpectedly. Also, you can’t be 100% sure in what order these calls will happen.
Another consideration is if your function saves or updates something internally; calling it multiple times may produce different results because it runs every time it’s called.
But don’t worry—using pure functions for simple getters is actually a good idea because they take up less space in the Blueprint graph.

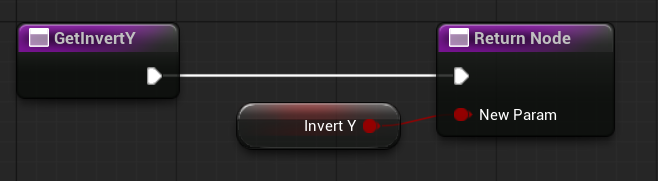
In this example, I used a pure function but saved its result. This way, the function will only be executed once. This is exactly the default behavior of non-pure functions—they run once and store their output until needed again.
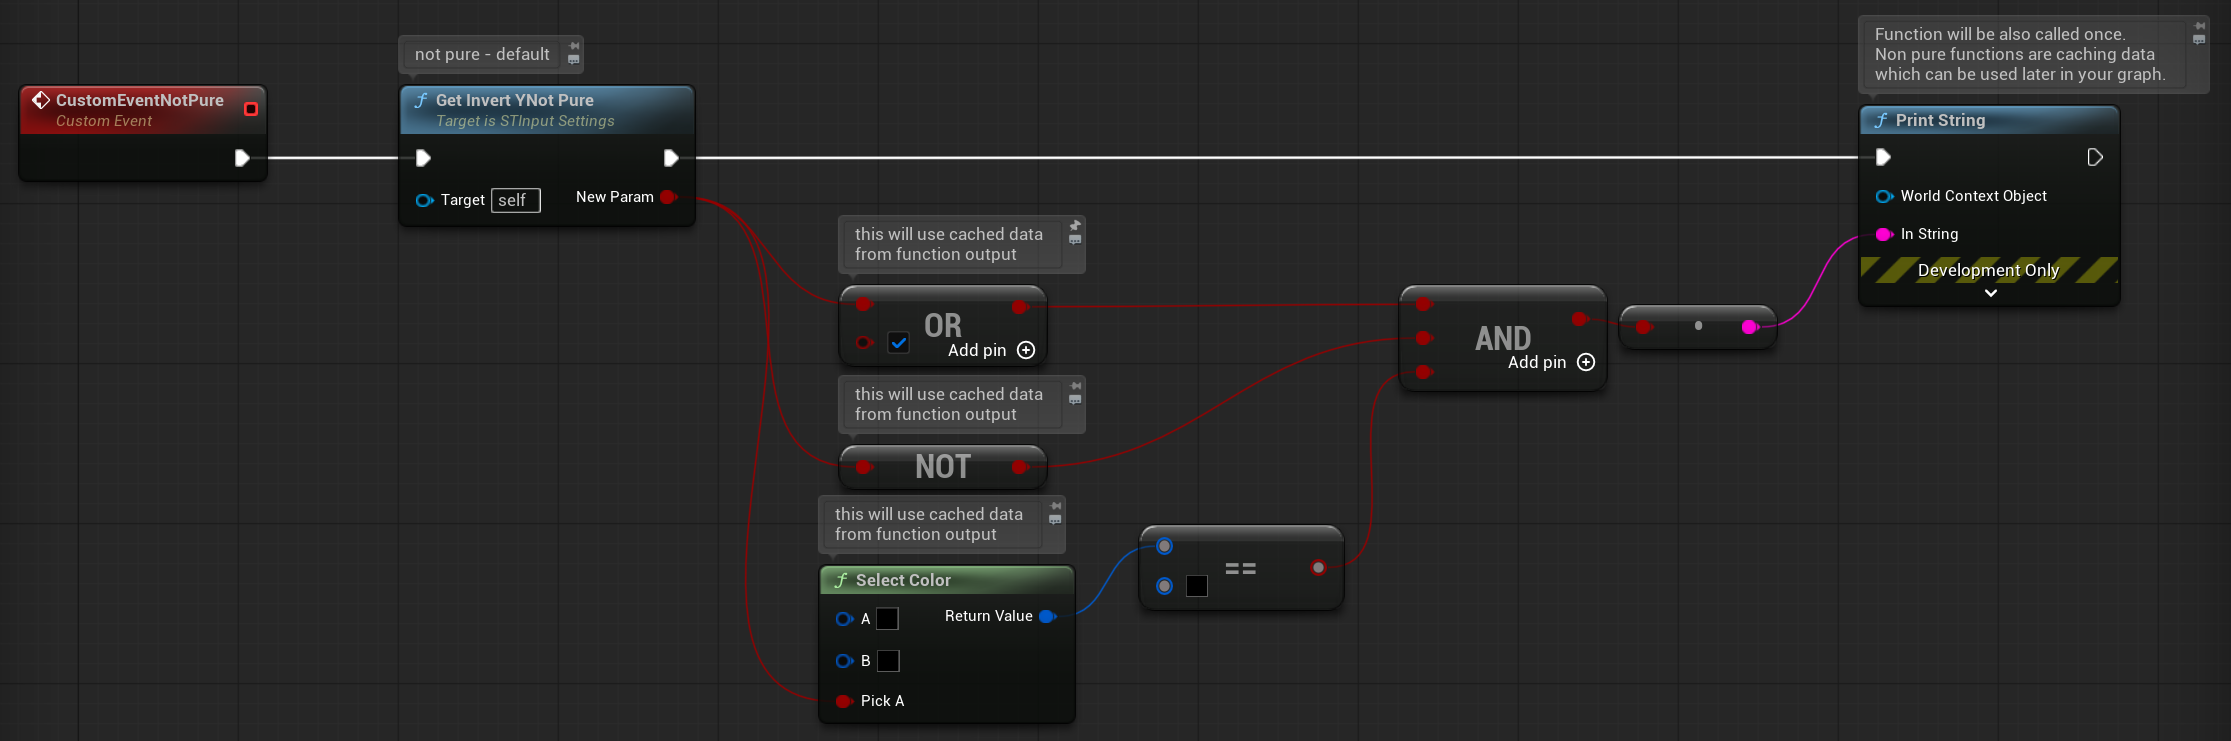
Like here — now using a non-pure function, it will be called only once. Caching is done automatically by the engine.
Why should you know this? Because if you create a pure function, it can produce different results each time it’s called. I’ve seen examples like that when analyzing other Blueprint-based projects.
Okay, but let’s get back to the function itself. It’s also marked as Const, which means the function cannot modify any variables or data inside it. Functions marked as const guarantee that the data inside won’t be changed.
Why is this important? This concept is common in programming languages, and you should try to apply it in Blueprints as well. It helps you develop good habits. If you’re creating simple getter functions or any function that shouldn’t modify data, mark it as const. Then, if someone tries to modify a variable inside that function, you will get an error because it’s marked as const. (you will see later example using Engine overriden function)
A good C++ example is a function that returns your object marked as const, so it can only be used to read values, not modify them. Currently (in Unreal Engine 5.6), Blueprints don’t have full const return functionality, but they do support const inputs.
Input Modifier
Create a new Blueprint named STInputModifier, extending from Input Modifier. This will be our base class for all custom input modifiers.
Inside it, create a new function named GetSTInputSettings — and in about a minute, you’ll see why this function is important when working with functions in general.

Make sure the target is passed by reference and marked as const.
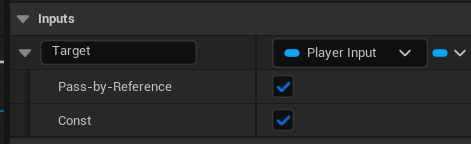
This tells the Blueprint Compiler that this parameter won’t be changed inside the function. Also, make sure the function itself is marked as Const.

Now create another Blueprint named NegateY_UsingSave, extending from the STInputModifier we created earlier.
When working with Blueprints, you’ll notice there are functions you can override.

Most of these functions are exposed from C++ so you can override them in Blueprints. Let’s override the ModifyRaw function from the Input Modifier class.

The ModifyRaw function is a const function (from C++), which means it cannot modify any state or variables. Because of this, our GetSTInputSettings function also needs to be marked as const.
If you try to mark it as non-const or use non-const inputs, the code won’t compile. Here’s an example of the compilation error you might get:
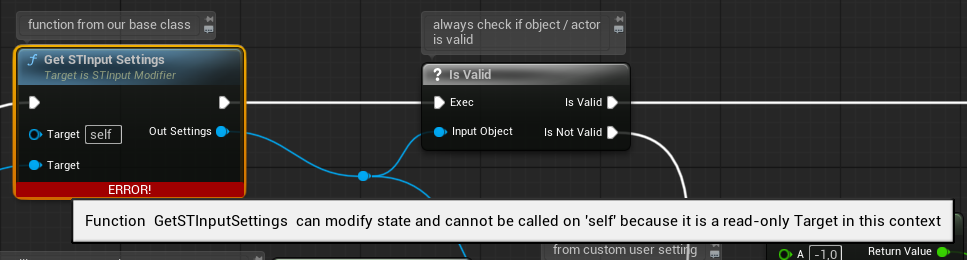
If you encounter this error later, it means the function you are working in is marked as const in C++. Remember, everything exposed in Blueprints comes from the underlying C++ code, so Blueprint functions must follow the same constness rules as their C++ counterparts.
Project Settings
We are almost done with data preparation. Open Project Settings, add DefaultInputMapping to the Mapping Contexts list, enable User Settings, and set the class to STInputSettings.

IA_Look_Mouse – update
Now that we have implemented the invert modifier, open IA_Look_Mouse and add the modifier to its list of modifiers.

Cheats to test Settings
The engine uses the console for cheats, which we can also use to test things out. Create a new Blueprint named STCheatManager extending from CheatManager. This will be our main class for cheats or helper functions that can be triggered from the console.
Create one function named ST_SetMouseInvertY and mark it as Advanced -> Exec.


We will name all our functions starting with ST_ so that it’s easy to find them later. This function simply changes the value of our invert setting.
Also, you can see how we are using Unreal Engine’s architecture here — the Cheat Manager has access to the Player Controller, which we can use without any hacks.
Note: The Cheat Manager won’t work unless you set it as the class in your Player Controller.
Player Controller – Handling Input
Open STGameplayPlayerController and set the Cheat Class to STCheatManager in the Class Defaults.


Now our Cheat Manager will be spawned, and we’ll have access to the ST_SetMouseInvertY function from the console during the game.
Next, let’s implement our input. When working with Blueprints, it’s a good practice to split your graphs and create many small functions to avoid spaghetti code. You can create a new graph and name it Input.

This way, we have a single “place” where all input logic is implemented. So, when you’re searching for functions in the Player Controller, you’ll easily find all your IA_* input action events!

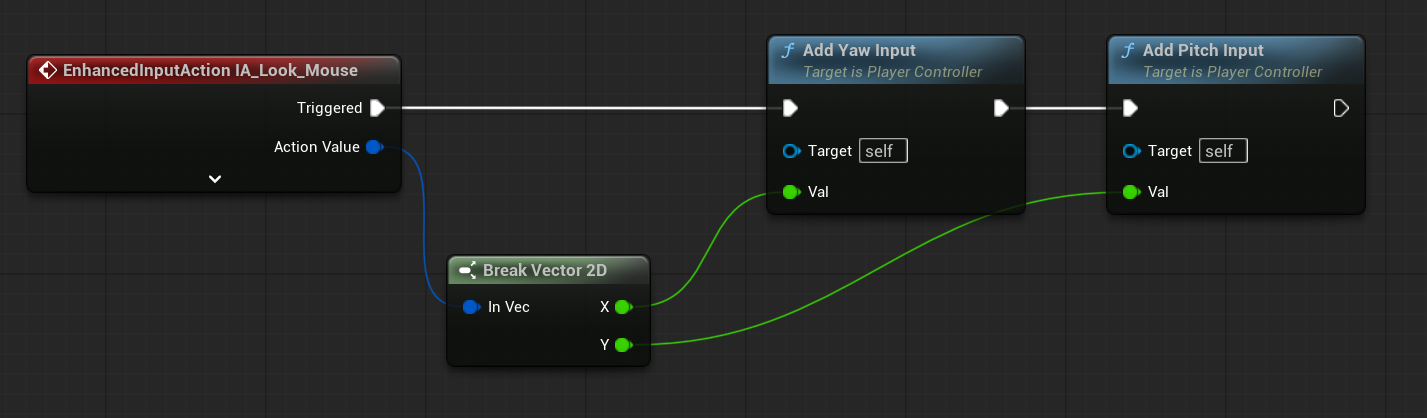
Easy as that! For the mouse, we’ll use the built-in engine functions to add yaw and pitch input, which will automatically update our camera rotation.
Now, when you hit play, you should see print strings appear when pressing LMB or RMB, and you can rotate your camera using the mouse. Also, try using the console command to invert the mouse Y-axis.
Let’s move into next part: Camera & Animation Blueprint.

Leave a comment