
Create a Small Game from Scratch Series: Endless Standing First-Person Shooter
Level: Beginner
Type: Blueprint
Version: 5.6
Download Project
In last tutorial we implemented Debug System and maked sure our weapon mechanics is working correclty. Now we can move into another big topic which is Damage System.
This damage system will be more advanced, as it include:
- Support for both projectiles (actors) and traces
- All features fully comatible with projectile and trace bullet types
- A projectile pooling system with debug support
- Custom physical materials
- Deal range-based damage calculations
- Penetration with damage falloff
- Bounces with damage falloff
- A simple Health Component – which will be extended later
- Damage communication based on a “From -> To” concept
- Data Managet to use our Primary Assets Data created earlier
- Final Result
- Damage Loop
- New Collision Query
- Custom Phys Mat
- Data Preparation
- Damage Interface
- Damage Manager
- Data Manager
- Health Component
- Testing Actor
- Base Projectile
- Projectile Pooling Manager
- Player Updates
Final Result
Damage Loop
Let’s start by explaining the damage loop. There are many ways to implement a damage system, but I want to show you a concept that worked very well in Rogue Spirit, where there were many damage modifiers, dependencies, and other variables. This approach isn’t new or overly complex—it’s a solid, flexible foundation for building more advanced systems.

The core idea behind this concept is that damage is always applied from one actor to another, and both the source and the target can react to and modify the damage data as it flows through the system.
When designing a new system, it’s always a good idea to sketch out the communication flow, loop, or a class diagram. Below, you can see the complete damage loop graph.
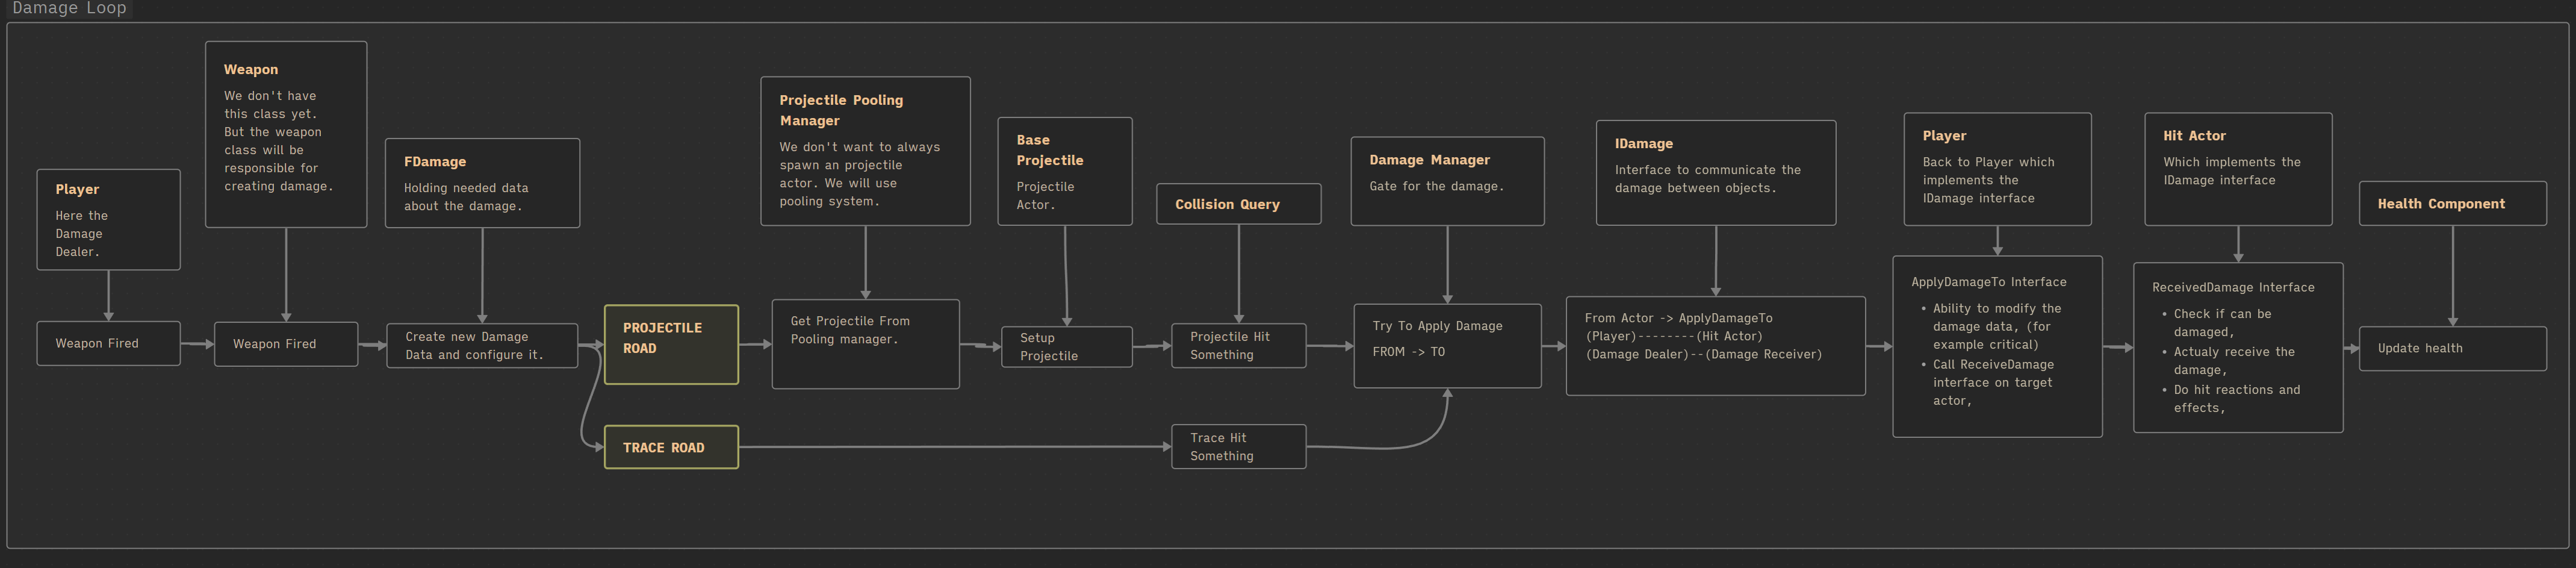
It might look complicated at first, but I’ll walk you through it step by step as we implement the system.
New Collision Query
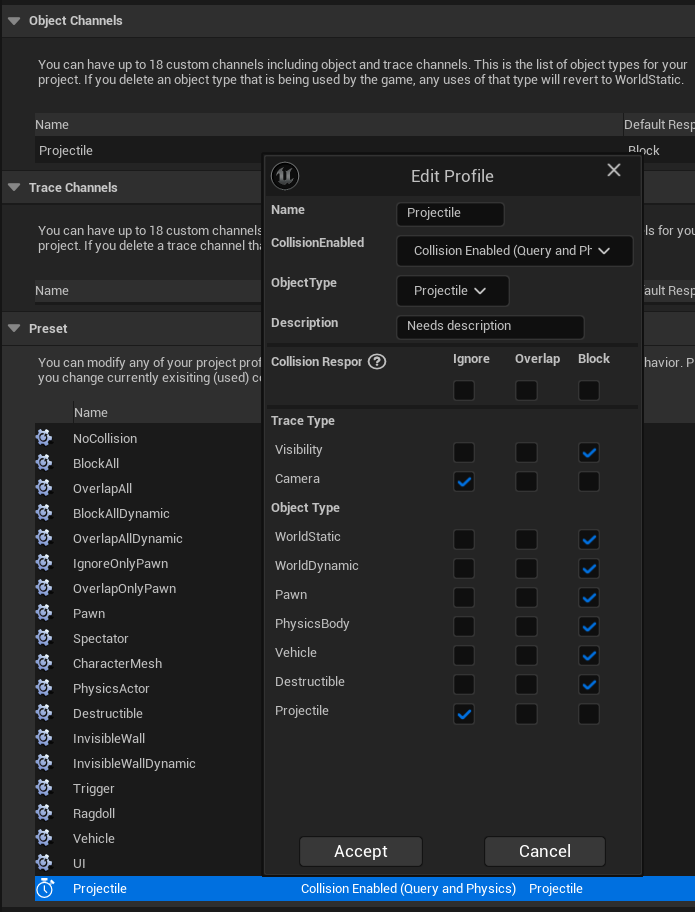
Unreal Engine uses collision channels for traces and physics interactions. You can find a good explanation of this topic [here].
Start by creating a new Object Channel named Projectile, and also create a Collision Preset with the same name.
Custom Phys Mat
We’ll use a custom physical material to store additional metadata and allow for more flexible communication between our systems—especially when handling what our projectiles or traces hit.
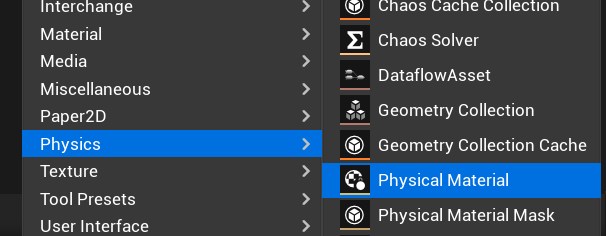
Create a new Blueprint class named STPhysMatBase, derived from PhysicalMaterial. Add a single variable:
PhysMatTag(Gameplay Tag)
We’ll use Gameplay Tags here for consistent and flexible communication across systems. This will make it easier to define behaviors like bounce and penetration based on material types—just like in the Weapon Mechanics Tutorial.
Now create new Physical Material extending from our base named STPhys_Default.

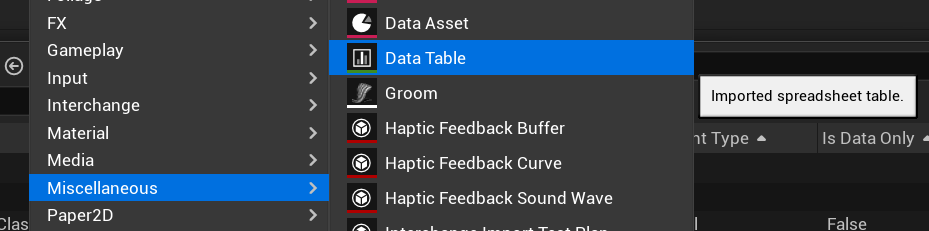
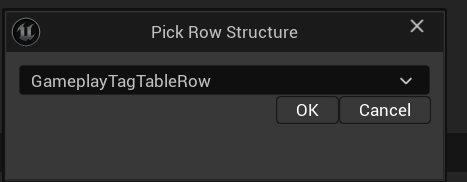
Create a new Gameplay Tag Data Table named PhysMatTag. This table will hold and manage all the physical material tags you’ll use across your project.
Open the PhysMatTag Gameplay Tag Data Table. Add a new row with the tag: PhysMat.Default
This will serve as your fallback or default physical material tag when no specific tag is set.
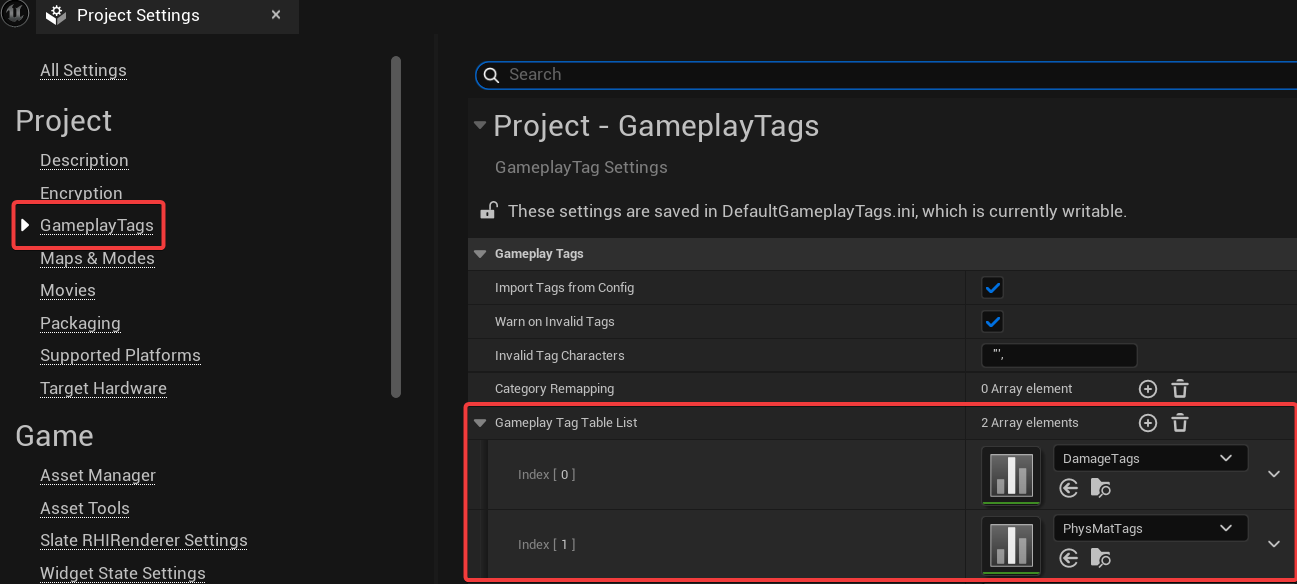
Register the Tag Table. Go to Project Settings → Gameplay Tags. In the Gameplay Tag Tables section, add your PhysMatTag Data Table to the list.
This ensures the engine loads your custom tags and makes them available throughout the project.
Go back to STPhys_Default and chose the PhysMat.Default for the PhysMatTag.
Data Preparation
Just like the PhysMatTags create another Gameplay Tag Data Table named DamageTags. Insert 3 rows:
- Damage.CriticalHit
- Damage.FriendlyFire
- Damage.GodMode
Those tags will be used to add more context into the damage without implementing data structures for it. (like bool bWasFriendlyFire or bWasInGodMode) – this way we can easy add another damage tags.
In Blueprints/Damage/ create two new folders Enums and Structs.
EDamageType. This will define the type of damage being dealt. It will be especially useful later when we start working on more advanced weapons and want different reactions based on the damage type.
| Physical | Represents standard physical damage. |
| Fire | Represents fire-based damage (e.g., flamethrower). |
| Cold | Represents cold-based damage (e.g., a sci-fi cooling weapon). |
| Electric | Represents electric damage (e.g., a lightning gun). |
FDamage. This is the main structure that holds all the damage-related data.
By this point, you should already know that types prefixed with E_ are enums and those with F_ are structs.
| Dealer | Actor Object Reference | Holds a reference to the actor dealing the damage. (e.g., if the player is shooting, this will be the player) |
| Receiver | Actor Object Reference | Holds a reference to the actor receiving the damage. (e.g., if the player hits an enemy, this will be the enemy) |
| Type | EDamageType | The type of damage (physical, fire, cold, electric, etc.). |
| DamageOriginal | float | The original damage amount before any modifications. |
| Damage | float | The current damage amount. This will be used to reduce health. |
| DamageMultiplier | float | A multiplier applied when the damage is received (e.g., due to armor or weaknesses). |
| HitInfo | Hit Result Structure | Contains information from the trace or projectile hit result. |
| Tags | Gameplay Tag Container | Stores all gameplay tags added to this damage. (e.g., critical hit, friendly fire or god mode) |
| DebugMessages | TMap<float, string> | Stores all debug messages added during the struct’s lifetime, with float keys (e.g., timestamps or steps) and corresponding messages. |
| PenetrationCount | int | Tracks how many times the projectile has penetrated an object. |
| BounceCount | int | Tracks how many times the projectile has bounced. |
Now create new folder Blueprints/Projectile/Structs and let’s add specific struct for projectiles.
FProjectileSpawn. This structure will be used to pass all necessary data to a projectile when spawning it through a pooling system.
| Transform | Transform | The transform (location, rotation, scale) at which the projectile should be spawned. |
| Owner | Actor Object Reference | The actor who owns the projectile (e.g., the shooter). |
| Mechanics | FProjectileMechanics | Holds data related to the projectile’s mechanics, such as speed, gravity, bounces, etc. |
| MaxProjectileLifespan | float | The maximum lifetime of the projectile before it returns to the pool. |
| AmmoData | FAmmoConfig | Contains information about the ammo used (e.g., visuals, effects, behavior). |
| DamageData | FDamage | Holds the full damage information. This data will later be passed to the actor that gets hit. |
Damage Interface
This will be the core interface for our damage system. Any actor that should participate in the damage flow—such as the player, enemies, destructibles, or interactive objects—will implement this interface.
In Blueprints/Damage/ create new Interface named IDamage. Add the following two functions to it:
- ApplyDamage
- ReceiveDamage
Both take an FDamage input and Return a bool output (e.g., to indicate success or whether the damage was applied/accepted).
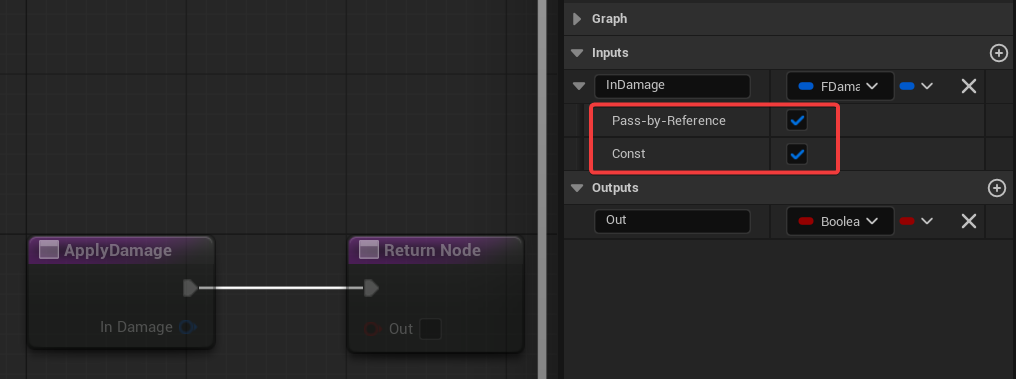
Make sure the FDamage input is marked as Pass by Reference and Const. While the performance gains in Blueprints may not be massive, as mentioned in earlier tutorials, it’s a good practice to use const references wherever possible to avoid unnecessary copying—especially when dealing with larger structs like FDamage.
Damage Manager
Our system uses a Damage Manager as a central gate for all damage handling.
This design makes debugging much easier later, since all damage requests go through a single point of control.
Create a new Blueprint named DamageManager, derived from ActorComponent.
TryToApplyDamage. This will be the main entry point for applying damage in the system. It should:
- Take an
FDamageinput (passed by reference and const). - Call the
ApplyDamagefunction on theDealerActor(From) using theIDamageinterface.
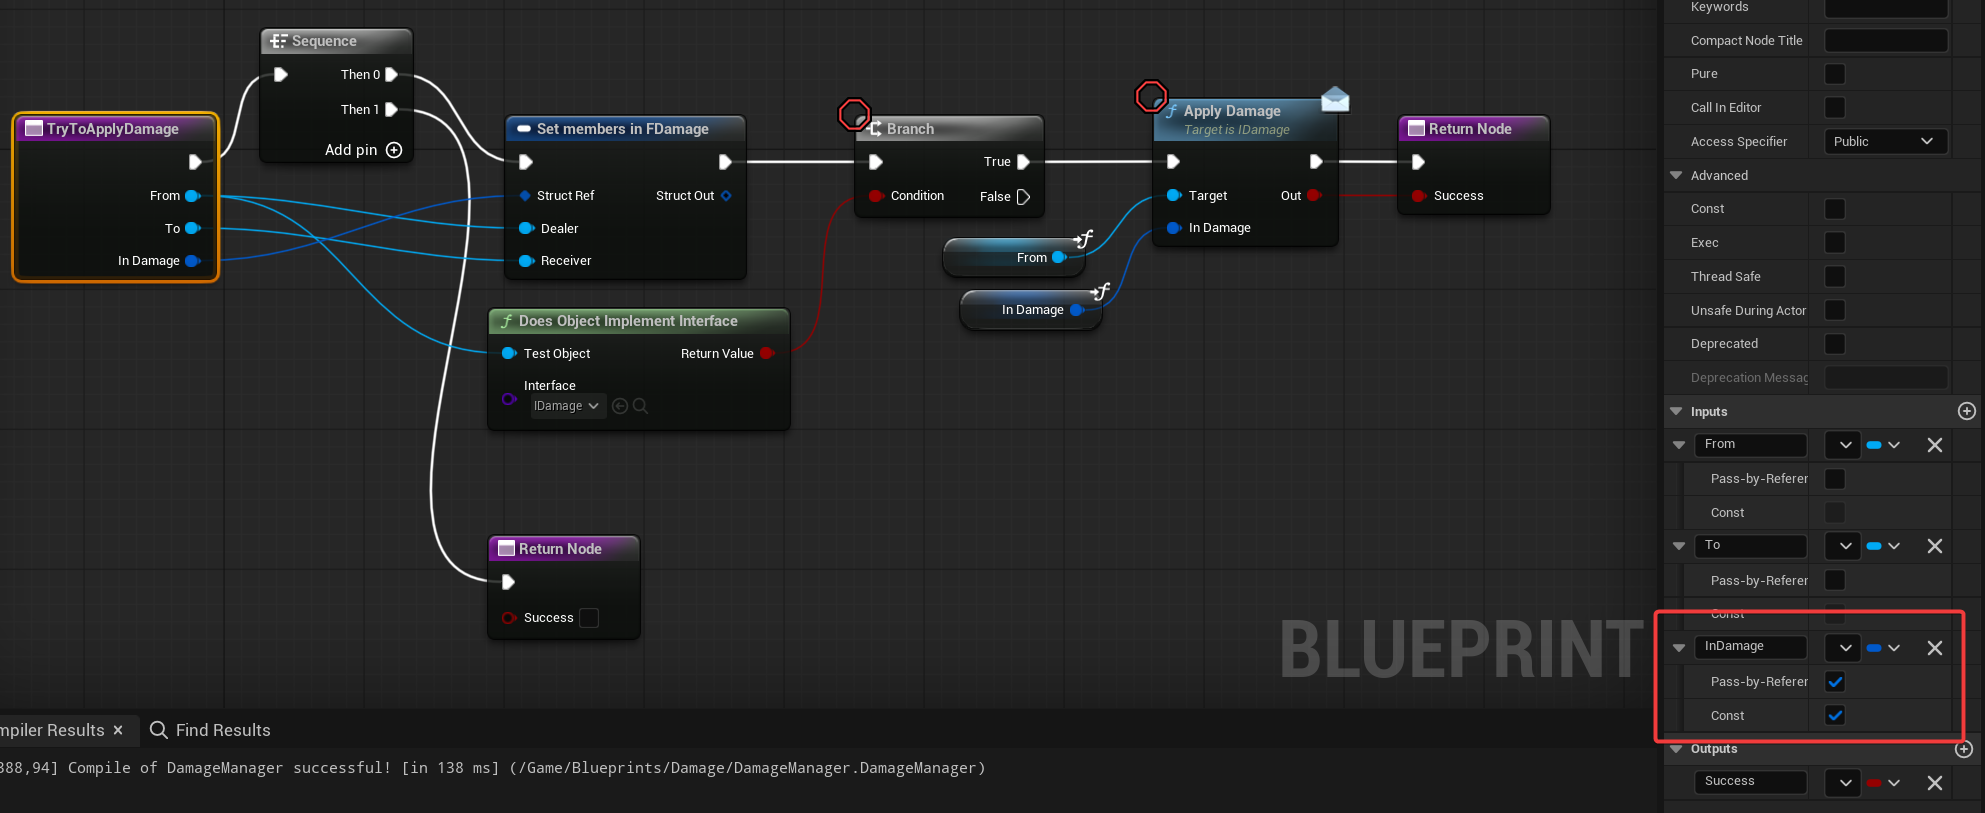
This centralizes the logic, by routing everything through the TryToApplyDamage function, we ensure there’s a single, consistent entry point for applying damage. This greatly simplifies debugging and future maintenance.
AddDebugMessageToDamage. A simple helper function to add debug information to the FDamage struct. You can extend this later to include additional data like timestamps, function names, or custom colors for visualization.
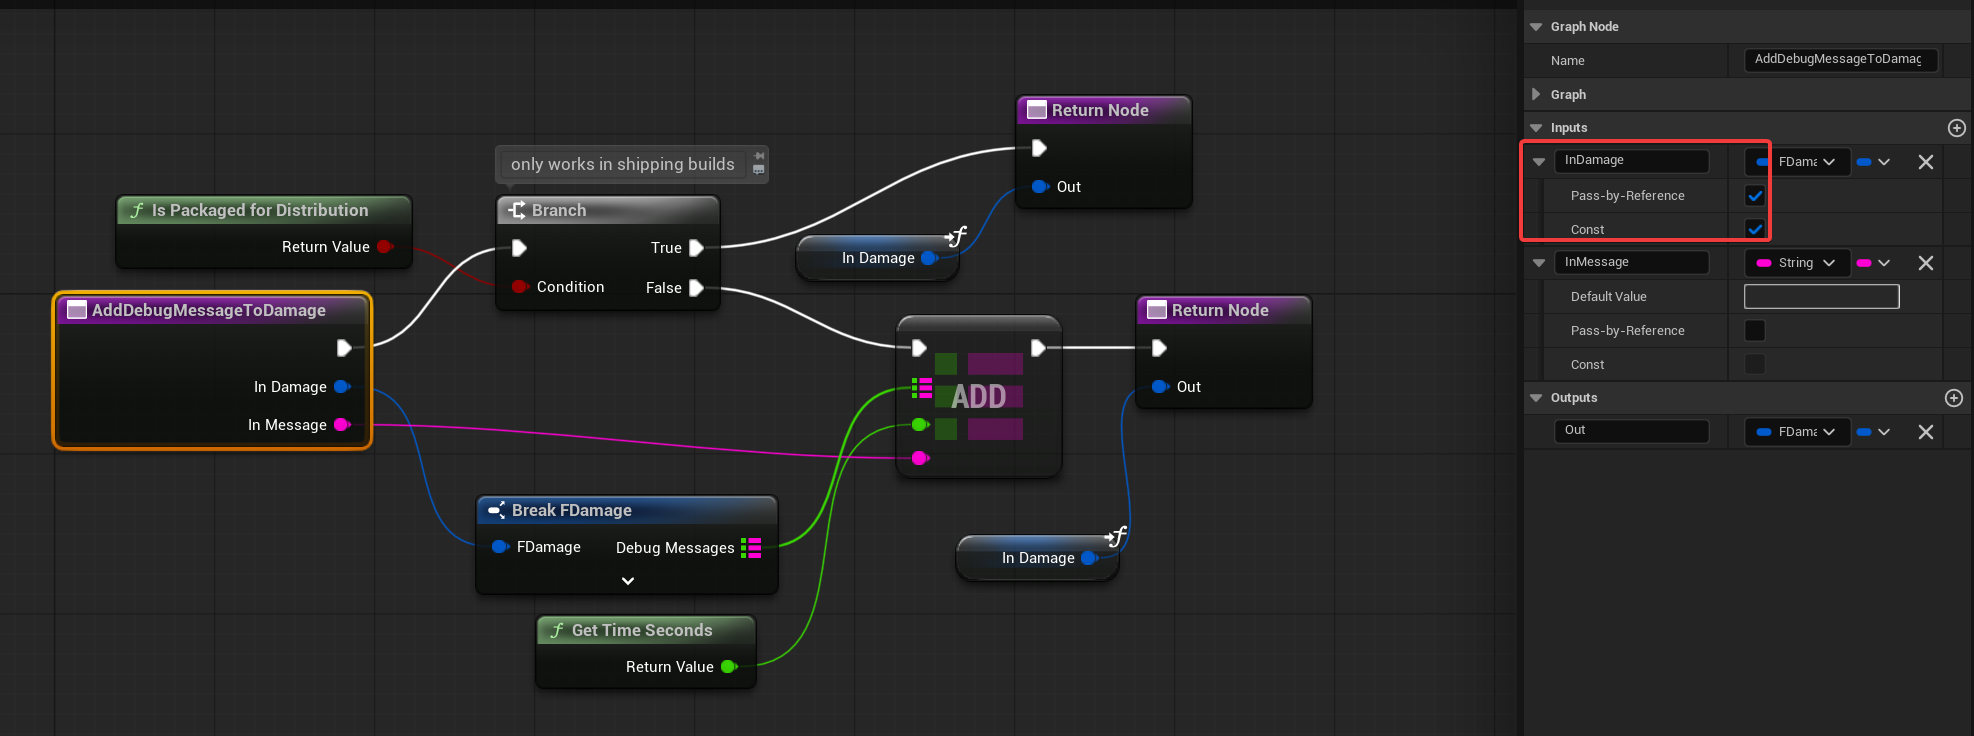
Purpose: Centralize debug logging within the damage system.
💡 Tip: Use IsPackagedForDistribution() to skip adding debug messages in Shipping builds. This keeps your final game clean and more performant.
AddTagToDamage.FDamage struct’s tag container.

Additionally:
- After adding the tag, it automatically calls
AddDebugMessageToDamageto log when the tag was added, - This keeps all tag logic and related debugging in one place.
Now, open STGameModeGameplay and add the DamageManager component to it. This makes the DamageManager globally available from the game mode, acting as a centralized damage gate.
💡 Note: If we were working in C++, the Damage Manager would be implemented as a World Subsystem—a more scalable and engine-recommended pattern for global systems.
Data Manager
In the Weapon Mechanics tutorial, we created Primary Data Asset (PDA) types for things like Ammo.
Now, we need a way to load and access that data at runtime.
While Unreal Engine provides the Asset Manager for handling this, its Blueprint implementation in 5.6 seems unreliable in some cases. The C++ version works great, but since we’re working in Blueprints, we’ll use a custom, simpler solution instead.
💡 Note: In a later stage, we’ll introduce a Game Loop system that will trigger asset loading during the loading screen. For now, you can populate these arrays during game start or BeginPlay
The DataManager will be responsible for:
- Storing all of our PDA (Primary Data Asset) as Data Asset references in arrays
- Organizing them into separate arrays (e.g., Ammo, Weapons, Players, etc.)
- Populating those arrays during the loading screen (or temporarily, on game start)
- Allowing any system to request (load) specific data by type or tag
Create a new Blueprint named DataManager, derived from ActorComponent. Add the component to STGameModeGameplay, just like we did with the DamageManager.
Variables
Inside the DataManager, create the following variables (all using Asset Data Array type):
- AmmoSoftData
- WeaponsSoftData
- PlayersSoftData
These variables correspond to the three Primary Data Asset types we created in earlier tutorials.
Functions
PropagateSoftDataAmmoSoftData, WeaponsSoftData, etc.).

It should:
- Scan the /Game/Data/ folder for relevant Primary Data Assets (PDAs).
- Add them to the correct Asset Data Arrays.
💡 Note: This is why all of your PDAs should be stored under /Game/Data/. Keeping your data organized in a single folder makes it easier to manage, batch-load, or asynchronously stream assets later—especially when working with larger systems like dialogues, quests, or world events.
GetAmmoData

This provides a clean and reusable way for other systems (weapons, UI, inventory, etc.) to access ammo configuration data.
💡 Note: This makes sure no one accesses or filters AmmoSoftData manually—centralizing access and allowing you to improve caching or error handling in one place later.
Health Component
This will be a simple health system for now—just enough to integrate with our damage system.
We’ll extend it with more advanced features later (e.g., states like “Bleeding”, “Invincible”, or “Reviving”).
Create a new Blueprint named HealthComponent, derived from ActorComponent.
Variables
| CurrentHealth | float | Holds the current health value. |
| MaxHealth | float | The maximum health the component can hold. |
| bDead | bool | Indicates whether the actor is currently in a dead state. |
And one Event Dispatcher: OnDeath. This will be triggered when the health reaches zero (or below).
Other systems (like animation, ragdoll, or scoring) can subscribe to it.
Functions
CheckIfDead.

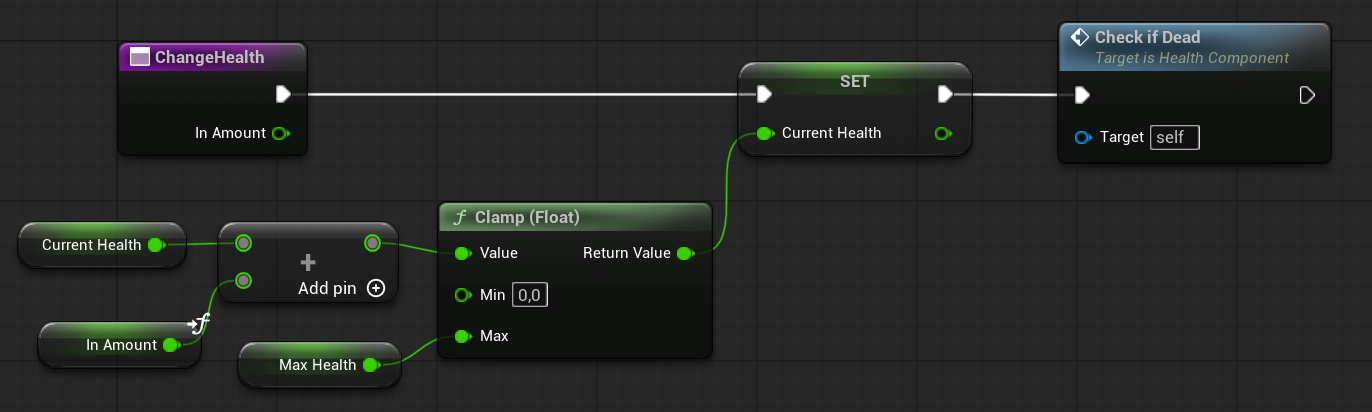
ChangeHealth.
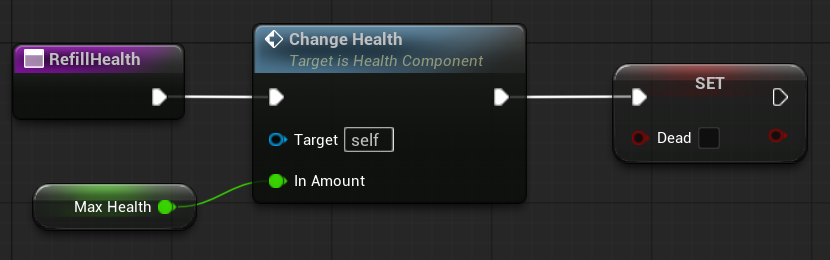
RefillHealth
💡 Note: In more advanced setups, you’d typically use an enum for states like Alive, BeforeDead, Dead, etc. But for now, we only need something basic that can respond to damage and trigger death when needed.
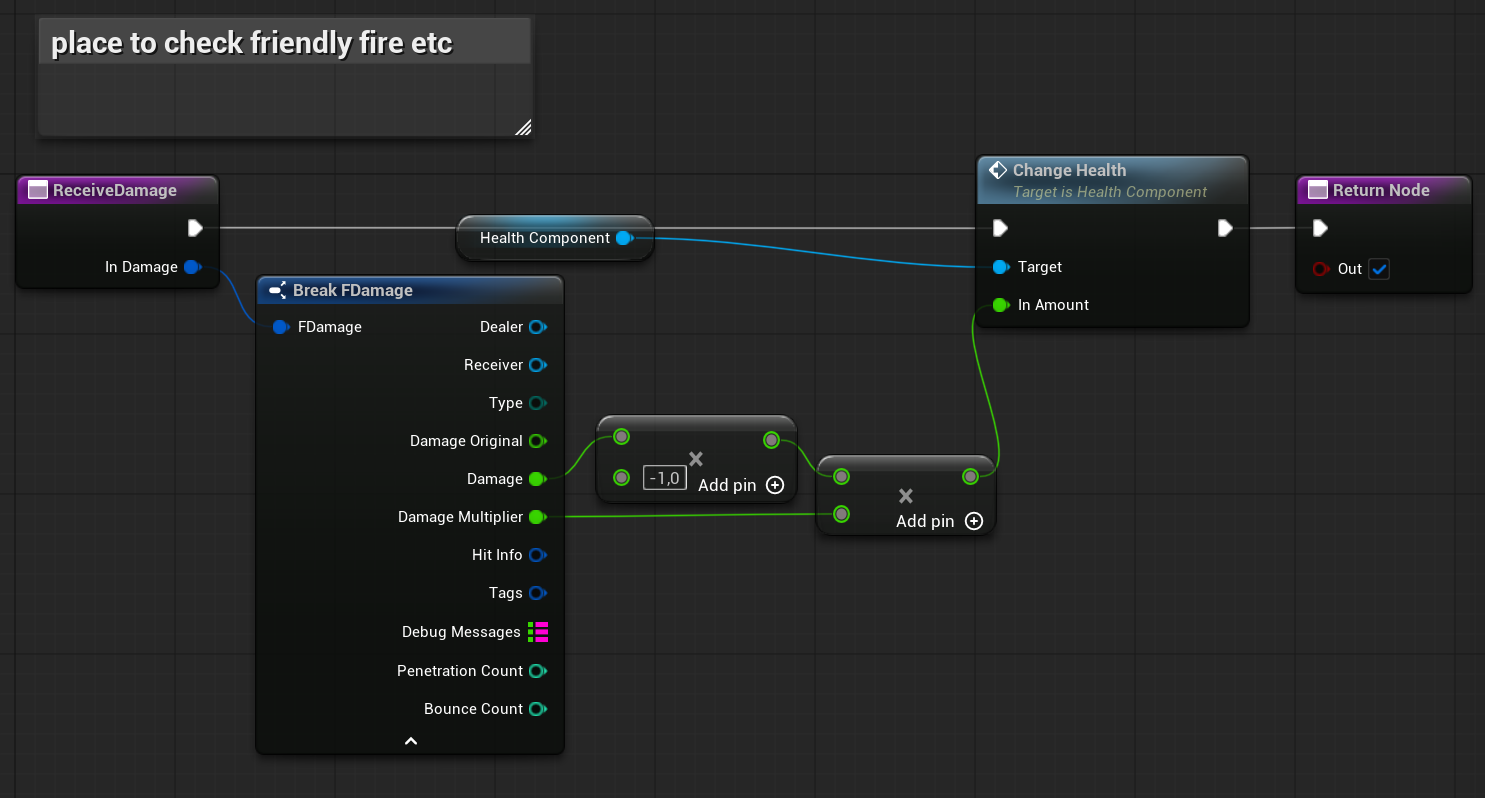
Testing Actor
We would need an actor with:
- IDamage interface implemented,
- Health Component,
IDamage Receive Damage should just change the health on the Health Component.
Base Projectile
Now we’re getting to the core of the system—the projectile logic. Create a new Blueprint named BaseProjectile, extending from Actor.
Inside the BaseProjectile Blueprint, create the following component structure:
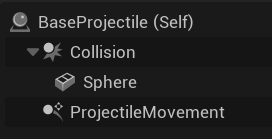
Sphere Mesh Component is used for debug visualization only. Set Collision to “No Collision”, as it’s not used for actual physics or trace logic. Later on we will have bullet mesh here when we will be doing weapons audio visual stuff.
ProjextileMovement Component modified variables:

Variables
| HoldingMechanics | FProjectileMechanicsInfo | Holds the actual mechanics (speed, gravity, bounces, etc.). This is set when the projectile is taken from the pool. |
| HoldingDamage | FDamage | The full damage struct, passed from the pooling system. This data is forwarded to the hit actor when the projectile impacts. |
| HoldingAmmo | FAmmoConfig | Stores all ammo-related data. |
| bTakenFromPool | bool | Indicates whether this projectile has been taken from the pool and is currently in use. |
| TimeToGoBackToPool | float | The lifetime of the projectile. Set by the pooling system when the projectile is spawned. After this time expires, the projectile should be returned to the pool. |
Dispatcher: OnProjStop
We’ll use this event dispatcher to let other systems know that the projectile has stopped—whether due to impact, reaching its lifespan, or being manually returned to the pool.
- Name:
OnProjStop - Input:
BaseProjectile(Object Reference)
This allows listeners (e.g., weapons, managers, or gameplay systems) to know which projectile has stopped.
Functions.
OnBackToPool.
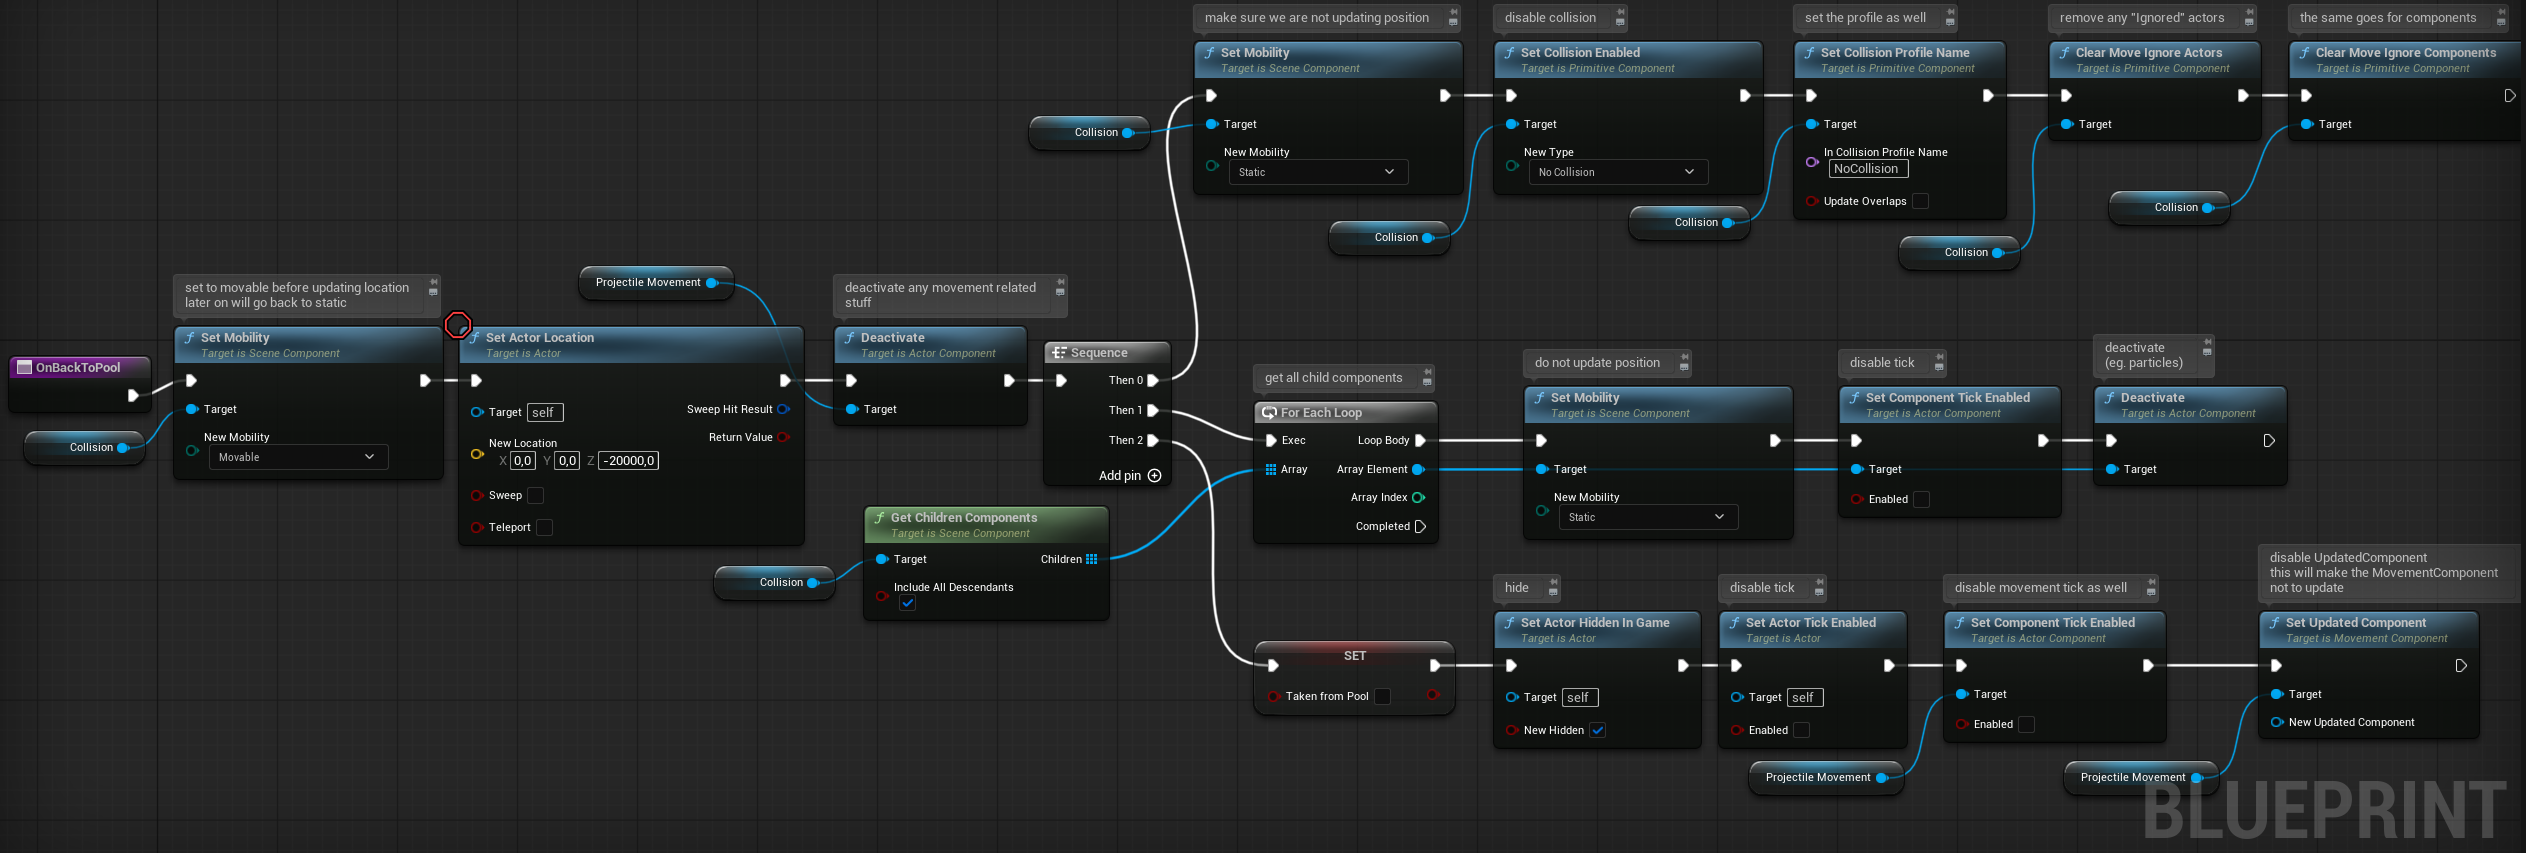
It will:
- Deactivate the projectile (disable tick, effects, collisions, etc.)
- Hide or reset visuals (like trail, mesh, particles)
- Mark the projectile as available for reuse
- Move the projectile far outside the gameplay area (e.g., to location
0, 0, -100000) to avoid accidental interactions
This ensures the projectile is completely “OFF”—not consuming performance, not interacting with the world—and ready to be re-activated when needed.
💡 Note: Object Pooling is a pattern used to avoid expensive operations like spawning and destroying actors. Instead, we keep a pool of reusable objects that we “activate” and “deactivate” as needed. It’s very common in games with lots of projectiles, enemies, or effects. We will be using pooling for our enemies later on as well.
OnPoolCreated.
It serves as an initialization step, ensuring the projectile starts in an “inactive” state.

OnTakenFromPool.
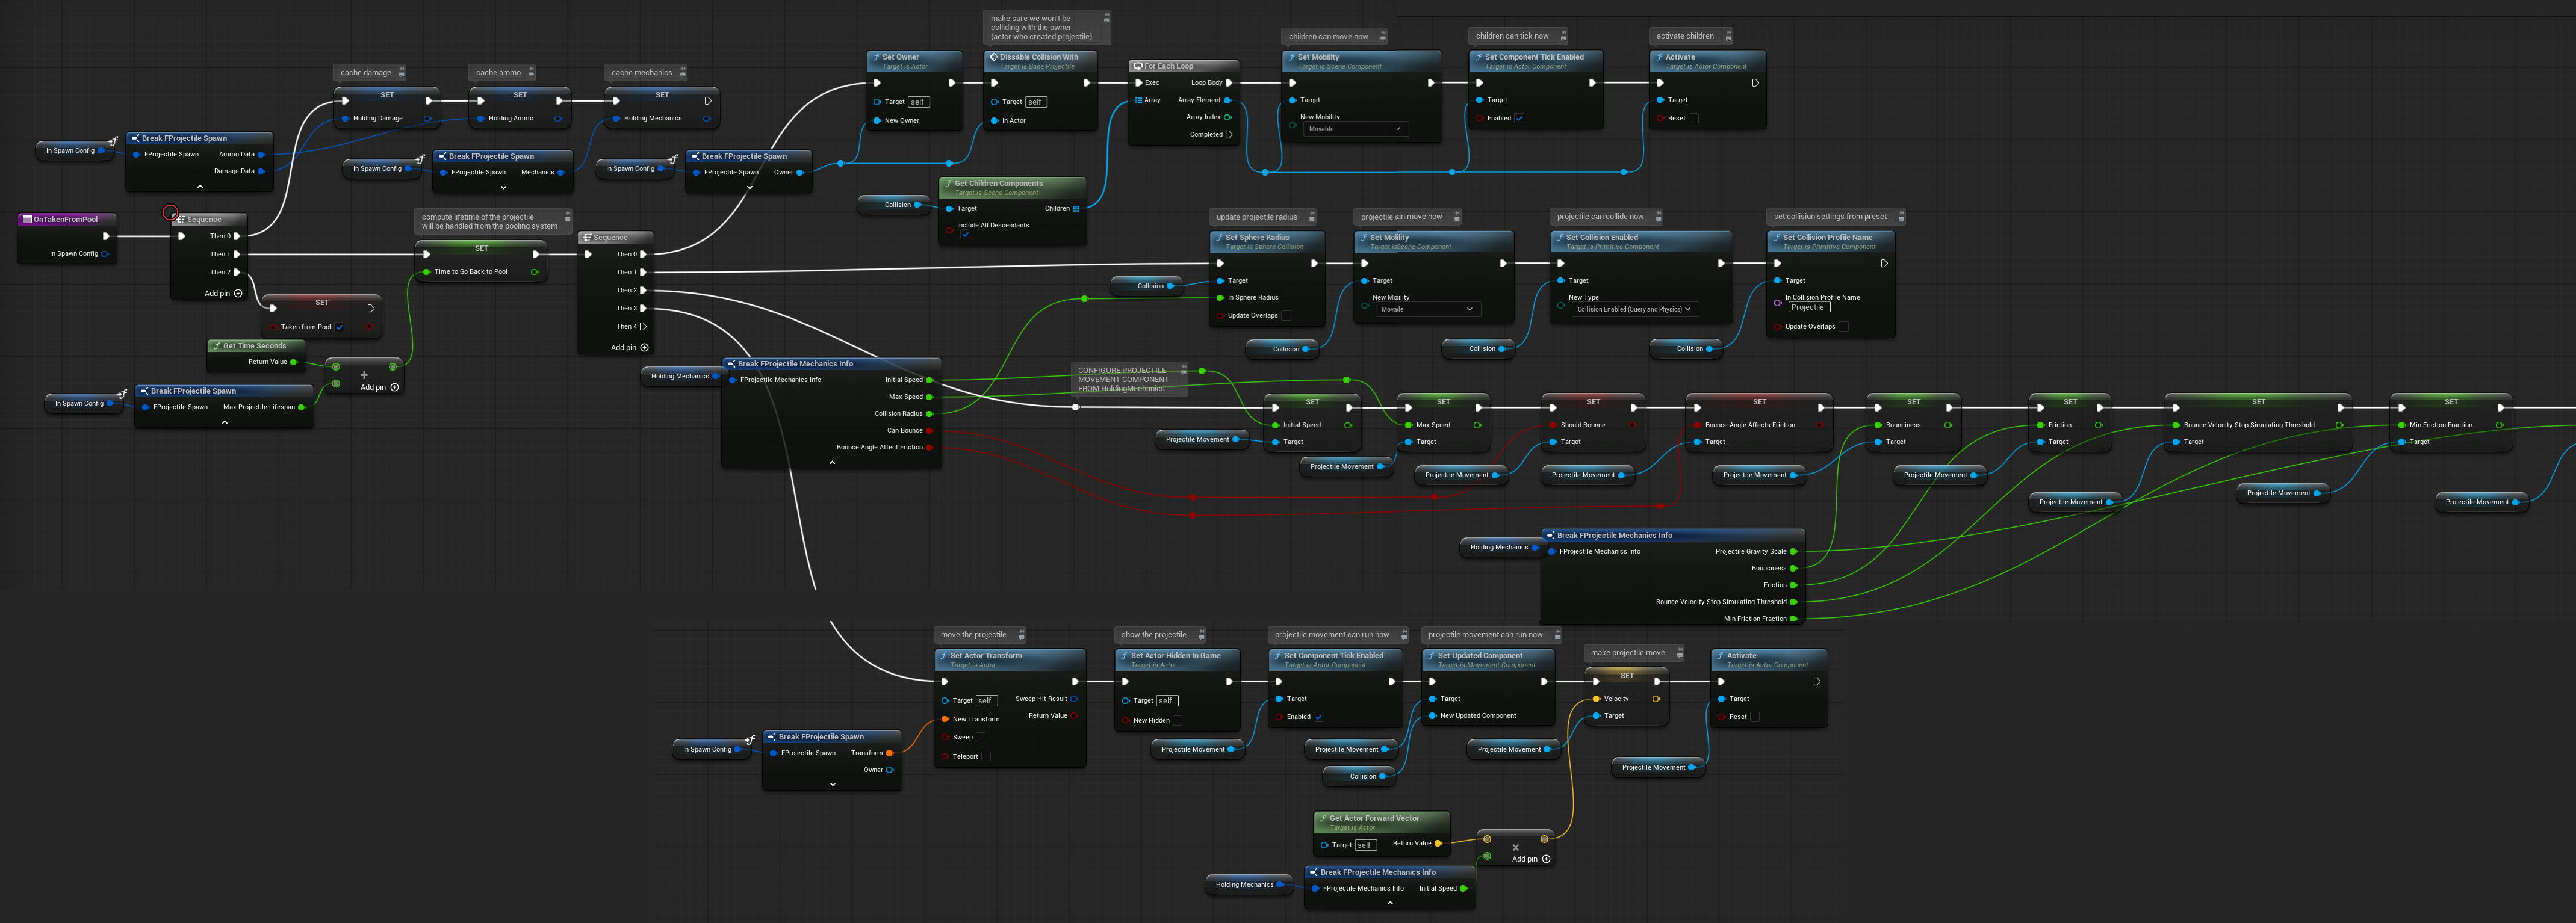
- Cache Incoming Data using
FProjectileSpawninput, - Mark the projectile as active (
bTakenFromPool = true) - Enable ticking, collision, or any other active systems
- Show the mesh, particles, and effects
- Apply the movement settings from
HoldingMechanics(like speed, gravity, bounce settings) - Move the projectile actor to the spawn Transform
DisableCollisionWith.

StopProjectile.
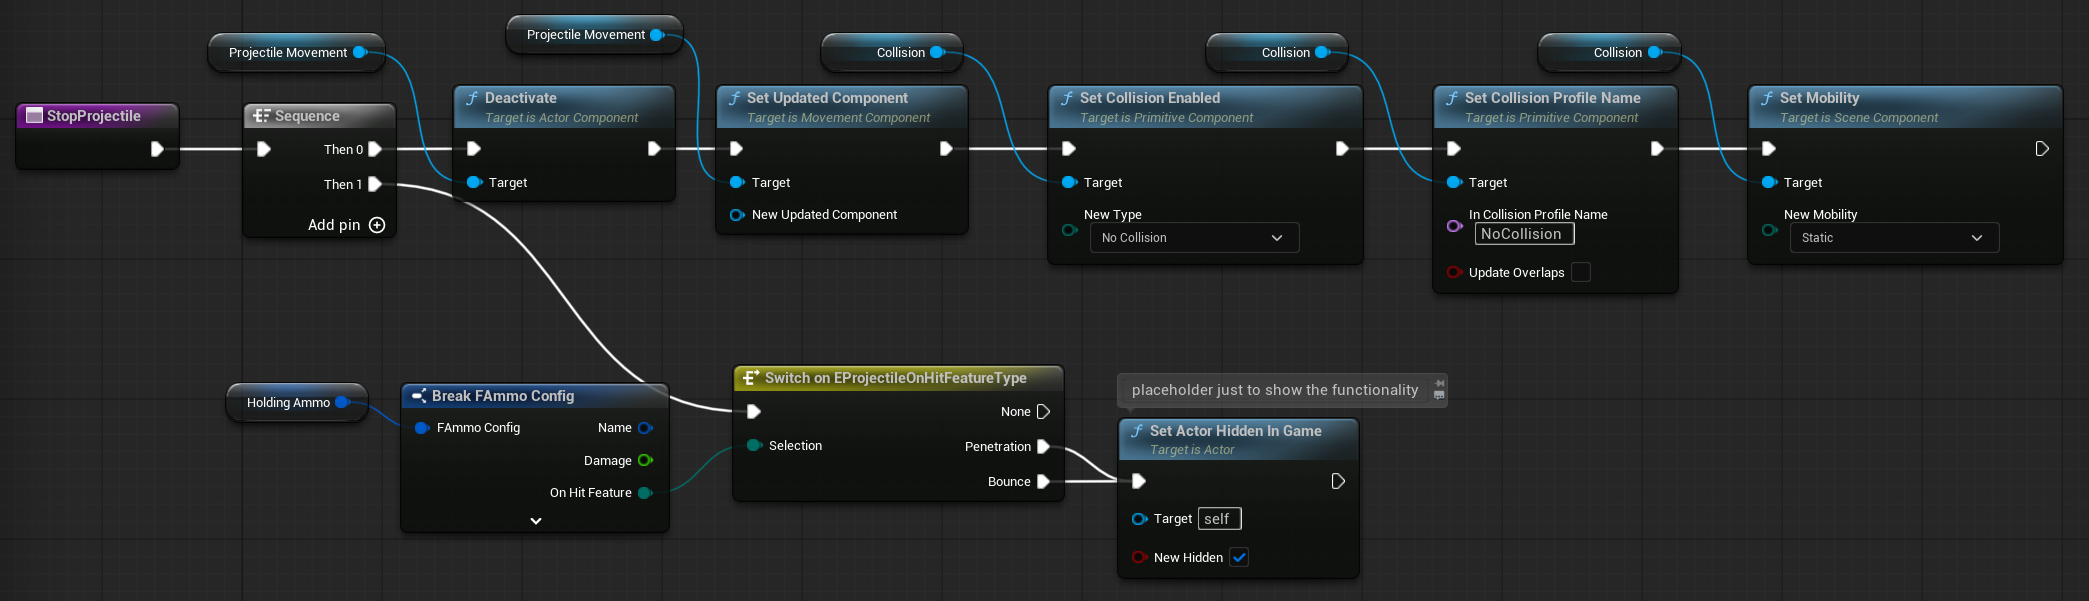
OnProjectileStop Event.ProjectileMovementComponent, and it’s triggered automatically when the projectile hits something and comes to a stop.
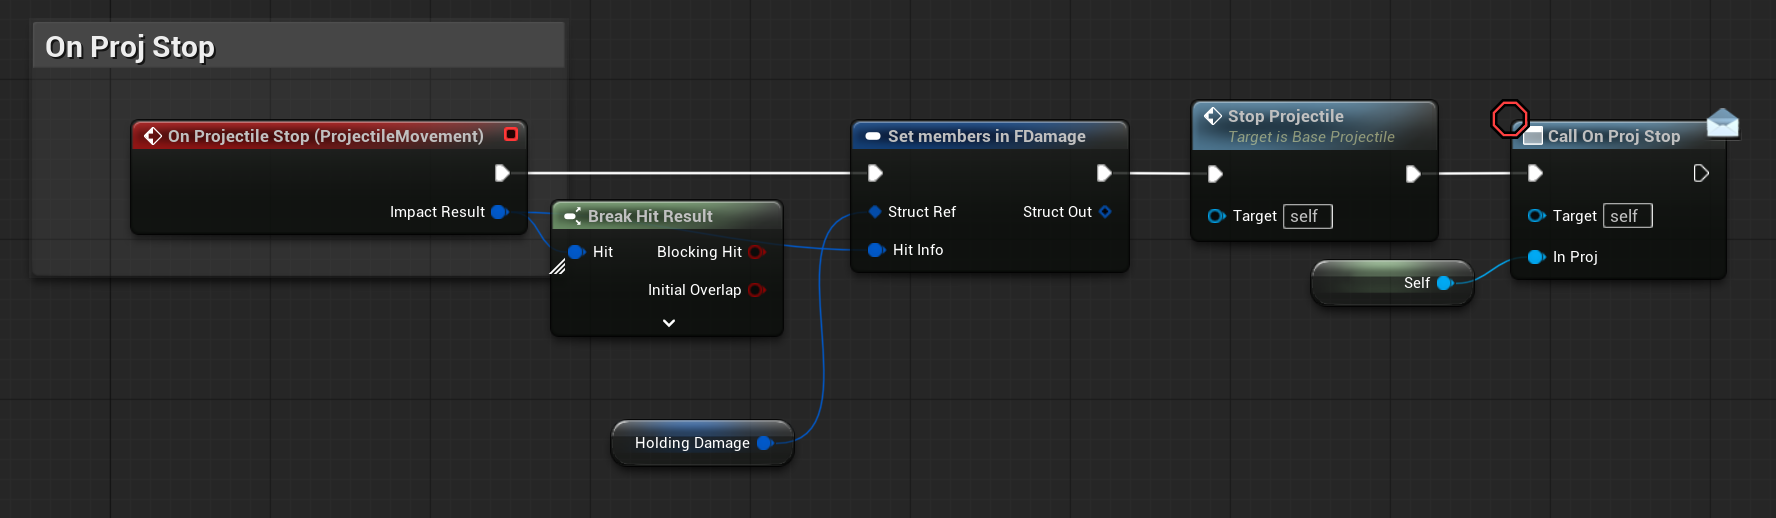
Logic:
- We take the
HitResultprovided by the event and assign it toHoldingDamage.HitInfo. This ensures that any actor receiving the damage later has full context of the hit (location, normal, impacted actor, etc.). - Stop the projectile
- Notify Listeners via Dispatcher. Broadcast a custom event dispatcher (e.g.,
OnProjectileStopped) to notify other systems that the projectile has stopped. This could be used by the weapon that fired the projectile, so it knows the projectile is done and can respond (e.g., refire cooldown, visual effect, ammo logic, etc.)
Projectile Pooling Manager
We previously introduced the idea of object pooling with the BaseProjectile. Now let’s build the full system that manages pooled projectiles.
Create a new Blueprint named ProjectilePoolingManager, extending from ActorComponent. Add this component to STGameModeGameplay, just like we did with DamageManager and DataManager.
Variables
| FreeProjectiels | BaseProjectile Object Ref Array | Stores all inactive projectiles that are available to be reused. |
| TakenProjectiles | BaseProjectile Object Ref Array | Stores all active projectiles that are currently in use. |
| StartingPoolSize | int | Determines how many projectiles to spawn and prepare in the pool when the game starts. Default: 50 |
| MaxProjectileDistance | bool | The maximum distance a projectile can travel before it is automatically returned to the pool. Default: 15000 |
| MaxProjectileLifespan | float | The maximum time a projectile can live before it’s returned to the pool (used for time-based cleanup). Default: 5 |
Functions
CreateProjectilePool.

It will:
- Spawn a set number of projectile instances (
StartingPoolSize) - Set them up properly (disable movement, hide visuals, etc.)
- Add them to the
FreeProjectilesarray, ready to be used
Init.
For now, it will be triggered in BeginPlay. This function will call CreateProjectilePool.
Deinit.EndPlay to clean up and clear any remaining data or references.

This also gives us insight into the final pool size at runtime. The pool can grow dynamically if the initial StartingPoolSize is too small to handle all active projectiles.
Update.
💡 Note: This is a key performance optimization: Instead of having every projectile tick individually, we disable their Tick functions and handle updates centrally through one tick on the Pool Manager.
It’s significantly more efficient to loop through 50 projectiles in one tick than having 50 separate ticking actors.

SpawnProjectileFromPool.
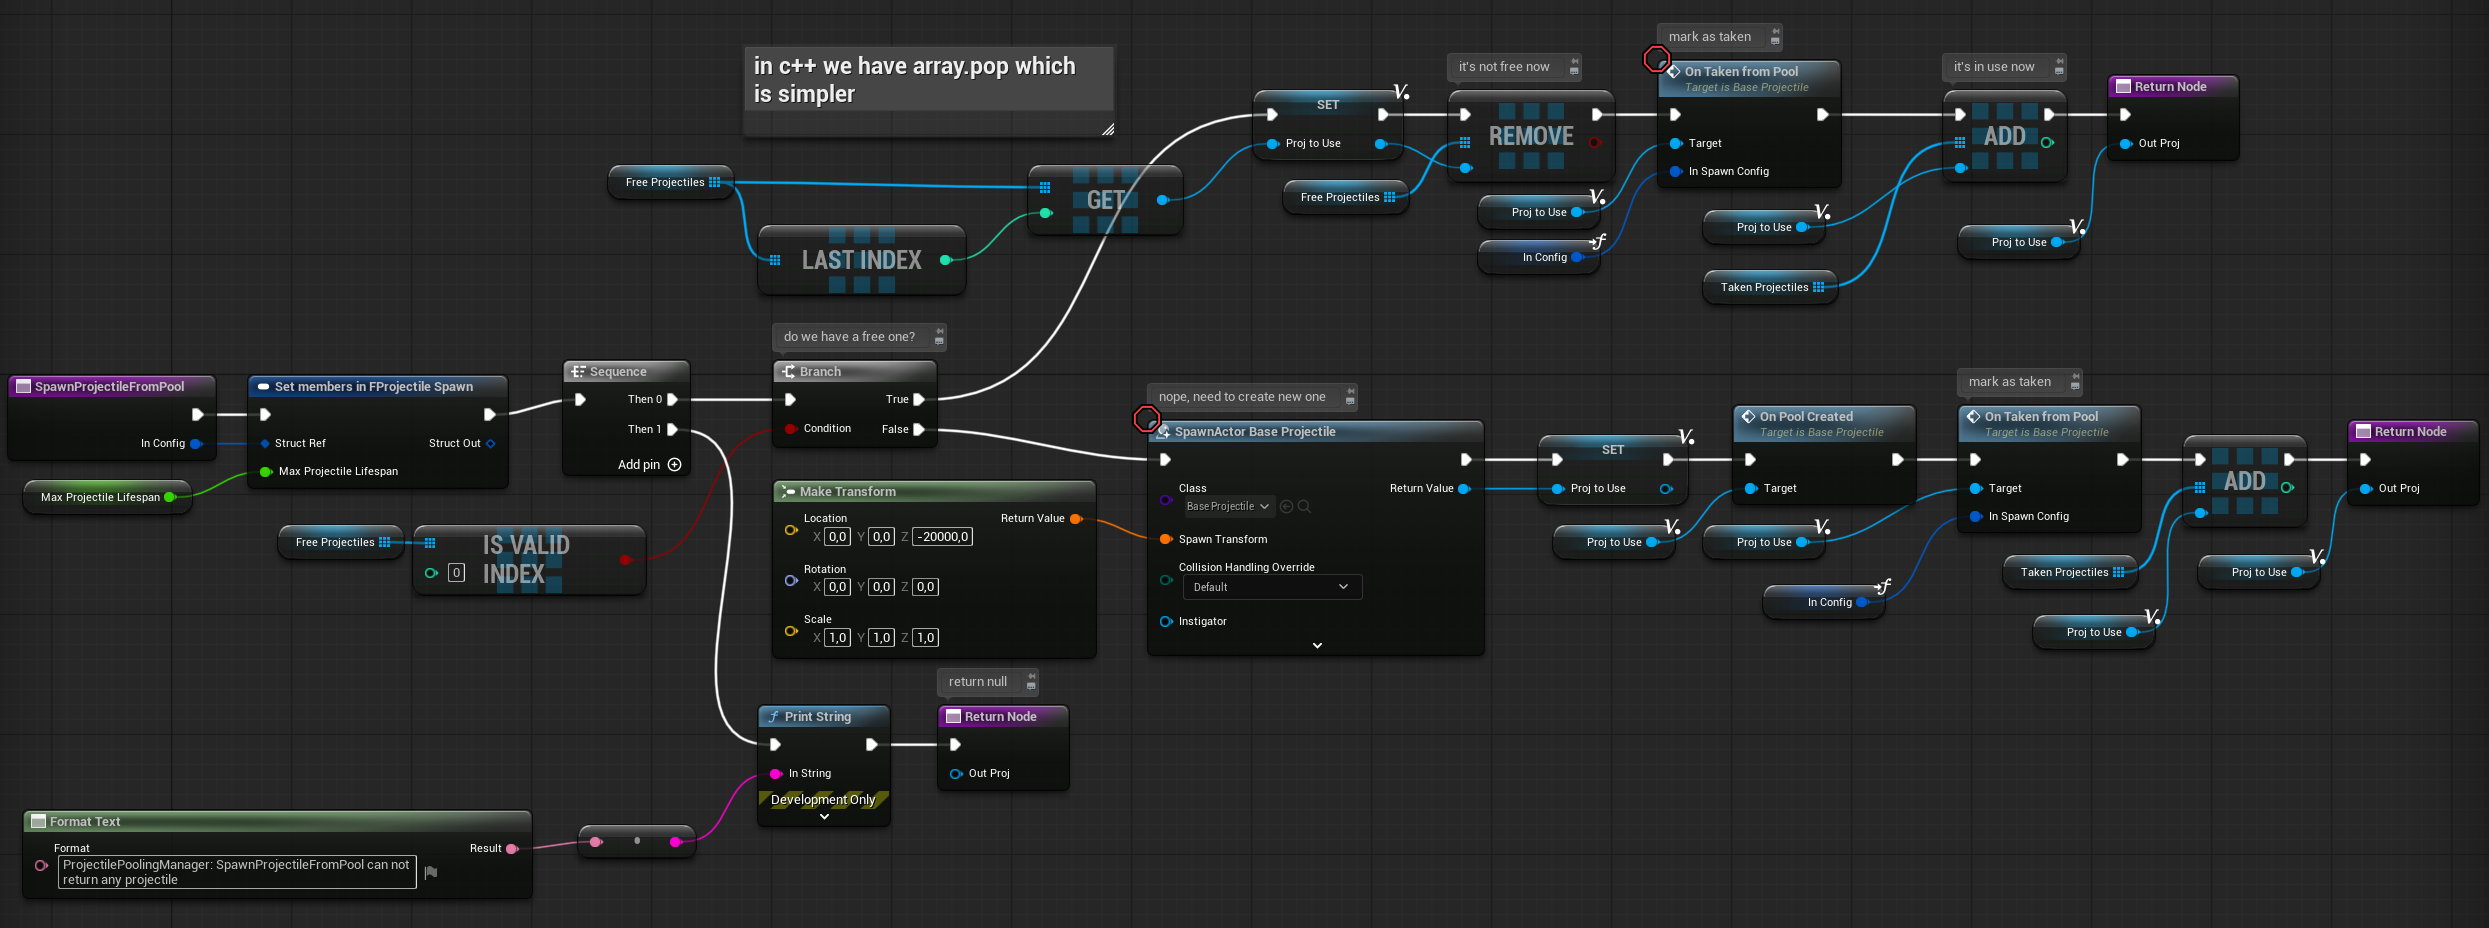
What it does:
Check the Free Pool:
- If there’s at least one projectile in
FreeProjectiles, take it from the pool.
If Free Pool is Empty:
- Spawn a new
BaseProjectileactor and add it to the pool system.
Initialize the Projectile:
- Call
OnTakenFromPool, passing in theFProjectileSpawnstruct - Add it to the
TakenProjectilesarray - Remove it from
FreeProjectiles(if it came from there)
Return the projectile to the caller
Remember to call Init on Begin Play, Deinit on End Play and Update on Event Tick.
Player Updates
At this stage, we don’t yet have a proper Weapon class to handle firing logic. We’ll create that later when we start working on audio-visual feedback and polish. For now, we’ll use the existing STGameplayPlayerPawn to test and integrate our damage system.
What we will do:
- Add temporary firing logic directly into
STGameplayPlayerPawn - Call our Damage System and Projectile Pooling Manager from here
- Use this setup for prototyping and testing the core functionality
We’ll now begin adding the necessary functions to handle this.
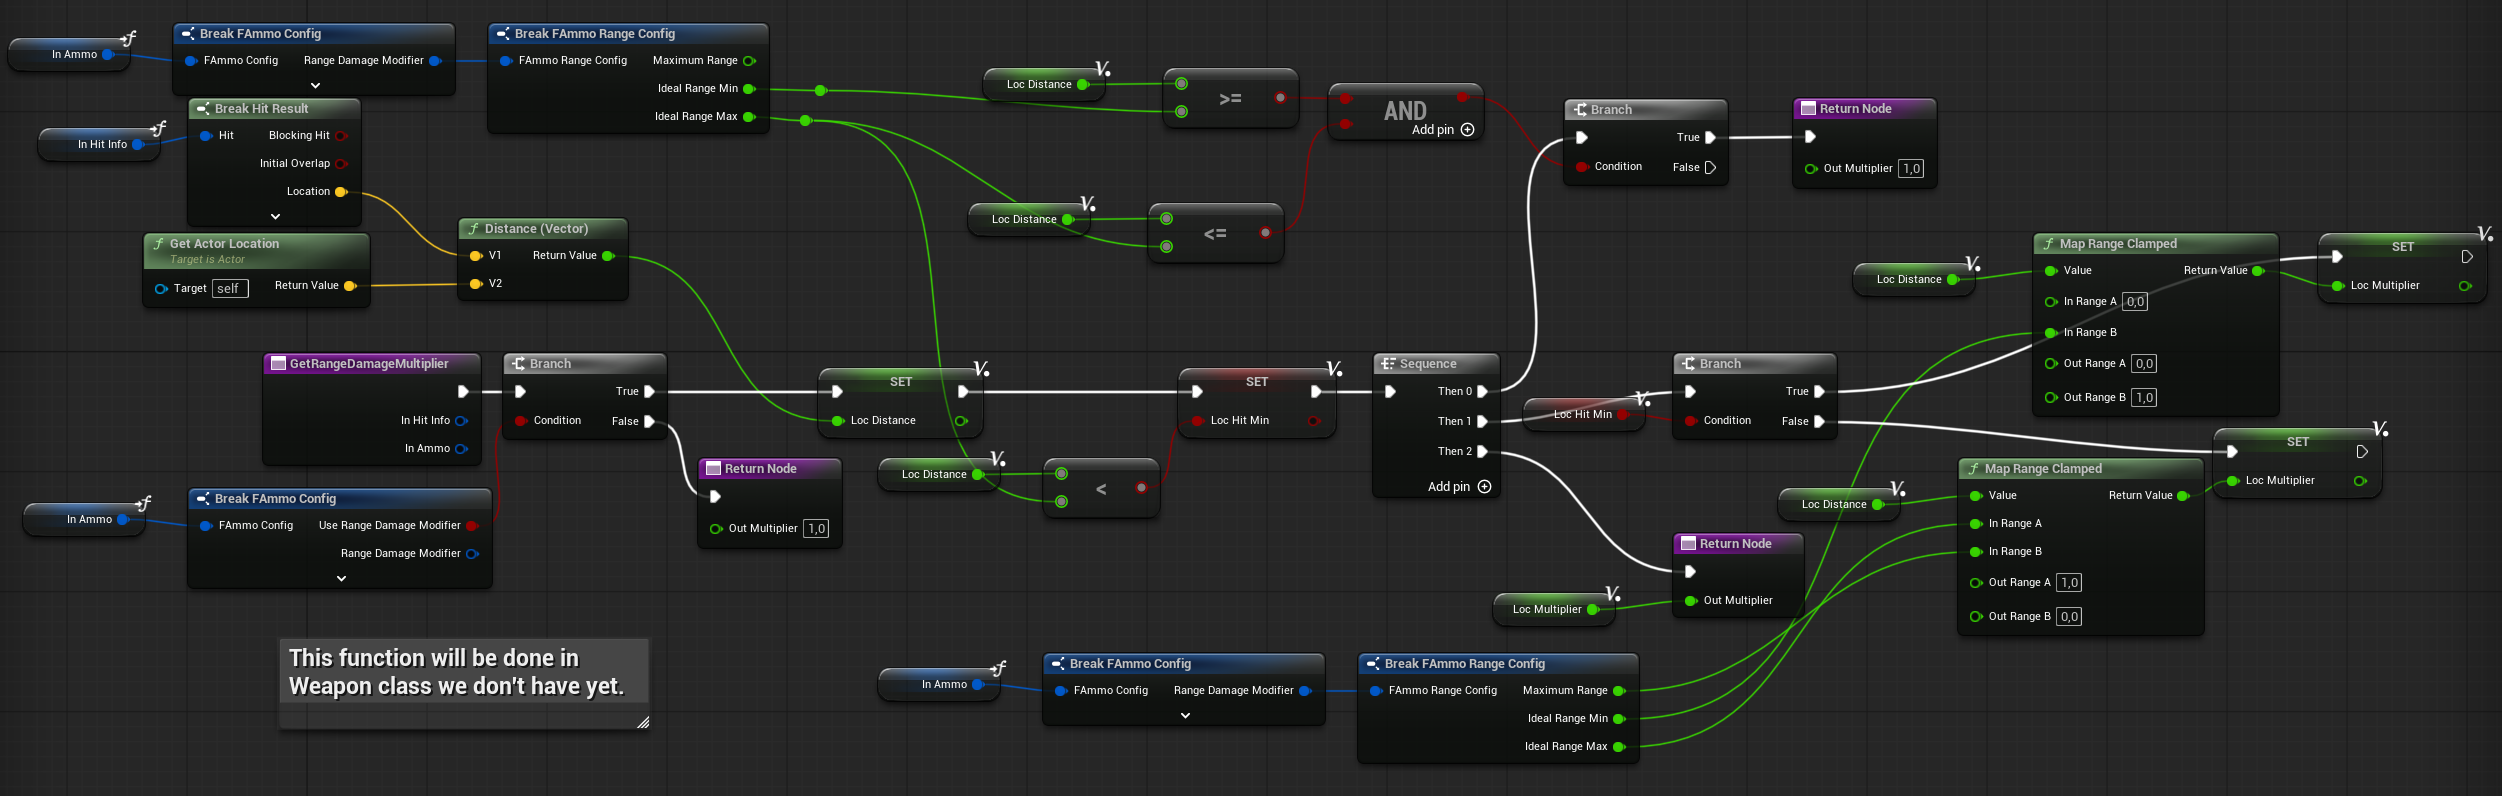
GetRangeDamageMultiplier.
- Pure function
- Input: Hit Result (const, ref) Used to get the impact location.
- Input: FAmmoConfig (const, ref) Contains the min/max damage range and falloff settings.
DoBounceProjectile.
It may look complex in Blueprints (as most advanced logic does 😅), but it follows clear and manageable steps.
What this function is doing:
- Cache Inputs as Local Variables. Makes the graph easier to read. Allows tweaking data mid-logic (e.g., modify bounce angle or multiplier)
- Check if the Surface Allows Bouncing. Based on tags in our custom physical material
- Check Bounce Limit. If the current bounce count exceeds
MaxBounces(from mechanics or damage struct), skip bounce - Apply Chance-Based Logic
- Update Damage Based on Bounce Count
- Calculate New Spawn Location & Rotation. Use surface normal + reflection logic
- Add Randomness to the Direction
- Spawn New Bounced Projectile. Bind
OnProjectileStopto track and return it when done

DoPenetrationProjectile.
DoBounceTraces.
- It keeps track of ignored actors.
- The direction of the trace is computed differently.
DoPenetrationTraces.
OnProjectileStop.

FireBullet.
- Spawns a new projectile if using projectile mode.
- Creates new damage data.
- When using traces:
- The first trace checks from the center of the first-person camera.
- A second trace is then fired in the direction where the first trace hit. This makes the tracing more reliable in first-person games, as it uses the camera center instead of the weapon’s bullet rotation. You can use PlayerWeapon debug and check blue debug.

And that’s all. We can now deal some damage! Next step will be to implement the Weapon Class with the weapon graphics representation. Stay tuned.

You must be logged in to post a comment.