Create a Small Game from Scratch Series: Endless Standing First-Person Shooter
Level: Beginner
Type: Blueprint
Version: 5.6
Download Project
In the previous tutorial, we implemented basic input. Now, we’re moving on to setting up the camera and the Animation Blueprint. This system will handle procedural recoil, leaning, and hiding/showing the weapon — all without using any baked animations.
The best part? It’s fully procedural and will later be configurable per weapon type. Once we add visuals, it’s going to look awesome.
- Camera
- Player Hands Skel Mesh
- Assign Skel Mesh
- Anim Blueprint
- Implementing Idle
- Lean Implementation
- Aim Implementation
- Reload Implementation
- Recoil Implementation
- Why use this approach?
Camera
To fully set up our player camera system, we need to handle a few things. Let’s start with creating a custom Camera Manager.
Create Camera Manager
Create a new Blueprint and name it STCameraManager. Set its parent class to PlayerCameraManager. Open the Blueprint and adjust the View Pitch Min/Max values to fit your gameplay needs.
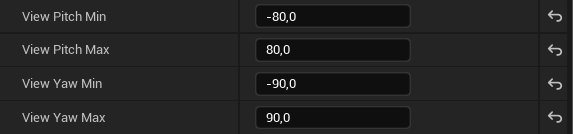
📝 Note: The Camera Manager is responsible for clamping the camera’s rotation limits when using Control Rotation on a camera. This is essential for preventing unnatural or extreme camera angles in gameplay.
Connect Camera Manager to PC
- Open your
STGameplayPlayerControllerBlueprint. - In the Class Defaults panel (select the root node in the Blueprint editor), locate the Player Camera Manager Class property.
- Set it to use your custom
STCameraManager.
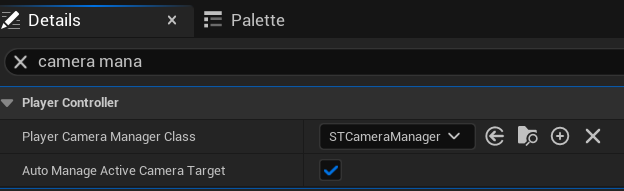
This tells Unreal to spawn and use your custom camera manager during gameplay, allowing your camera settings (like pitch limits) to take effect.
Create Out Own Camera Component
Next, create a new Blueprint named STPlayerCameraComp extending from CameraComponent. Open it and make sure Use Pawn Control Rotation is enabled.
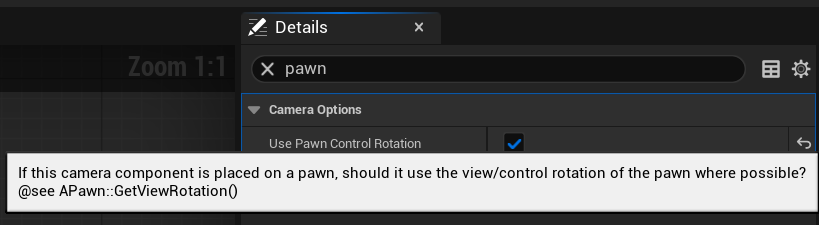
By enabling “Use Pawn Control Rotation” on the STPlayerCameraComp, you’re telling Unreal that this camera’s rotation should be driven by the Pawn’s control rotation, which is manipulated by Add Pitch Input and Add Yaw Input (typically handled inside your Player Controller).
You can also change the default FOV to 80.
Add Camera Component to Player
Open STGameplayPlayerPawn and add the STPlayerCameraComp component.
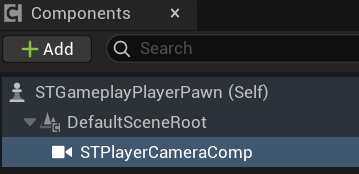
Now we are using our custom camera component together with our camera manager class. This setup will be helpful later on.
Camera Modifiers
When reading tutorials about Unreal Engine classes, you might have seen the Camera Modifier class mentioned. We will use it to change the FOV (for aiming) and for other purposes later on.
Create a new Blueprint named STCamModBase extending from CameraModifier. Open it and add one variable:
- CachedPlayerPawn (STGameplayPlayerPawn object reference)
Then override the two functions available for overriding: Blueprint Modify Camera:
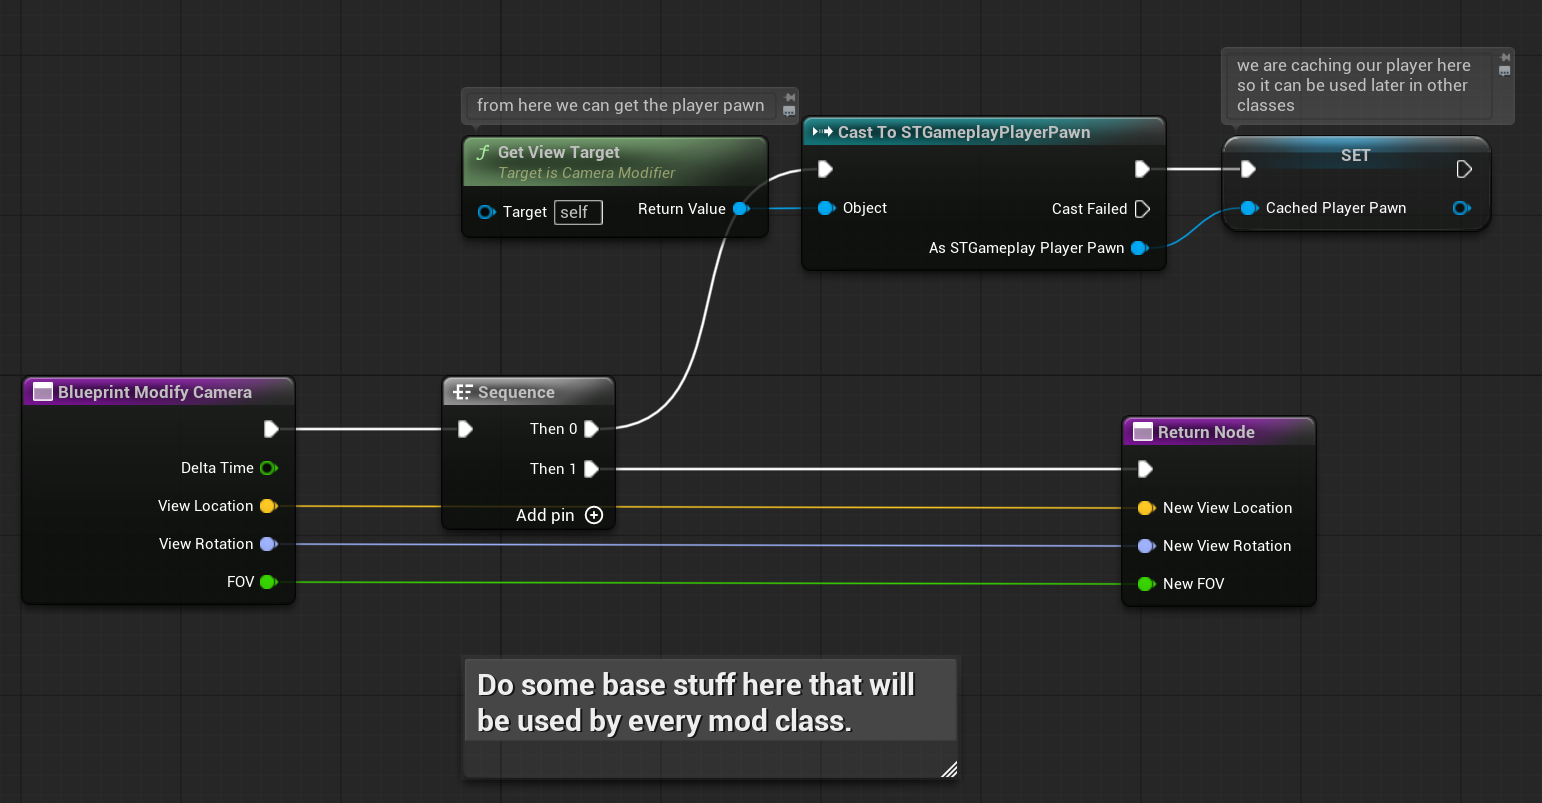
And Blueprint Modify Post Process:

If you’re not sure how to call the parent function, you can right-click (RMB) inside the Blueprint graph and select Add Call to Parent.
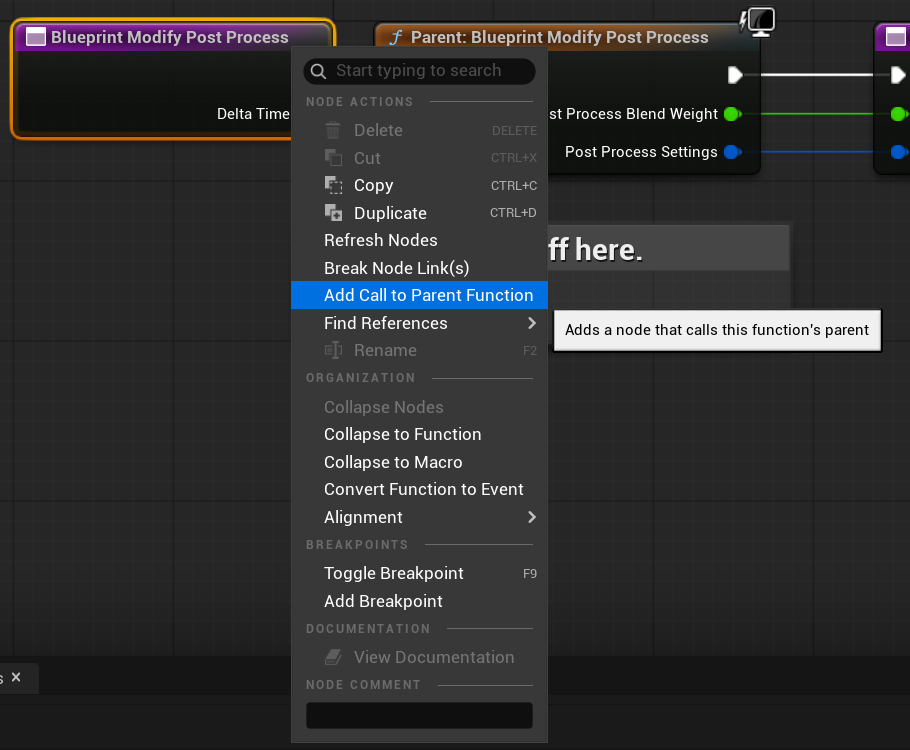
This ensures you call the parent function, which might perform important operations. Always check the parent function’s implementation to decide if you should call it or not. In this example, the parent function is a C++ function exposed to Blueprints but has no actual C++ implementation, so you can safely delete the call if you want. I just wanted to demonstrate how this functionality works.
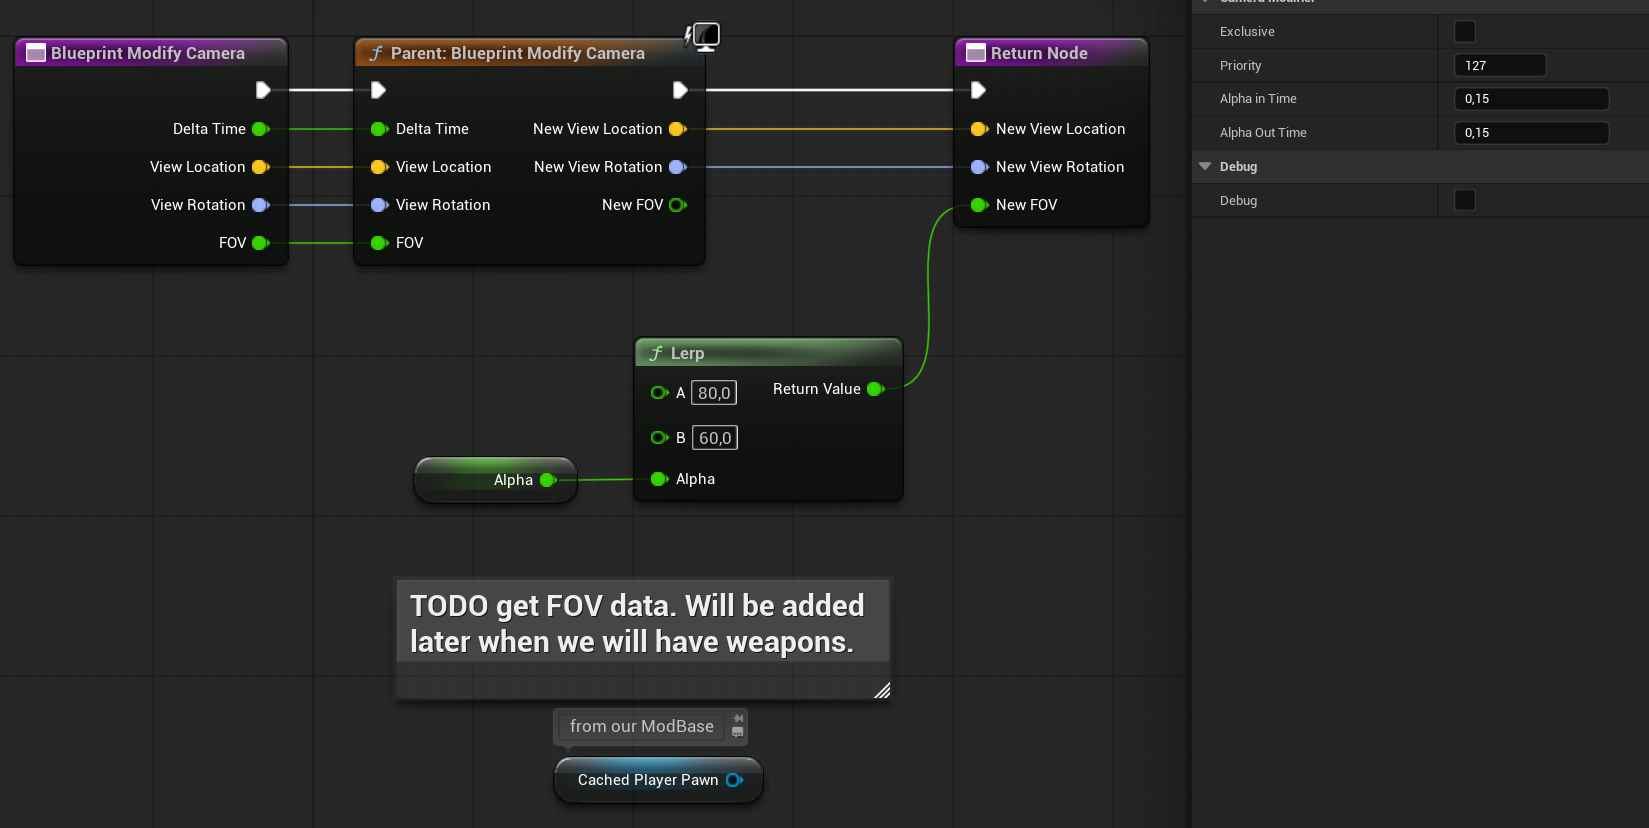
Now that we have the base class, let’s create a modifier to change our FOV. Create a new Blueprint named STCamMod_Aim, extending from STCamModBase. Override the Blueprint Modify Camera function:
Some notes:
- We’re calling the parent function because it currently handles caching our player, and it might include more functionality in the future.
- Right now, we’re passing hard-coded data just for demonstration purposes. Later, these values will be replaced by actual weapon configurations.
- We use an Alpha value to drive the FOV. In the Details panel, you’ll see Alpha In/Out times, which control the interpolation when enabling or disabling this modifier.
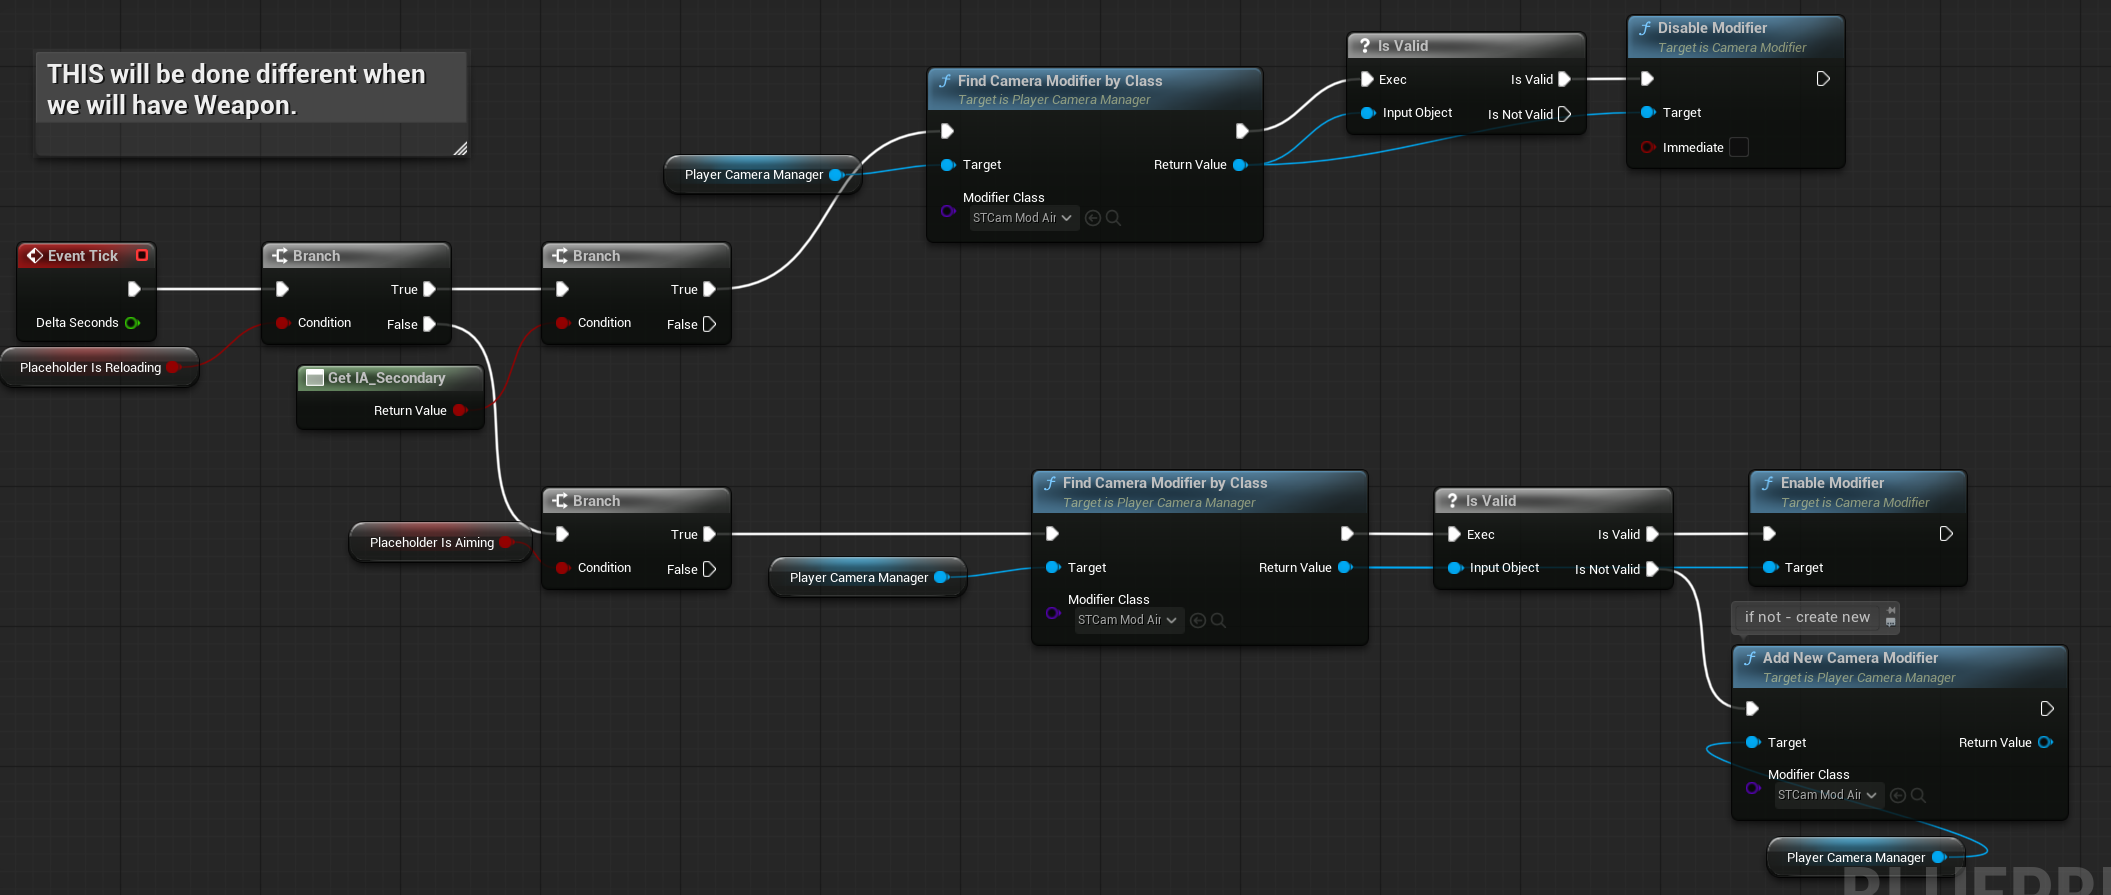
Next, we’ll set up enabling and disabling this modifier. This will be a placeholder, as aiming will eventually be triggered by the weapon functionality—since some weapons have aiming and others don’t. To demonstrate, we’ll use the Player Controller’s secondary input to toggle aiming.
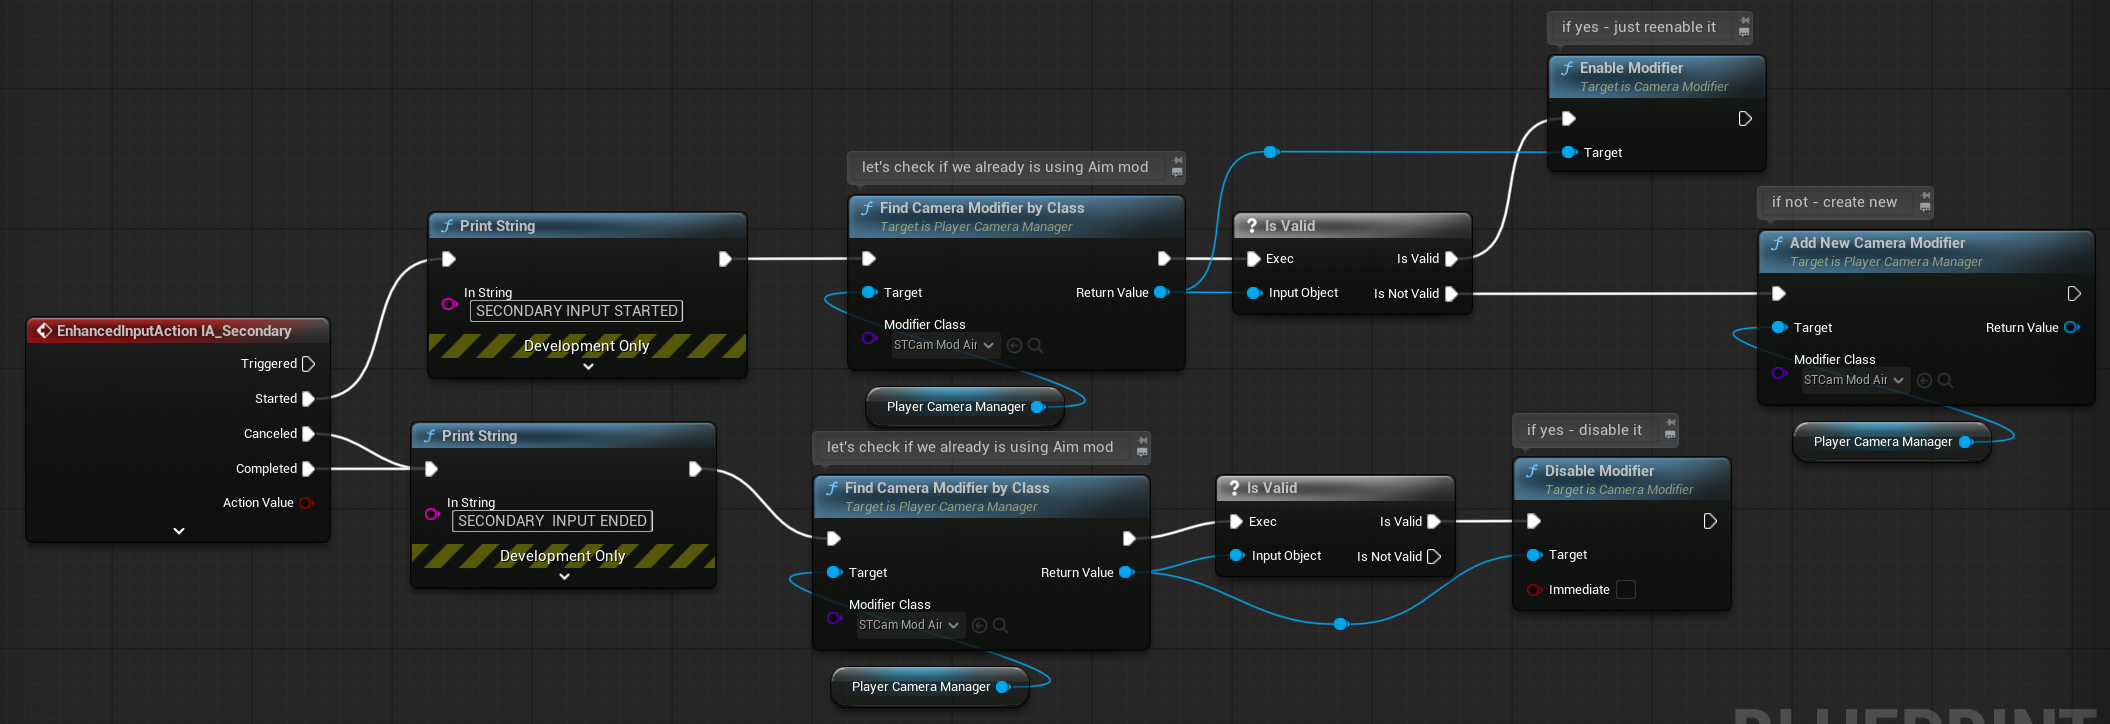
This is the proper way to manage camera modifiers. First, check if the modifier is already running — if it’s not, create it; if it is, just re-enable it. This prevents spawning a new modifier each time you press the secondary input.
Now you have a working AIM modifier that can be toggled on and off. There are many ways to implement this, but it’s important to know that camera modifiers exist and can be used for tasks like this. They can also be used to change post-process effects.
Next, go back to STCamMod_Aim and override the Blueprint Modify Post Process function.

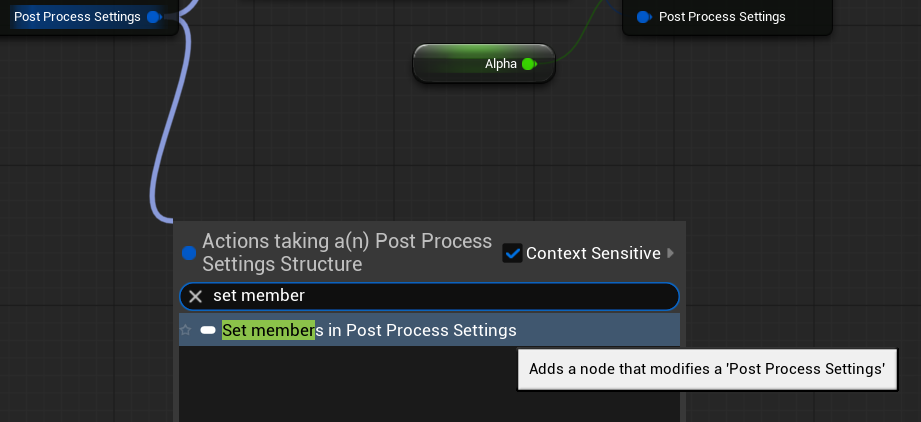
We are also using Alpha here to drive the blend weight. This means you will see the vignette post-process effect smoothly interpolate when the Aim modifier is active.
Camera modifiers can be used for dynamic camera and post-process changes during gameplay. In C++, they can also assist with specific camera modes, handling things like collisions and final camera output.
Player Hands Skel Mesh
To use procedural animations with the Animation Blueprint, we need a Skeletal Mesh for the player’s hands. There are many ready-made FPS hands or TPP models available. For this example, I won’t use visible hands — only the weapon will be shown. However, the Skeletal Mesh will still drive several important effects:
- Leaning: When the camera moves, the weapon will lean based on its rotation.
- Recoil: Shooting will trigger a simple procedural recoil animation.
- Idle animation: A subtle, procedural “wavy” animation for the held weapon.
- Reloading: Procedural animation to hide/show the weapon during reload.
- Aiming: Similar to reloading, but for changing the weapon’s position when aiming.
All of these effects can be achieved by driving the bone transforms of the hands Skeletal Mesh.
Assign Skel Mesh
Open STGameplayPlayerPawn and create two Skeletal Mesh Components:
- Hands_Right,
- Skel Mesh: SkeletalCube (it’s from the engine content, simple cube)
- Visible: false
- Location (10, 10, -20)
- Hands_Left,
- the same as the right one,
- Location (10, -10, -20)
- Component Tag -> LeftHand. This is critical as we need to know which hand is which in other places, (like Anim Blueprint)
Attach both components to the STPlayerCameraComp, so they move with the camera.
Next, add placeholder weapon meshes for testing. Create two Static Mesh Components:
- SM_WeaponPlaceholder_Right
- Location: (0,0,0)
- Mesh: GizmoArrowHandle – from engine content,
- Attached to Hand_Right,
- No Collision,
- SM_WeaponPlaceholder_Left
- Same as above, but attached to Hands_Left
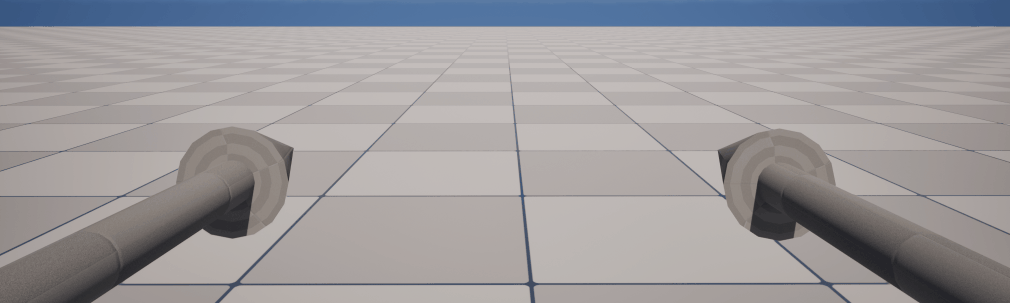
You should now have the components set up like this:
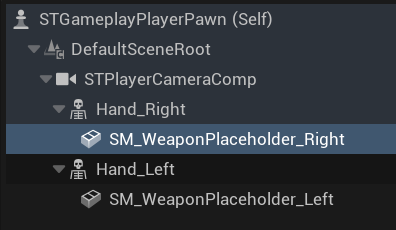
Two invisible skeletal meshes for hands attached to the camera, each with a placeholder static mesh weapon attached.
Make sure to attach both Hands_Right and Hands_Left components to the parent’s Bone01 socket! Without this, they won’t update their position properly.

After selecting the socket, you’ll need to adjust the rotation as well because the static mesh will now use the bone’s location and rotation. Set the Yaw to 90 degrees.
When you hit play, you’ll see the two meshes attached to the camera—looking a bit weird for now.
Later, when you add player hands, this is the place where you’ll want to attach your weapon mesh to the hand’s socket.
Anim Blueprint
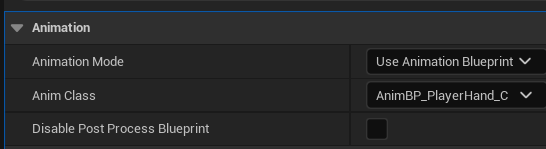
Create a new Animation Blueprint based on the Editor Cube Skeleton and name it AnimBP_Player. Then assign this Anim Blueprint to both your Left and Right hand Skeletal Mesh components.
Now open the Anim Blueprint and let’s start by adding a bunch of variables.
Idle Category
- IdleFinalLoc (Vector) — Computed location for bone transform
- IdleFinalRot (Rotator) — Computed rotation for bone transform
- IdlePickedRandomRot (Rotator) — Random target rotation for idle movement
- IdlePickedRandomLoc (Vector) — Random target location for idle movement
- IdlePickedNewRand (Bool) — Helper flag indicating if new random targets were picked
Idle animations will use simple sine function that periodically pick new random location and rotation targets to smoothly interpolate toward.
Aim Category
- bForceAim (Bool) — Placeholder to trigger aiming; controlled later by weapon logic
- bIsInAim (Bool) — Indicates if the player is currently aiming (used by the Anim Blueprint)
- InAimAlpha (Float) — Smooth blend factor for aiming transitions
- AimLocation (Vector) — Target position offset for aiming
- AimRotation (Rotator) — Target rotation offset for aiming
- AimIdleMultiplier (Float) — Scale factor to reduce idle animation intensity while aiming
Aiming will simply offset bones toward specific transforms to reflect aiming pose.
Reload Category
- bReloading (Bool) — Whether the weapon is currently in the reload state
- ReloadingAlpha (Float) — Interpolation factor for reloading animation
- ReloadLocation (Vector) — Target location offset for reload animation
- ReloadRotation (Rotator) — Target rotation offset for reload animation
- bDebugForceReloading (Bool) — Temporary debug flag to trigger reload animation manually
Reload animation works like aiming — offsetting bones to predefined transforms.
Lean Category
- LeanPrevRot (Rotator) — Rotation from the previous frame for smoothing
- LeanAmount (Rotator) — Current lean rotation offset
- LeanAmountInverted (Rotator) — Inverted lean rotation (reserved for future use)
Leaning makes the bones lag behind the control rotation for a natural feel; easy to build upon later.
Recoil Category
- RecoilGoBackTime (Float) — Duration to return from recoil pose
- bInRecoil (Bool) — Whether recoil is currently active
- RecoilBlendIn (Float) — Speed of blending into recoil pose
- RecoilBlendOut (Float) — Speed of blending out of recoil pose
- RecoilLocation (Vector) — Bone offset position for recoil
- RecoilRotation (Rotator) — Bone offset rotation for recoil
- RecoilAimMultiplier (Float) — Scale factor to reduce recoil while aiming
- RecoilAccumulatedTime (Float) — Time accumulator to limit recoil duration
- bRecoilUseRemainingSpreadAsBlendOut (Bool) — Placeholder for future integration with weapon spread system
Lastly add two variables to Default category:
- BaseLocation (Vector) — Base bone location for the weapon
- BaseRotation (Rotator) — Base bone rotation for the weapon
Most of these variables will be configured individually for each weapon. For example, a shotgun might have stronger recoil, while a sniper rifle could have a dedicated aim mode with different settings.
We don’t have weapon functionality implemented yet — that will come in the next chapter. For now, I just wanted to show you how much can be done purely inside the Animation Blueprint. And this is only the beginning of what’s possible with procedural animation!
Implementing Idle
First, we need a function to pick a new random location and rotation for the idle animation. Create a new function inside the Animation Blueprint and name it PickNewIdleLoc.
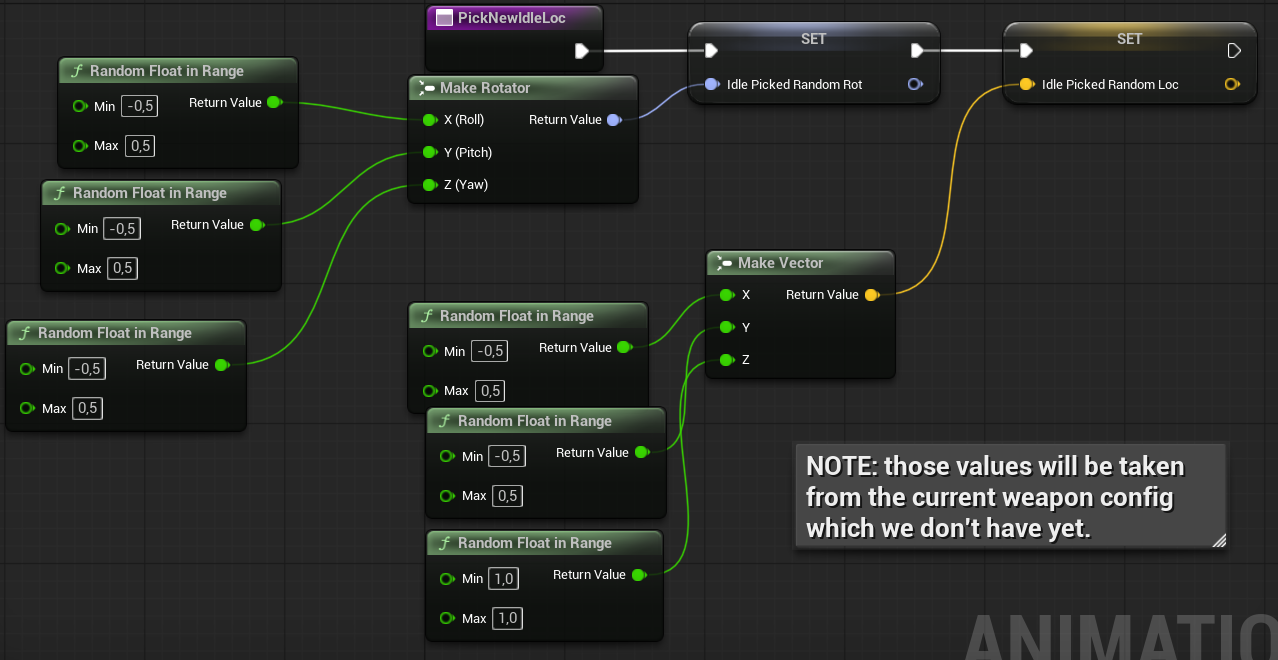
These values represent the maximum offsets allowed in the idle animation. Later, each weapon can have its own configuration.
Next, create a function to update the idle animation. Name this function UpdateIdle, and add one input parameter:
- Delta Time (float)
Inside this function, create two local variables:
- LocIdleAlpha (float) — stores a computed sine value that oscillates between 0 and 1
- LocNeedToPickNewRand (bool) — signals when it’s time to pick new random location and rotation values
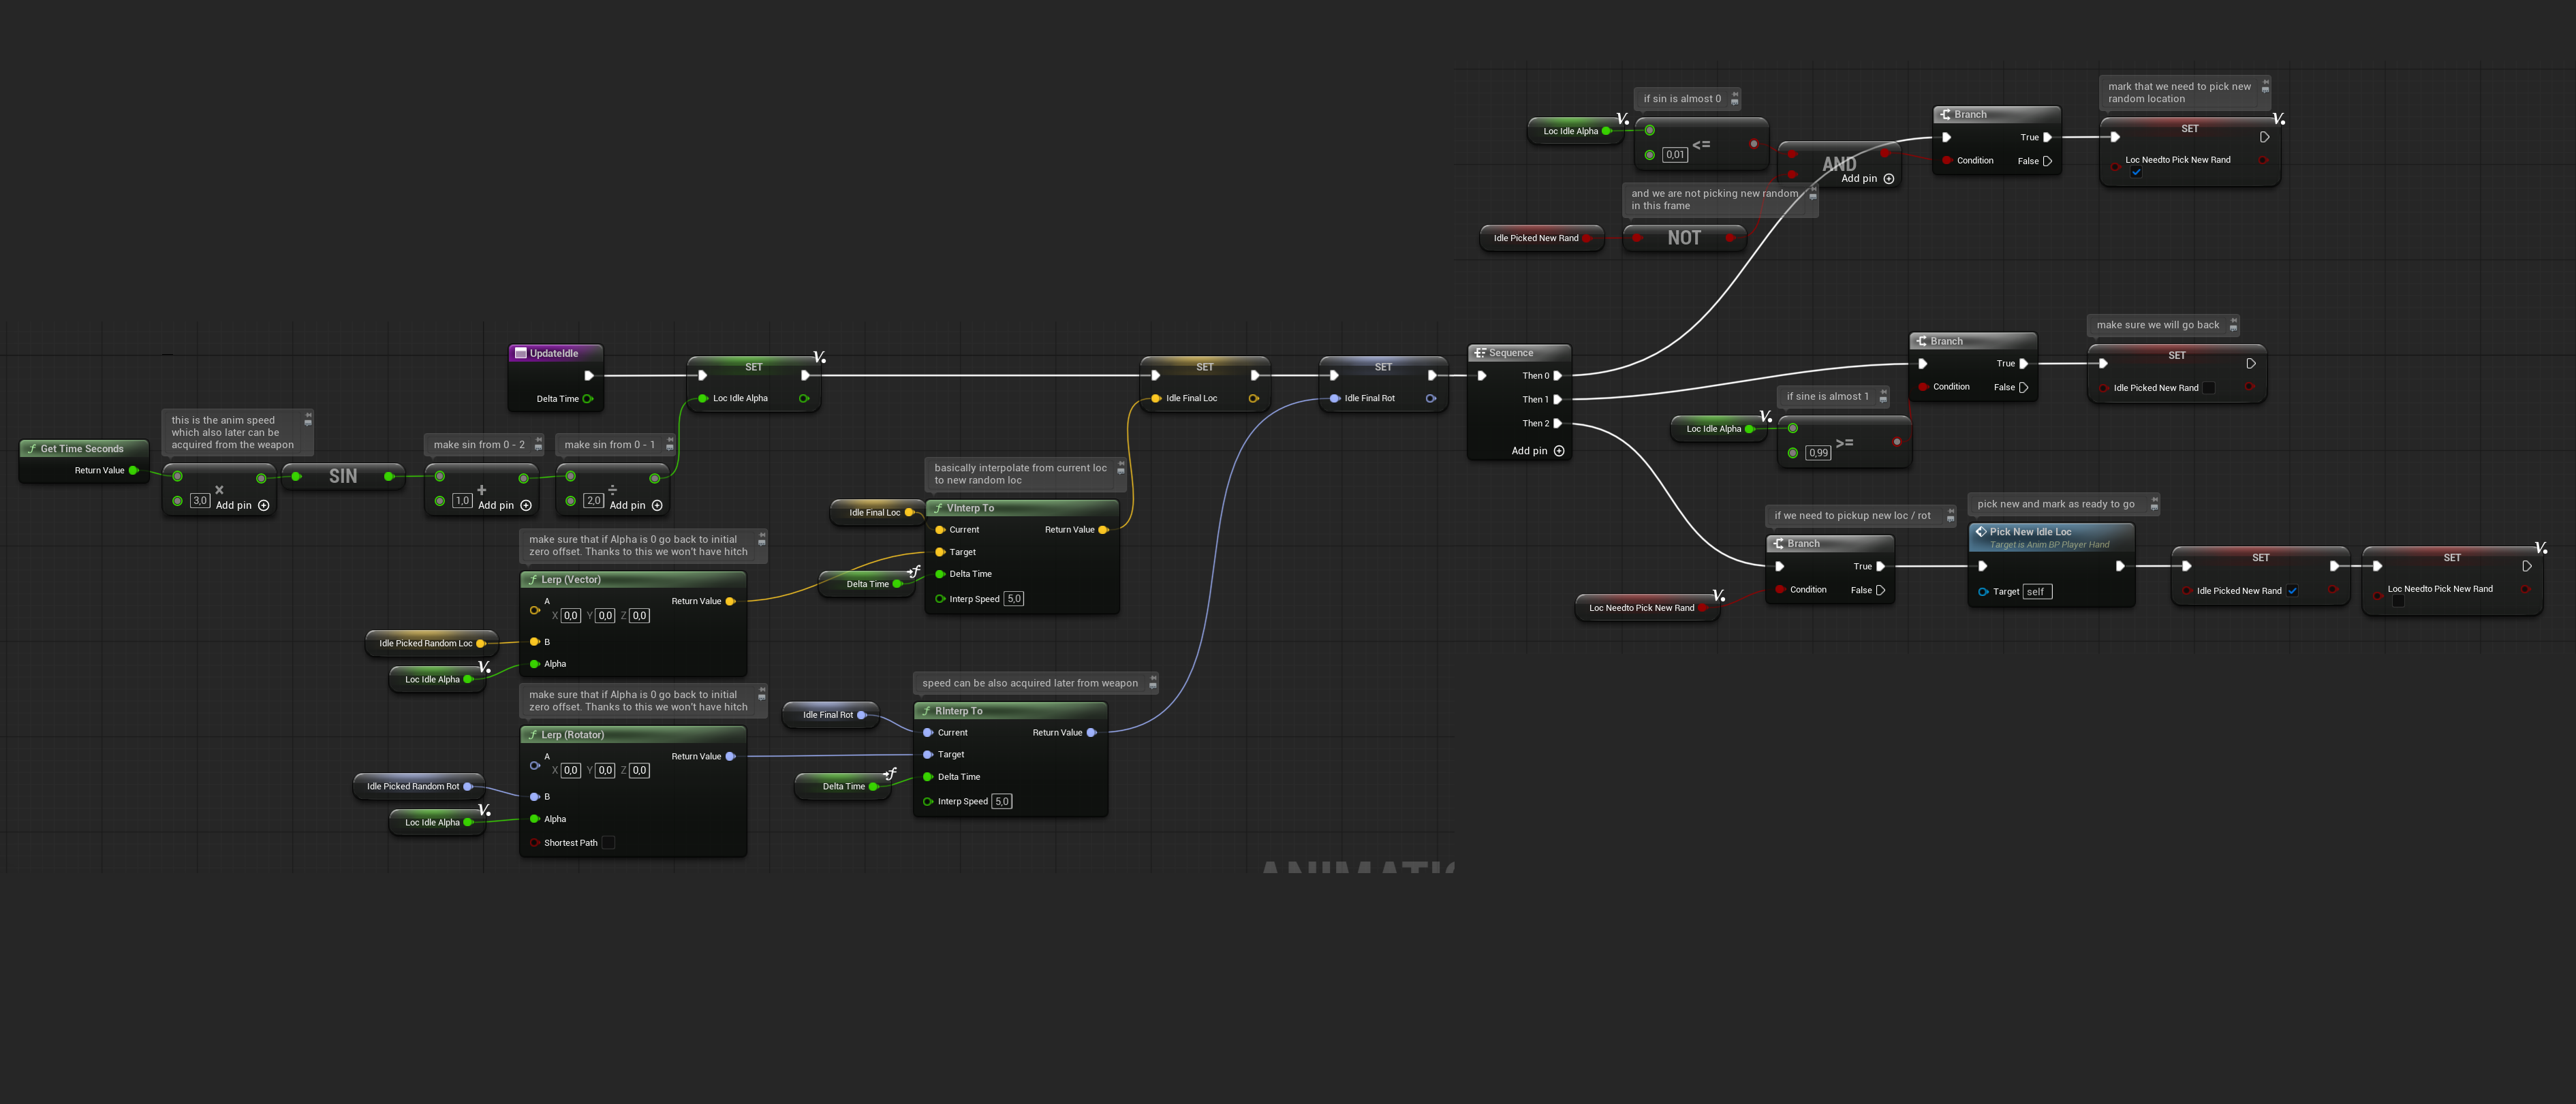
I’ve added comments inside the function to explain the logic. It’s pretty straightforward: the idle alpha goes from 0 to 1, and when it gets close to 0, it picks a new random location and rotation. This prevents any sudden jumps and makes the animation look natural.
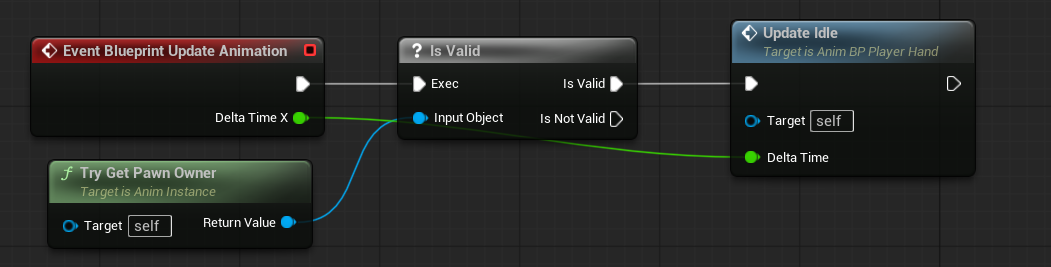
Next, go to the Event Graph and call the UpdateIdle function every frame using the Blueprint Update Animation event.
Now, in the AnimGraph, add a Transform Bone node.
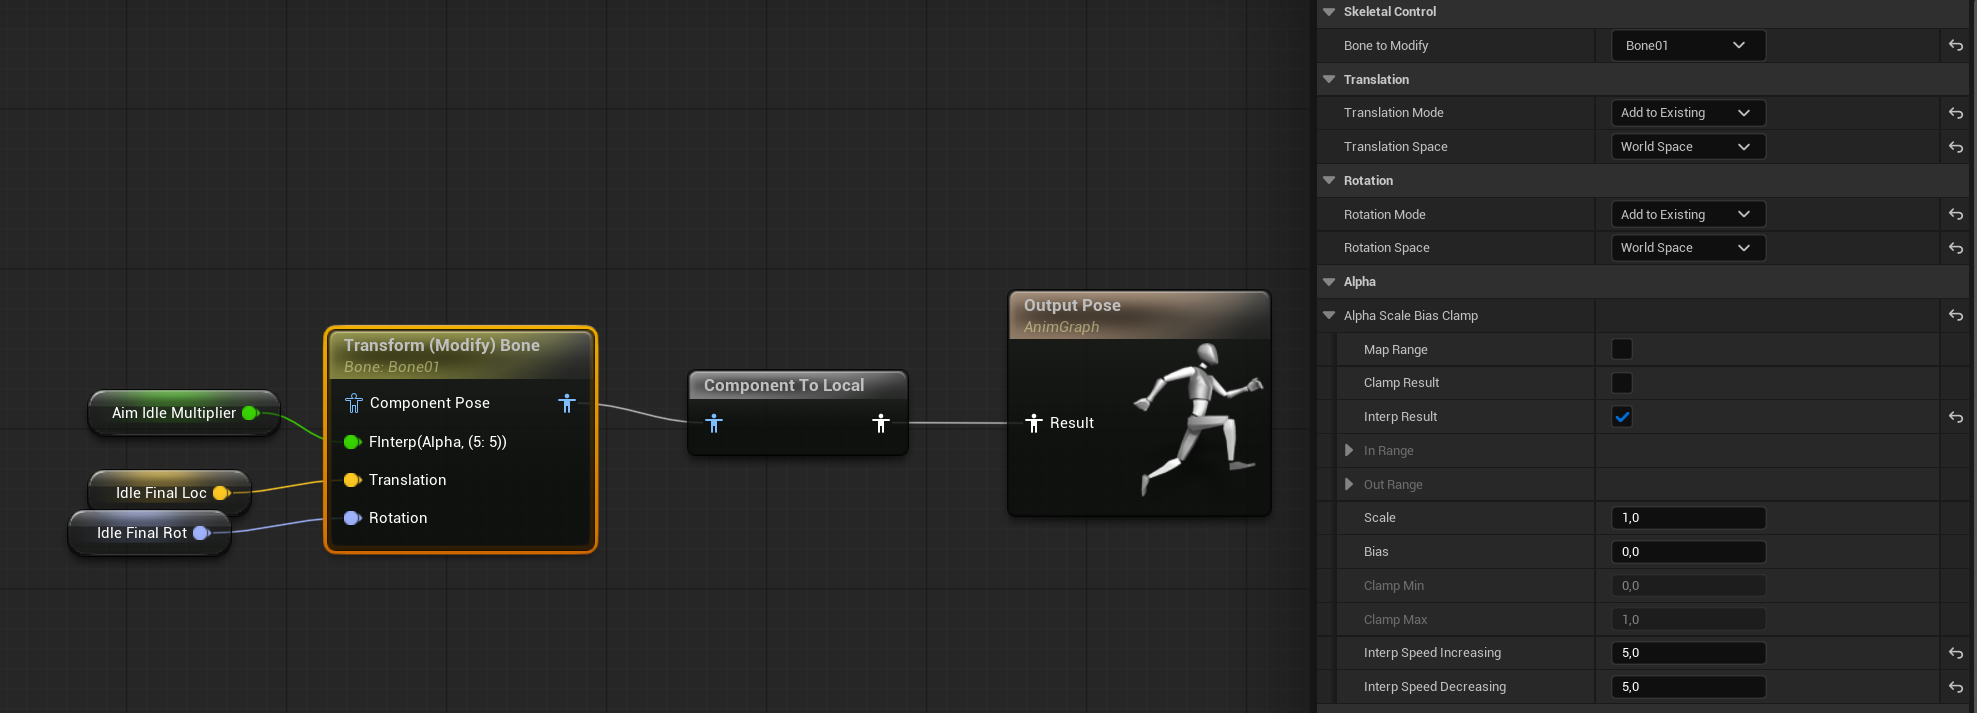
This will add a delta to the position and rotation of the Bone01, smoothly interpolating the result.
When you hit play, you should see your weapons subtly moving.
Lean Implementation
Create a new function named UpdateLean with one input parameter:
- Delta Time (float)
Inside the function, add one local variable:
- LeanDelta (Rotator)
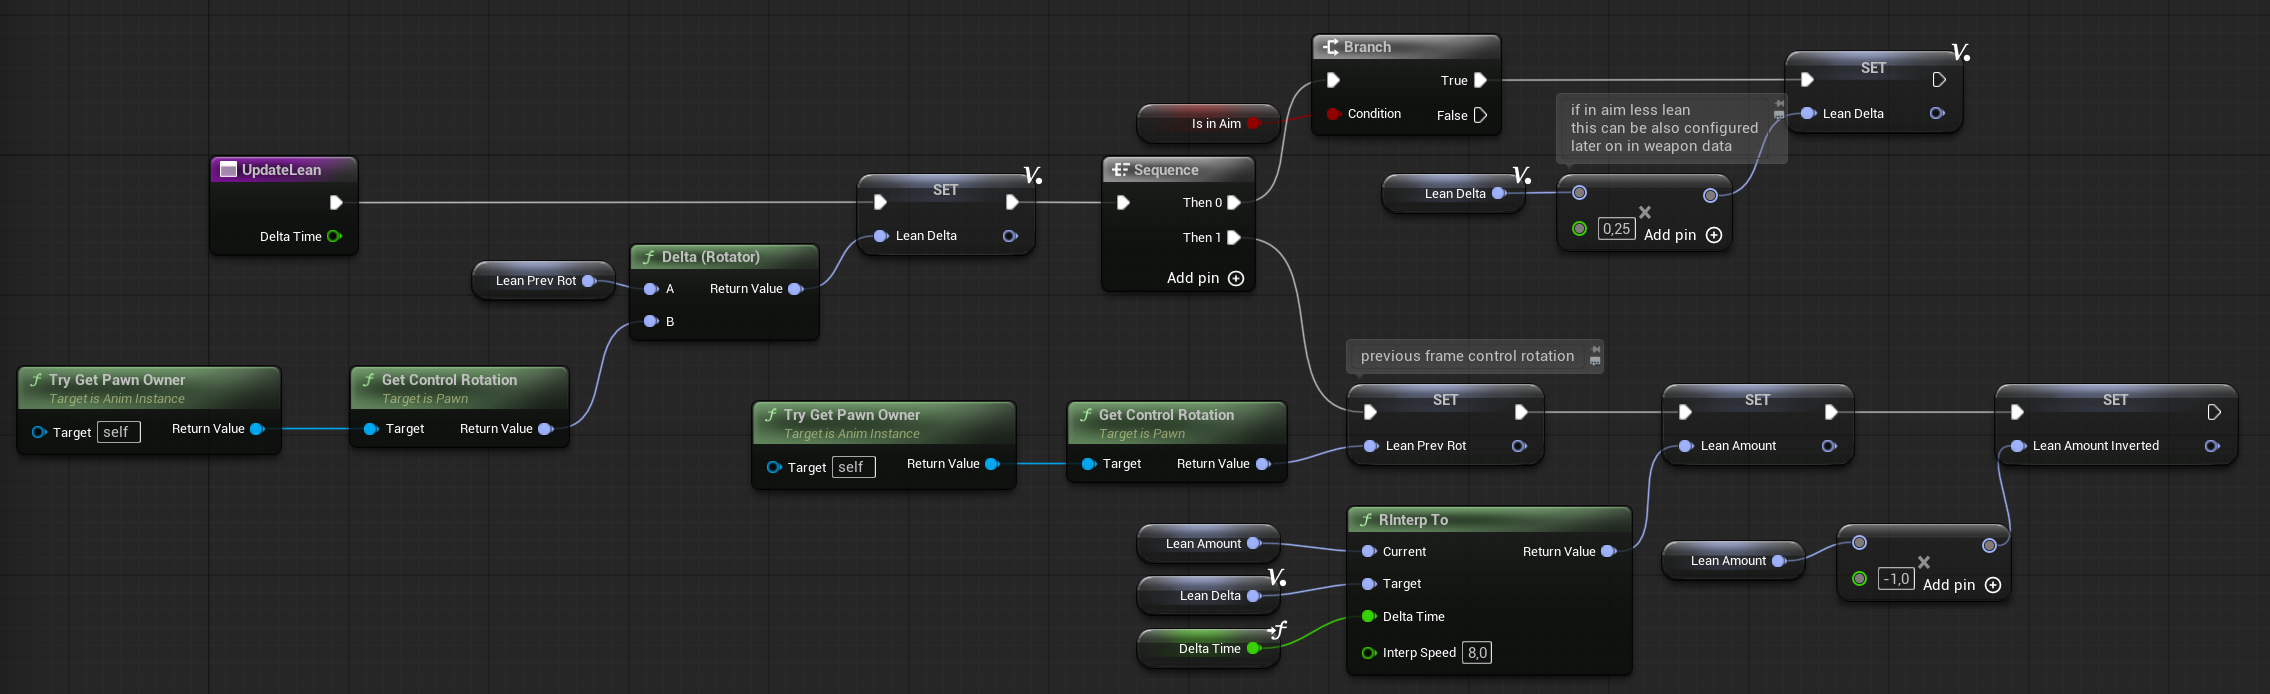
The UpdateLean function is straightforward — it interpolates the rotation between the previous frame and the current frame. This creates a smooth lag effect for the weapon, making camera rotation feel more natural.
Add the UpdateLean function call to the Update Animation event, alongside the UpdateIdle function you added earlier.
Finally, in the Anim Graph, add another Transform Bone node to apply the lean effect.

When you hit play, you should see your weapons smoothly leaning in response to the camera’s rotation.
Aim Implementation
Create a new function named ConfigureLocations — this will serve as our configuration function for when we equip weapons later on. For now, use hardcoded data inside the function just to test the setup.
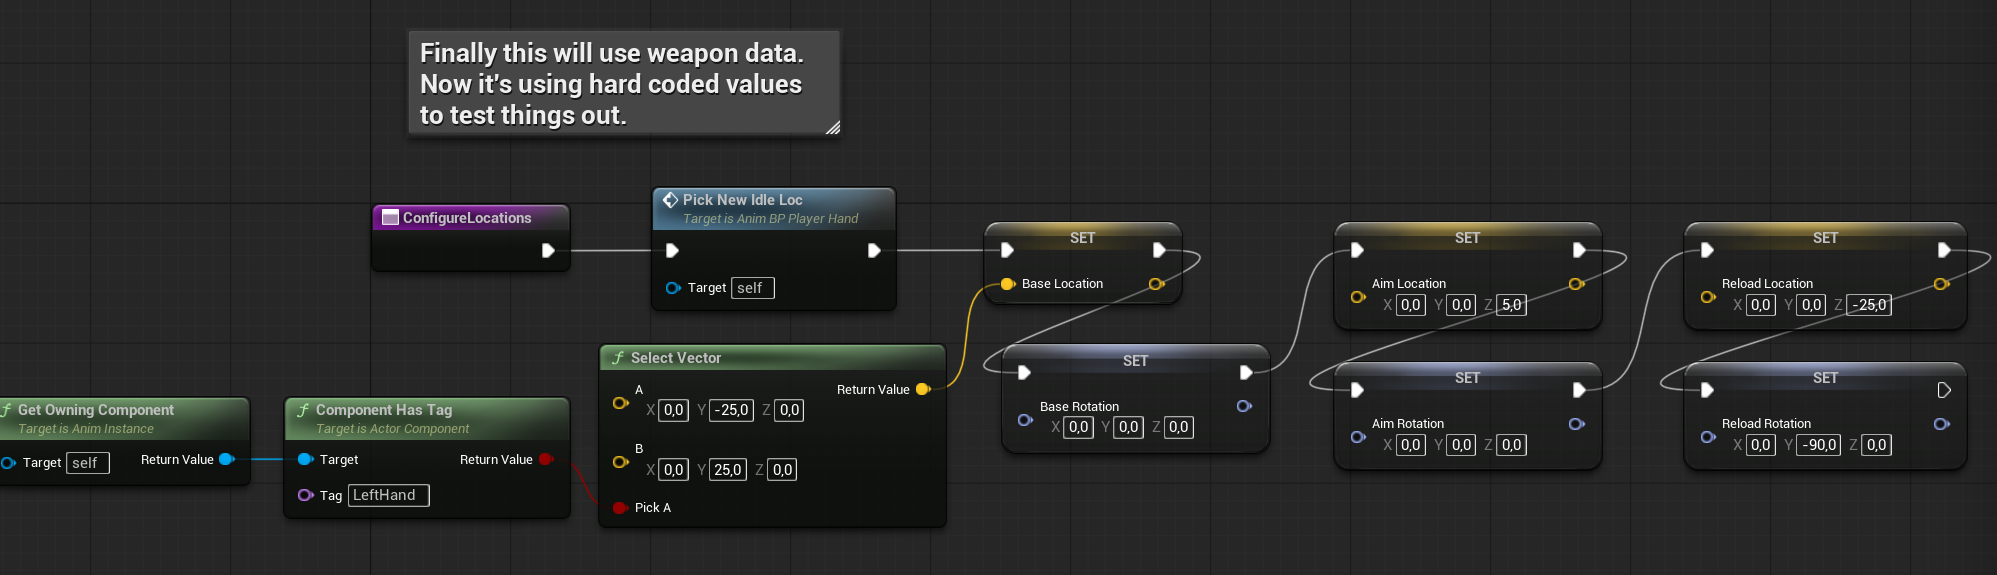
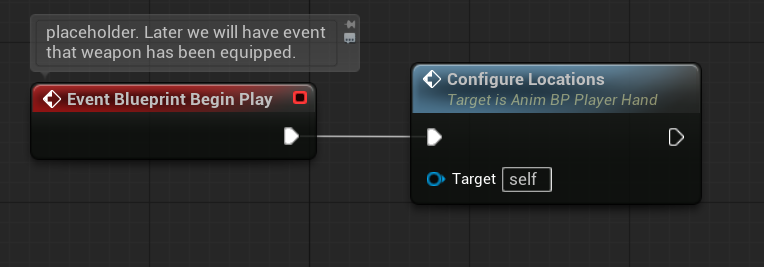
n the Event Graph, add the Event Begin Play node and connect it to call the ConfigureLocations function. This will ensure your initial configuration runs as soon as the animation blueprint starts.
This way, we have our defaults set up, and we can now move on to implementing the Aim functionality.
Create a new function called SetInAim with one input parameter:
- ForceAim (bool)
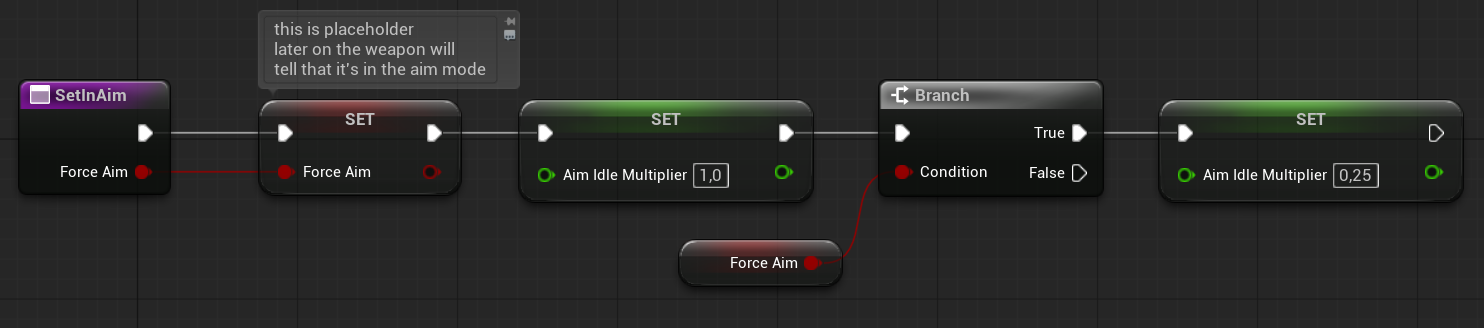
This function will be called whenever the weapon enters aim mode. Since we don’t have the weapon class implemented yet, it will use some placeholder values for now.
Next, create another function named UpdateAim.
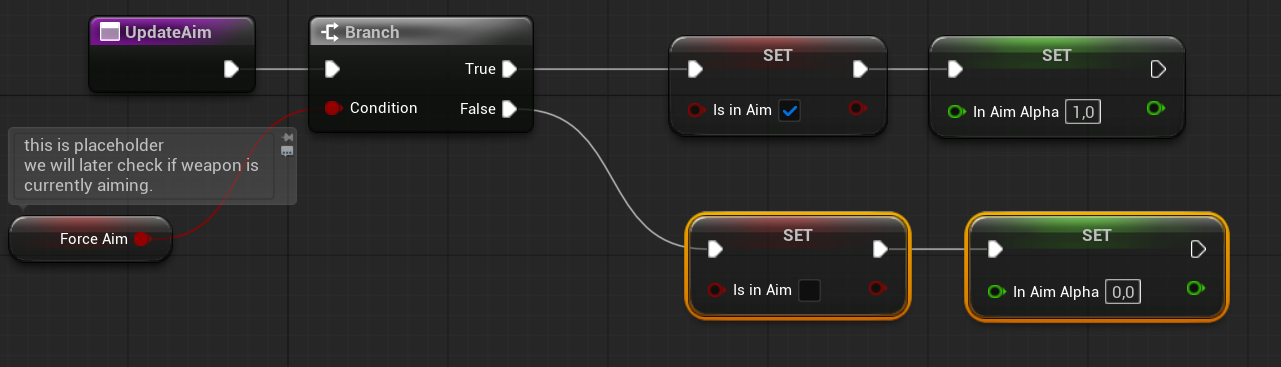
Call UpdateAim from Blueprint Update Animation, just like we did earlier with UpdateIdle and UpdateLean.
Next, open the Anim Graph and add two separate poses to handle Aim and No Aim states. This will allow the animation to switch smoothly between aiming and normal stance.
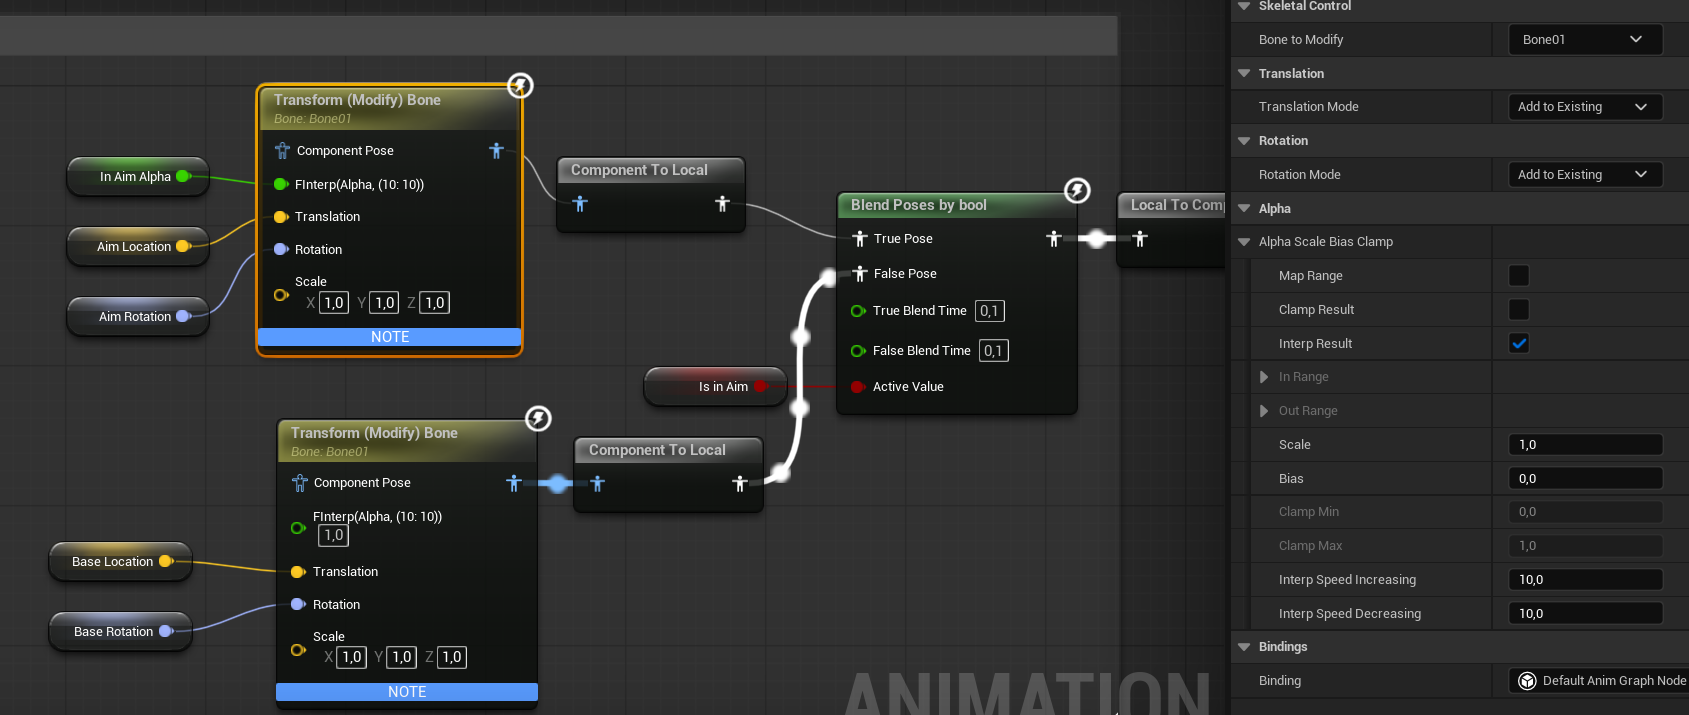
This setup chooses between the Base and Aim locations depending on whether we are in Aim mode or not — simple as that. But now, we need a way to trigger the aim.
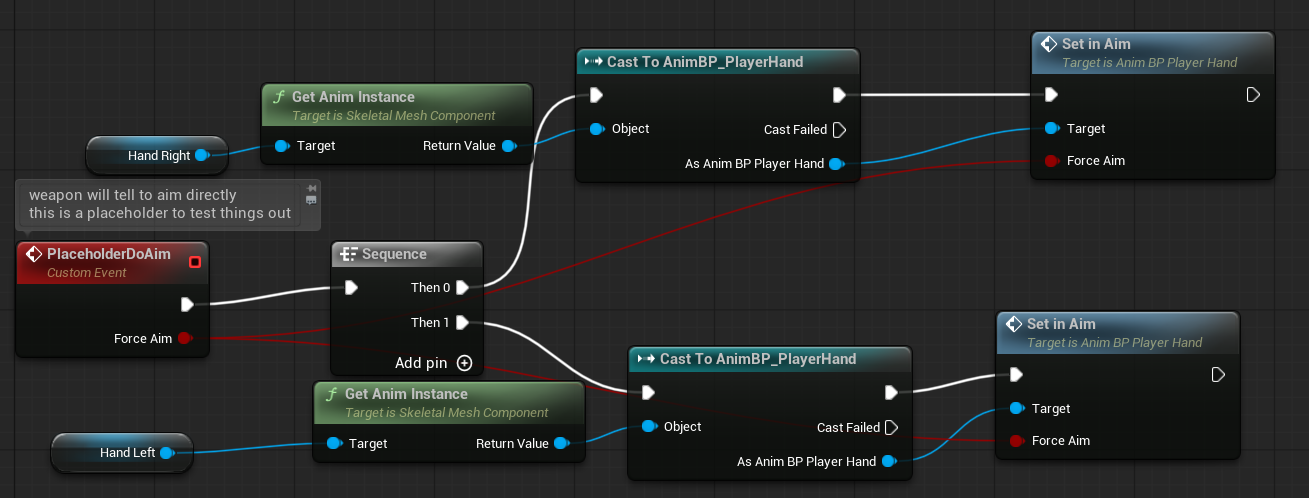
Open your player pawn (STGameplayPlayerPawn) and create a new event called PlaceholderDoAim with one input:
- ForceAim – (bool)
In the Player Controller, create two variables:
- bPlaceholderIsAiming (bool)
- bPlaceholderIsReloading (bool)
These variables will store our placeholder state information and will be passed to the Animation Blueprint from the Player Controller. Eventually, this will be handled differently, with the Weapon class managing these states and communicating directly with the Anim Blueprint.
Next, use the IA_Secondary input action event and call the PlaceholderDoAim function on the Pawn to toggle aiming.
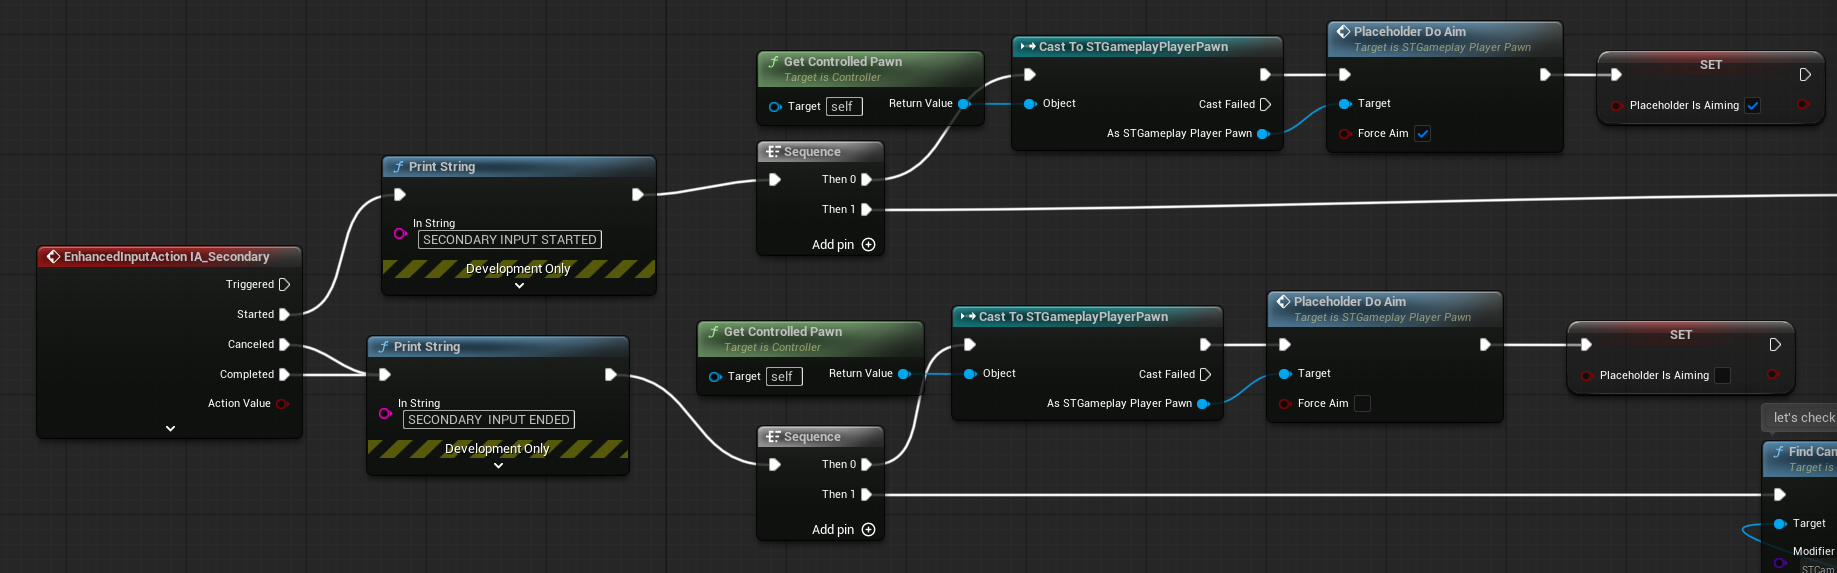
When you play, pressing the right mouse button will start aiming.
Reload Implementation
Go back to the Anim Blueprint and create a new function named UpdateReloading.
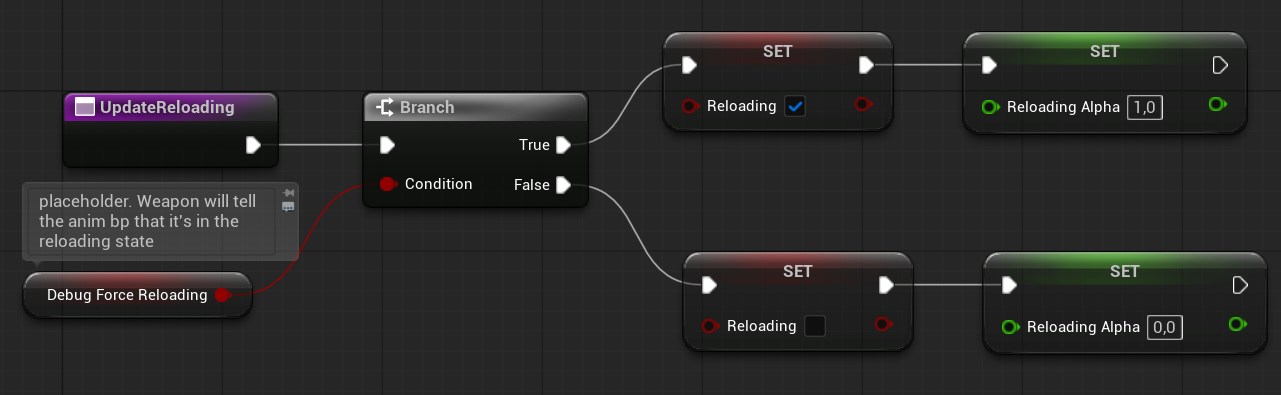
Also, add this function to the Blueprint Update Animation event where the other update functions are called.
Then, in the AnimGraph, add another Transform Bone node.
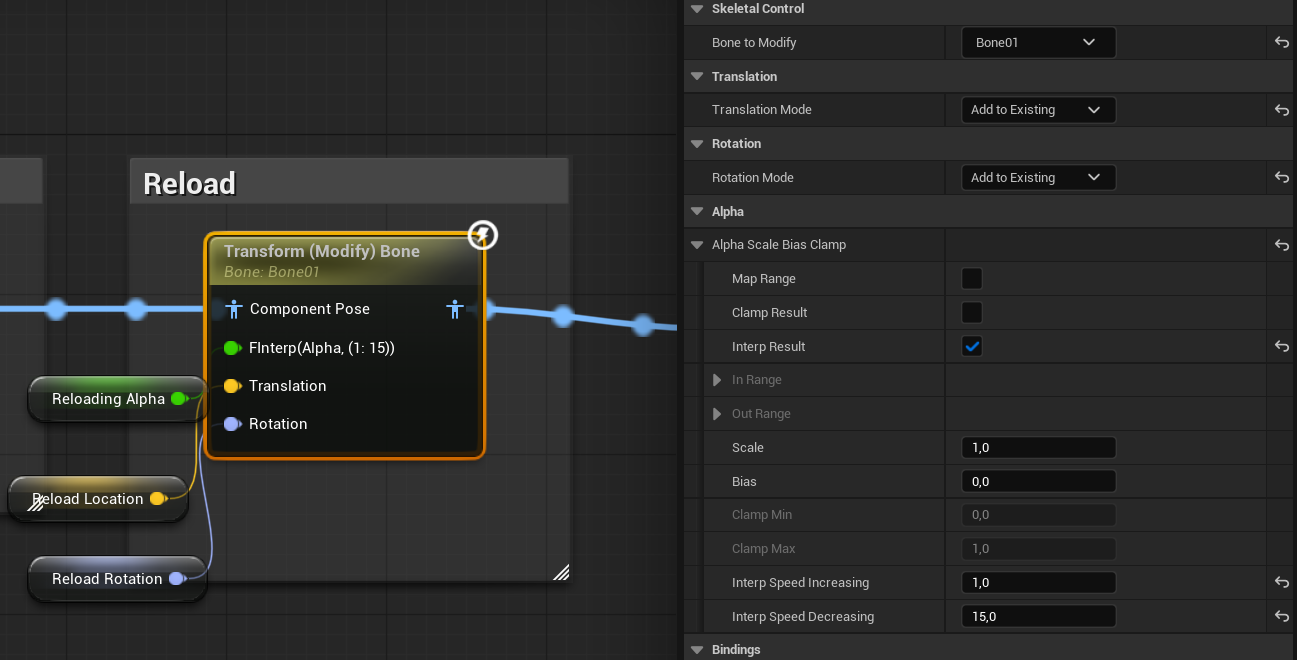
It should be straightforward from here. Always keep an eye on the interpolation speeds in the nodes (on the right side of the screen).
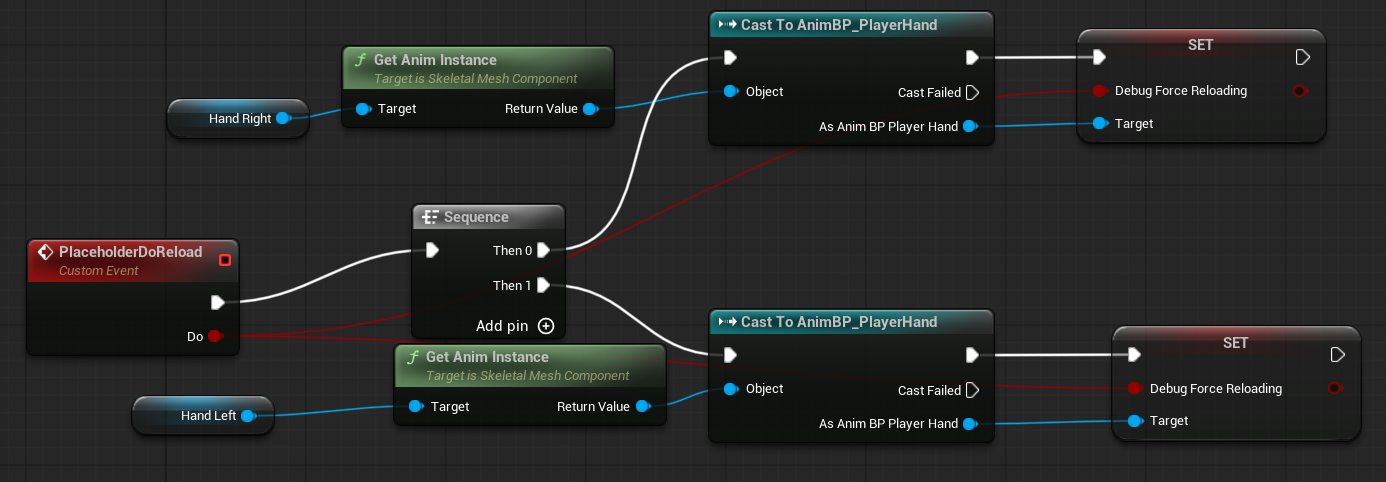
Just like with Aim, since we don’t have weapon functionality yet, we’ll pass placeholder data from the Player Controller → Pawn → Anim Blueprint.
In your Pawn, add a new event called PlaceholderDoReload with one input:
- Do (bool)
We don’t have an input action set up for reloading yet. We could add one, but for now, I’ll use a debug key to trigger reload instead.
Go to your Player Controller, open the input graph you created earlier, and add a debug key event for the R key.
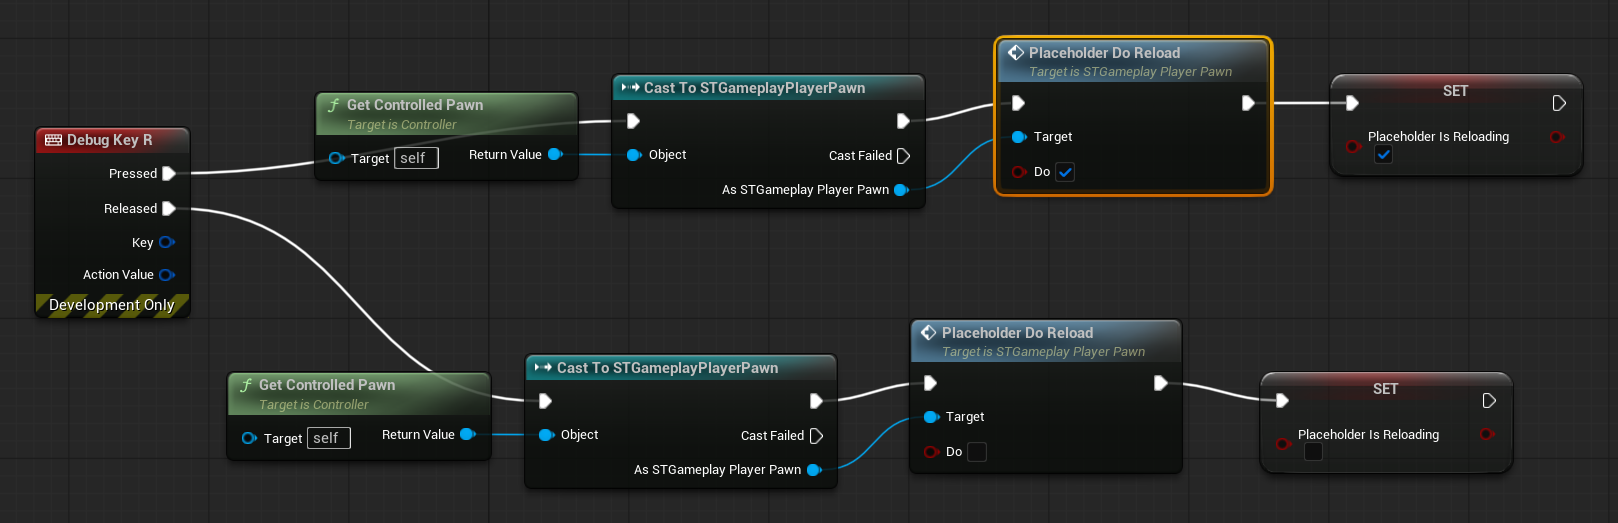
You can use this kind of implementation to quickly test and check things out.
Now, when you play, holding R will put the weapon into the reloading state.
However, there is one issue — while aiming, reloading doesn’t stop the camera modifier. Eventually, the camera modifier will be controlled directly by the weapon using simple events, but since we don’t have weapon functionality yet, we’ll fix this temporarily by using the Tick function in the Player Controller.
It’s not the preferred approach to handle this in Tick, but it works as a placeholder for now.
Basically, when we are reloading and still holding the Secondary action (aim), we will stop the Aim camera modifier.
Recoil Implementation
Go back to your Anim Blueprint and create a new function called SetInRecoil.
This is a fire-and-forget function used to trigger the procedural recoil animation.
Next, create another function named UpdateRecoil with one input parameter:
- Delta Time (float)
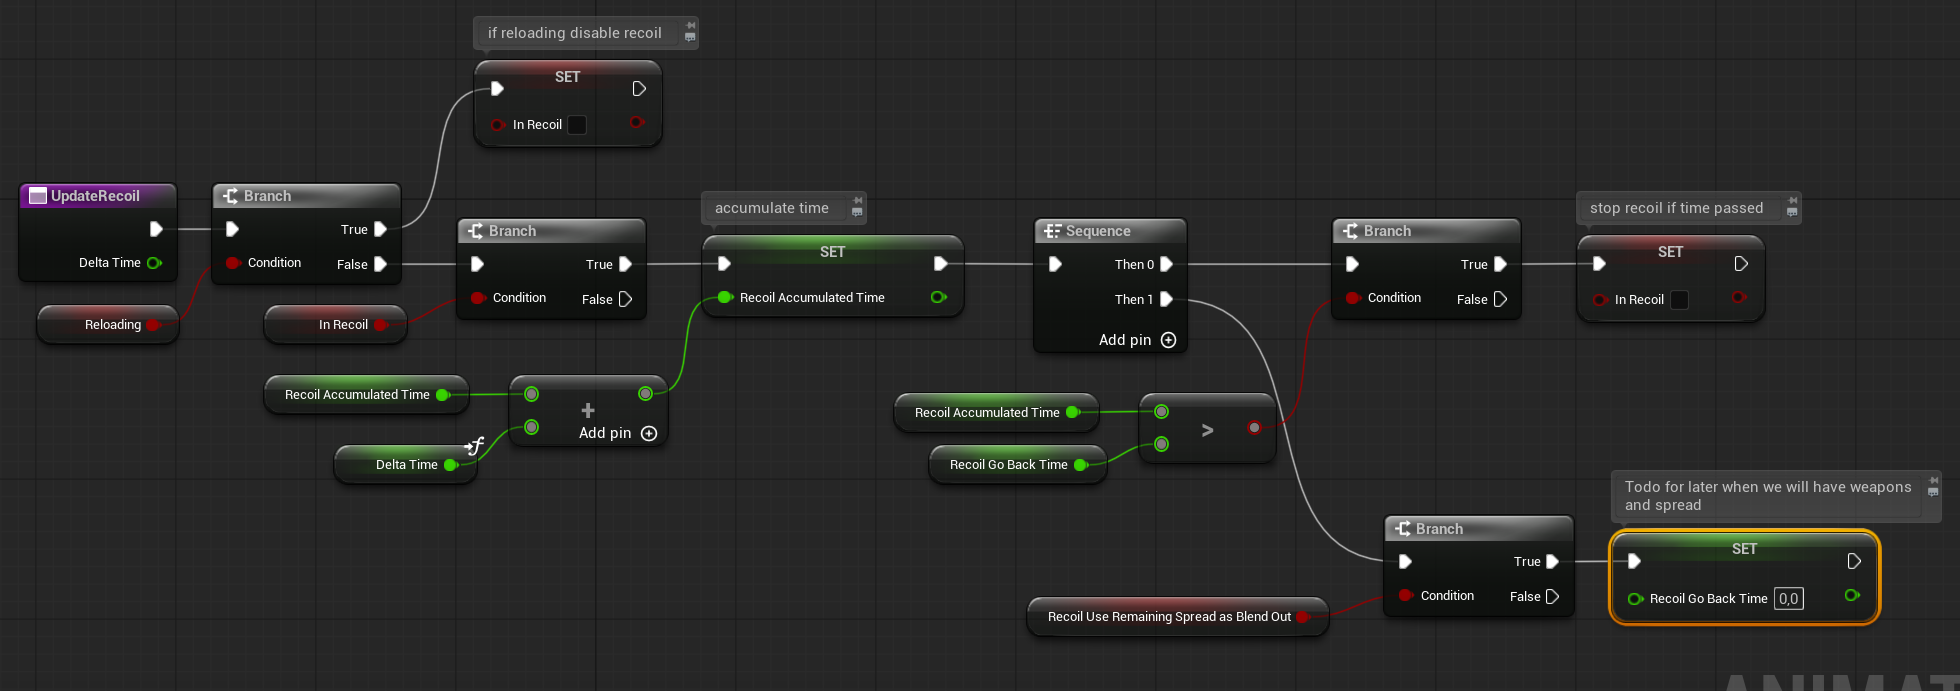
Add the UpdateRecoil function to the Blueprint Update Animation event, just like the other update functions.
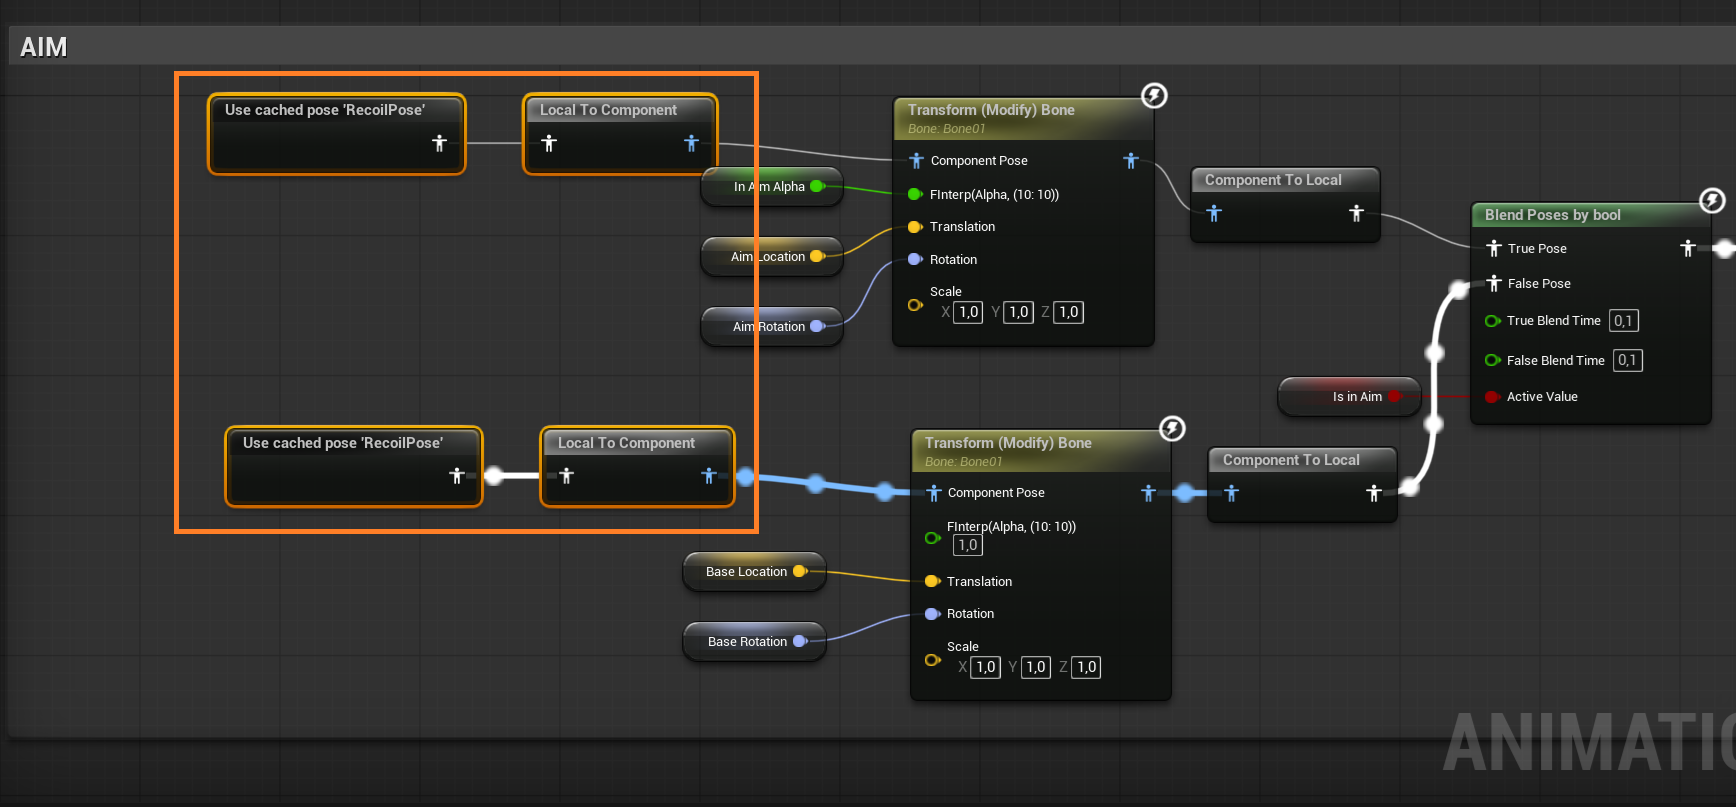
In the Anim Graph, use a bool blend pose node to blend the recoil animation.
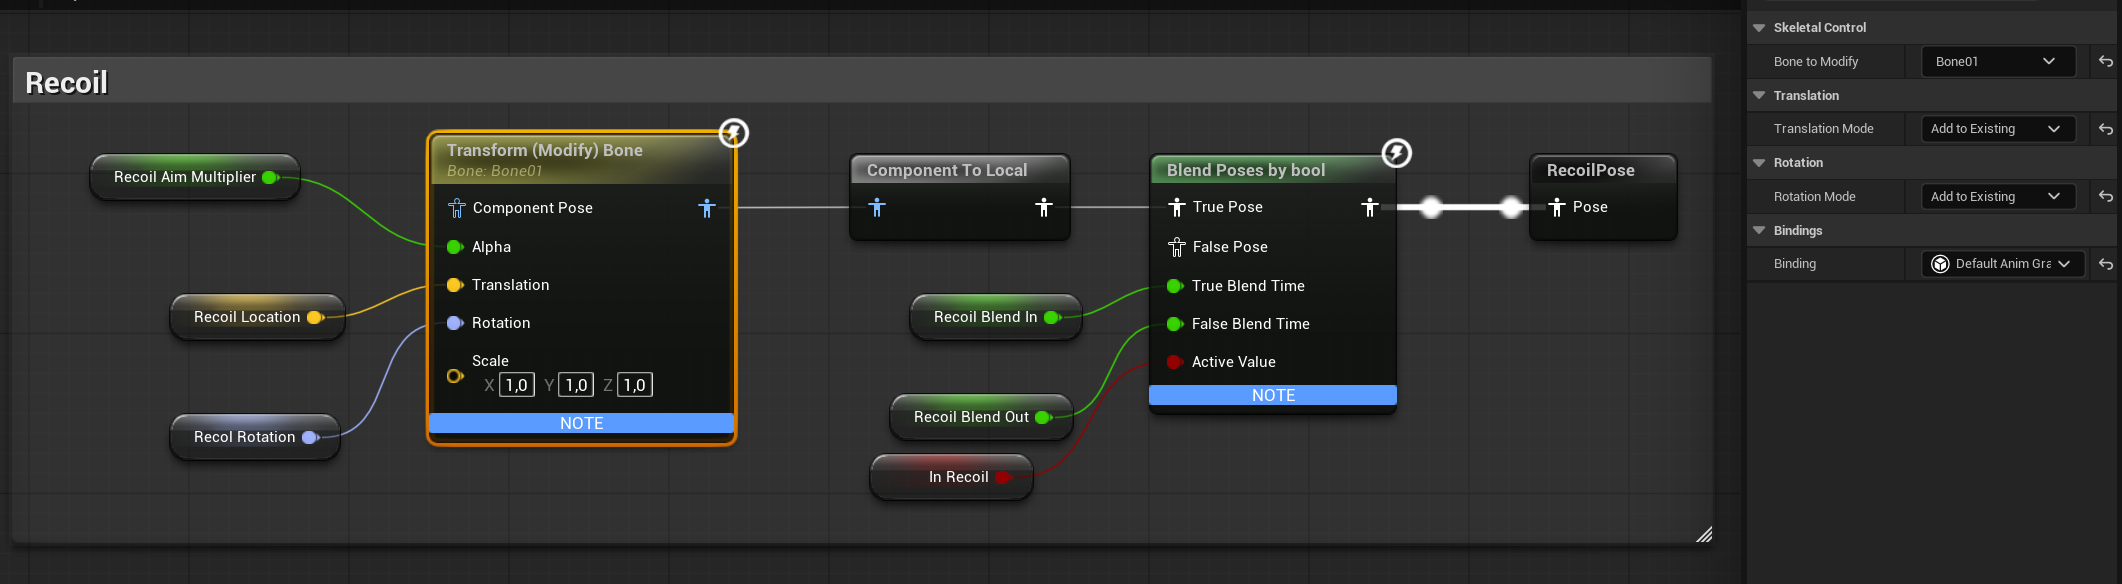
This time, we are using the cached pose functionality.
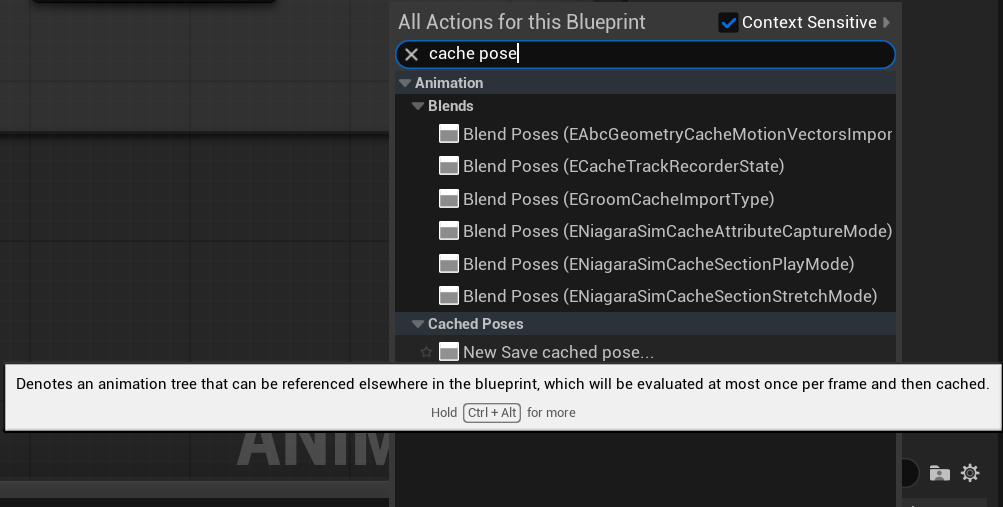
Thanks to this, we can use the cached pose multiple times in the graph, since it needs to be used in our previous blend poses controlled by the bool used for the Aim functionality.
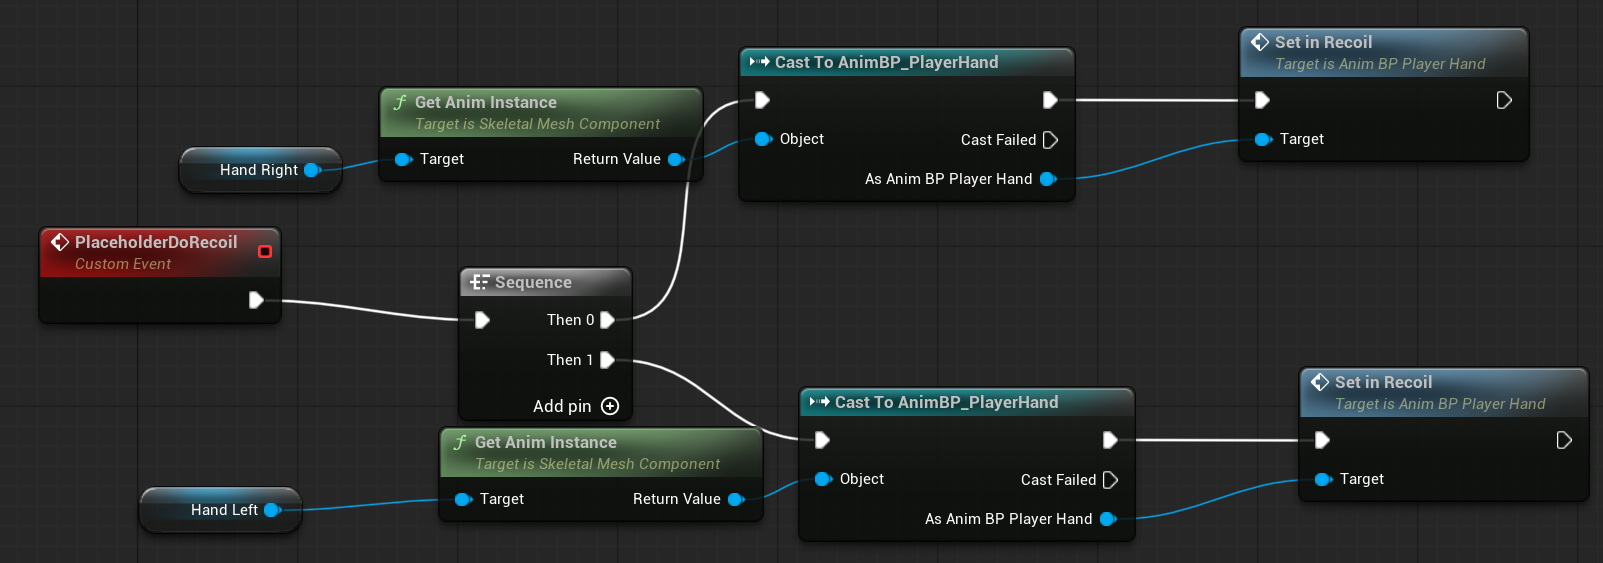
Like before, we need to pass the trigger from the Player Controller → Pawn → Anim Blueprint. This will again be a placeholder. Go to your Pawn and add a new event named PlaceholderDoRecoil.
Now, go to your Player Controller and use the primary input to trigger the recoil.
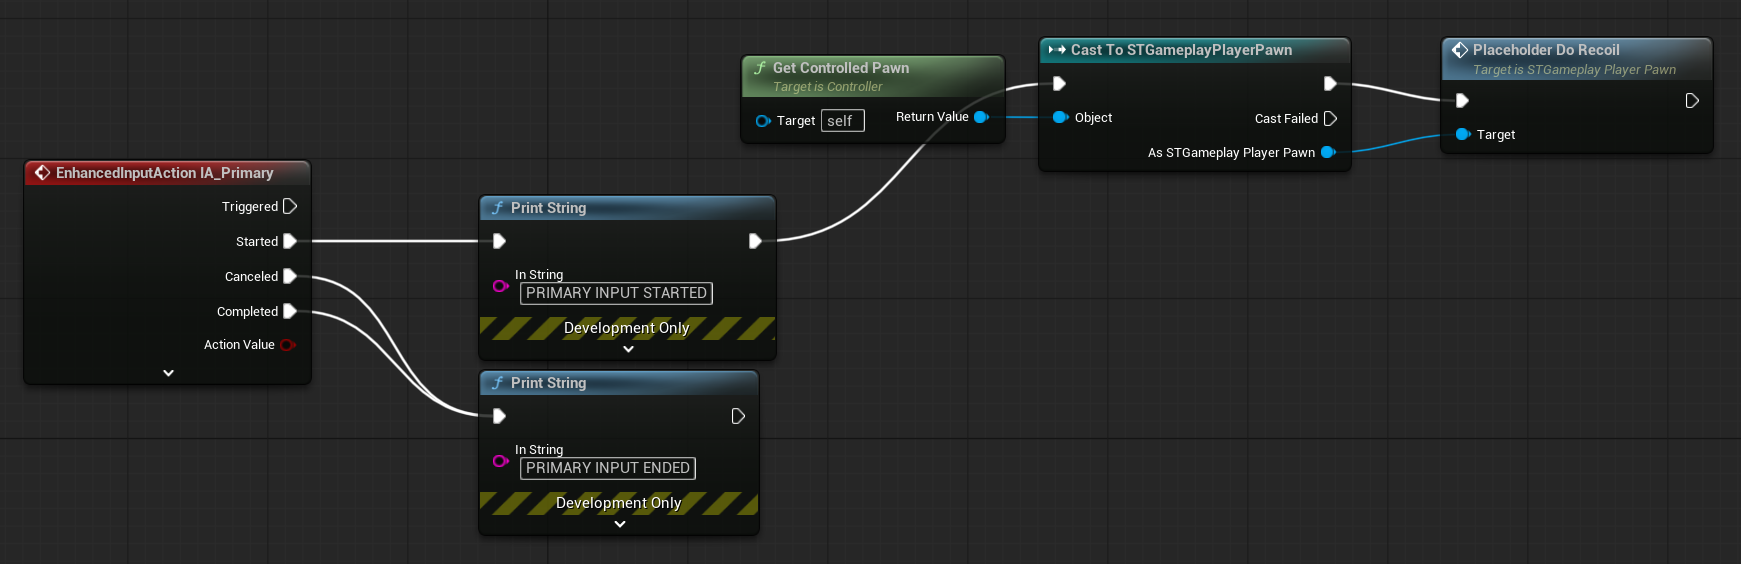
And now you should see the recoil in action.
Why use this approach?
First, it helps you learn the Animation Blueprint system, which will be useful later when you explore Control Rig. But more importantly, it encourages you to think outside the box — do you really need animations for everything? Can some effects be achieved procedurally or in a different way than you initially expect?
With this basic system, you can customize each weapon’s:
- On-screen position
- Recoil behavior
- Amount of lean
- Different aiming locations and effects
When your game has tons of weapons, this makes it much easier to differentiate them without constantly needing to coordinate with animators.
That’s all for this tutorial! Next up is the Weapon Mechanics.

Leave a comment