
Create a Small Game from Scratch Series: Endless Standing First-Person Shooter
Level: Beginner
Type: Blueprint
Version: 5.6
Download Project
In the last tutorial, we finished the damage indicators. This time, we’ll continue focusing on the audiovisual side by creating blood splatters.
Final Result
- Final Result
- Theory
- Data
- Splatter Decal Actor
- Splatter Decal Manager
- Splatter Spawning
- Decal Material
- Conclusion
Theory
As always, let’s start by analyzing what we want to achieve.

We will be implementing:
- Data to configure the splatter
- The ability to configure the splatter per bullet and per physics tag (e.g., flesh, oil, mud)
- A Decal Manager responsible for creating and pooling decals, added as a component to the player’s audiovisual actor
- A Decal Actor that holds the decal component and uses our material
- A function to spawn the decal, implemented using the Blueprint Function Library
- Decal spawning on weapon hit
- Decal spawning on infiltrator hit and ragdoll

Data
FDecalSplatterConfig. This struct holds the configuration for a blood (or surface) splatter.
| SupportedPhys | GameplayTagContainer | A container of gameplay tags representing physical surfaces supported by this splatter (e.g., Flesh, Mud, Oil). |
| Material | Material Interface Soft Reference | A soft reference to the decal material. This allows different materials to be used depending on the physical surface type. |
The PDA_BulletHitAudioVis contains an array of FDecalSplatterConfig, with at least one splatter already configured. It also provides a function which returns the appropriate splatter configuration for a given physical tag.
GetSplatterConfig (link)
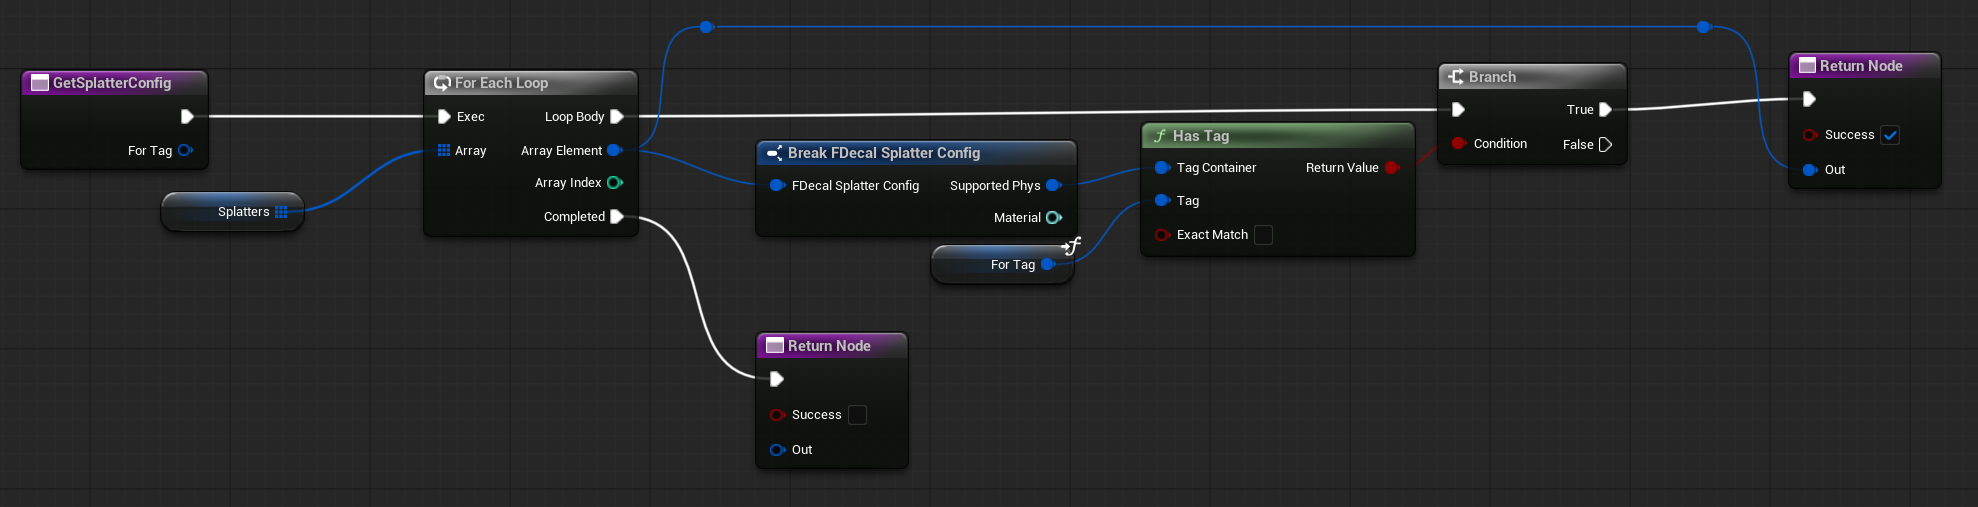
This allows us to query the PDA for the correct splatter settings based on the surface hit—something we’ve done similarly in earlier tutorials.
Splatter Decal Actor
There are many ways to implement splatter effects. For example:
- Using Niagara to spawn sprite-based splatters
- Using Niagara decal components with pooling (already supported by default)
- Or even doing it in screen space via post-process, which is something worth exploring in the future
However, since our pooling manager will differ from Niagara’s default system, we will use actors as the base for our decals. This approach gives us full control over how splatters behave and are managed.
Component Setup
We use a Scene Component as the root. This is important because the Decal Component applies a local offset—mainly due to the texture not being ideally prepared for this type of effect. (We’re reusing the same texture used for flesh impacts from the Shooter Example Project.)

Variables Overview
| MI_Decal | MaterialInstanceDynamic | Holds the dynamic material instance of the decal. This allows us to modify parameters at runtime. |
| MarkedForDeletion | bool | Indicates whether the decal is in the process of being hidden. Used during fade-out or cleanup animations. |
| SoftMaterialToUse | Material Interface Soft Reference | A soft reference to the current material used by this decal. This can be swapped out if needed, depending on the surface type or effect. |
| OnDecalDeactivated | Dispatcher with one BP_SplatterDecal (self) input | Will be called when the decal finishes its hiding animation and will be captured by the pooling manager. |
Functions Overview
OnPoolCreated.
This function is called when the actor is created by the pooling system. Currently, it simply calls ReleasedFromPool() to initialize the actor’s state.
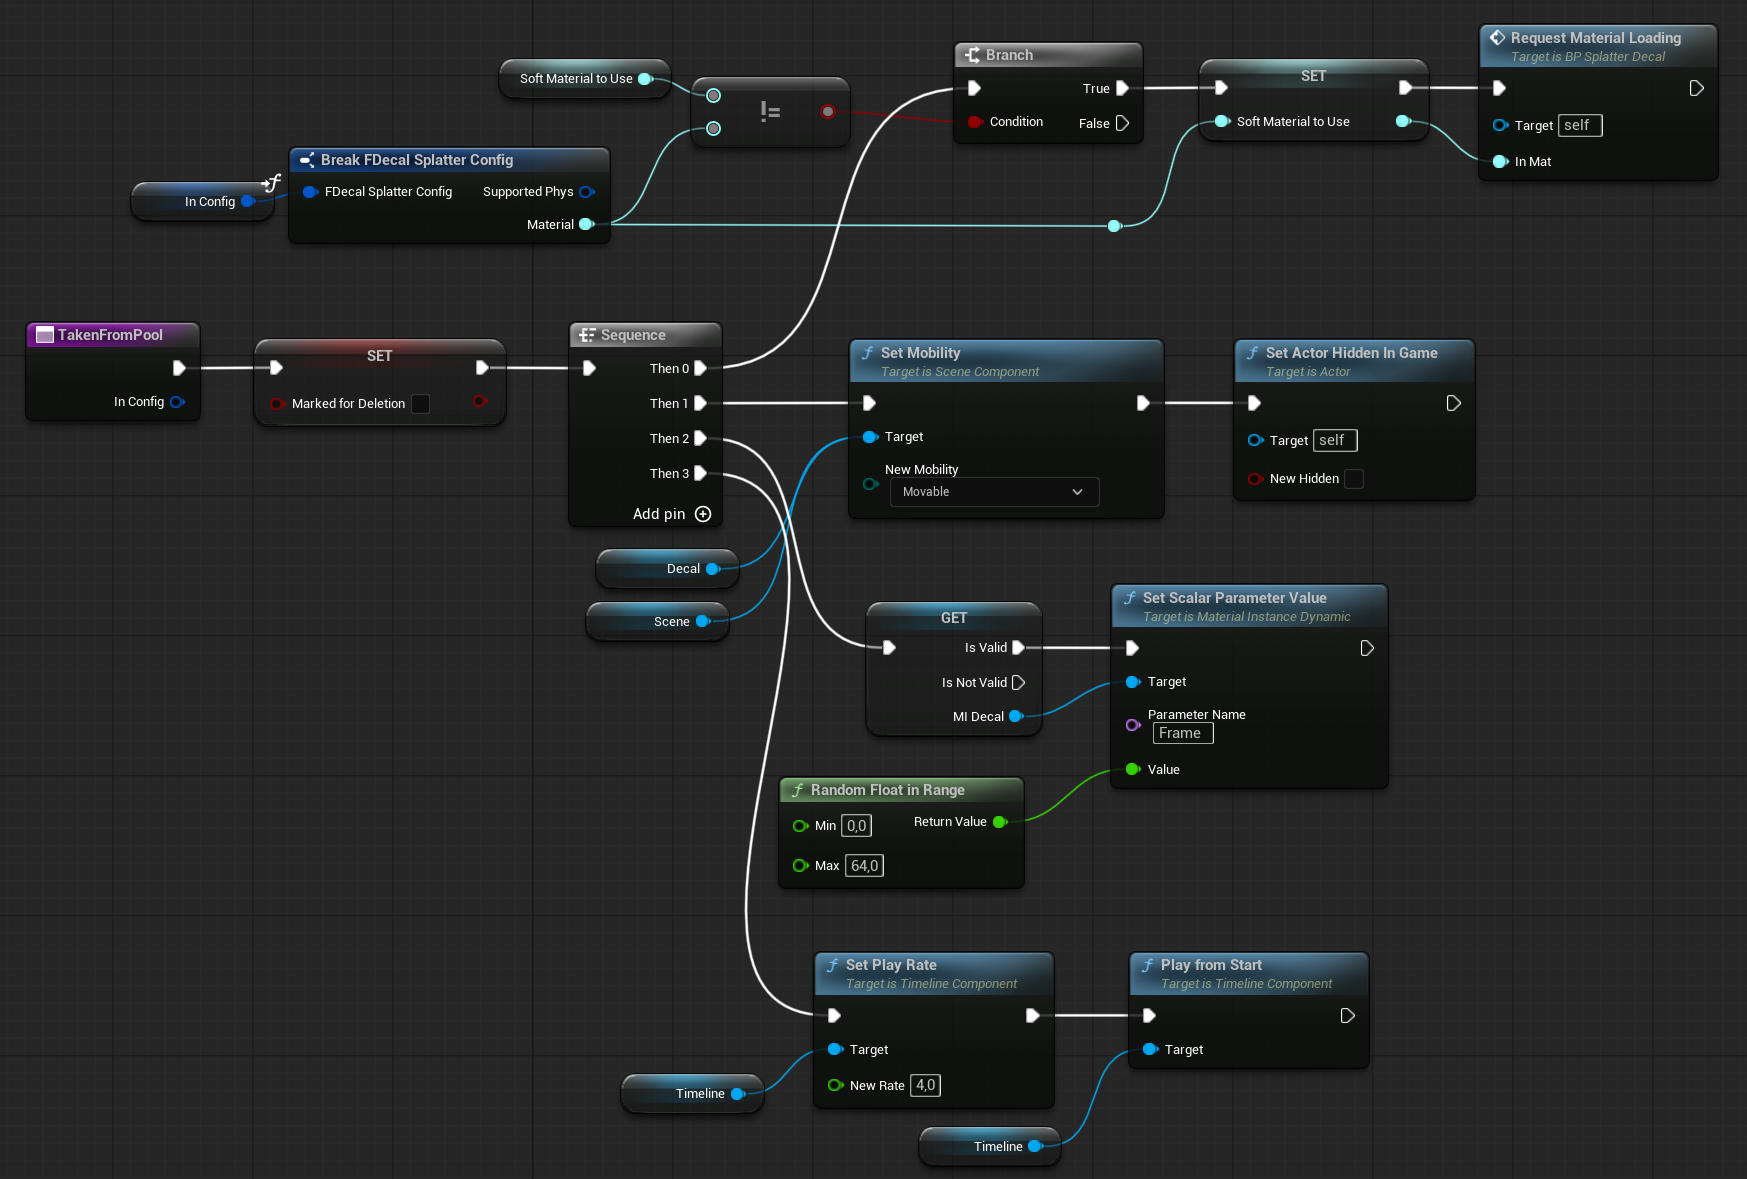
TakenFromPool (link)
This function is called when the decal is retrieved from the pool—typically when it needs to be spawned or activated.
It performs the following actions:
- Checks if a new material needs to be loaded, and applies it if necessary
- Sets the component’s mobility to
Movable - Chooses a random frame on the UV texture to add variation
- Starts the “show” animation using a Timeline component
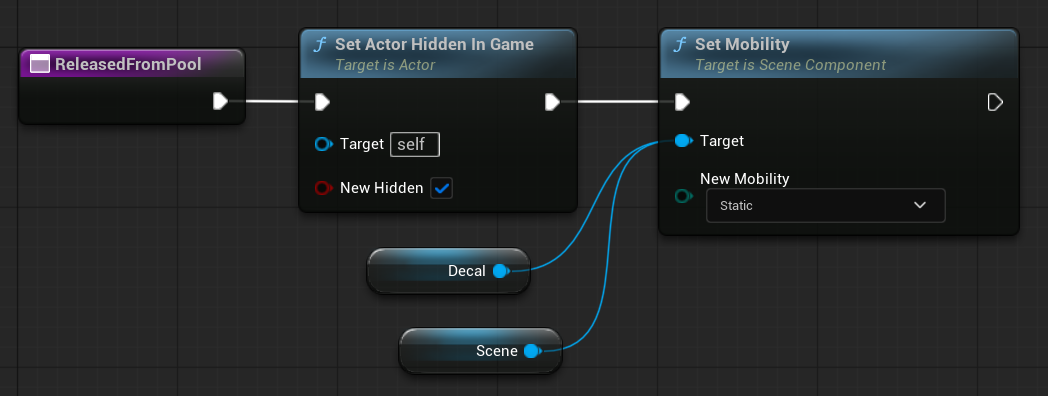
ReleasedFromPool
This function is called when the decal should be returned to the pool and deactivated. Currently it’s just hiding the actor and marking components as static.
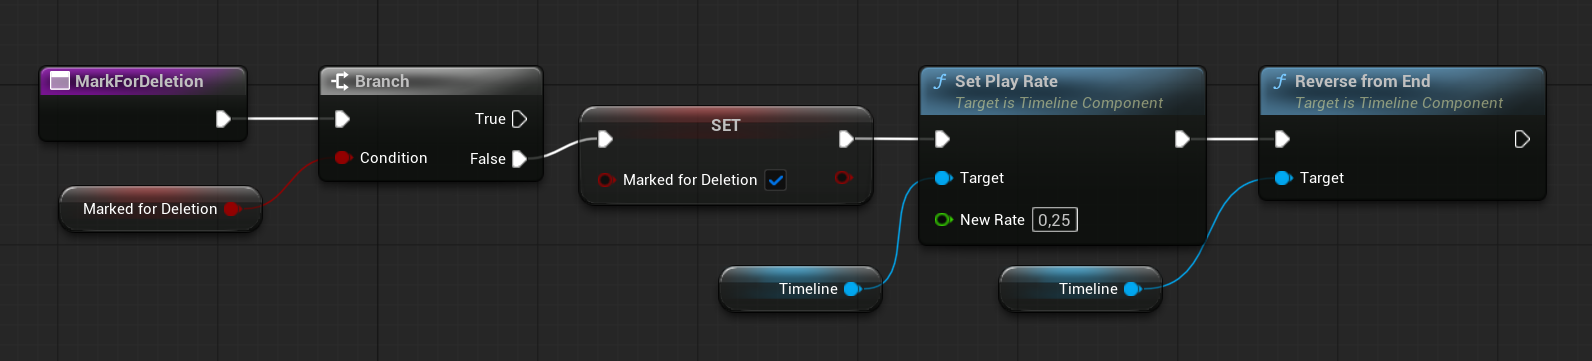
MarkForDeletion
This function is called when the pooling system requests the decal to be returned to the pool. It begins playing the “show” animation in reverse, using a different play rate to create a smooth hide/fade-out effect.
Timeline
The animation we’re creating could technically be implemented using Tick or a Timer. However, in Blueprints, we can take advantage of Timelines which are easier to control.
When you create a new Timeline in Blueprint, it becomes a component with its own internal tick that activates only when the timeline is playing. This makes it a great tool for controlling time-based animations or logic that only needs to run at specific moments during gameplay.
💡 Note: In other words, you can use a Timeline as a “temporary Tick” that runs only when needed—without constantly ticking every frame.
Our timeline uses a simple float curve that eases from 0 to 1. By adjusting this curve, you control the smoothness and timing of the decal’s animation. Additionally, you can add multiple tracks to the timeline to handle different animations—such as separate tracks for showing and hiding the decal.
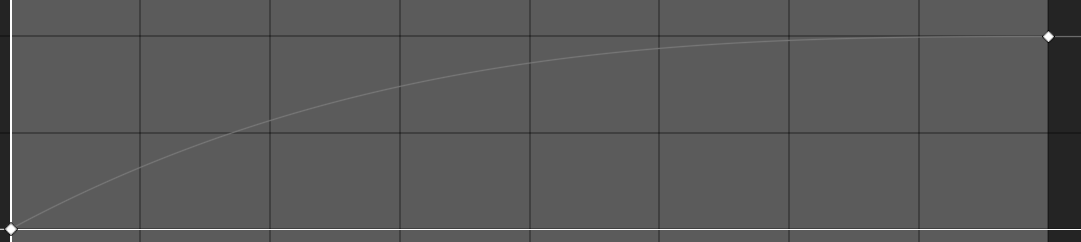
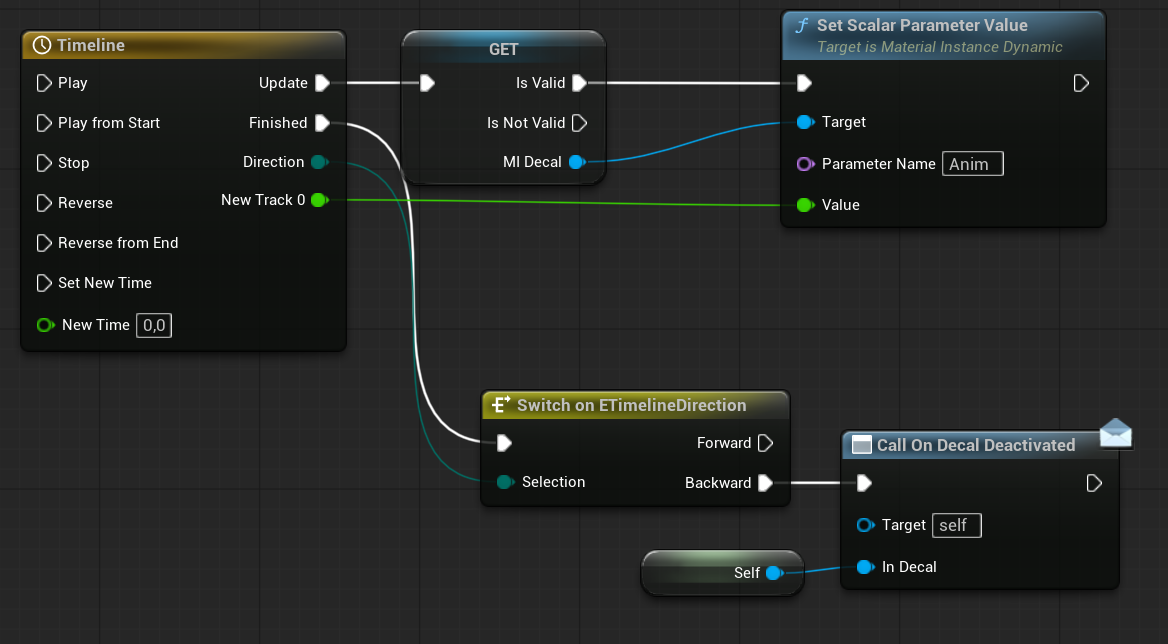
The timeline controls the material’s Anim scalar parameter, which I will demonstrate shortly. When the timeline finishes playing backwards, it triggers the Deactivated dispatcher. This event is caught by the pooling system, which then actually returns the decal back to the free pool for reuse.

By using different decal textures, you can create a much wider variety of splatter effects. Our current texture isn’t ideal—it was originally designed for flesh hit effects rather than splatters. So keep in mind, with properly prepared textures, the results can look significantly better.
RequestMaterialLoading
To avoid hitches when loading new materials, we use asynchronous loading. As our project grows, managing these async loads will require a dedicated loading manager system. The great part is that we’re already using soft references for our materials, which will make implementing such a loading system much easier in the future.

What’s the Frame param? This is our decal texture.

Our decal texture uses a frame parameter to choose the splat from the Texture. The frame parameter selects which part of the texture to display. You could also select Frames which are looking OK for you and randomly pick from them only.
If you create your own textures, here are some tips:
- Make the splat start from the center and look more like an actual splatter
- Leave larger gaps between frames to reduce blending issues between them
- You can find many splatter textures in the Marketplace, which can be combined into a SubUV texture for use in your project
Splatter Decal Manager
The goal for this manager is to always keep a fixed number of decals (e.g., 20) visible in the scene.
Once this threshold is reached, the oldest decal will be gently removed—using a hide animation—and returned to the pool. This means the pooling behavior here is different from previous systems we’ve built, where decals were usually returned immediately after being hidden or timed out.
This approach creates a more persistent, layered look while still keeping memory and performance under control.
Variables Overview
| MaxNumOfDecalsAlive | int | The maximum number of decals that should remain active (visible) in the scene at any given time. |
| Free | BP_SplatterDecal Array | Holds decals that are currently free in the pool and ready to be reused. |
| Taken | BP_SplatterDecal Array | Holds decals that are currently in use (visible in the scene). |
Functions Overview
CreateStartingPool (link)
Just like in our previous pooling systems, this function is used to initialize the decal pool during loading.
In addition to spawning the initial pool of decals, it also:
- Binds each decal’s
OnDecalDeactivatedevent to the manager - Adds the spawned decals to the free pool, making them ready for use
This setup ensures that all decals are properly tracked and can be reused efficiently.

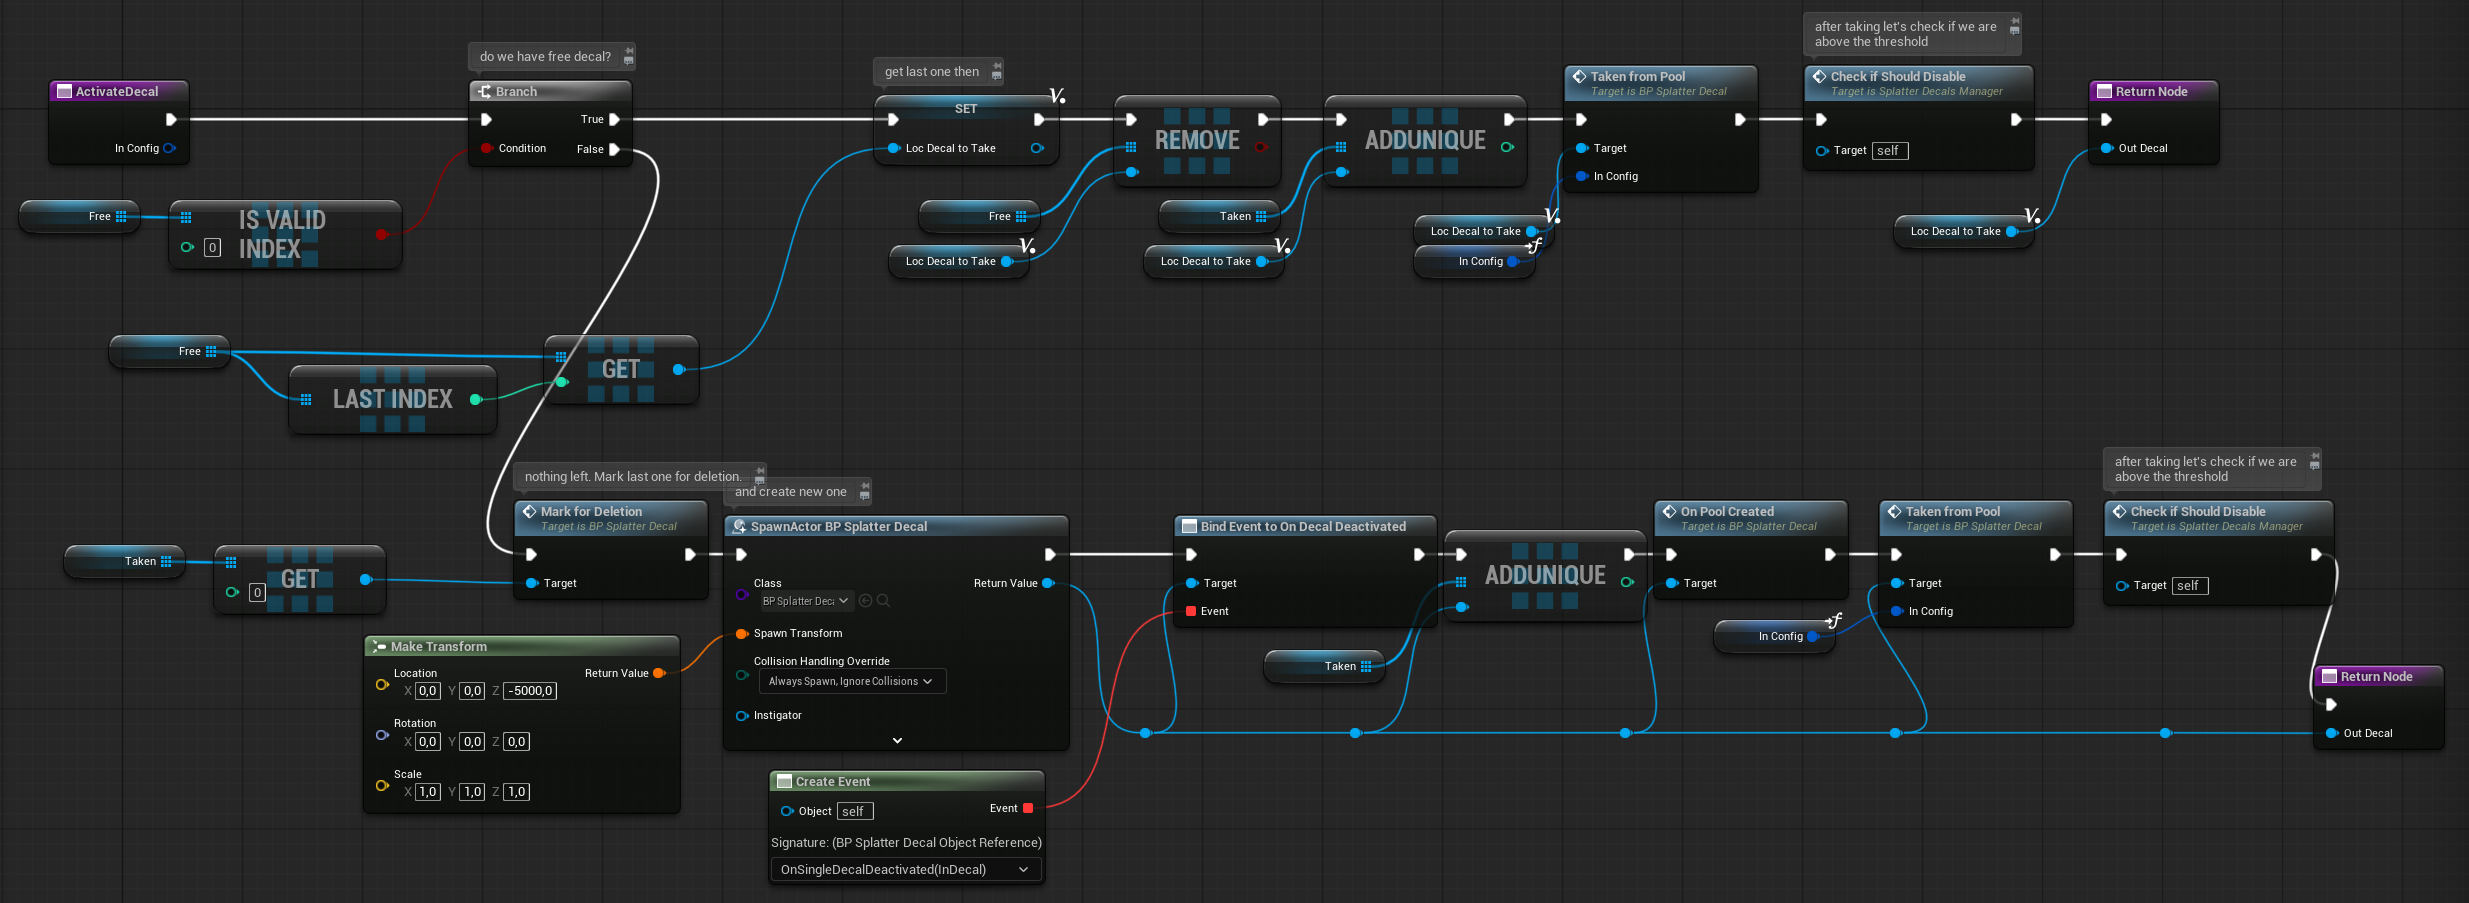
Activate Decal (link)
This function is a bit more advanced than the pooling systems we’ve built earlier.
If a free decal is available:
- Simply take it from the free pool
- Add it to the taken pool
- Then check whether the number of active decals exceeds the threshold (e.g., 20 visible decals)
If no free decal is available:
- Mark the oldest active decal to start its deactivation (e.g., play the hide animation)
- Create a new decal and add it to the pool (increasing the pool size)
- After that, again check if we’re exceeding the maximum allowed active decals and handle it accordingly
This approach ensures consistent visual presence while dynamically expanding the pool when needed—without letting too many decals stay alive beyond the limit.
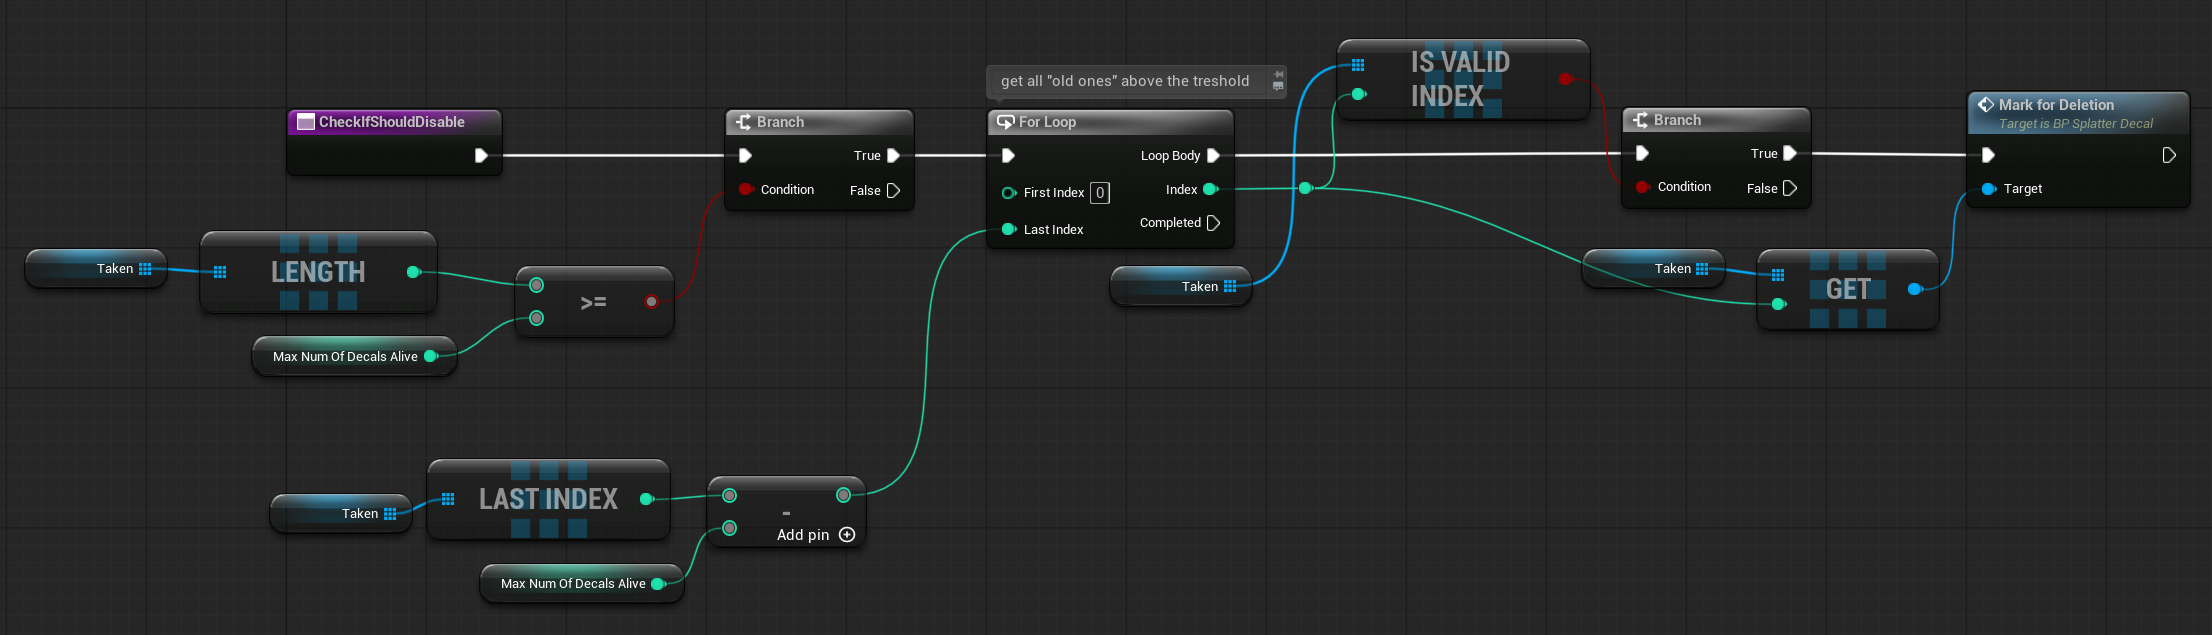
CheckifShouldDisable (link)
This function checks whether the number of active decals exceeds the defined threshold (e.g., MaxNumOfDecalsAlive).
If we’re over the limit, it selects the oldest decals (those added first to the Taken array) and triggers their deactivation—by starting the hide animation and returning them to the pool afterward.
This ensures that only the most recent decals stay visible, keeping the scene clean and within performance limits.
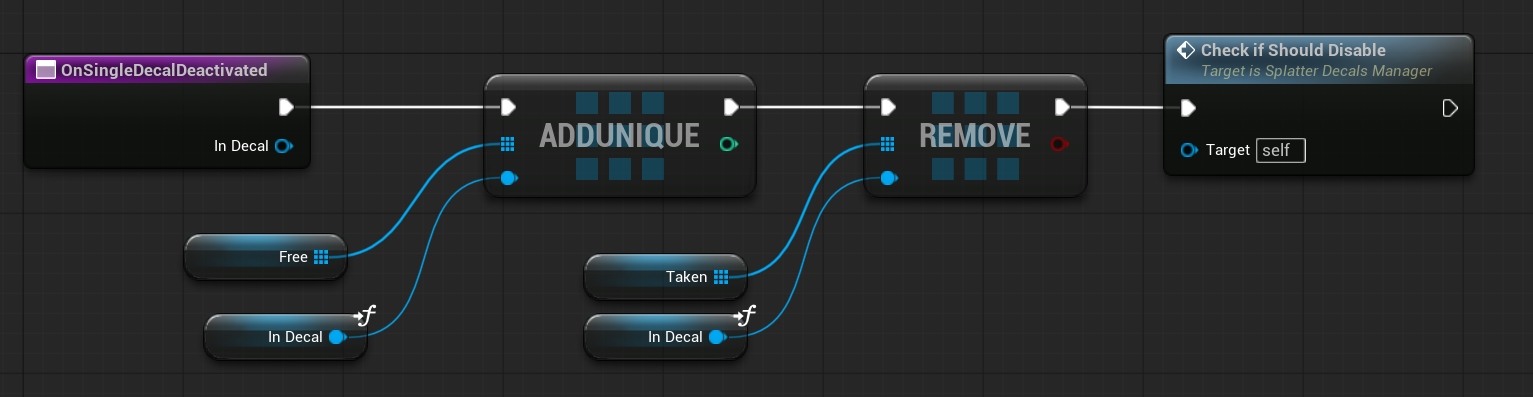
OnSingleDecalDeactivated
This function is called by the decal itself when it finishes its hide animation.
It performs the following actions:
- Updates the pool arrays by moving the decal from the
Takenlist back to theFreepool - Calls
CheckIfShouldDisableagain to ensure we’re still within the active decal threshold
This keeps the pool state accurate and maintains consistent control over how many decals are active at once.
Splatter Spawning
Since we’ll have multiple places in the game where splatter decals need to be spawned, we’ll use a single function to handle all decal spawning logic. This keeps the system consistent, avoids code duplication, and ensures the pooling behavior is managed in one place.
Global Function
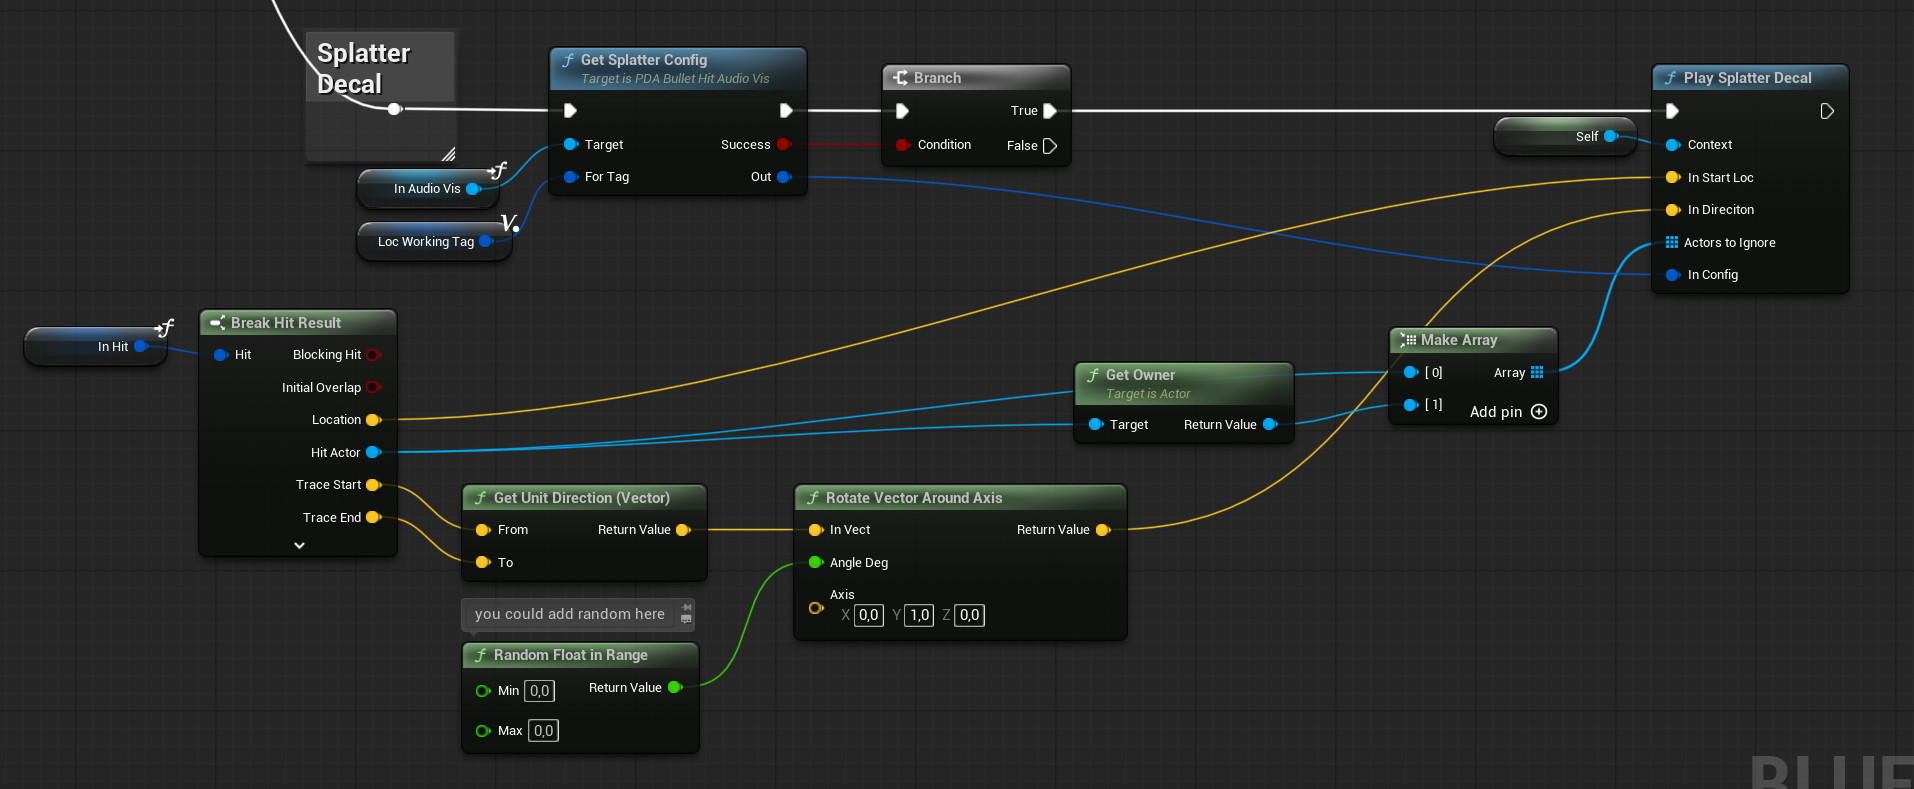
Our function is located at the AudioVisFunctionLib created earlier. (link)

Determining the decal’s placement isn’t too difficult. When we hit a character or surface, we already have the hit location and impact direction. From there, we can perform an additional trace—called a “decal sphere trace.”
Why a sphere trace? A sphere trace doesn’t stop directly on the surface—it ends slightly before it, which gives us better decal placement without clipping into geometry.
For rotation we can use the hit normal to orient the decal. However, in my case, I blend:
- 50% of the impact direction
- 50% of the hit normal
This results in a more natural and varied decal orientation.
You’re encouraged to experiment—try using 100% hit normal or 100% direction to see what gives you the look you prefer.

Of course, the function uses the Pooling Manager to retrieve a decal actor from the pool.
This ensures consistent reuse of decal instances and avoids unnecessary spawning, keeping performance optimized.
Weapon
In our Weapon Actor class, there’s a function called SpawnHitEffects. We’ll use this function as the entry point to spawn splatter decals whenever a weapon successfully hits a surface or character. This keeps all hit-related visuals—like blood splatters, impact effects, and decals—organized in one place.
Infiltrator
The Infiltrator requires special handling for splatter decals. When a bullet hits flesh, I want to add blood splats both when hitting the Infiltrator’s body and when they are in ragdoll state.

In a real game, I might only keep the flesh splats and ragdoll splats, removing splats on Infiltrator hits because the Infiltrator has metal parts that shouldn’t trigger blood splat effects. (I could trigger them on critial hit for example) However, since this is just an example, I want to show you how to handle these different cases explicitly.
ReceiveDamage. In earlier tutorials, we created a damage system with a function that’s called whenever an actor receives damage. We can leverage this function to trigger special effects when our enemy takes damage. In our example, we’ll use it to play the splatter effect whenever damage is received.

For the ragdoll, I intentionally used physics-based collisions to demonstrate how you can track physical animations.
In a typical game, though, I would consider approaches that avoid relying on collisions for effects like splatters, to improve performance and control.
First you need to turn on the hit events on the Infiltrator Skel Mesh Component.

To enable this setup, go to the Physics Asset and select only the bodies that should generate hit events. The fewer you select, the better the performance—so try to limit it to key areas like the torso or head, depending on what you need.

Now back in the infiltrator you can add OnHit event when selecting the Mesh Component.
OnComponentHitMesh (link)
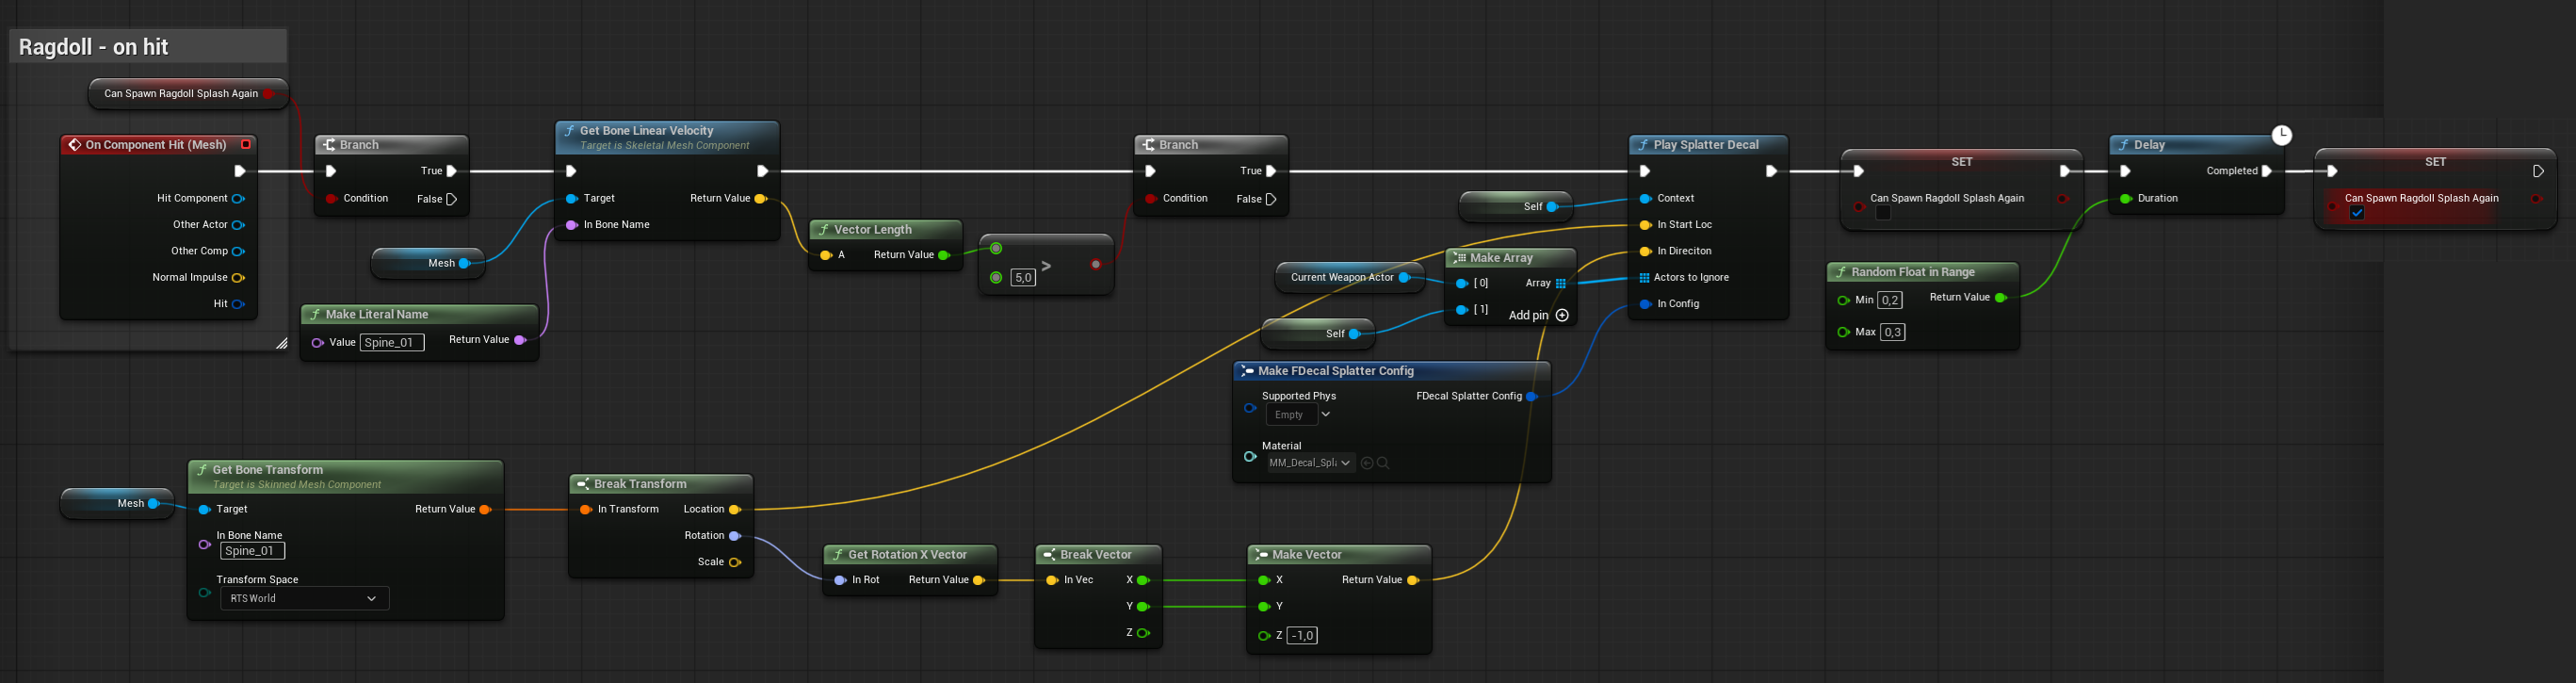
Hit events are only triggered when the mesh collides with something, such as during ragdoll simulation. To control splatter spawning, we use a custom boolean to prevent repeated triggers.
Here’s the logic flow:
- Check if we’re allowed to spawn a splatter (based on the custom bool)
- If
Spine_01’s velocity is greater than a certain threshold, we:- Spawn a splatter decal at
Spine_01‘s location - Use
Spine_01‘s spatial rotation for decal orientation
- Spawn a splatter decal at
- Set a short cooldown before allowing splatter to spawn again
The current setup is simple, but there’s a more optimized way to handle it. Instead of relying on collision hit events, I suggest using a Timeline to simulate a temporary tick. This lets you:
- Track the velocity of
Spine_01over time - Detect sudden stops or drops in velocity (indicating impact)
- Trigger the splatter effect based on this condition
This approach avoids the overhead of hit events and gives you more control over when and how splatters are spawned during ragdoll simulation.
💡 Homework Idea: Ragdoll Velocity-Based Splatter Trigger. This could be a great homework I could give you 😀
Custom Stencil
Our decal material will use the Custom Stencil Buffer to avoid drawing on specific meshes—like the Infiltrator. To make this work you need to enable stencil for Infiltrator Skel Mesh Component.
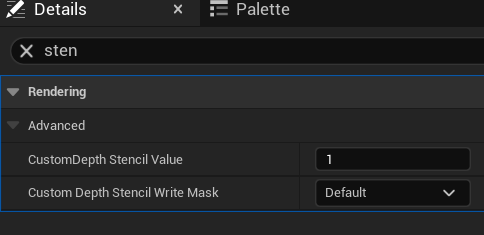
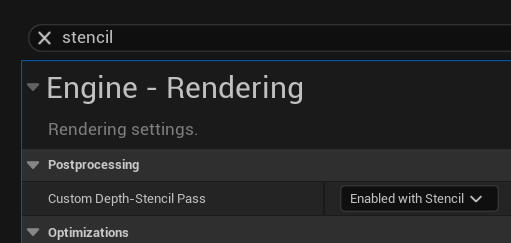
Also make sure custom depth-stencil pass is set to Enabled with Stencil.
Since Custom Stencil values range from 1 to 255, and you’ll likely use them in various systems—such as:
- Outlines
- Special effects
- Decal masking
- Render targets
- Post-process filters
…it’s a good idea to keep a shared stencil ID map in your project documentation.
Decal Material
Let’s take a look at our MM_Decal_Splatter.
Backface Culling

I’m not drawing the decal on the other side of the surface, which means that when we hit a wall, the decal won’t appear on the opposite side as it normally would.
Stencil Mask

Stencil mask is used to blend out the decal.
Chosing Frame to draw
I also created MF_SubUVOnly material function which is just outputing the UV for the SubUV without using the texture. This way I can select which frame the shader should use.

Reflectino effect
I’m adding subtle reflection effect to the base color as well.
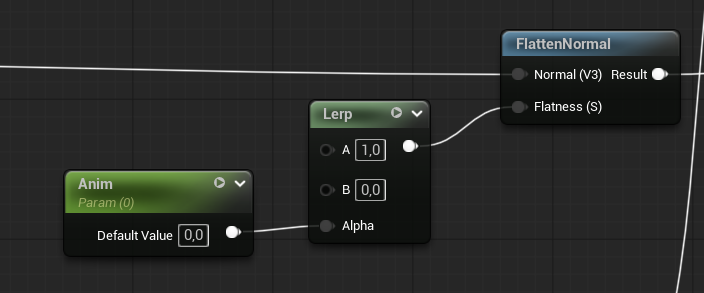
Show / Hide Animation
The animation is really simple—I’m just multiplying the color and flattening the normals.
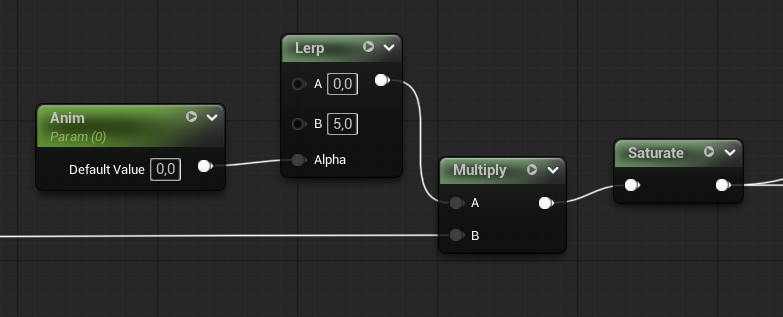
In your case, you could animate the UVs with 5 frames to create the animation. That’s why it’s always worth investing a lot of time into creating assets that fully support the effects you want to achieve. In my case, I can only use assets from the Shooter Example, Lyra, and other projects released by Epic.
Conclusion
I hope you learned something—or maybe even got inspired to try something new!
In the next part, I’ll be working on creating a level using Procedural Content Generation (PCG) to build it randomly.

You must be logged in to post a comment.