Create a Small Game from Scratch Series: Endless Standing First-Person Shooter
Level: Beginner
Type: Blueprint
Version: 5.6
Download Project
Last time, we implemented the UI Manager, so now it’s finally time to create an enemy!
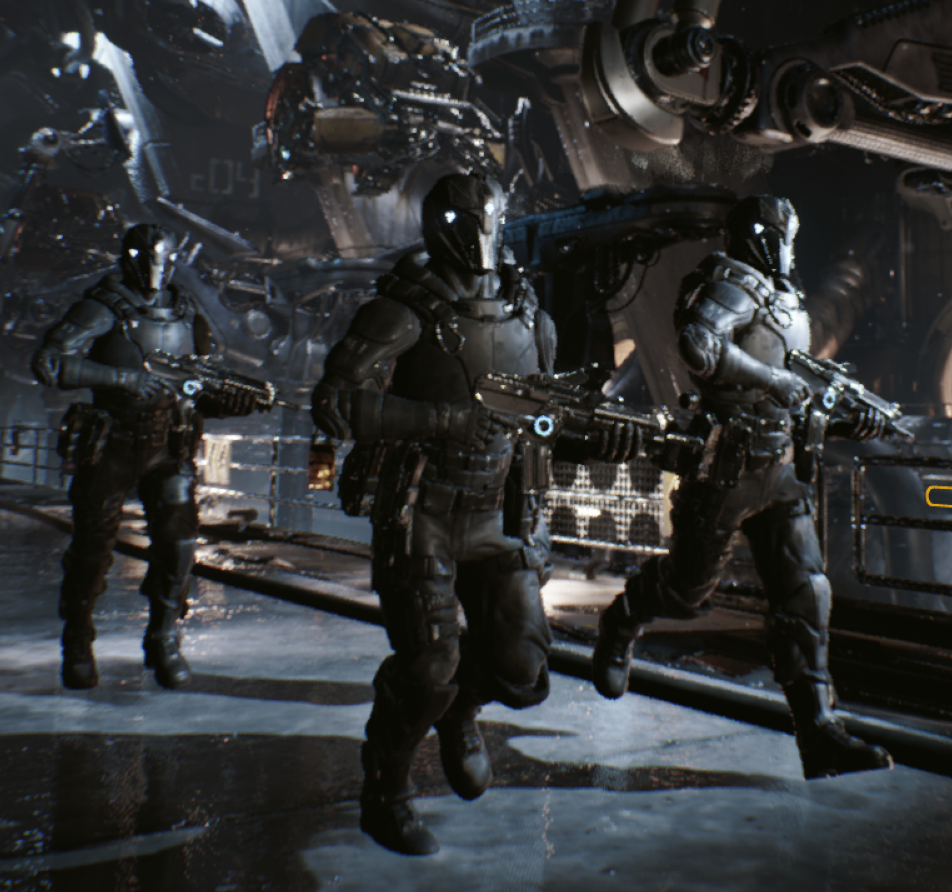
Normally, I would use a purchased sci-fi warrior mesh, but since I’m sharing this project with you all, I can’t use paid assets.
That’s why I’ll be using a character from Epic’s Infiltrator demo instead. It will take a bit of extra work, but that’s okay—I’ll show you how to retarget animations.
- Final Result
- Hi Level
- Data – Enums
- Data – Audio Visual Actions
- Data – AudioVisualTags
- Data – Character Hit Reactions
- AnimNotifyState_InHitReaction
- Character Audio Visual Action Spawner
- Character Hit Reaction Manager
- SetIsInHitReactionAnim
- Retarget anims
- Animation Blueprint
- Physical Asset
- Base Enemy
- Enemy – Infiltrator
- AI – Controller
- AI – Services
- AI – Tasks
- AI – Blackboard
- AI – Behavior Tree
- Global Events Manager
- Impact Decals
- Crosshair Update
- Conclusion
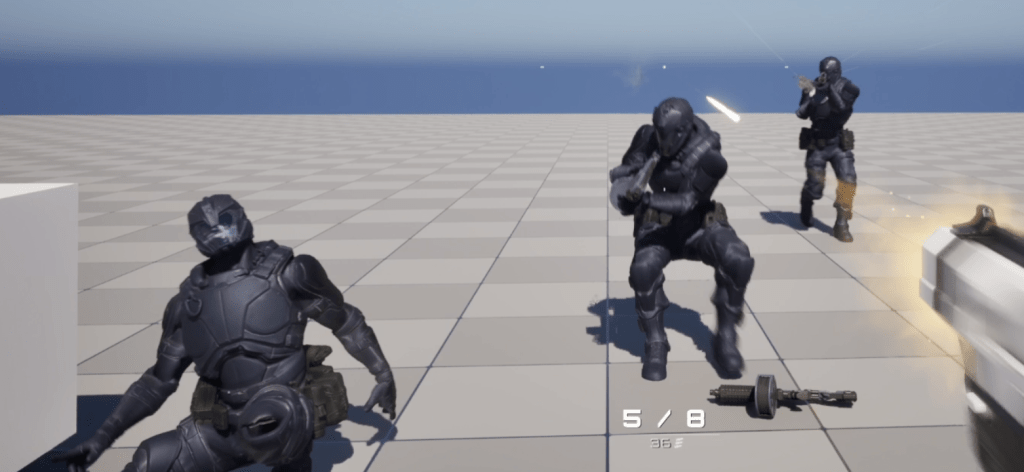
Final Result
Hi Level
As always, let’s start by breaking down what we’ll be doing.

This post will cover a lot, as our goal is to get the Infiltrator character fully working—and looking good—in the game.
Character Audio-Visual Actions
This part of the system will handle playing sounds and spawning Niagara effects based on action tags. For example: dying, firing, reloading—basically anything the character can do.
Character Hit Reactions
Next, we’ll implement a simple system to detect which body part was hit and play the appropriate animation. I also want to add physical reactions without relying solely on animations. On top of that, I’d like the ability to mark certain body parts as weak spots, so we can apply damage multipliers (e.g., leg shots deal less damage).
Ragdoll
Of course we will have Ragdoll setup with Physical Asset.
Animation Blueprint
We’ll retarget animations from the Lyra game to the Infiltrator character. The Animation Blueprint will support basic locomotion, additive animations, simple IK for hands and looking direction, and layered upper-body animations.
AI
The Infiltrator should move toward the player and be able to shoot. The player should also be able to eliminate him.
Decal Updates
We’ll spawn hit-reaction decals on the character. Our previous system (based on sprites) will be replaced with Decal Components—still powered by Niagara.
Crosshair Updates
Using the Global Events Manager, we’ll display hit markers and elimination markers on the crosshair.
Sounds like a lot to do—so let’s get started!
Data – Enums
ECharacterAudioVisActionLocationType. When spawning audio-visual effects for a character, we need to define where the effect should appear. This enum helps us control that:
| OwnerLocation | The effect will spawn at the character’s location (i.e., the character triggering the effect). |
| HitLocation | The effect will spawn at the hit location provided by the passed-in hit result. |
ECharacterAudioVisActionRotationType. Similar to location, this enum determines the rotation of the spawned effect:
| None | No rotation will be applied (i.e., zero rotation). |
| OwnerRotation | The effect will use the owning character’s rotation. |
| HitNormal | The effect will align with the hit normal from the passed-in hit result. |
These enums allow us to control exactly where and how audio-visual effects appear during gameplay—making the system flexible and context-aware. When needed we can add more types here later on.
Data – Audio Visual Actions
FCharacterAudioVisActionSpawnConfig. This struct holds the configuration for spawning audio-visual effects based on a specific action tag.
| ActionTags | GameplayTagContainer | Contains the action tag(s) that trigger this config (e.g., AudioVis.Action.Dying). |
| LocationType | ECharacterAudioVisActionLocationType | Defines the spawn location for the effect (e.g., owner location or hit location). |
| RotationType | ECharacterAudioVisActionRotationType | Defines the rotation to use when spawning the effect (e.g., owner rotation or hit normal). |
| Niagara | FNiagaraSpawnConfig Array | Holds Niagara system configurations to be spawned for this action. |
| Sound | FSoundSpawnConfig Array | Holds sound configurations to be played for this action. |
PDA_CharacterAudioVisActionsPreset. We need a data container to store our audio-visual presets. As before, we’ll use a Primary Data Asset for this purpose. It will store Array of FCharacterAudioVisActionSpawnConfig, and two functions:
GetAssetsToLoad. Used by the loading system to asynchronously load any required assets during the loading screen.

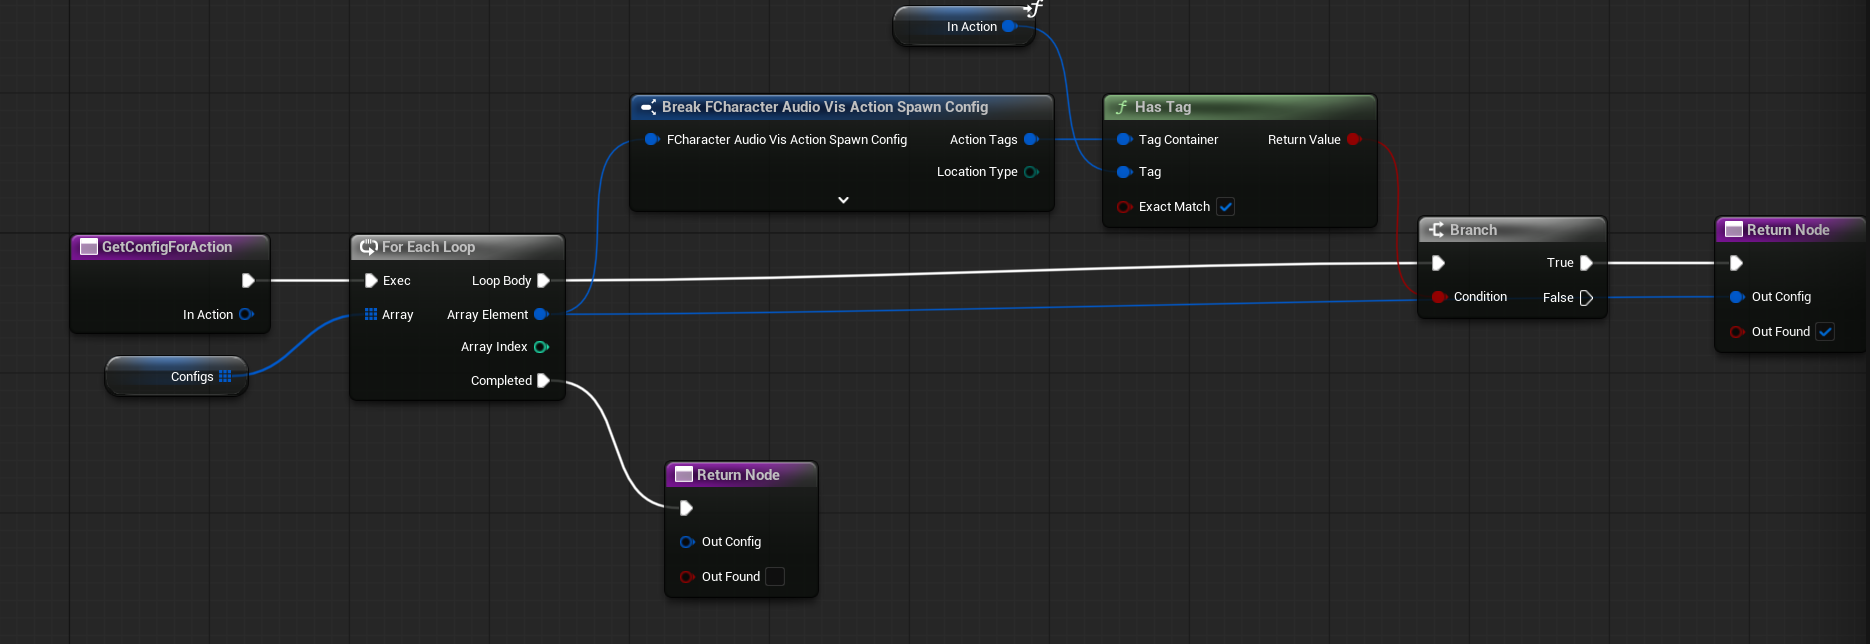
GetConfigForAction. Returns the corresponding audio-visual config for a given action tag. This is used by the runtime system to determine what to spawn and where.
Data – AudioVisualTags
To support our audio-visual system, we need to define a set of gameplay tags under the AudioVisualTags.
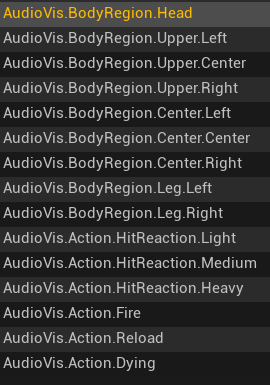
These tags will be used to trigger and configure various effects. Currently, we include:
- Body regions
Tags that identify different parts of the character’s body (e.g.,AudioVisual.BodyRegion.Head), useful for hit reactions and weak spot logic. - Hit reactions intensity
Tags to define the intensity or severity of a hit (e.g.,AudioVisual.Action.HitReaction.Light). - Actions
Tags for specific character actions that should trigger audio-visual effects.
This system is easily extendable. You can add more action tags later to support additional gameplay events like jumping, landing, healing, etc.
💡 Note: Using Gameplay Tags to define specific action types is considered good practice. Tags are:
- Easily extendable – You can add new actions without changing core systems.
- Globally accessible – They can be used across different systems like animation, VFX, audio, and AI.
- Replication-friendly – Since tags are lightweight and network-aware, they’re easier to replicate across clients.
- Cleaner and more modular – They help keep your code/data decoupled and organized.
This makes your audio-visual system more flexible and future-proof.
Data – Character Hit Reactions
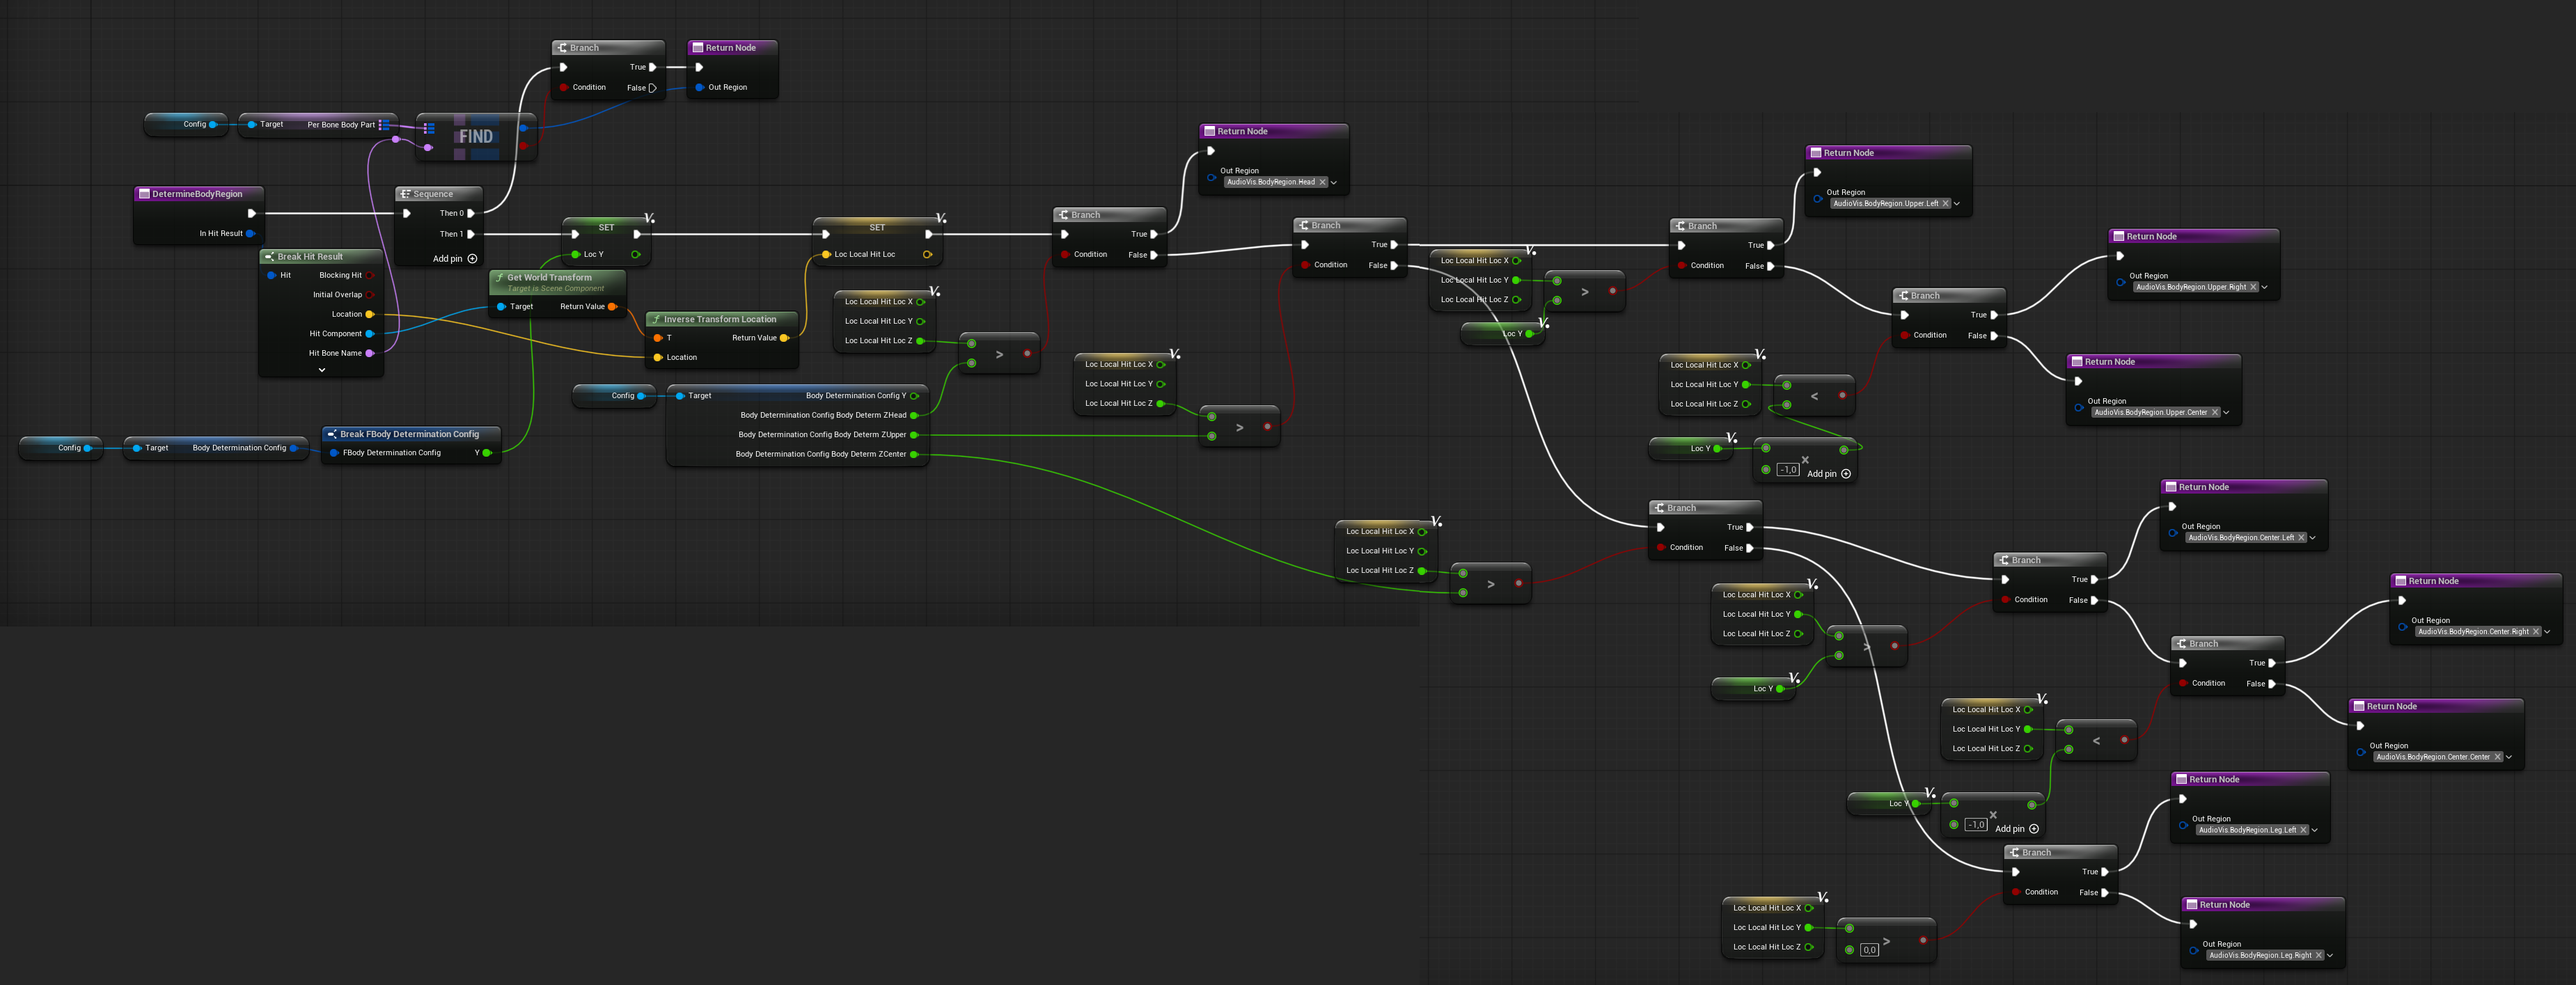
FBodyDeterminationConfig. This struct is used for a simple hit body part determination system. It allows us to trigger the appropriate reaction animations—for example, headshots, hits to the upper or lower body, or legs. This setup is game-specific, and the goal here is to demonstrate that you don’t need to configure reactions for every individual bone a bullet might hit. Instead, we can generalize based on simple spatial thresholds.

| Y | float | Defines the horizontal (Y-axis) range in local space used for distinguishing between left and right side hits. Note: While we currently use only “left” and “right”, this system could be extended later to support “left / center / right”. |
| BodyDetermZHead | float | The local space height threshold for identifying a head hit. |
| BodyDetermZUpper | float | The local space height for determining upper body hits (e.g., chest or shoulders). |
| BodyDetermZCenter | float | Represents the center body height. Anything below this value is considered a lower body hit (e.g., legs). |
This system allows you to respond to hits with appropriate animations or physics reactions based on simple spatial logic—without needing per-bone configuration. It’s lightweight, customizable, and fits most gameplay needs.
Of course, this system isn’t perfect. For example, if the character has their hand raised and you hit them, the system might register it as a headshot due to its height.
If you want a more accurate solution, you’d need to set up Physical Materials for each body part in your Physics Asset and detect hits based on that. However, for my purposes, that level of detail is too complex and not worth the overhead.
This simple setup works well enough for general reactions without getting bogged down in per-bone / per Physical Material precision.
FBodyPartHitReactionConfig. This struct stores hit reaction data for individual body regions. It allows us to define which animations should play when a specific area is hit, along with optional damage modifications and weak spot settings.
| BodyRegions | GameplayTagContainer | Contains gameplay tags representing supported body regions (e.g., BodyRegion.Center.Left). This helps map the reaction to specific hit zones. |
| Anims | Animation Asset Array Soft Obj Ref | A list of animation assets that can be used for this body part. One will be chosen randomly at runtime to add variety. |
| DamageMultiplierToAdd | float | This value adjusts the final damage multiplier. For example, leg hits might reduce damage, while other areas might have no change or increase it. |
| WeakSpot | bool | Marks the region as a weak spot. This flag can be used by other systems (e.g., scoring, critical hit feedback) to apply special logic. |
| DynPhysImpulseMultiplier | float | Adjust the Physical Hit Reaction impulse. |
| DynPhysBlendMultiplier | float | Adjust the Physical Hit Reaction blend. |
This setup gives you a flexible way to define hit reactions per body part without hardcoding values, making it easy to tweak behavior or extend it later with more regions or animations.
FPhysMatHitReactionConfig. This struct provides an alternative way to define hit reactions, damage multipliers, and weak spots—based on physical materials instead of body regions. This is especially useful for precise hit detection on specific materials. For example, the Infiltrator character has a glass section on the helmet, and we can mark that as a weak spot using its physical material.
| PhysTags | GameplayTagContainer | The physical material used to identify the hit surface (e.g., glass, metal, armor). |
| DamageMultiplierToAdd | float | This value adjusts the final damage multiplier. For example, leg hits might reduce damage, while other areas might have no change or increase it. |
| WeakSpot | bool | Marks the region as a weak spot. This flag can be used by other systems (e.g., scoring, critical hit feedback) to apply special logic. |
By using physical materials, you gain more precise control over where weak spots are on the mesh—especially useful for armored characters or complex surfaces. This can be combined with body region detection for even more flexibility.
FDynamicPhysHitReactConfig

In addition to playing animations on hit, we want to introduce light, physics-based hit reactions to add realism and variety. This struct allows us to configure those reactions on a per-character basis.
| UseDynamicPhysHitReaction | bool | Enables or disables the dynamic physical hit reaction system for the character. |
| DisabledBonesNames | Name Array | A list of bones that should not trigger physical reactions. For example xxclude the pelvis to prevent full ragdoll-like behavior. |
| ImpulseMinMax | Vector2d | Stores the minimum and maximum impulse applied to the hit bone. This allows control over the force range used in the physical reaction. |
| Duration | float | Specifies how long the dynamic reaction should last. |
| BlendCurve | RuntimeFloatCurve | Defines the blend weight over time using a runtime float curve. Useful for animating a smooth blend between animated and physics-driven movement. |
| BlendMultiplier | BlendMultiplier | A global multiplier for the blend strength. This can act as a filter—e.g., set it to 0.5 to halve the overall effect, then amplify specific body parts through additional per-part settings (like a stronger effect on the head). |
This system allows subtle physical feedback during combat or impact moments without full ragdoll physics, keeping the character responsive and visually dynamic.
PDA_CharacterHitReactionPreset.

This is the main Primary Data Asset that holds all the necessary configuration for handling character hit reactions. It combines animation-driven and physics-based responses, offering flexibility and precision for different hit scenarios.
| PerBodyParts | FBodyPartHitReactionConfig Array | Contains hit reaction configurations for each body region (e.g., head, chest, legs). Determines which animations to play and whether to apply damage modifiers or mark as weak spots. |
| BodyDeterminationConfig | FBodyDeterminationConfig | Defines how body parts are determined based on hit location in mesh space. Useful for simple and fast body region detection without needing bone-specific logic. |
| DynamicPhysReaction | FDynamicPhysReactConfig | Holds configuration for dynamic physics-based hit reactions, allowing lightweight physics responses (e.g., subtle bone movement) on impact. |
| PerPhysMat | FPhysMatHitReactionConfig | Contains hit reaction settings for specific physical materials (e.g., glass, armor). Ideal for precision-based weak spots like a helmet visor. |
| DyingAnims | Animation Assets Soft Obj Array | A list of death animations that can be played when the character dies. One will be chosen randomly. This can be extended by body types as well. |
| PerBoneBodyPart | TMap Name | GameplayTag | Maps specific bone names to body region tags. This overrides the general body determination logic, ensuring consistent results for critical bones (e.g., always treat “Head” bone as BodyRegion.Head). |
This setup gives you full control over how characters react to damage—visually, physically, and mechanically—based on what part of the body was hit and how the impact occurred.

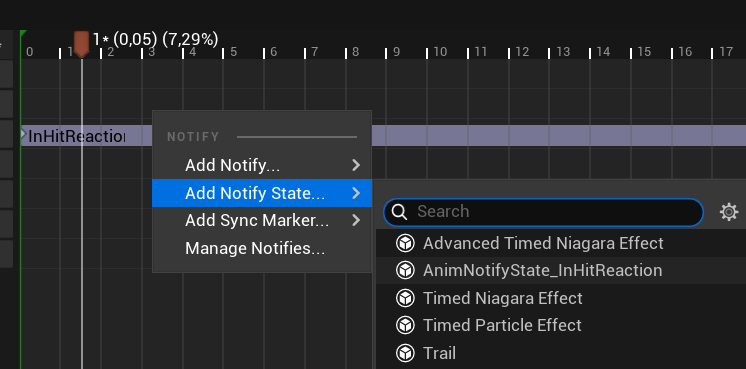
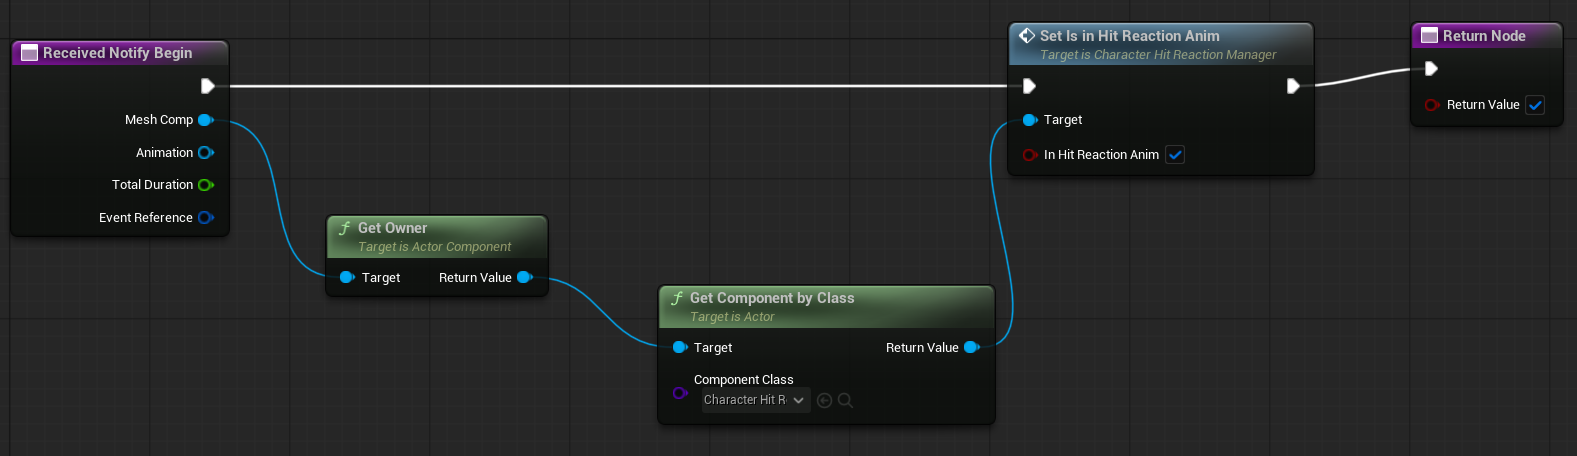
AnimNotifyState_InHitReaction
When working with hit reactions or other gameplay-driven animations, it’s a good idea to build around some kind of Action System—like GAS (Gameplay Ability System) or Able Ability. However, in this case, we’ll keep things simple. I’ll cover full action systems in a separate tutorial.
For now, we have a specific gameplay need: We don’t want the AI to fire its weapon while in a hit reaction.
To solve this, we’ll use a custom AnimNotifyState called AnimNotifyState_InHitReaction. This notify will be placed inside the hit reaction animations, and it will:
- Set a flag like
IsInHitReactionon theCharacterHitReactionManagerwhen active. - Clear the flag when the notify ends.
This way, other systems (like AI firing logic) can check this flag to determine whether the character is currently “staggered” and temporarily unable to attack.
💡 Note: Anim Notifies are a powerful tool for:
- Spawning VFX or sound at specific animation frames.
- Triggering gameplay logic based on animation timing.
- Marking states (like hit reactions, reload windows, footsteps, etc.) during an animation.
By embedding this logic directly into the animation timeline, you ensure that behavior lines up perfectly with what the player sees—no guesswork or manual timing required.
Character Audio Visual Action Spawner
Now that our data is set up, we need a system that can actually spawn the audio-visual effects for characters based on gameplay actions. This is where the CharacterAudioVisActionSpawner comes in.
This is an ActorComponent that gets attached to the Base Enemy (or any other character that supports action-driven audio visual effects).
It holds one variable:
| HoldingPreset | PDA_CharacterAudioVisActionsPreset | A reference to the Primary Data Asset that holds all the action-to-effect mappings. This preset defines what should happen visually and audibly when a given action tag is triggered. |
And one function: PlayAudioVisAction (Blueprint Link)
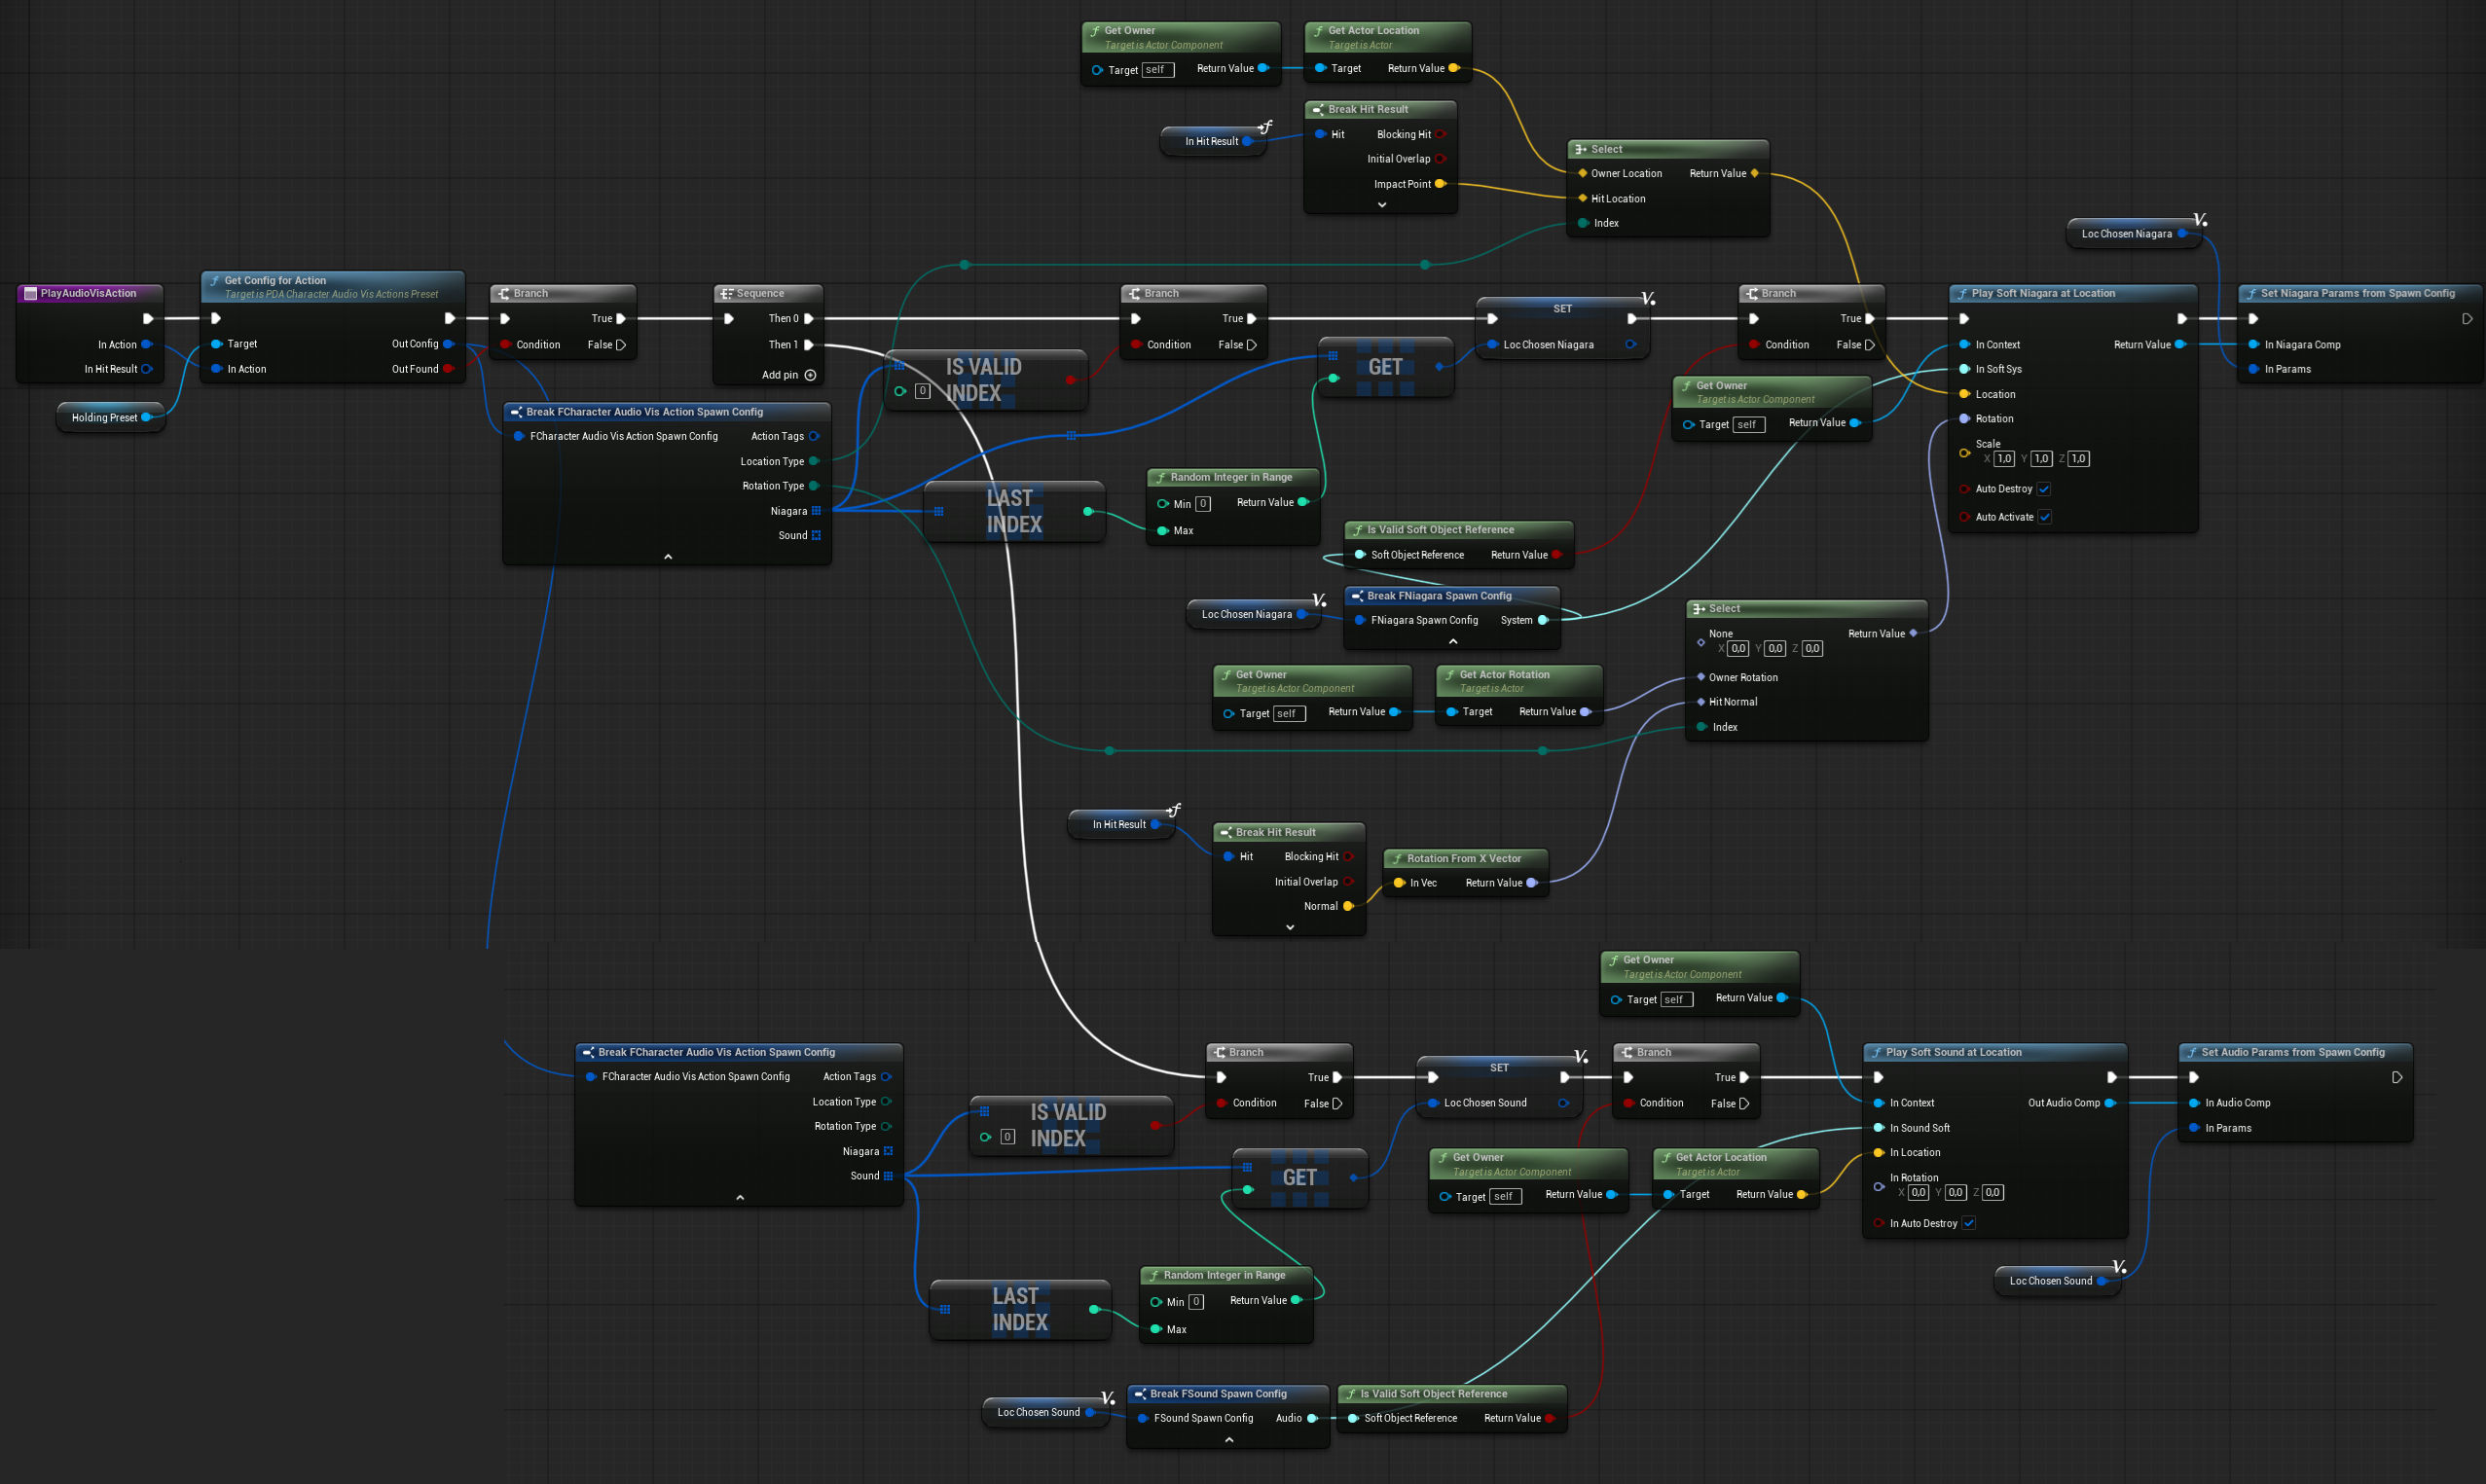
It will get and spawn the corresponding Niagara and sound effects, just like any other audio-visual system we’ve created earlier. It also makes use of our centralized Audio Visual Manager, which ensures that all Niagara systems and audio components are spawned and managed consistently in one place.
Example Usage:
When the enemy character dies and fires an action tag like AudioVis.Action.Dying, this component will:
- Query the preset via
GetConfigForAction(tag). - Determine the spawn location and rotation (owner or hit location).
- Spawn the Niagara VFX and play the corresponding sound.
Character Hit Reaction Manager
To complete the hit reaction system, we need a Character Hit Reaction Manager — an ActorComponent that can be added to the Base Enemy. This component is responsible for triggering both animation-based and physics-based hit reactions when the character is damaged.
| PhysReactComponent | SkelMeshComponent | Reference to the skeletal mesh that will be affected by physical hit reactions. |
| Config | PDACharacterHitReactionPreset | Link to the main hit reaction preset asset. This holds all the body regions, physical material, and dynamic physics configs. |
| DefaultHitReaction | FBodyPartHitReactionConfig | Used as a fallback if no matching region or material is found. |
| IsInHitReactionAnim | bool | Indicates whether the character is currently playing a hit reaction animation. Set via the AnimNotifyState_InHitReaction |
Physical Reaction-Only Fields
| PhysReactAccTime | float | Accumulated time since the physical reaction began. |
| PhysReactImpulse | FVector | The computed impulse that should be applied to the bone. |
| PhysReactPlaying | bool | Indicates that a physics reaction is actively playing. |
| PhysReactApplied | bool | Indicates that the impulse has already been applied. |
| PhysReactBoneName | FName | The bone name to which the impulse will be applied. |
| PhysReactBlendMultiplier | float | Blend multiplier to scale the physics response strength. |
These could be wrapped into a structure, which would definitely be easier to manage. For now, I will leave it as it is.
We have lot of functions here.
DetermineBodyRegion ( Blueprint Link )
This function is used to determine which body region was hit. It returns the appropriate gameplay tag.
GetBodyPartInfo (link)
It will return the BodyPartInfo for a specific gameplay tag.

SetIsInHitReactionAnim
This one is simple — it just sets the IsInHitReactionAnim bool based on the input. It will be used in the AnimNotifyState.
PlayHitReactionAnim (link)
This function plays the hit reaction animation based on the body part data and the animation instance. As you can see, it uses the FullBodyAdditive slot, which I will explain later when we discuss the animation blueprint.

You could use Play Animation Montage on the owning character—it works the same way as playing a slot animation as a dynamic montage. But montages allow for more complex animations—it’s up to you which one to use.
PlayDynamicPhysHitReact (link)
This function requests the dynamic physics hit reaction to play. The actual animation is handled in UpdatePhysReact.

It sets up the animation by resetting timers, configuring the impulse, multipliers, and assigning the component to use for the animation.
UpdatePhysReact (link)
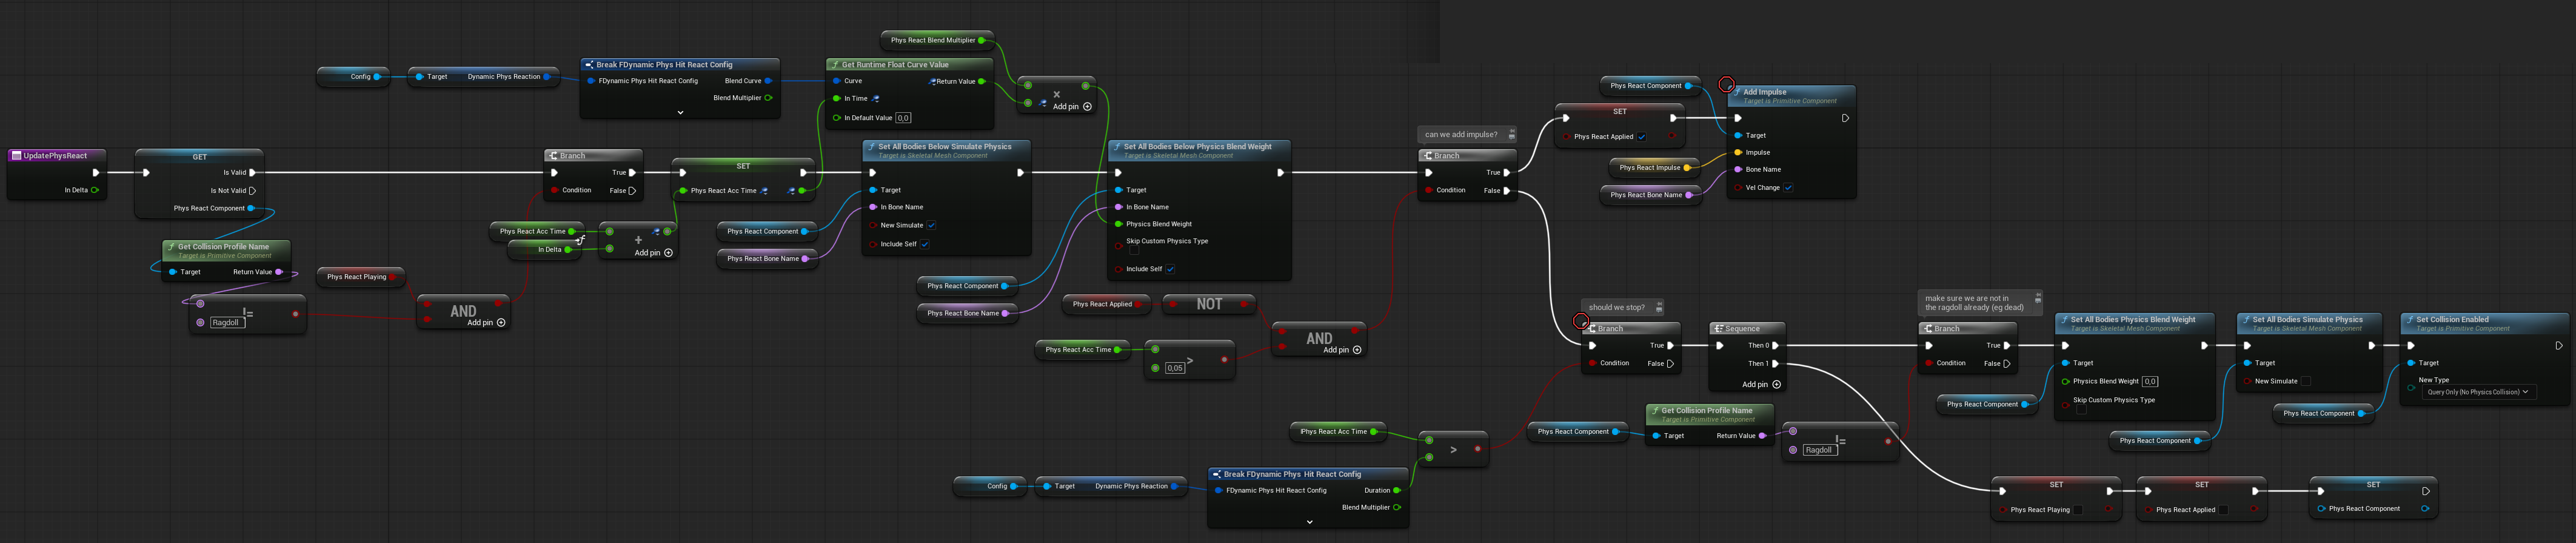
This function updates the physical reaction each tick.
- It uses a curve to blend the physical weights.
- An impulse is applied at the start of the effect.
- The reaction lasts for a set duration, after which it is disabled.
- Each tick, it also checks to ensure the owner is not in a ragdoll state.
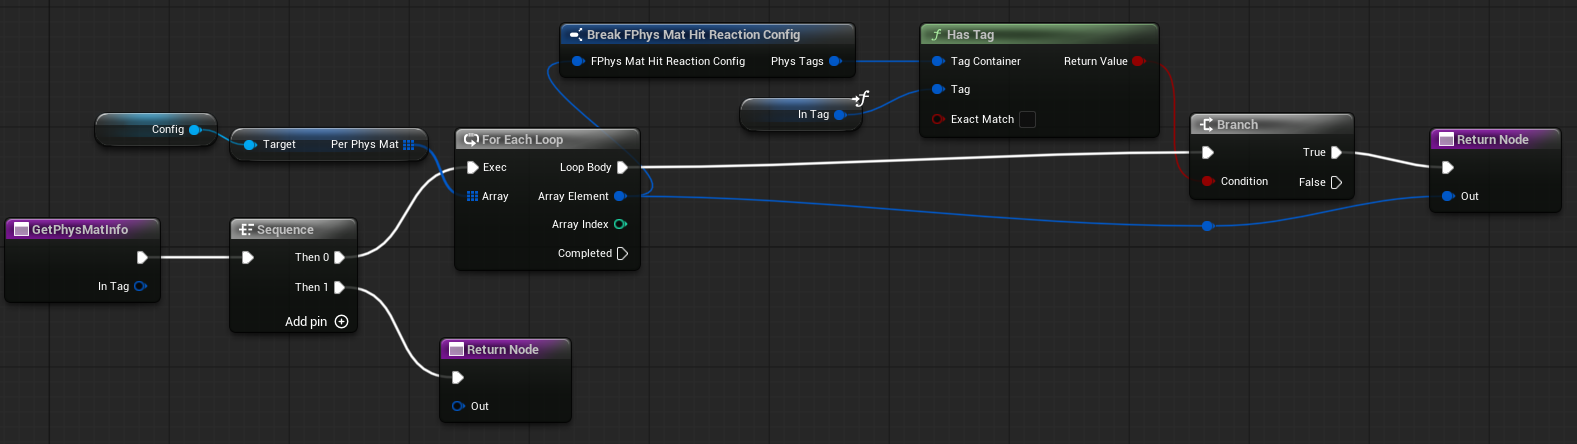
GetPhysMatInfo (link)
A simple function to get the FPhysMatHitReactionConfig based on the gameplay tag.
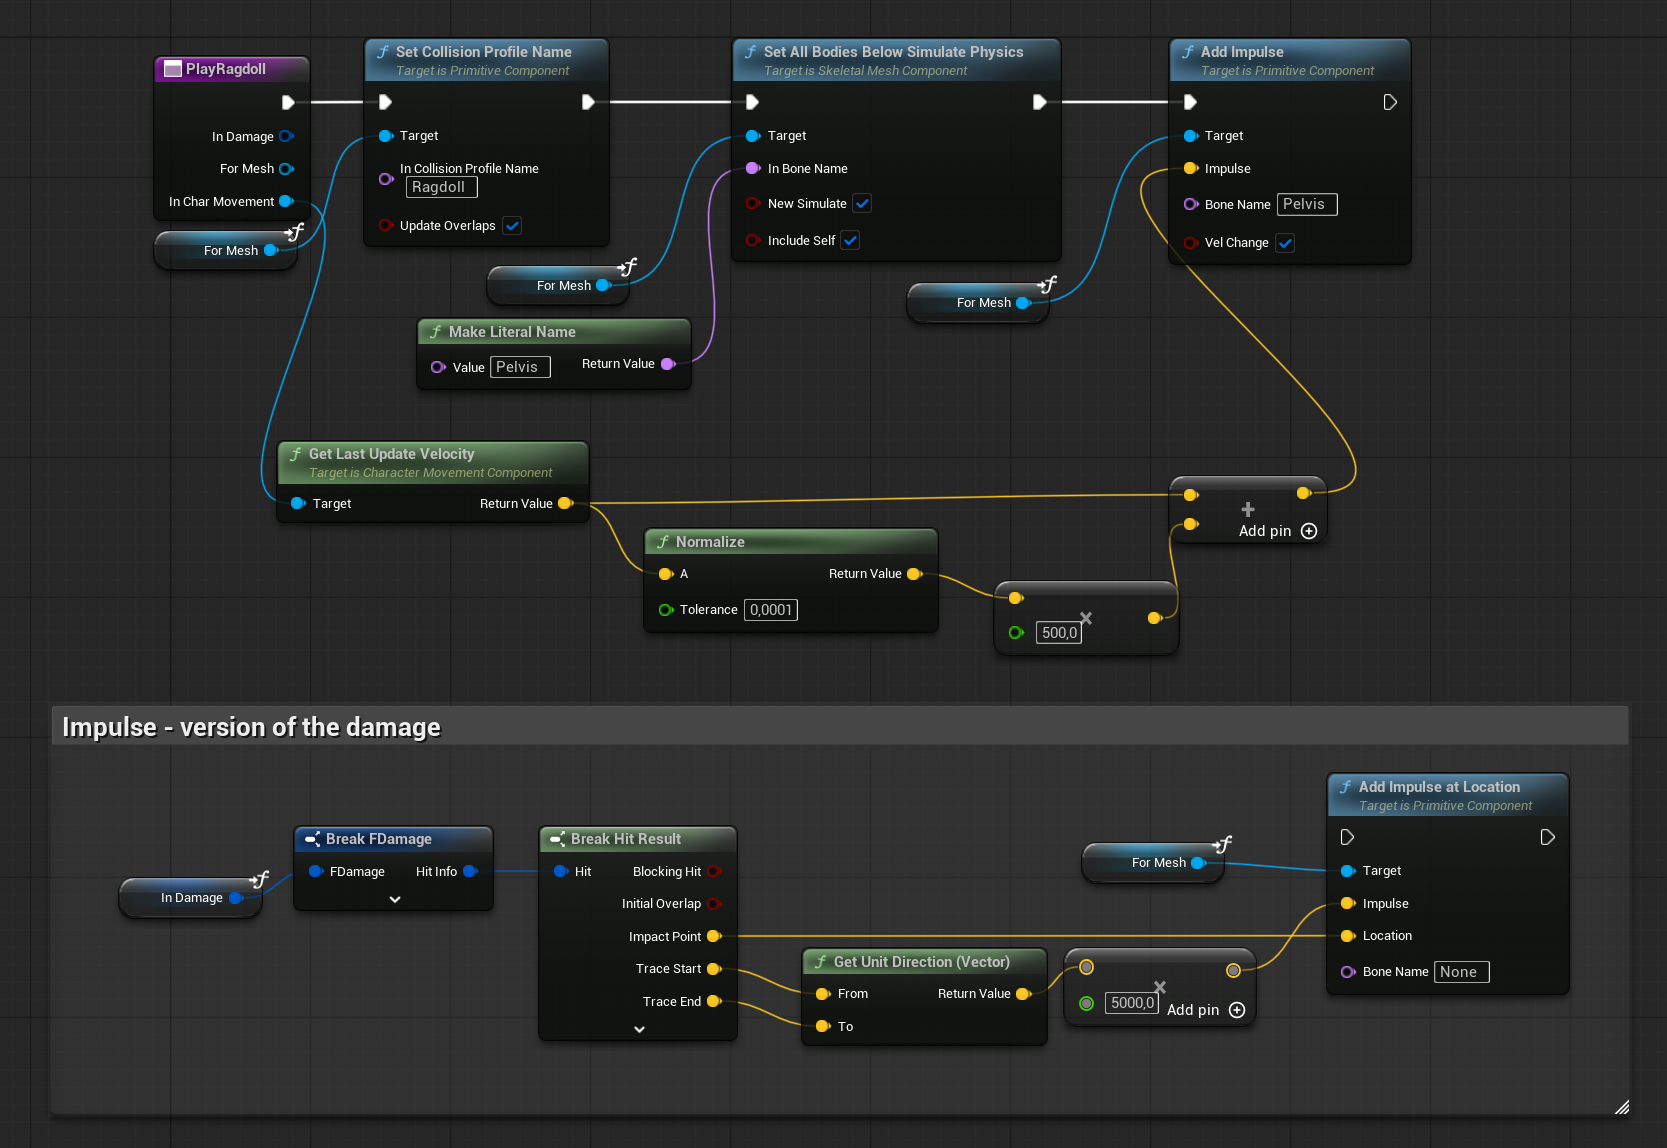
PlayRagdoll (link)
This function has two ways to enable ragdoll:
- Using the hit direction as the impulse.
- Using the velocity from the character movement as the impulse.
This setup can be easily extended later to choose which method to use and how strong the impulse should be. These settings can be configured in the Character Audio Visual Hit Reaction preset.
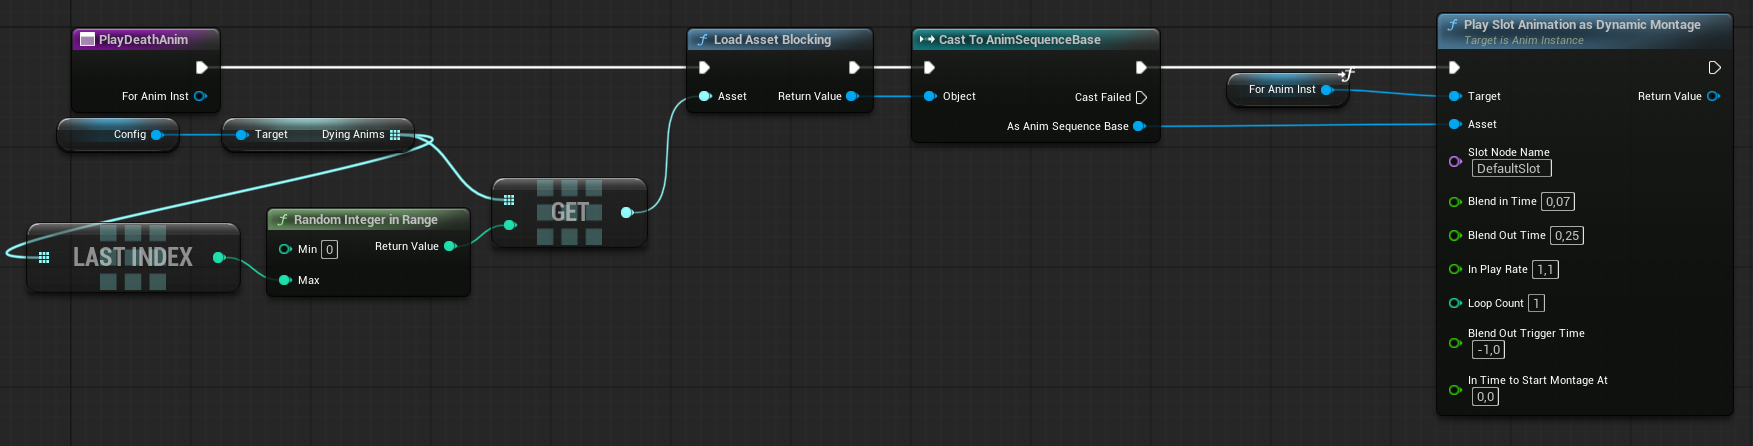
PlayDeathAnim (link)
It’s almost the same as playing the hit reaction animation, but a different animation slot is used.
Retarget anims
Before moving forward I would like to show you how I retargetted animations from Lyra to use with Inflitrator character.
Before I start please watch some great talks about retargeting.
And read official info about retargetting and retarget manager.
Moving from Infiltrator Project
I’ve moved the SK_Infi mesh to the Lyra project. There are a few ways you can do this:
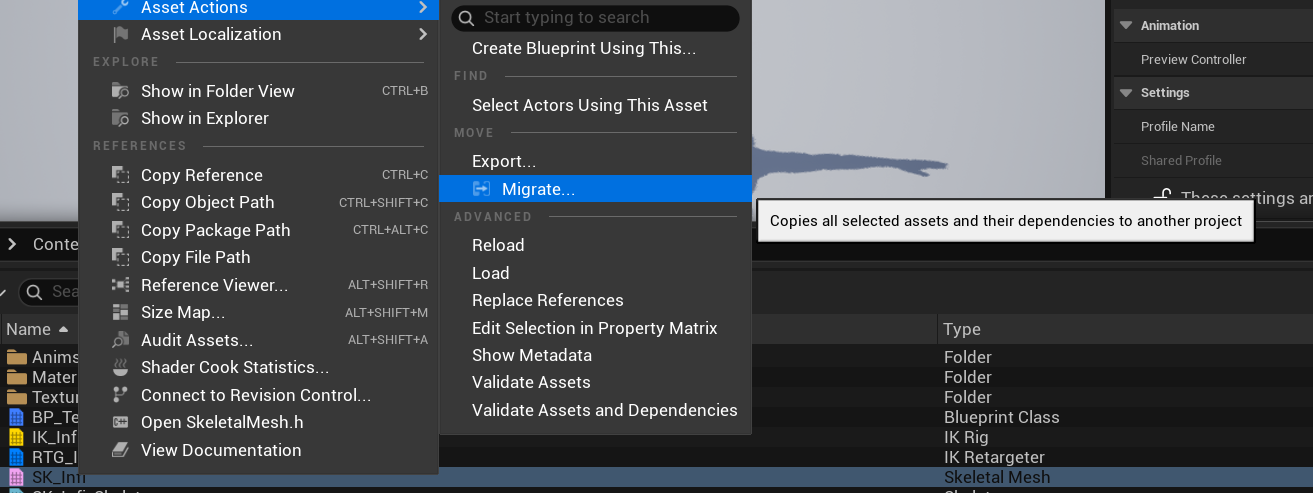
- Migration.
This method copies all related assets—materials, textures, skeletons, etc.—to the selected project, while retaining the original folder structure.
However, I don’t recommend it, as it often brings along many unnecessary files. - Copy & Paste (Same Folder Structure)
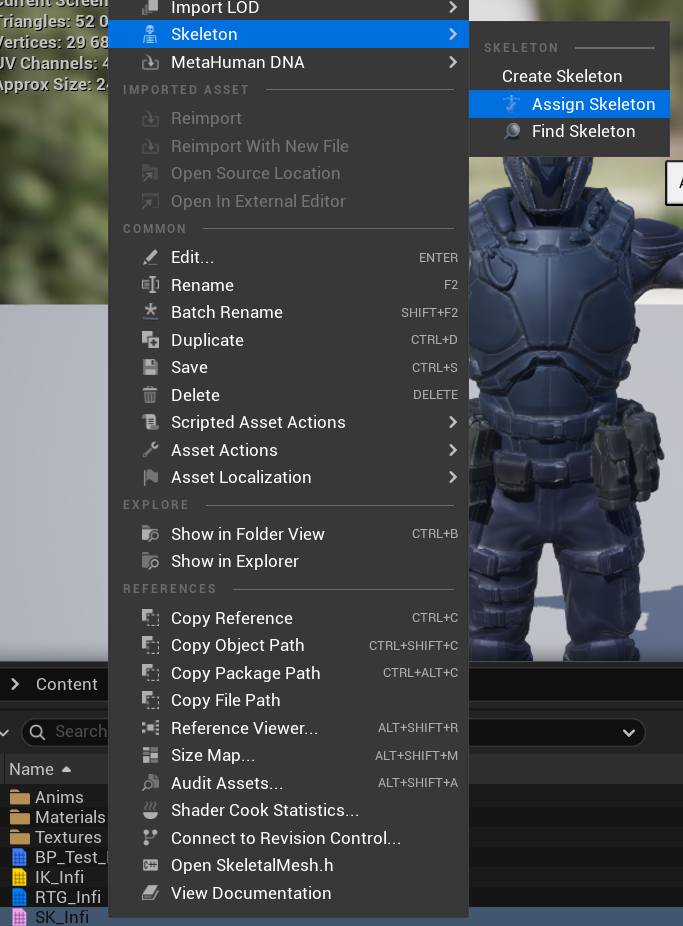
You can manually recreate the same folder structure in your project and copy only the assets you need. For this example, that would be just the skeletal mesh and its skeleton. - Copy & Paste (New Folder Structure)
Keep in mind that assets reference other assets. For instance, a skeletal mesh references its skeleton.
If you’re copying into a different folder structure, you’ll need to open the assets in the correct order to avoid broken references.
In this case, you can manually assign the new skeleton before opening the skeletal mesh.
IK Solver
In Lyra, I created a new IK Rig using the Full Body IK solver.

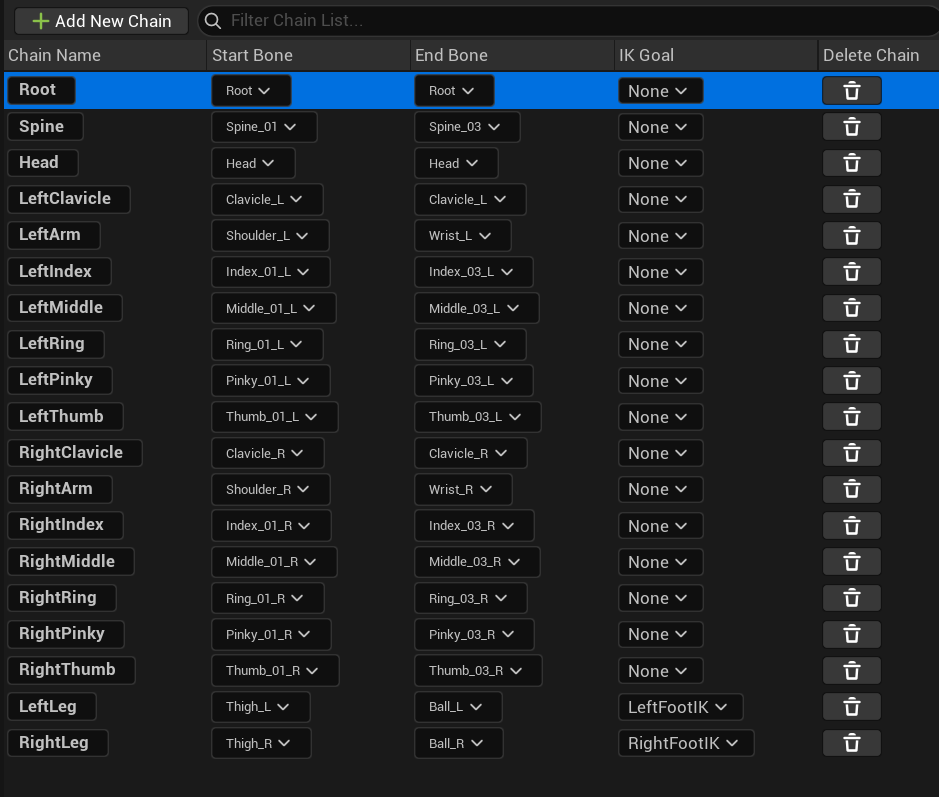
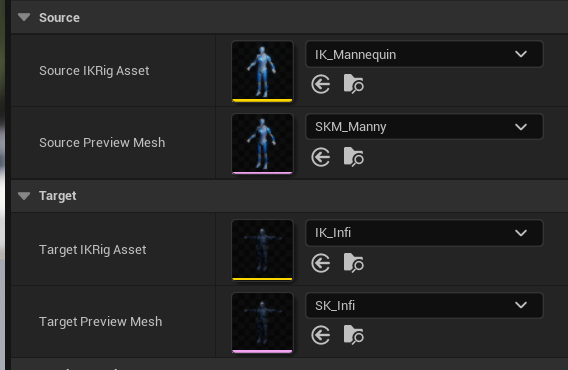
IK Retargeter
I also created an IK Retargeter asset, configured to use Manny as the source and Infiltrator as the target.
With chain mapping:

If you want to preserve root motion in the animations, make sure the Root Translation Mode is set to Globally Scaled.

And don’t forget to adjust the Infiltrator’s pose to match Manny’s, instead of using the default T-pose.
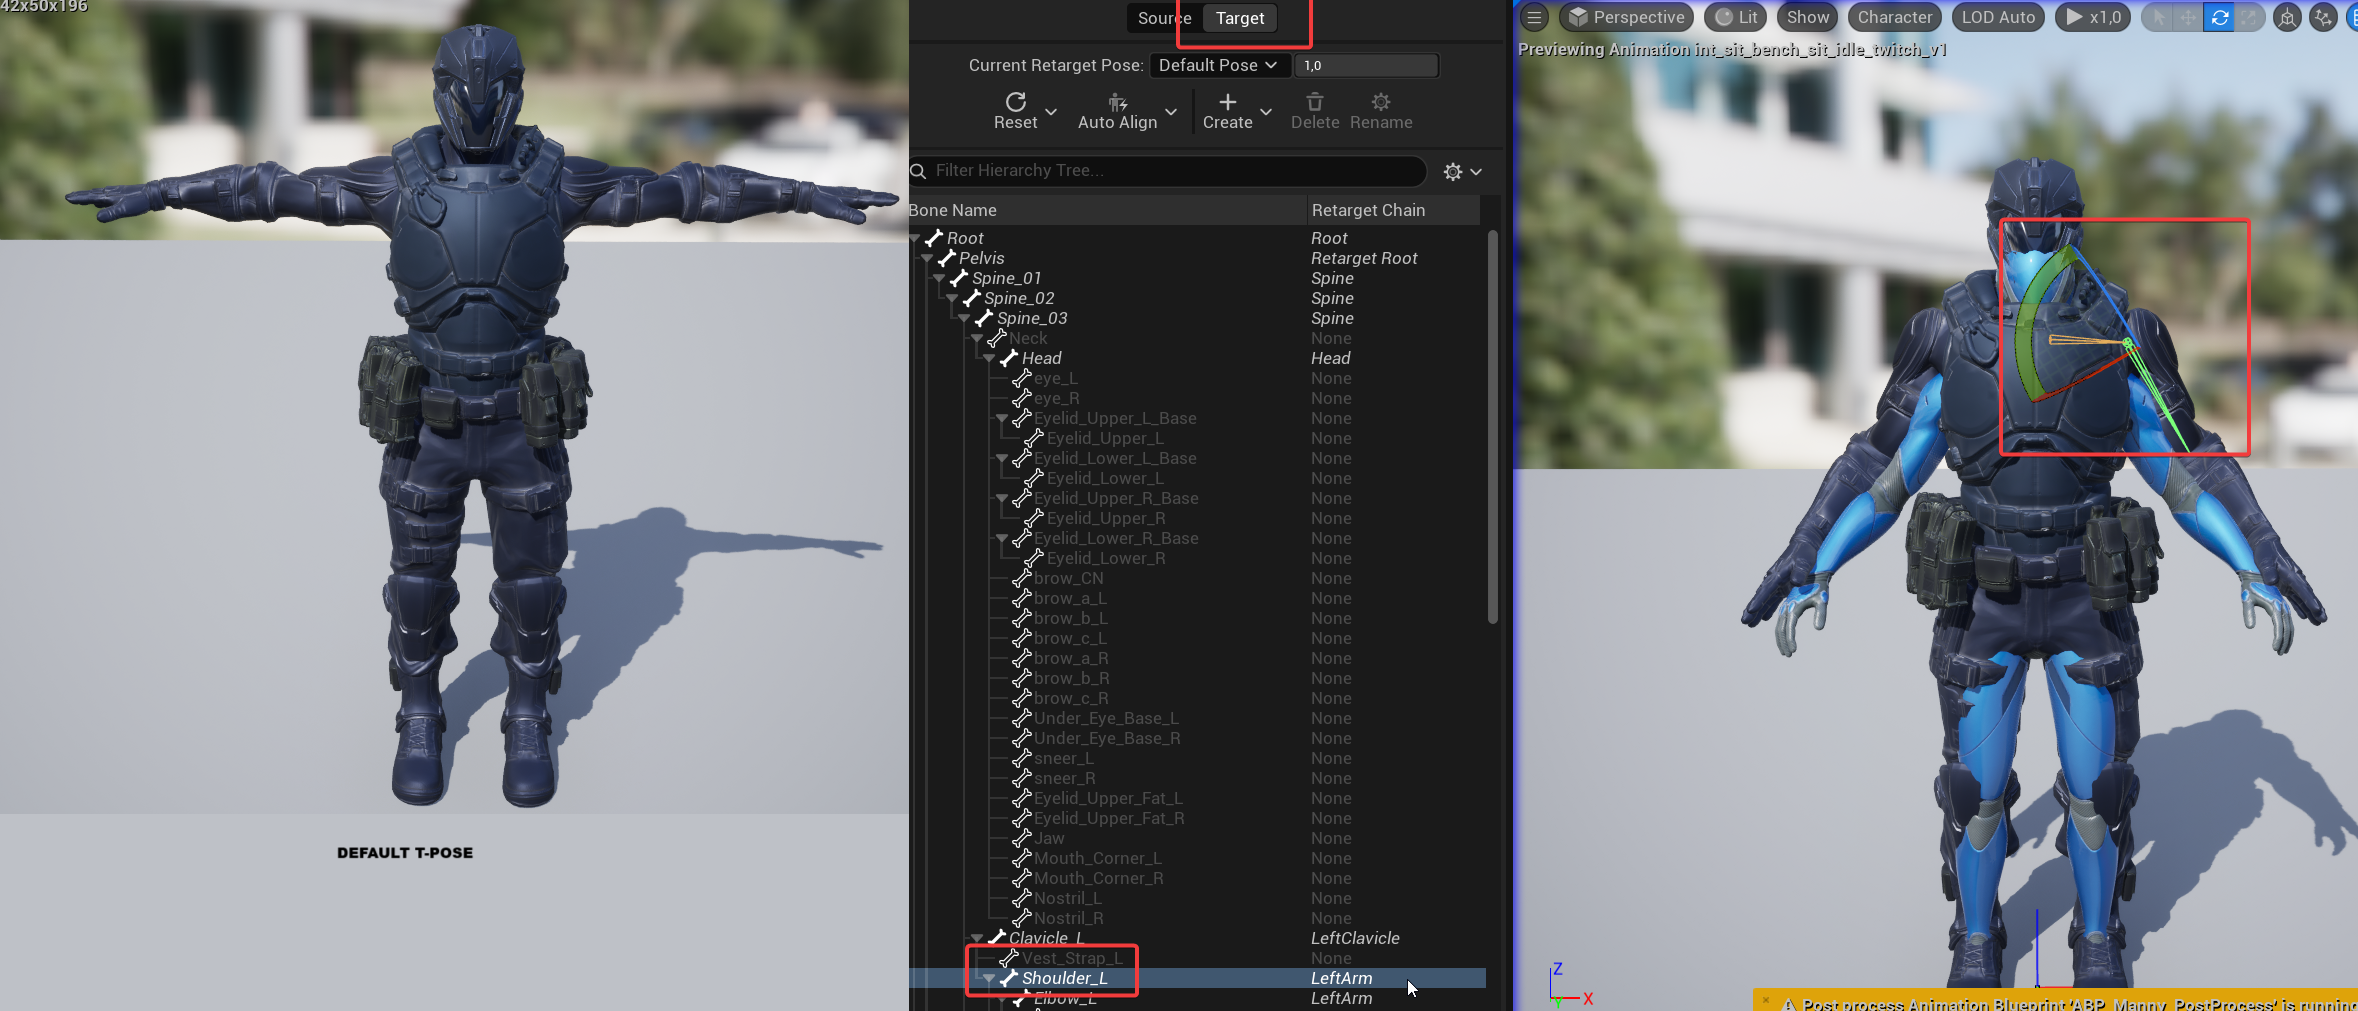
Without this, your animations won’t align correctly. It’s important to take your time here and ensure the base pose matches Manny’s pose as closely as possible.
With all of this set up, you can now preview the retargeted animation and export it.
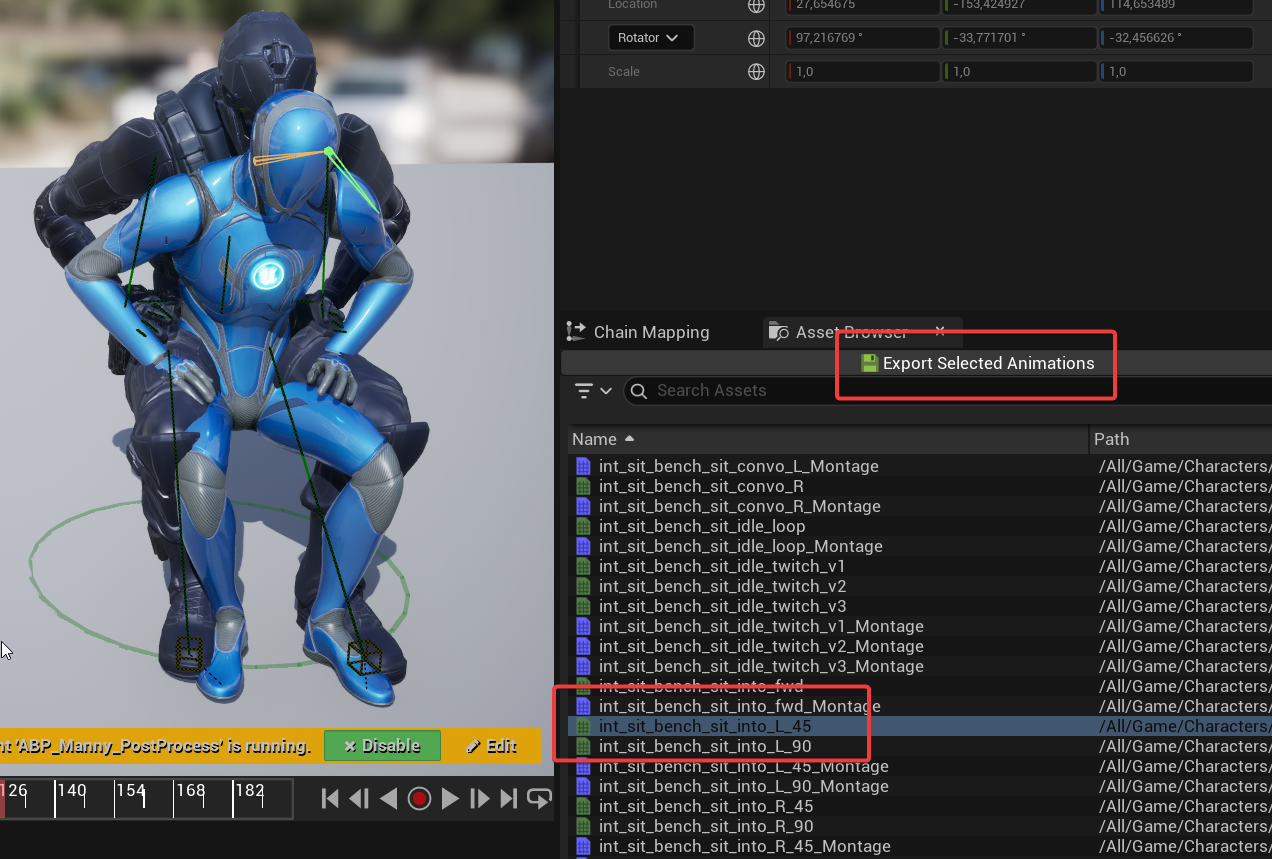
Which I did for locomotion, hit reactions and some others.
💡 Note: You can find tutorials on how to retarget animations dynamically at runtime without exporting them. However, as of version 5.6, this approach isn’t recommended—it renders two characters, animates both, and applies Full Body IK to one of them. That’s not ideal for games just yet.
Animation Blueprint
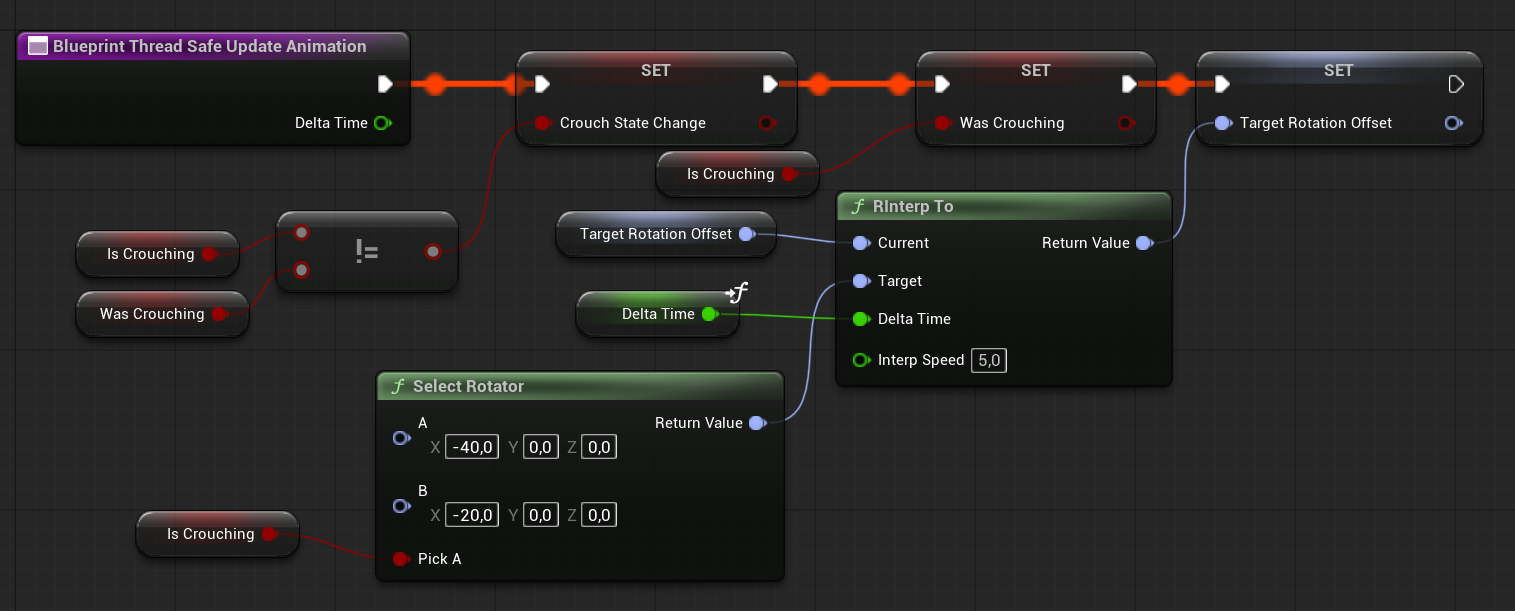
The animation graph ( AnimBP_BaseEnemy ) is quite simple but includes a few workarounds that could have been avoided with a better retargeting setup. I was a bit lazy and did the retargeting quickly—but thanks to that, I can now show you some basic things you can do in the Anim Blueprint.
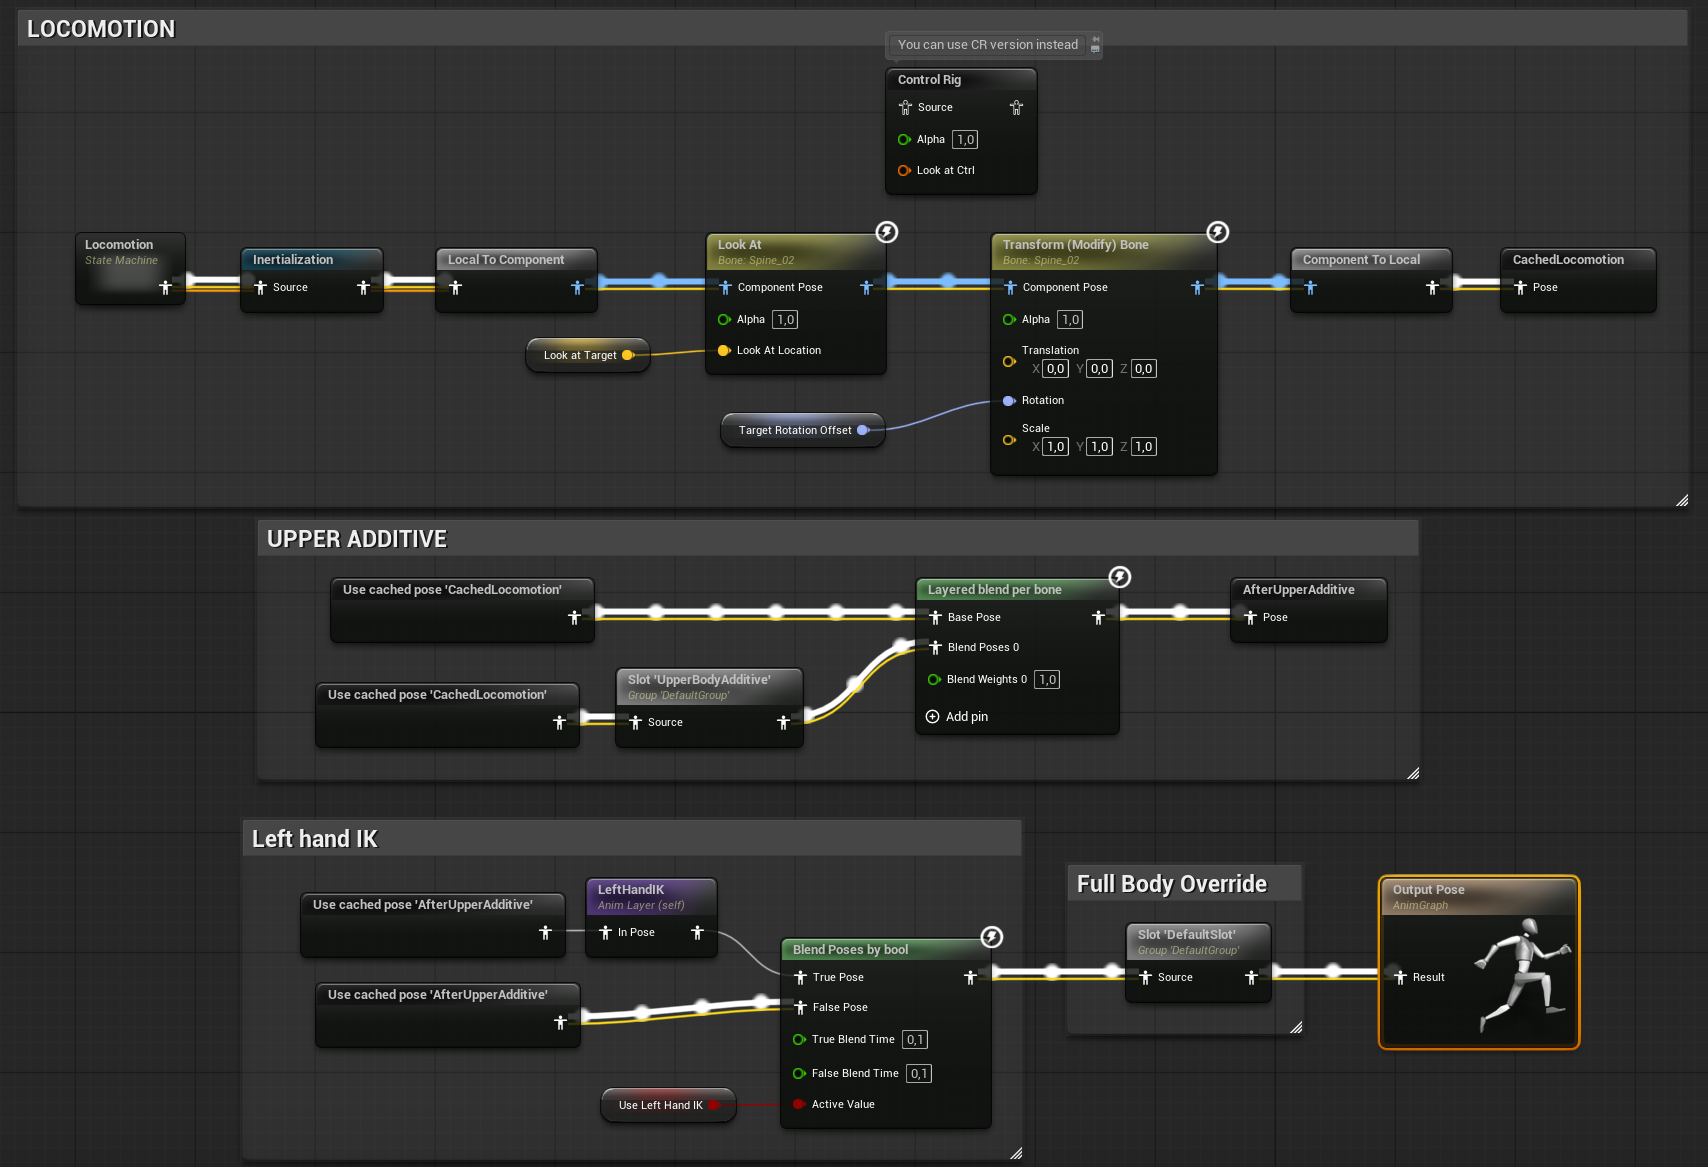
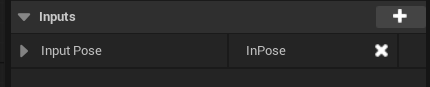
Look at
I’m using the Look At node to face the enemy to the target.
I’m using the Look At node to make the enemy face the target. After that, I also apply a small offset to the bone to account for differences in weapon positioning between standing and crouching animations.
For a more layered approach, check out CR_Infi_LookAt, which uses multiple Aim nodes. You can achieve a similar setup in the Anim Blueprint by using more than one Look At node.
Basically, it’s a good idea to handle procedural animations in the Control Rig rather than in the Anim Blueprint.
Hand IK
Since I didn’t take the time to properly set up the retargeting, my character’s left hand is offset during the firing animation.
To fix this, I’m using a Two-Bone IK to position the left hand correctly on the weapon. However, I disable the IK during the reload animation, as the hand placement is already correct there.

You can also improve modularity in your Anim Blueprint by using Animation Layers.

Alternatively, this entire setup could be moved to the Control Rig for better flexibility.
Layered Blend Per Bone
The Infiltrator will have two states — standing and crouching — but I don’t have separate animations for hit reactions or reloading. That’s why I’ll use additive animations that affect only the upper body.
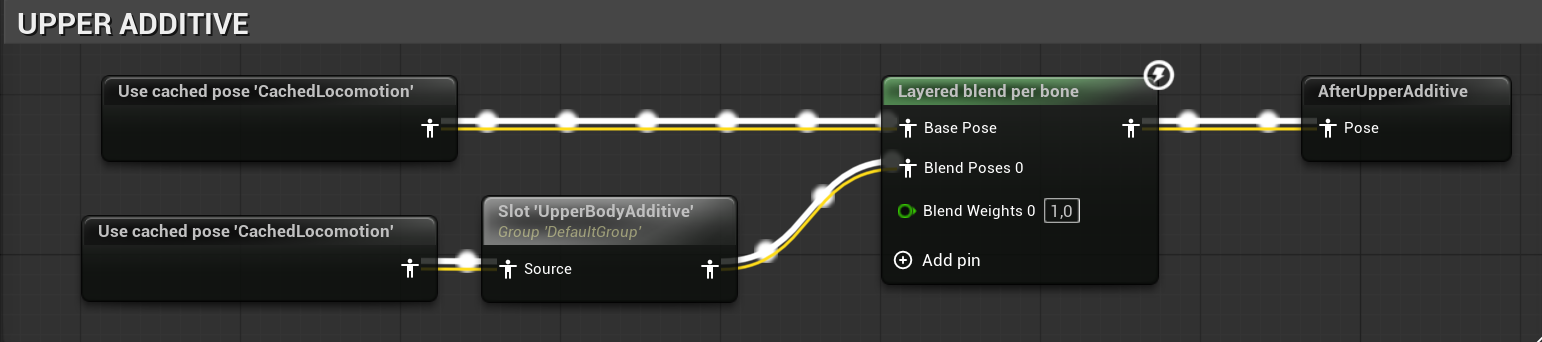
Additive animation is a technique where one animation is added on top of another. Rather than replacing a base pose or animation, it modifies it — for example, by slightly changing the rotation of the spine or the position of a hand. This is especially useful for layered or procedural-looking animations.
Locomotion
I’ve created the most basic locomotion setup I could.

What’s good about this example is that it includes a separate state machine for idle, since we have two versions of the enemy — crouching and standing.

You should take your time and analyze this part of the Anim Blueprint, as it’s one of the most commonly used systems when working on locomotion.
One of the great things about the Anim Blueprint is that you can use a Sequence Player node to choose which animation should be played directly inside the graph.


There are three functions you can override. For example, the Sequence Player for idle:

It simply selects the correct idle animation based on the crouching boolean. This is the only “advanced” logic in the animation graph for now.
Event Graph Functions and Performance
When working with Anim Blueprints, it’s important to understand the performance implications. I highly recommend reading this good article on animation optimization.
It’s really easy to hurt performance by doing heavy calculations inside the Anim Graph or by using functions that are not thread-safe.
Whenever possible, use thread-safe functions to perform calculations without accessing external objects. This helps keep your animation system fast.
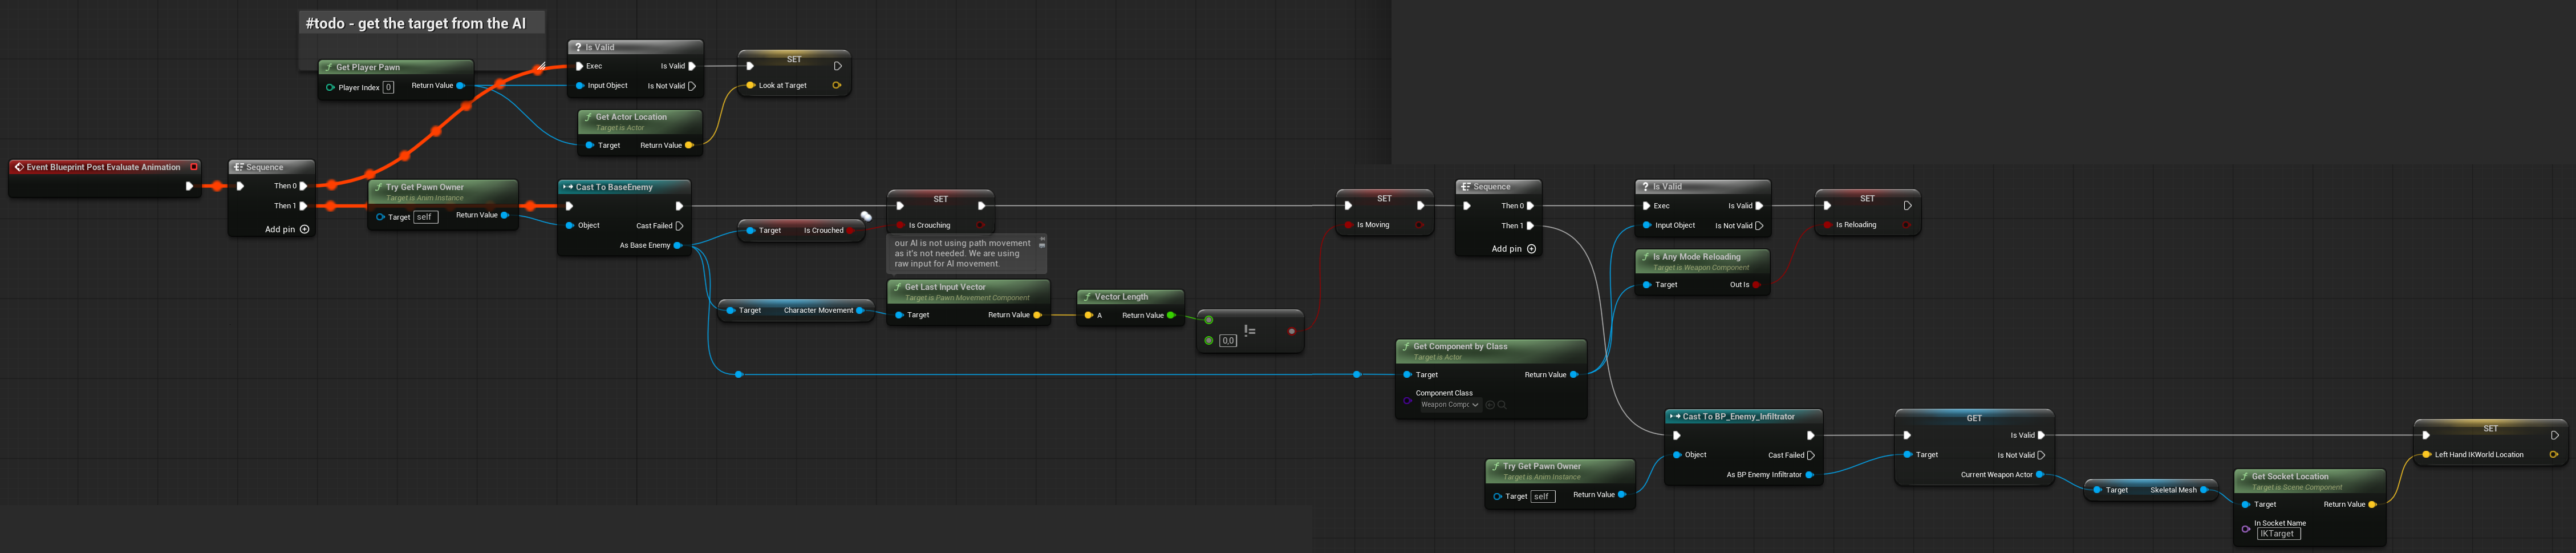
You can also instead of using Update Animation function use Post Evaluate to update data that need talk to outside world. Here’s mine (link)
Physical Asset
As always, make sure to get some context. Read the official documentation. Watch this best tutorial on how to create proper humanoid physical assets. it’s based on Unreal Engine 4.2, but it still covers many foundational topics you should understand:
And one more thing — you can always take a look at the Mannequin Physical Asset from the Lyra project to see how Epic set things up.
Our physical asset (SK_Infi_Physics) doesn’t have anything fancy — just one special body on the jaw with a Glass physical material. This will serve as our weak spot.
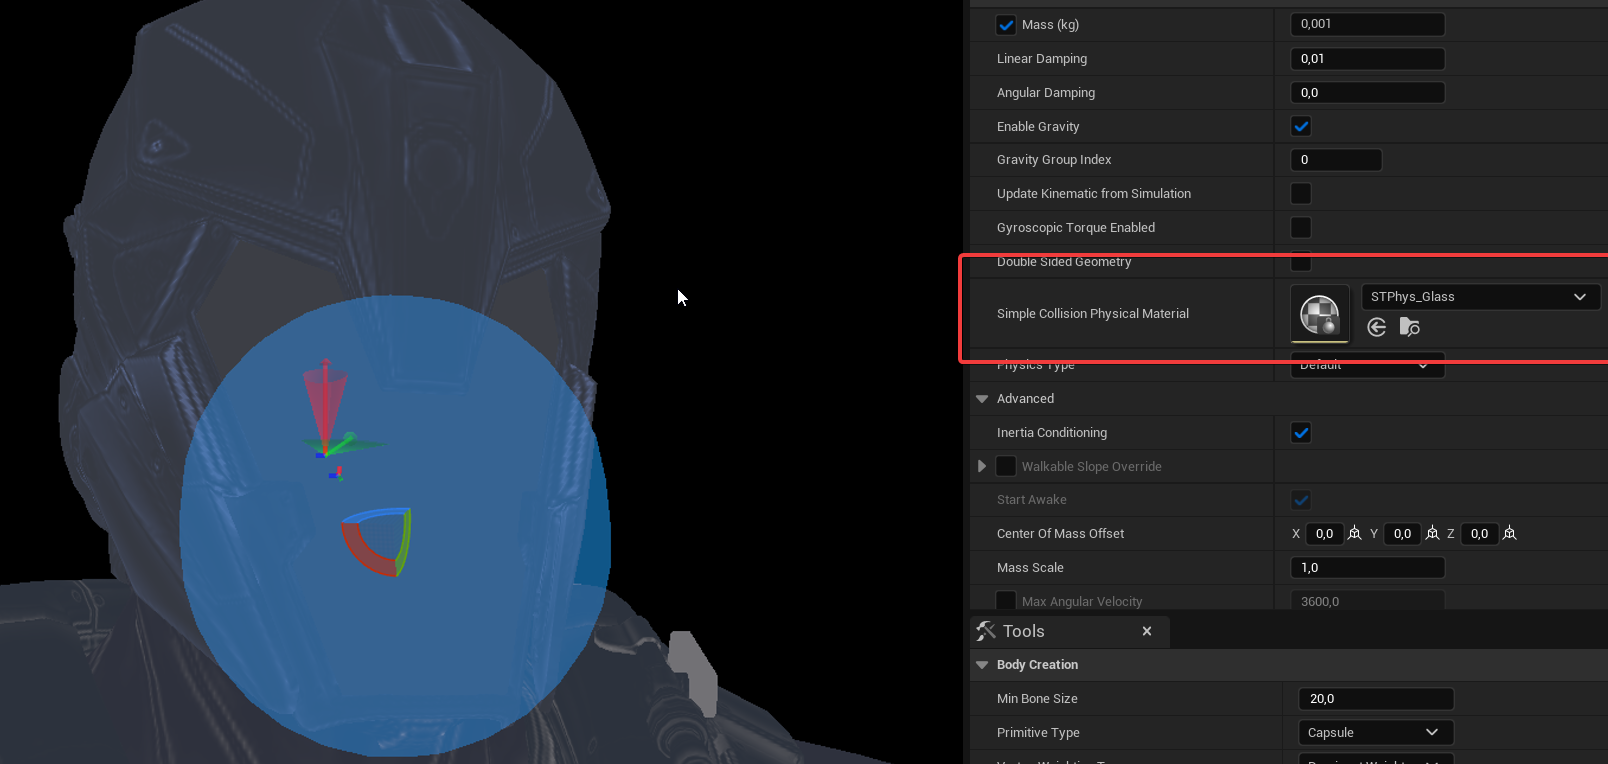
💡 Note: If you don’t see the Simulate Selected button, go to Project Settings and enable Use Small Tool Bar Icons.

Creating a good-looking physics asset for use with ragdoll can take a couple of days — so, as always, take your time!
Base Enemy
Now we can move to Base Enemy Class. Which have some components:
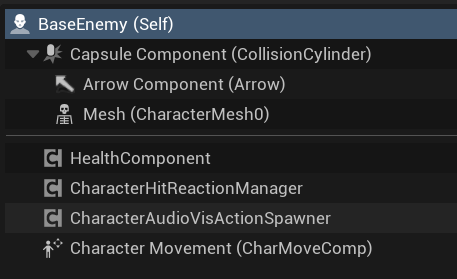
- HealthComponent
- CharacterHitReactionManager
- CharacterAudioVisActionSpawner
It’s holding just one variable for now.
| BTTorun | BehaviorTree | Holds a reference to the Behavior Tree asset that will be run by the AI Controller. |
And some functions.
OnDeath (link)
Called by the HealthComponent’s OnDeath event.
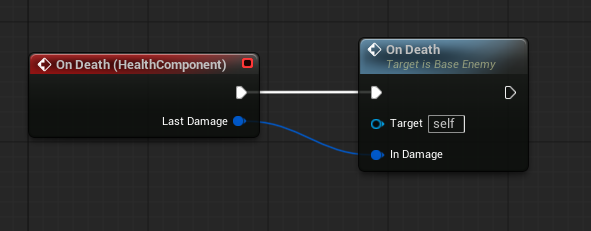

By default, it plays the dying action, a death animation, and enables ragdoll. Characters can override this function to include more custom effects.
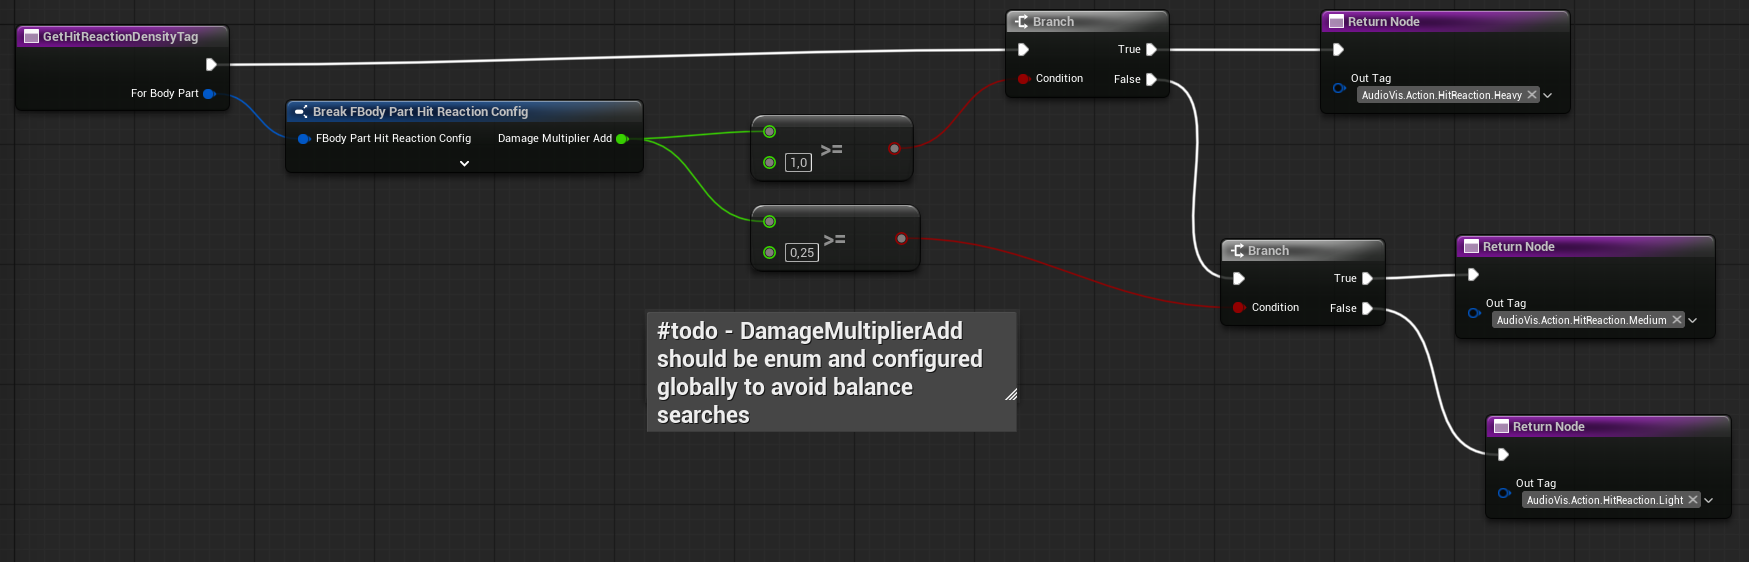
GetHitReactionDensityTag (link)
This function returns the hit reaction density (Light, Medium, Heavy) based on the damage multiplier for the body part.
💡 Note: As you can see, I’ve hardcoded the values for now — something you should generally avoid. These will be moved to a configuration asset later during the balancing phase.
PlayWeakSpotEffects
This function is currently empty but will be overridden by child classes. For example, the Infiltrator will make the glass part of his helmet glow.
GetDamageManager
Helper function to retrieve the Damage Manager.
This could be moved into a global function library, as other classes might also need a simple way to access the Damage Manager.
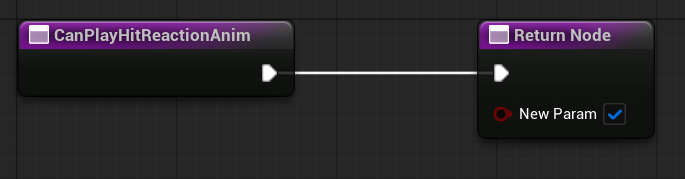
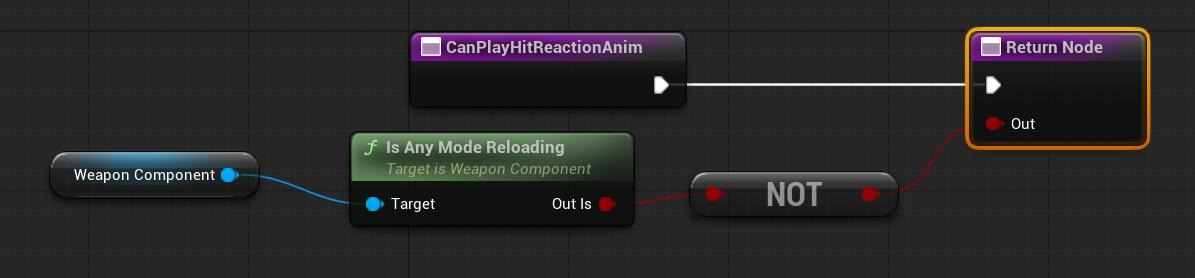
CanPlayHitReactionAnim
Returns true by default. Will be overridden by child classes.
ReceiveDamage Interface (link)
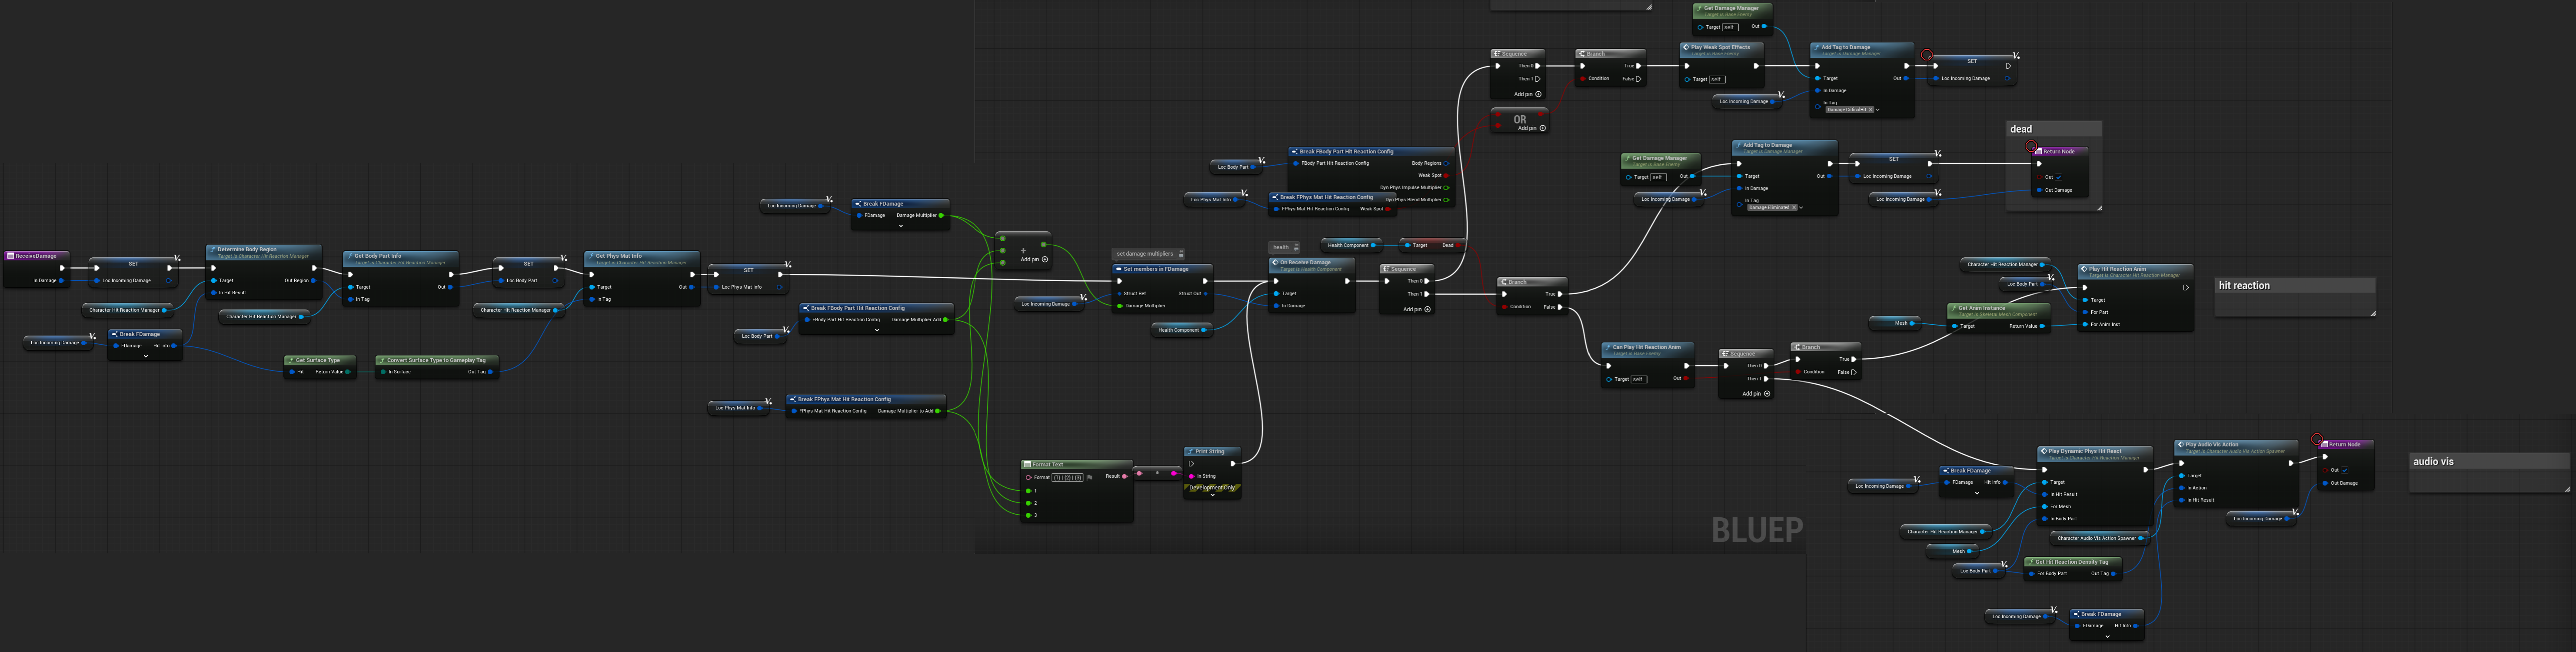
This function do lot of stuff:
- First, it determines the data we’ll be working with: body region, body part info, and physical material info.
- Modifies the incoming damage multiplier (e.g., for weak spots or lower body hits).
- Calls
OnReceiveDamageon theHealthComponentto update the current health. - If the hit was on a weak spot, it plays weak spot effects and sets the critical hit tag.
- If the character is dead, it adds the eliminated tag to the damage.
- If not dead, it checks whether a hit reaction animation can be played—if yes, it plays it.
- If not dead, it also plays the dynamic hit reaction and audio-visual effects.
- Finally, it returns the modified
FDamagestruct.
CanHoldFire Interface (link)
Simple function that returns whether the enemy can hold fire. Currently, it returns true if the enemy is not in a hit reaction and not dead.
GetBulletDirection Interface (link)
This function uses the TargetActor from the Blackboard, which will be described later.
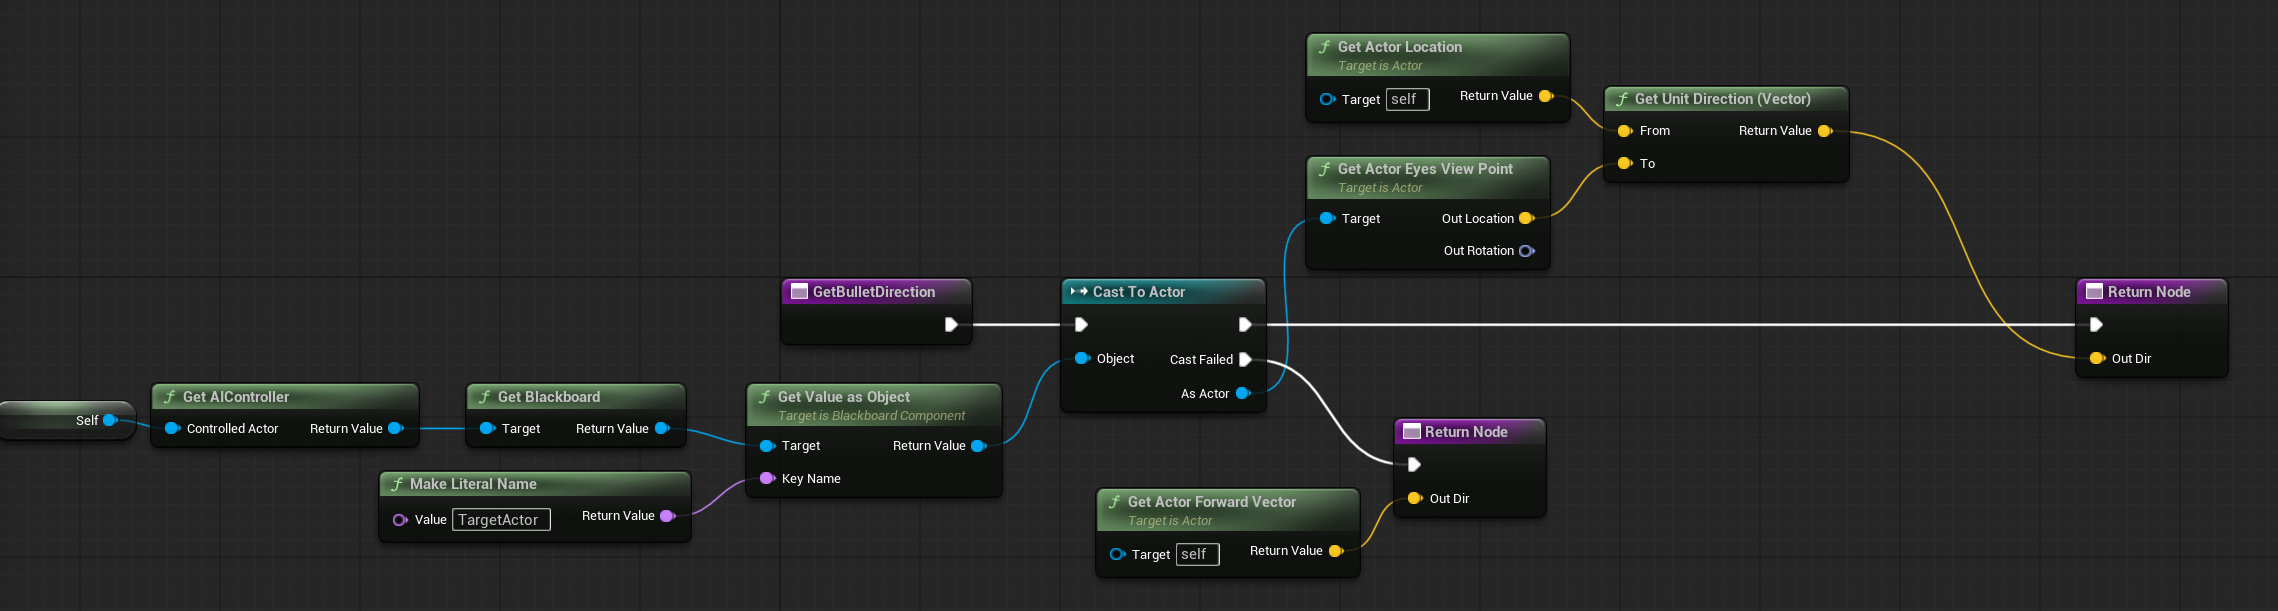
Remember that GetBulletDirection comes from the IWeapon interface we created in earlier tutorials.
PlayRagdollWithDelay Event

This is called OnDeath function to be able to play ragdoll with some random delay.
Enemy – Infiltrator
Now that we have our Base Class, we can create a child class for our Infiltrator. He has a WeaponComponent, which the Base class does not. Maybe some enemies won’t have weapons—like a flying drone that wants to explode near the player.
There is some stuff in the event graph.
Begin Play. Some enemies will randomly start crouching.

Just like in the Player Pawn, we set up the weapon actor whenever the Weapon Component changes the weapon.

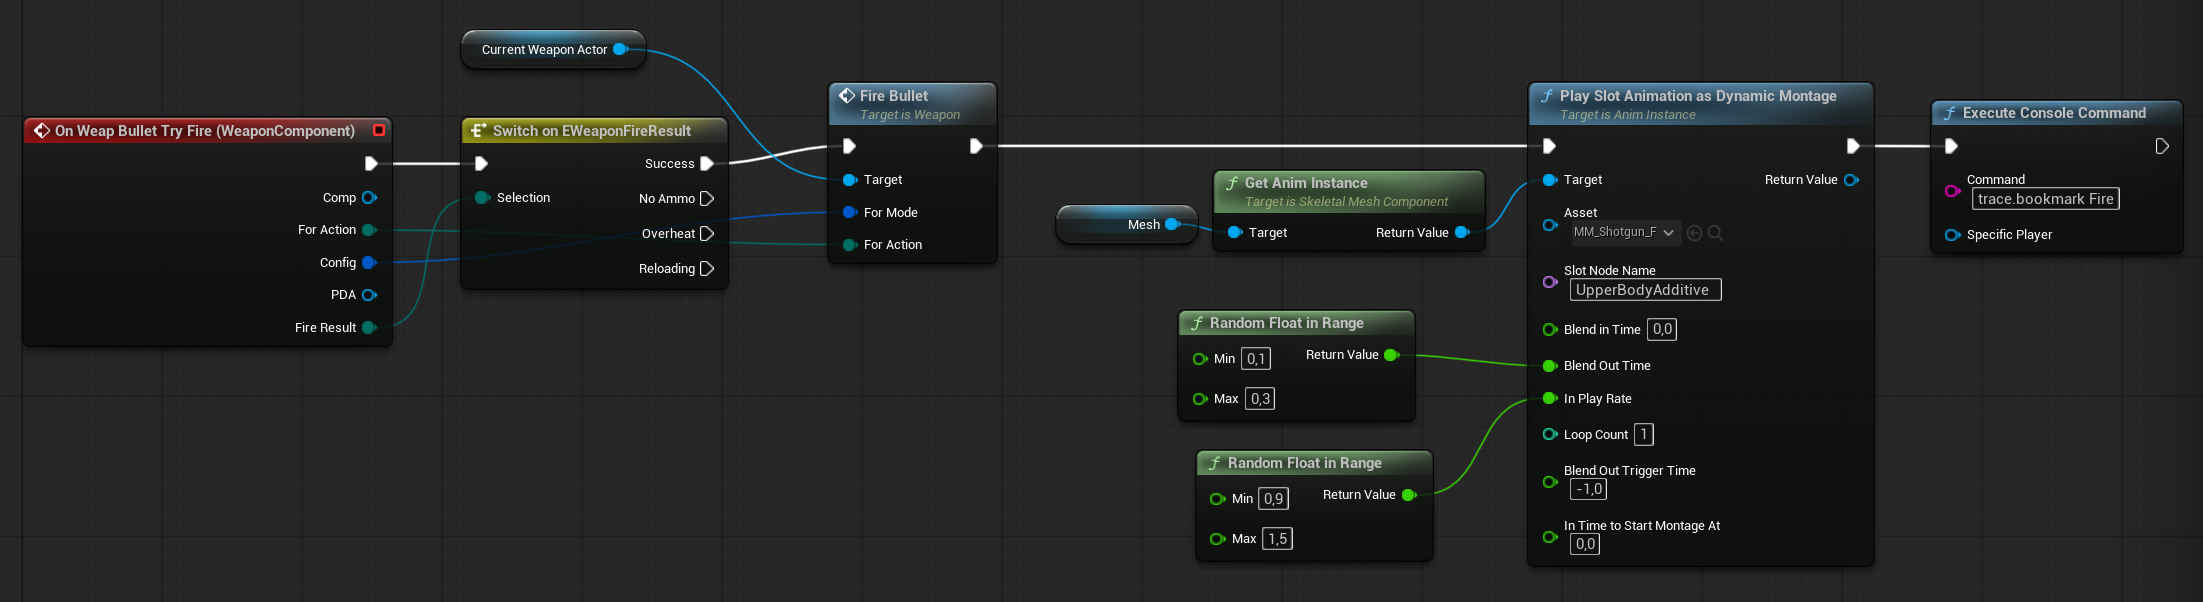
Just like in the Player Pawn, we fire the bullet when the Weapon Component calls for it.
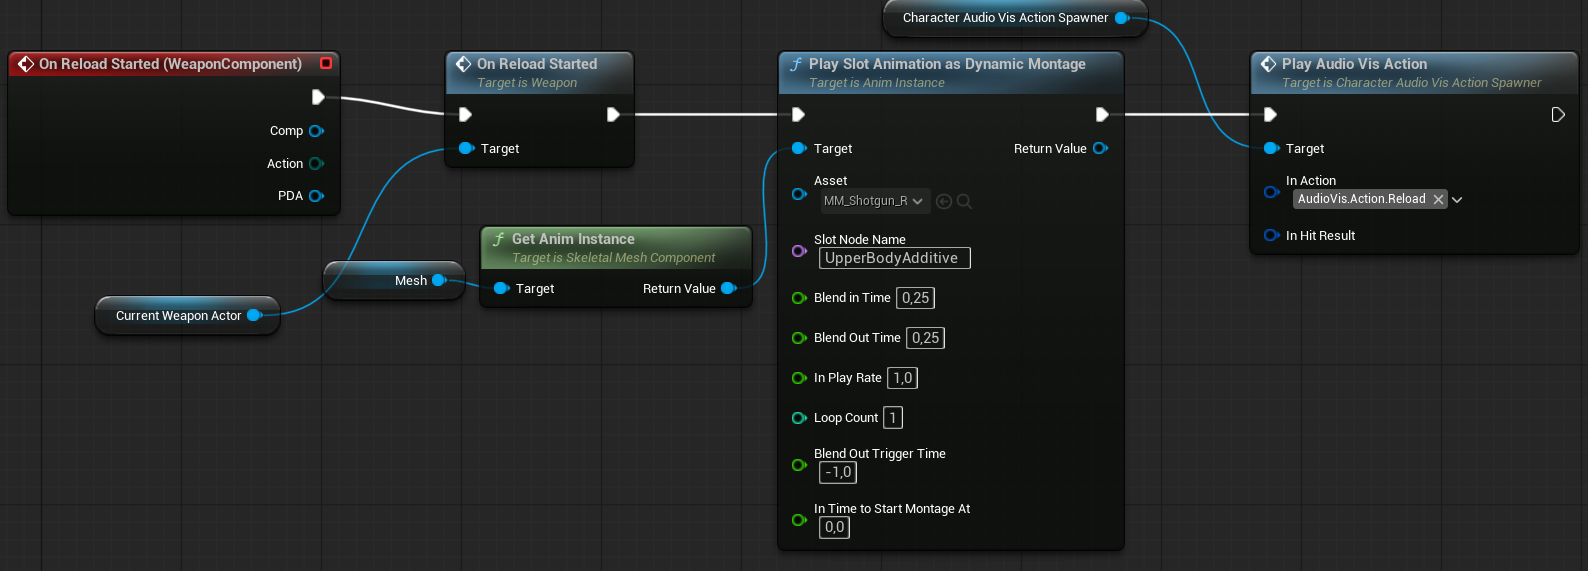
The same applies to reloading.
And lastly, the GlassGlow effect driven by the timeline.

Timeline is simple curve with 0.5s lenght going down.
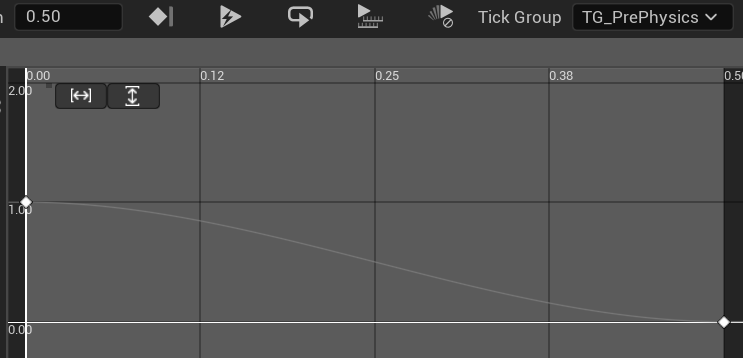
The timeline will be triggered when the weak spot is hit. This provides the player with immediate feedback, indicating the weak spot and allowing for instant elimination of the enemy.

CanPlayHitReaction is overriden to not to play hit reaction when weapon is reloading.
Also, take a look at the class defaults—they enable crouch mechanics and spawn the default AI controller.

AI – Controller
Our base AI Controller is quite simple — it has just one function to run the behavior tree and set a random value for use in the Blackboard.

Normally, for AIs like this, I wouldn’t use AI Controllers, Behavior Trees, or Blackboards. Instead, I’d implement the AI using a state machine, a simple component, or even directly in the Character class — it depends on the character.
BUT I’m using these systems on purpose so you can get an idea of how to create more complex behaviors.
AI – Services
A Behavior Tree Service is a special kind of node that runs periodically while a Behavior Tree is active. It’s used to perform ongoing checks, updates, or background tasks that help the AI decide what to do next.
Think of it like a background task or helper that keeps refreshing some data or making sure certain conditions are met while the AI is running its behavior.
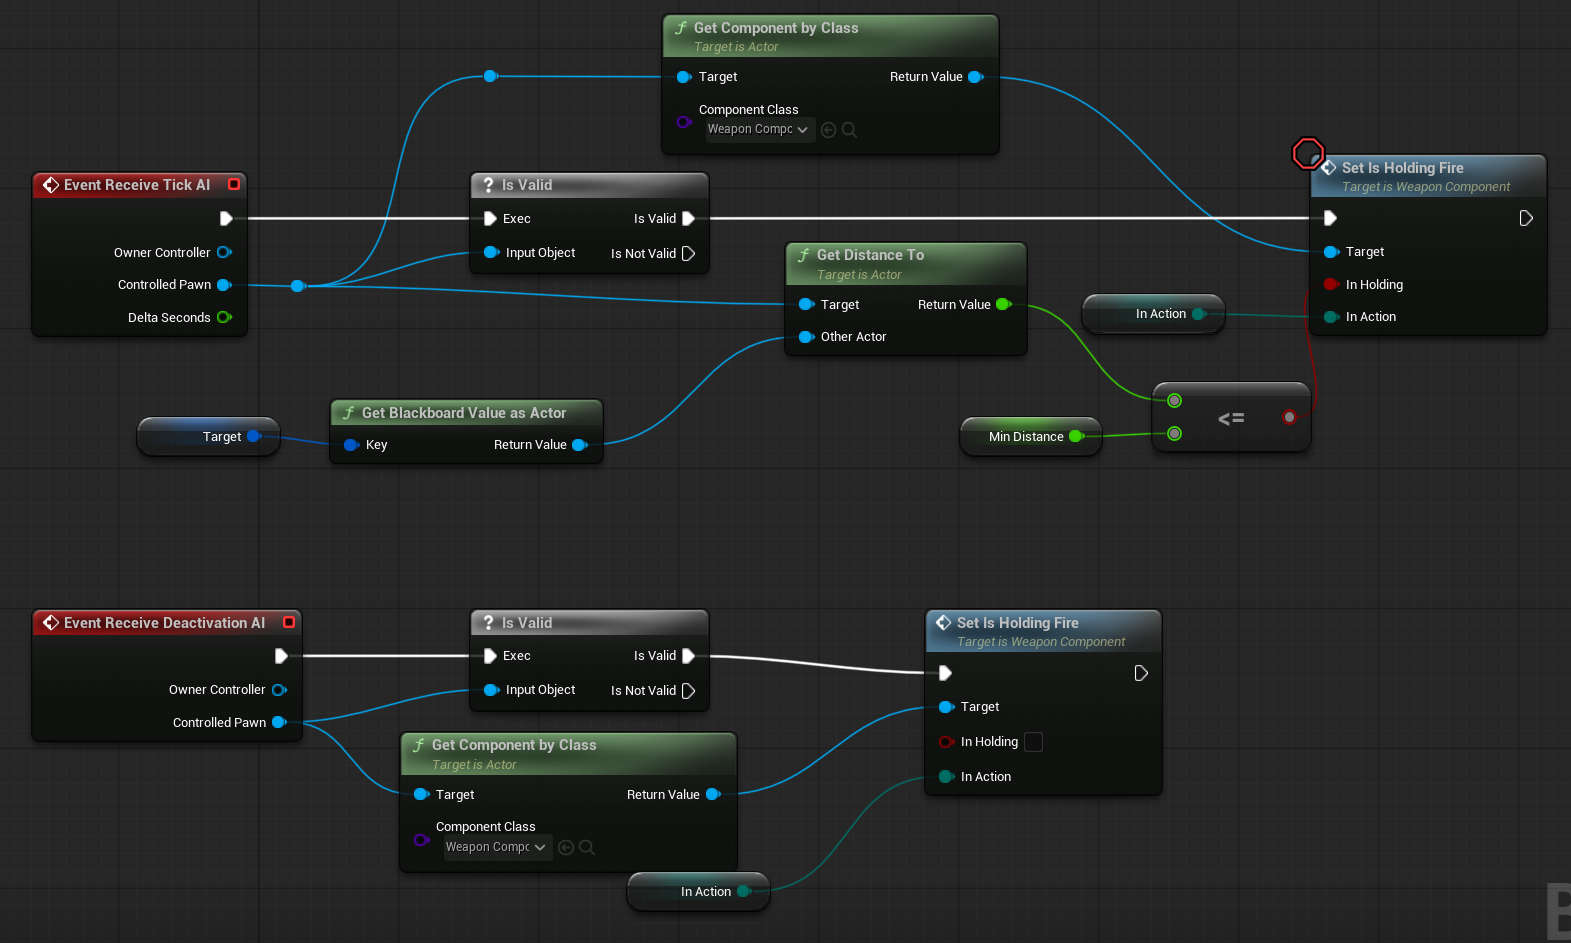
BTService_HoldWeaponFire. This service is responsible for making the AI hold its fire trigger.
| Target | BlackboardKeySelector | Selects which Blackboard key should be used as the Target in the behavior tree. |
| InAction | EWeaponInputActionType | Specifies which weapon input action type the hold fire applies to (primary, secondary, tertiary). |
| MinDistance | float | The minimum distance to the target at which the AI will hold its fire. |
BTService_Update is a more complex service that updates various Blackboard keys for the AI.
| Target | BlackboardKeySelector | Selects which Blackboard key stores the current Target in the behavior tree. |
| Distance | | Selects which Blackboard key stores the Distance to the Target. |
| Health | | Selects which Blackboard key stores the Health of the current AI. |
| IsDead | | Selects which Blackboard key stores the IsDead boolean of the current AI. |
| DistanceLeftToTravel | | Selects which Blackboard key stores the remaining distance the AI needs to travel. |
| Random | | Selects which Blackboard key stores a random value for use in decision-making. |

As you can see, Behavior Trees can only use Blackboards to store data. I’ll explain more about Blackboards shortly.
AI – Tasks
Behavior Tree Task is a node within a Behavior Tree that performs a specific action or operation for an AI character. Think of it as a “to-do” item in the AI’s decision-making process. Tasks can include things like moving to a location, playing an animation, attacking, waiting, or interacting with objects.
When the Behavior Tree reaches a Task node, it runs the code associated with that task until it finishes successfully, fails, or gets interrupted. The result of the task can influence the AI’s next steps in the Behavior Tree.
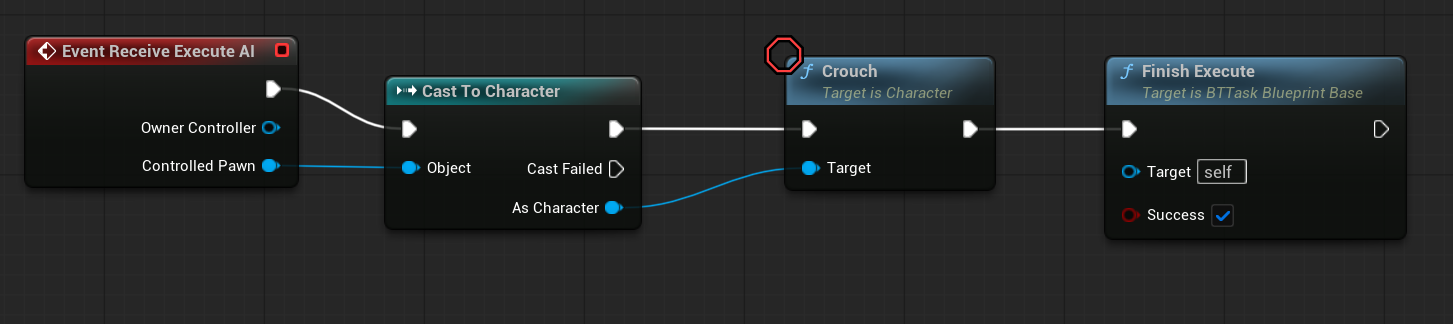
BTTask_Crouch. Really simple – just call Crouch function on the controlled Pawn.
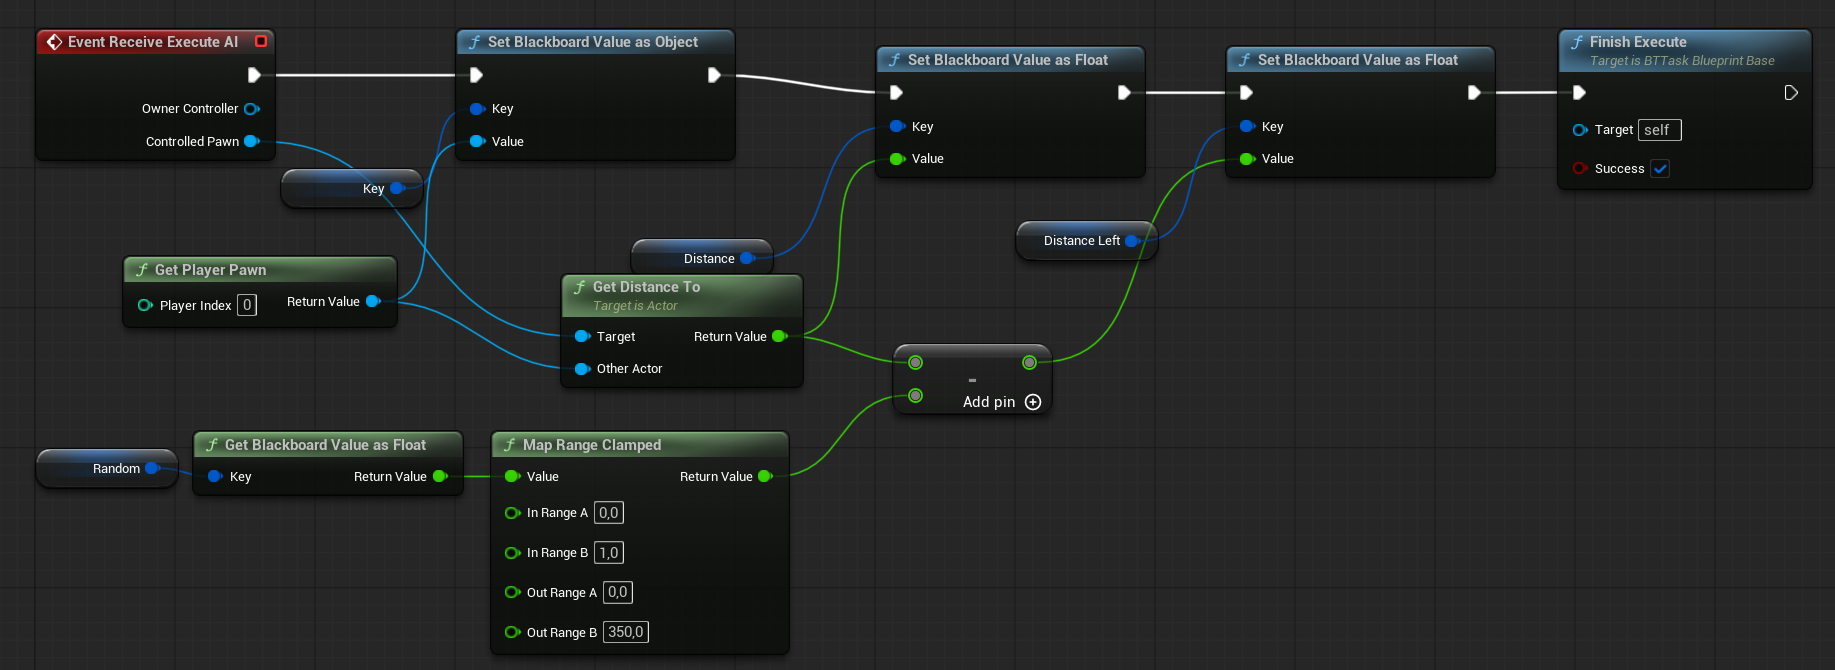
BTTask_GetTarget. This does the same thing as the Update Service. We use a Task here because we want to get the target as quickly as possible, and the Update Service is not called every frame.
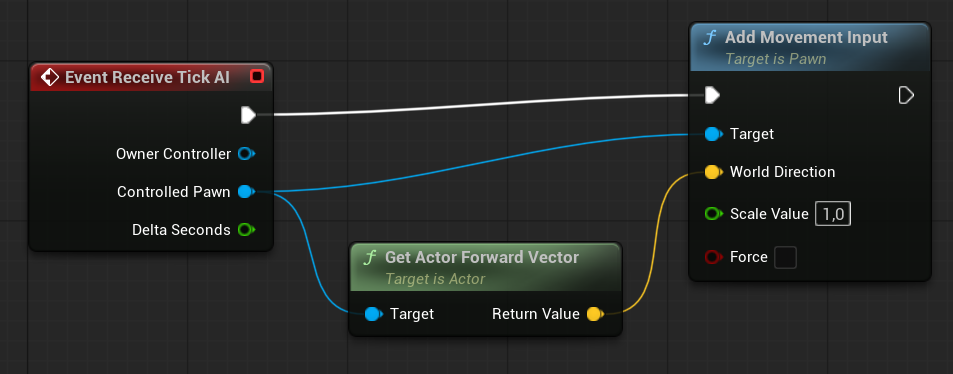
BTTask_MoveForward. As you can see, this task uses Tick and constantly adds forward movement input for the AI. Yes—our AI doesn’t use navigation movement; they simply move forward.
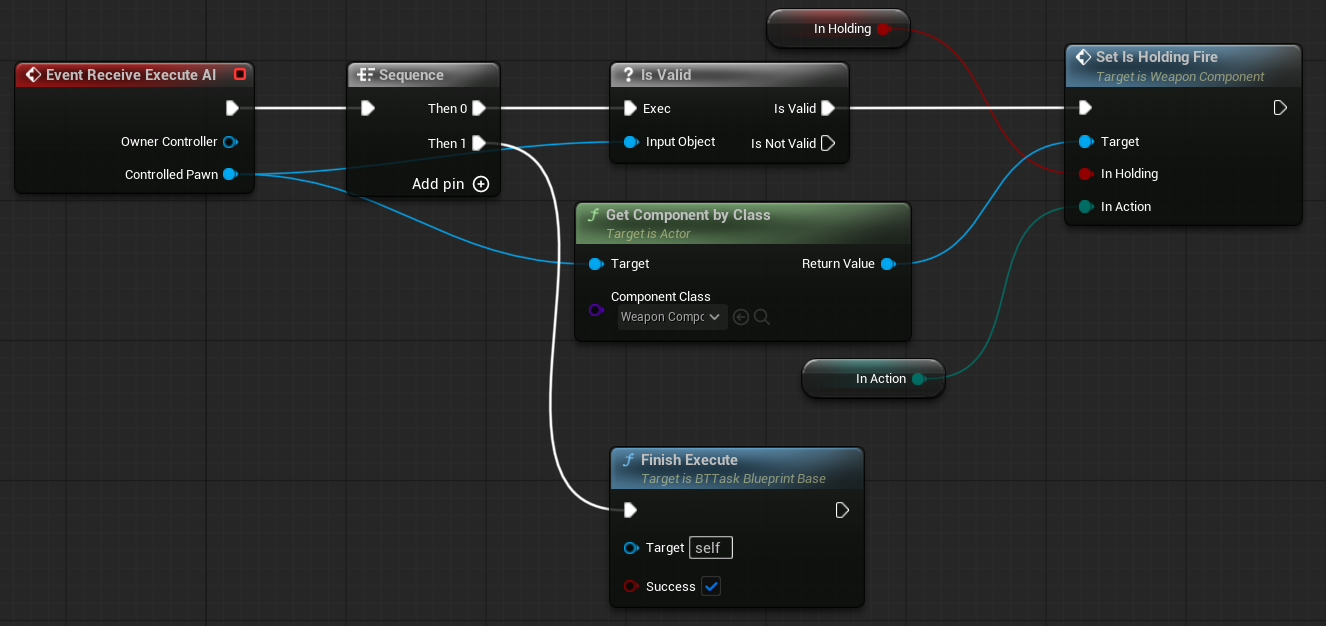
BTTask_SetHoldingFire. This task allows us to enable or disable the weapon trigger within the Behavior Tree.
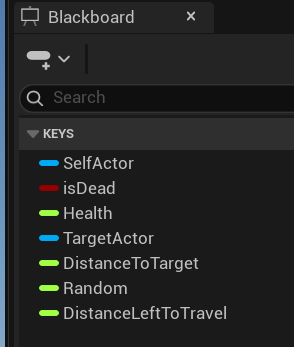
AI – Blackboard
Blackboard is a data container used with Behavior Trees to store and share information between different AI behavior components—like tasks, services, and decorators.
- Think of it like a shared memory space for an AI character.
- It holds key-value pairs (like variables) that AI behavior logic can read from and write to.
- Each key has a type: boolean, vector, object, enum, integer, float, etc.
Behavior Trees cannot work directly with external objects like the Character, AIController, or Weapon Component due to optimization reasons. That’s why they use Blackboards.
And we have basic Blackboard that will be used as a base for all other Blackboards.
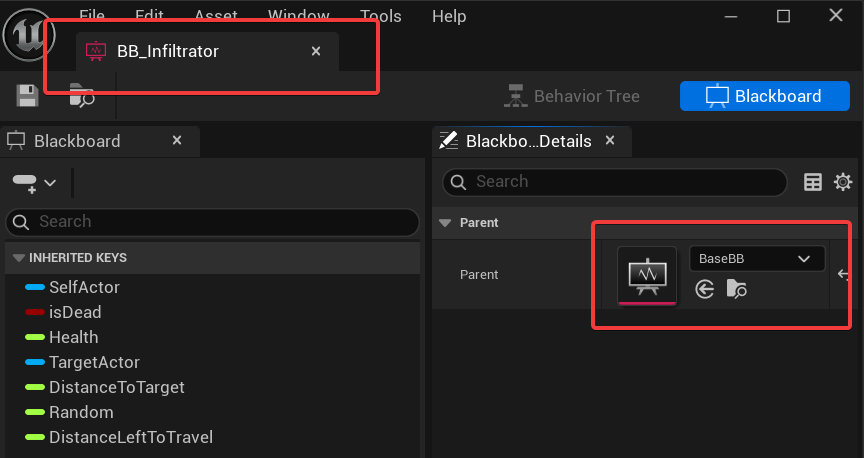
I can add custom data to the BB_Infiltrator blackboard while still using the base data from the default blackboard. This allows for a more object-oriented approach when designing your blackboards.
AI – Behavior Tree
You can find a lot of examples on how to create and use Behavior Trees. But the best approach to learn is to create something by your own. I suggest to take your time and analyze this simple Behavior Tree for the Infiltrator.
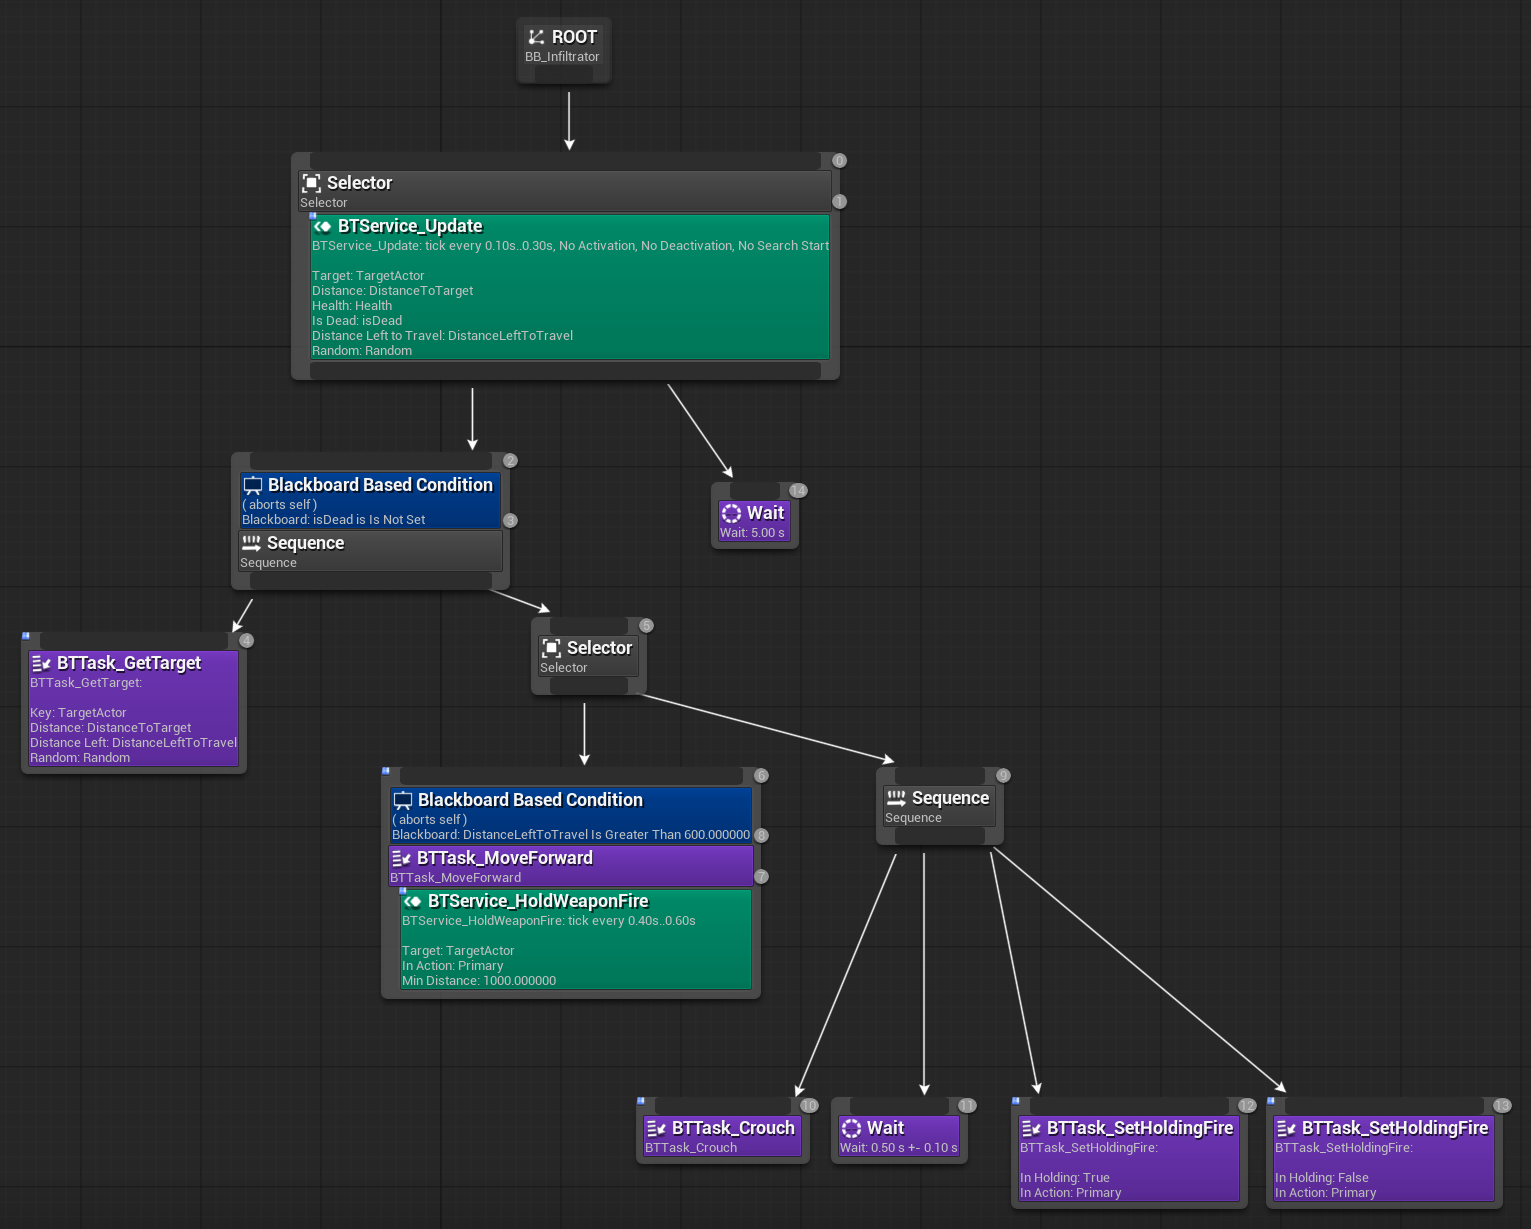
What’s the difference between Selector and Sequence?
A Selector runs its child nodes from left to right until one of them succeeds. As soon as one child returns Success, the Selector stops and returns Success as well. If none of the children succeed, then the Selector returns Failure.
Think of it as:
“Try this… if it doesn’t work, try the next thing… until something works.”
A Sequence also runs its child nodes from left to right, but it stops as soon as one of them returns Failure. If a child fails, the entire Sequence fails. If all children succeed, then the Sequence returns Success.
Think of it as:
“Do this, then that, and then the next… but if any step fails, the whole thing fails.”
So having this in mind our simple Behavior Tree is:
- If the controlled pawn is dead – do nothing (
Waittask).- This could be moved higher in the tree to prevent running the update service unnecessarily.
- if not dead
- First, get data about the target (update blackboard).
- Move forward if the distance to the target is greater than 600 units.
- While moving, try to hold fire if we’re close enough.
- If we’ve finished moving (i.e., we’re close to the target):
- Start crouching.
- Fire the weapon.
- Repeat the loop.
This isn’t rocket science—just take your time. If you find AI interesting, consider investing time into learning EOS, the perception system, and Mass as well.
Global Events Manager
It’s good practice to have a centralized place for global events. Later on, these events can be used for various purposes—like triggering achievements, tracking specific stats, or firing audio-visual effects.
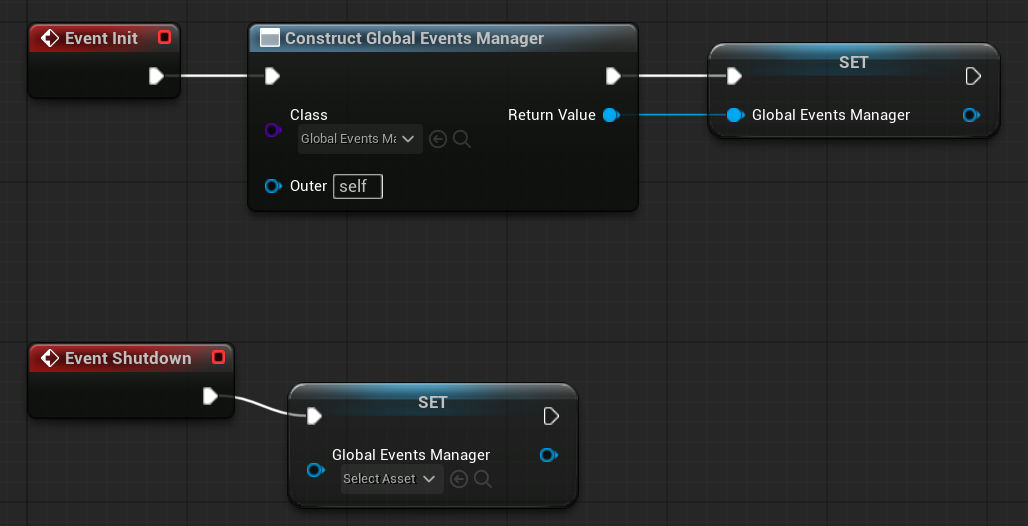
If we were using C++, this would typically be a Game Instance Subsystem, since we want the events to persist across levels.
In Blueprints, we’ll use a regular Object, which will be created by the Game Instance during initialization.
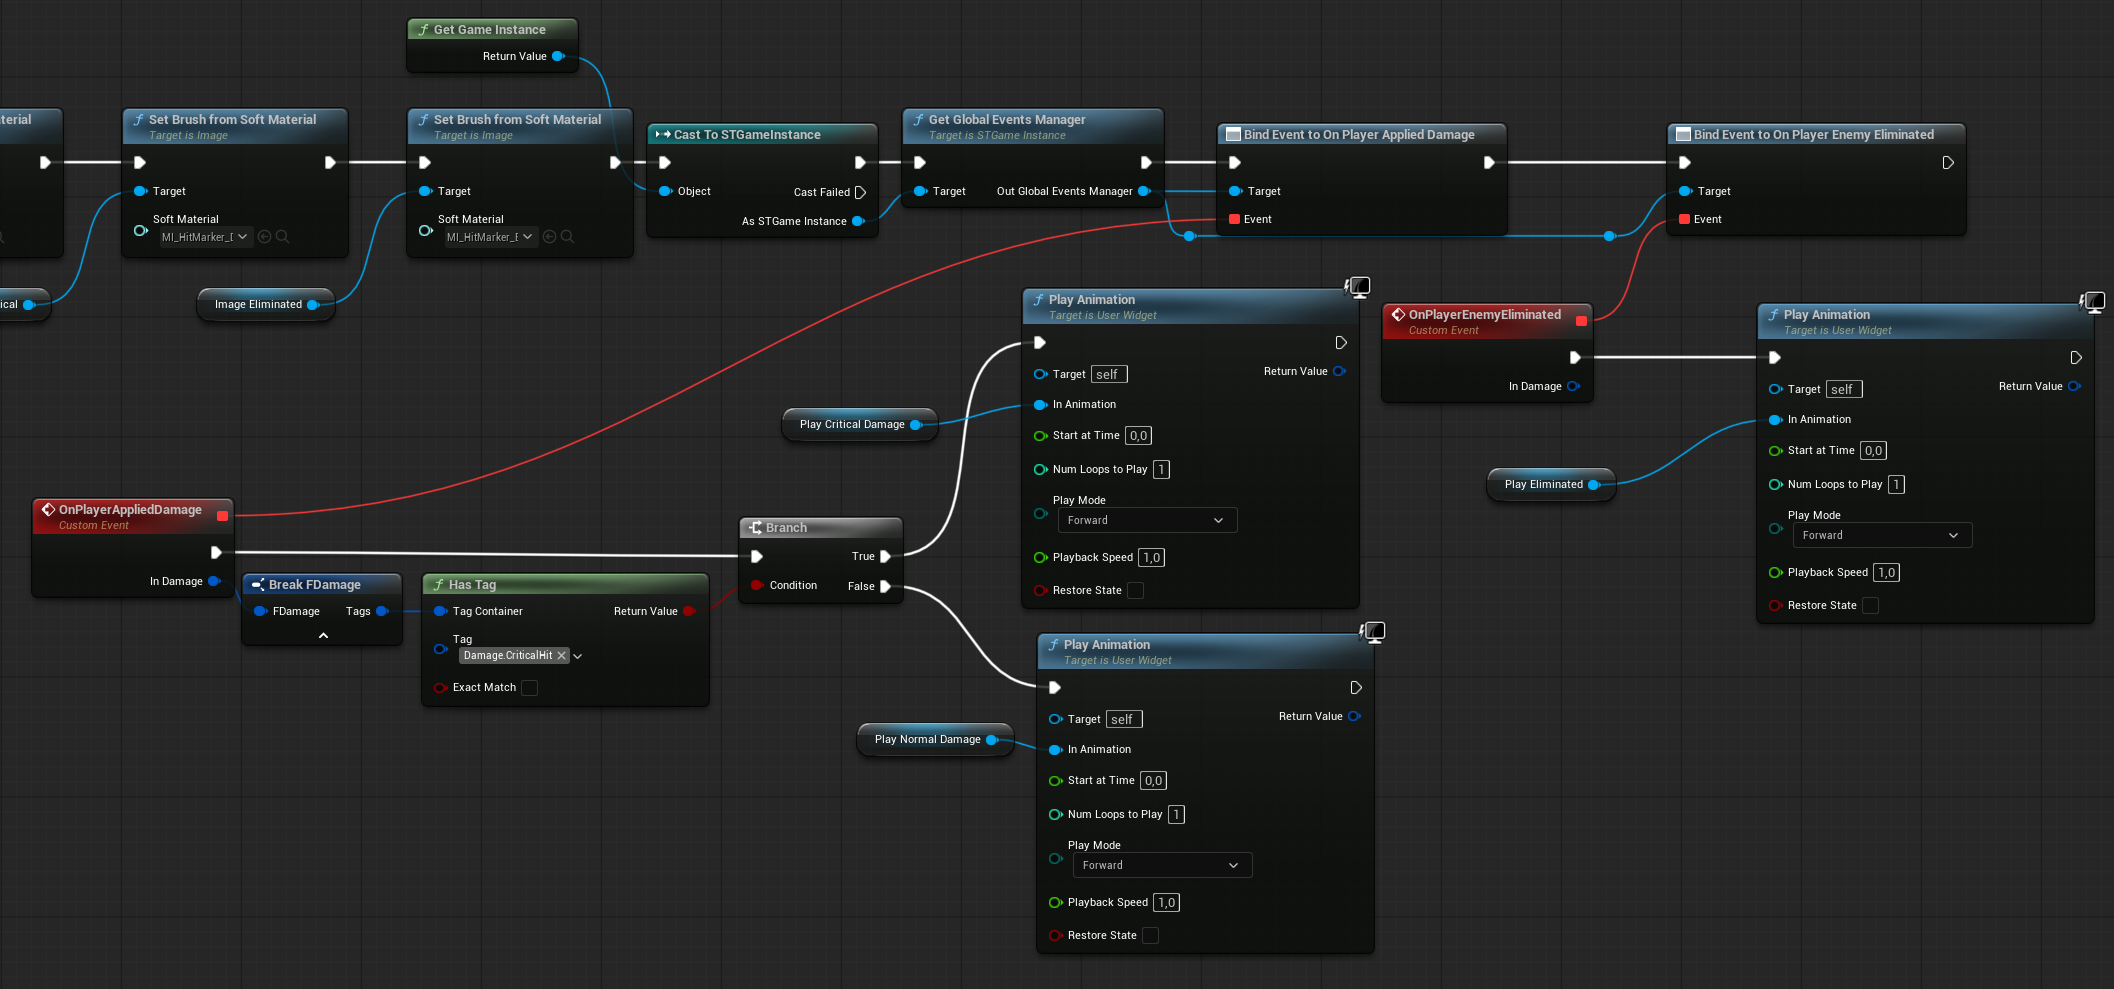
Currently, the Events Manager has only two dispatchers:
| OnPlayerAppliedDamage | Input: FDamage | Called by the CallOnPlayerAppliedDamage function. |
| OnPlayerEnemyEliminated | | Called by the CallOnPlayerEnemyEliminated function. |
There are also two functions to trigger these dispatchers.

Our Player Pawn will call these functions when applying damage.
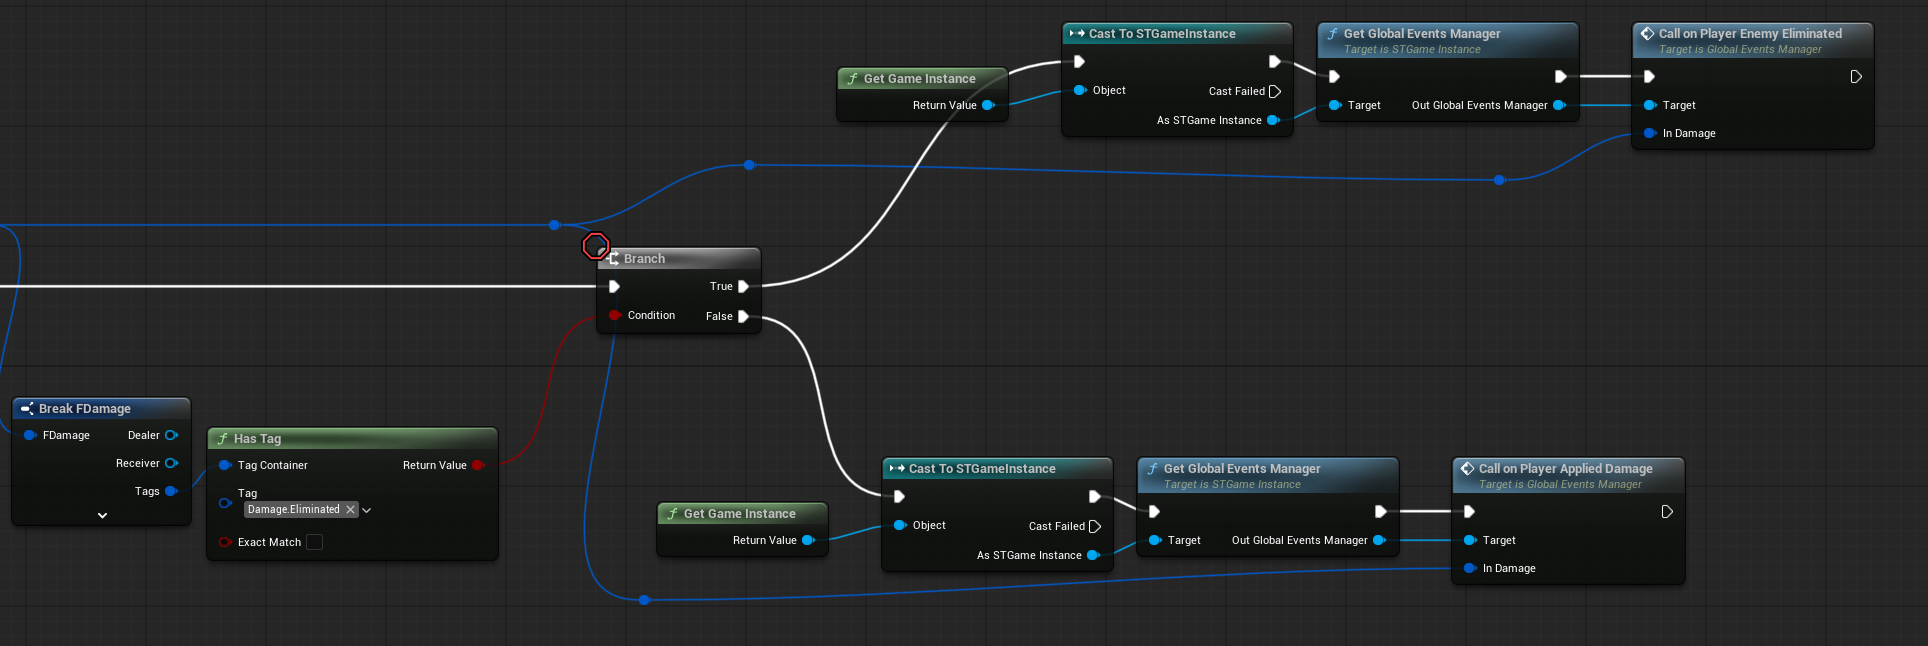
As you can see, we’re starting to use tags like Damage.Eliminated.
Now, any system can listen for and respond to this event—our crosshair will react to it soon.
Impact Decals
Our earlier NS_ImpactDecals Niagara system used Sprite Renderers with orientation calculated from the tangent. This was a good practice in most cases, as it was cheap and efficient. However, when drawing hit effects on characters, we now need to use Decal Components, which project the texture onto the surface instead of rendering flat sprites.
The good news is that we can use Decal Components directly in Niagara, so there’s no need to create a separate system to spawn them—Niagara will handle it.
💡 Note: We should implement Niagara pooling later for the most frequently used particles. There will be a post about performance where we’ll cover optimizations.
What changed is thelLocation and rotation for the decal are now determined differently.
DetermineDecalTransform ( link)
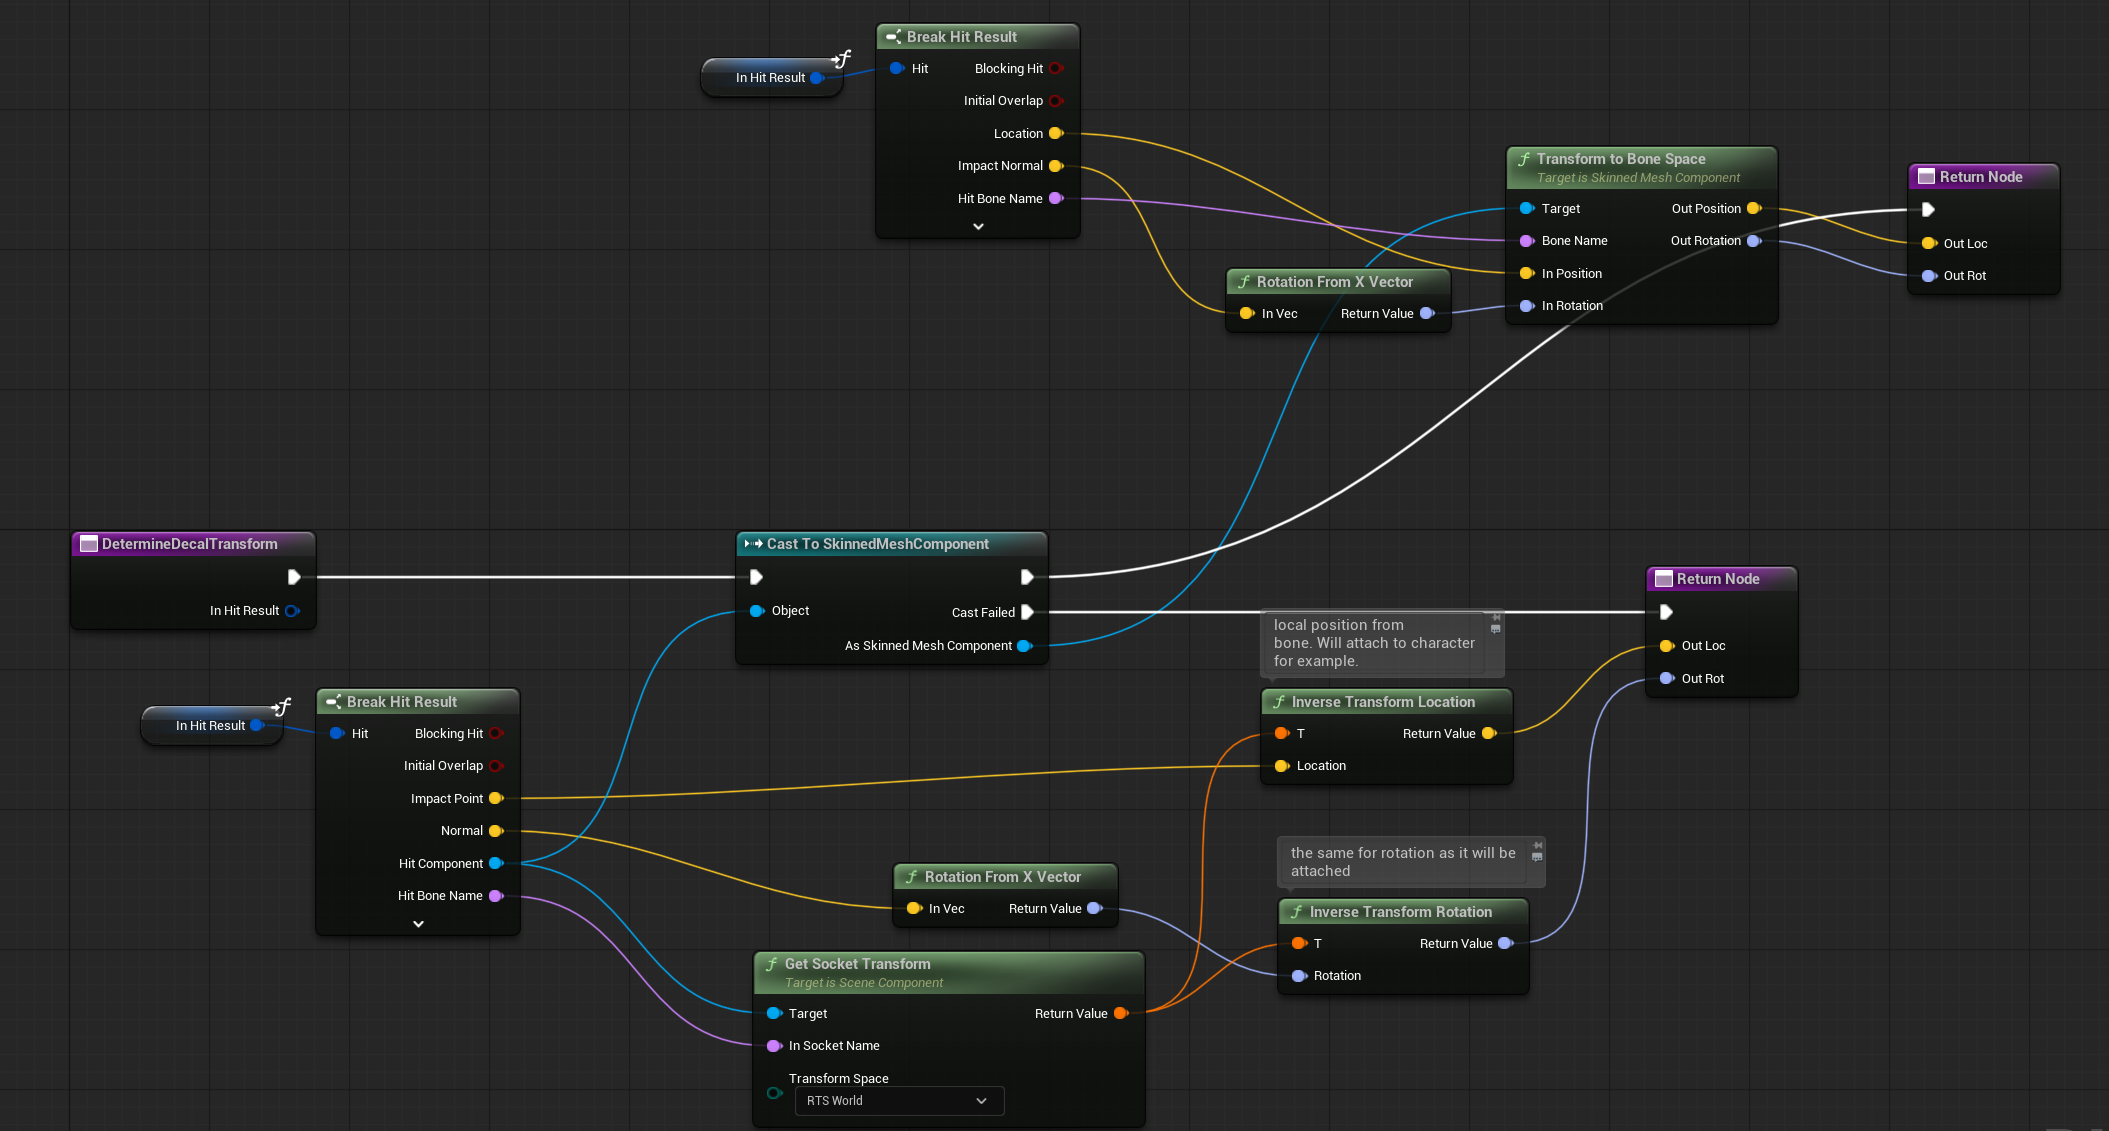
When hitting a SkinnedMeshComponent, we use a different approach for calculating the transform.
Also the material has been updated. ( MM_Decal )
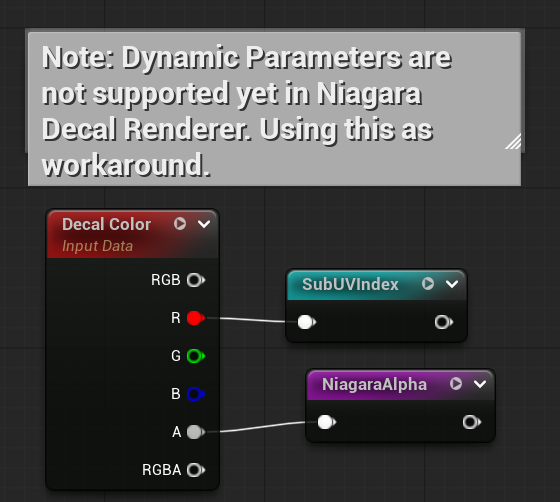
As of version 5.6, dynamic material parameters do not work with Niagara’s Decal Renderer.
That’s why we’re using R channel to select the SubUV and A channel for the Alpha.
Also, the SubUV selection was moved from Niagara to the Material, since SubUV modules in Niagara only work with Sprite Renderers, not Decal Renderers.

Later on, we will also implement triplanar decals, but I’d like to save that for a future tutorial.
Crosshair Update
Our crosshair (W_Crosshair) now informs the player when:
- Applied damage to someone,
- Applied damage to someone but it was critical hit,
- Eliminated someone
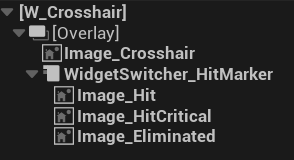
The widget has three animations for each event, which are triggered by our Global Event Manager.
Conclusion
This post covers a lot of different topics, but that was intentional—I wanted to show how many systems are connected to the enemies. Later on, adding new enemies will be much easier.
Note: If you want to spawn AI, just press the T key on the default map.
Next, we’ll work on Damage Amount Indicators. Stay tuned!

You must be logged in to post a comment.