
- Object
- Actor
- Basic Components
- Pawn
- Character
- Controller
- AIController
- Player Controller
- Player Camera Manager
- Camera Modifier
- HUD
- Info
- GameModeBase
- GameStateBase
- Player State
- Local Player
- GameInstance
- Subsystems
- World
- Level
- Level Blueprint
- Data Asset
- Blueprint Function Library
- Basic Flow
- Pro Tip
- What next?
If you want to use Unreal Engine to create games, you’ll need to work within its engine architecture. This is one of the main differences between Unity and Unreal Engine.
Keep in mind that this architecture also helps you with communication between different elements in your game. So basically the more you know the architecture the better and optimal your game project is.
Let’s start by explaining the classes.
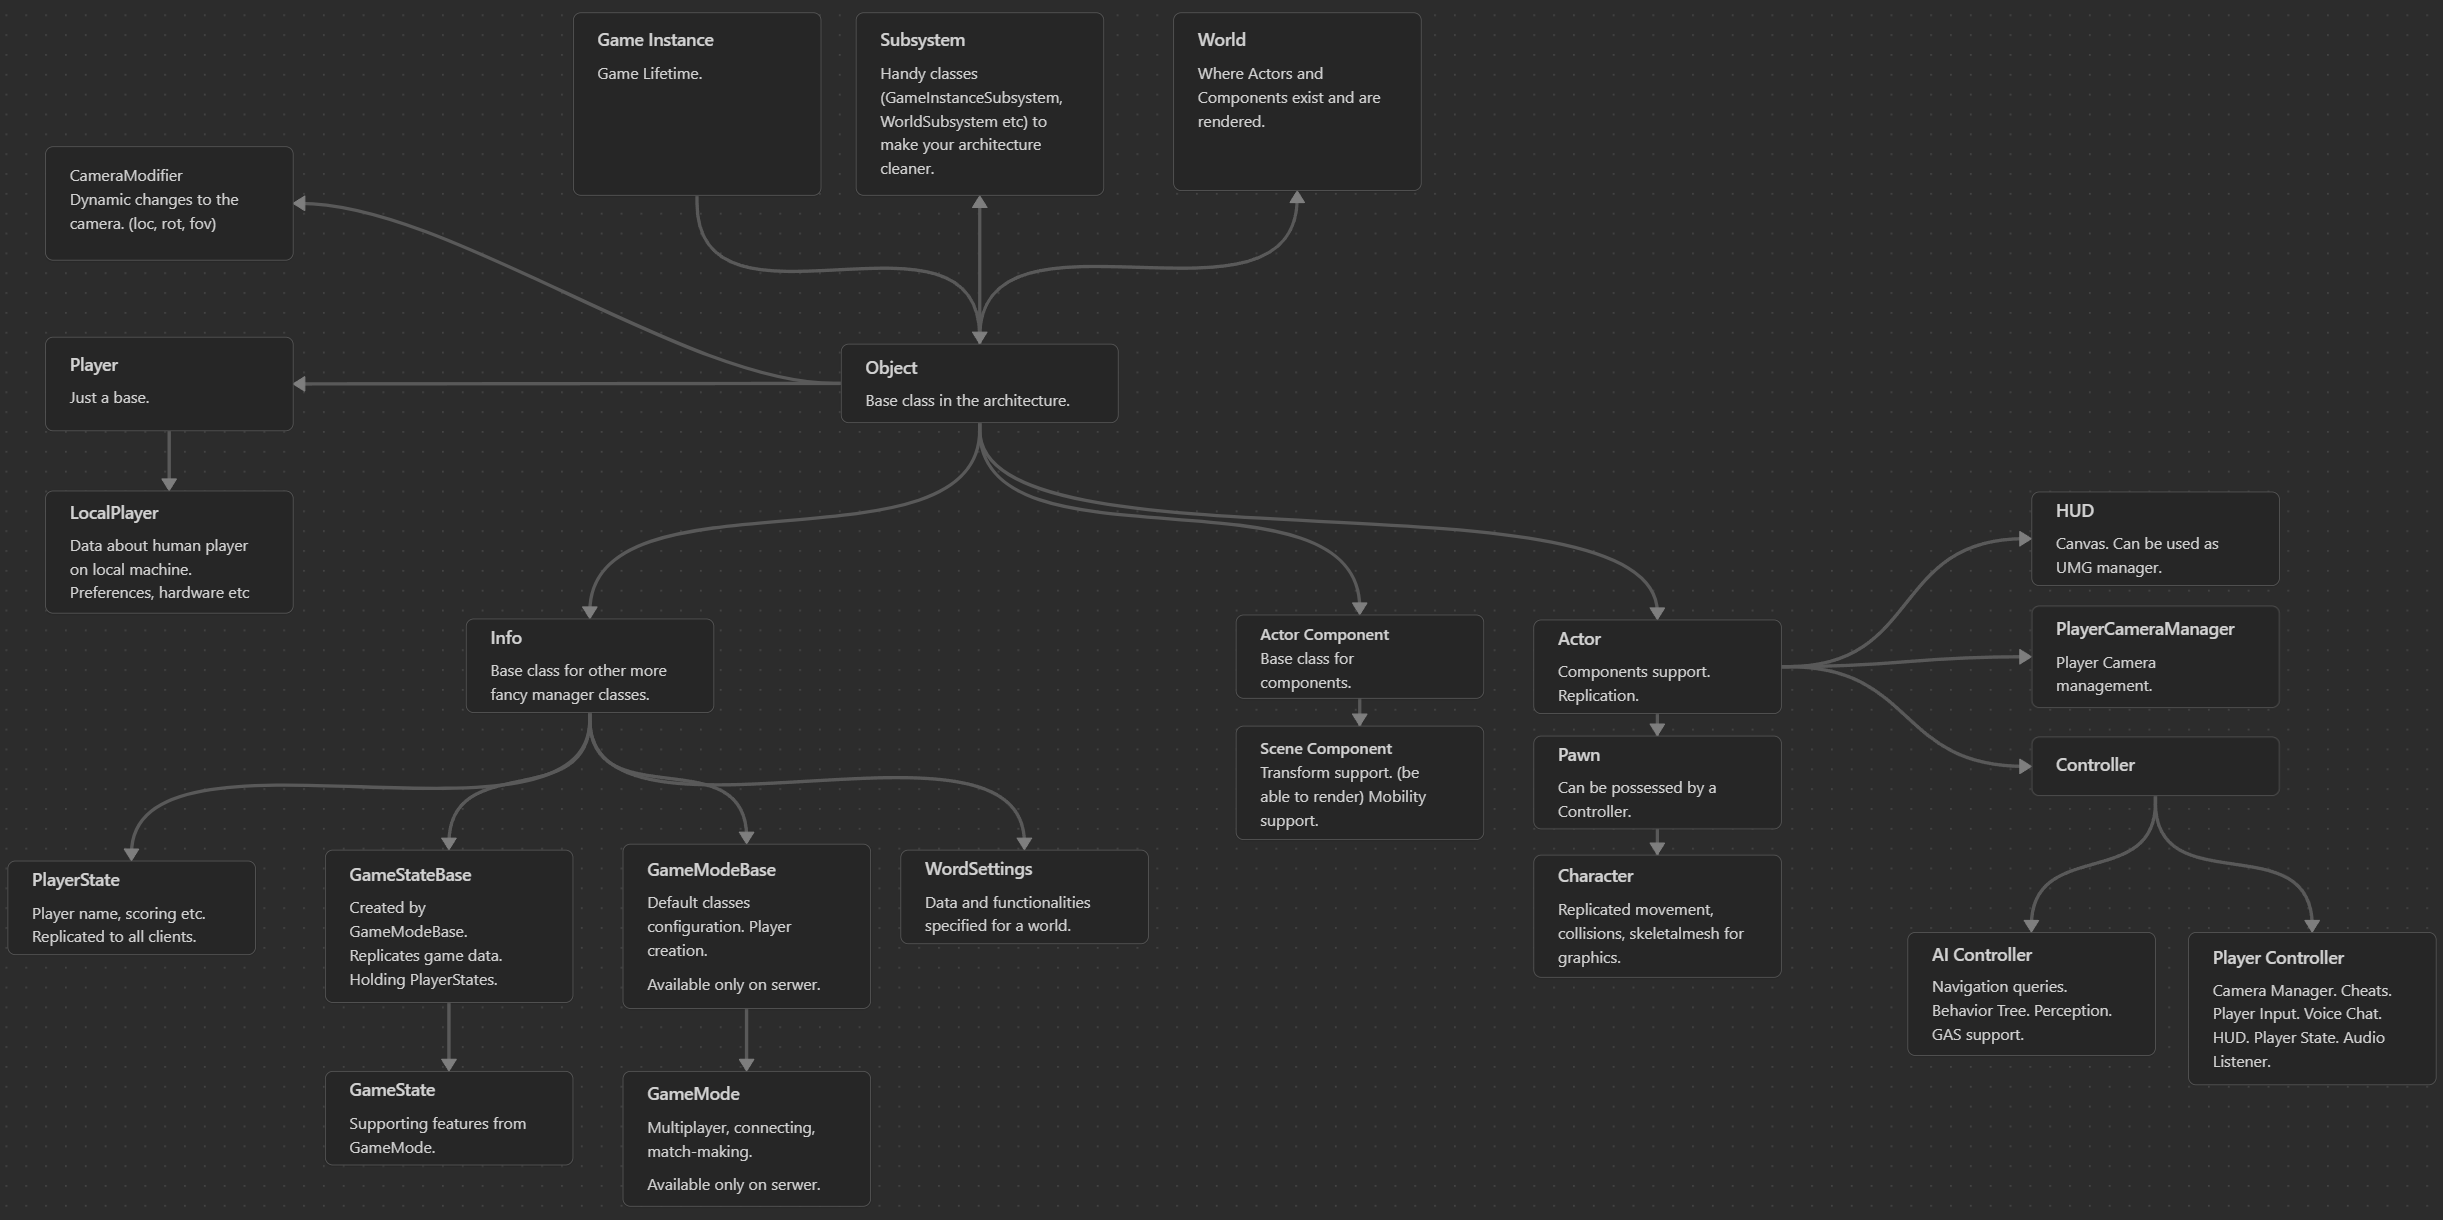
Object
This is the base class for everything that uses what we might call the “Unreal Architecture.” It cannot have components (meaning it can’t have a graphical representation, for example) and is not replicated by default.
When to use it:
This is a great class for managers, data containers, or anything that doesn’t require a graphical representation. However, if you’re creating managers, be sure to also look into Subsystems and GameInstance, as they might be more appropriate depending on your needs.
There are two ways to create objects (including instances of classes that inherit from it).
- Instanced: This means the object is created during gameplay, allowing you to call functions on it or modify its properties in runtime.
- Defaulted: This means accessing the class’s default values (for example, predefined data), without creating an actual instance during gameplay.
You can read more information about them here.
Actor
It extends from the Object class, so it inherits all of its functionalities. Additionally, it introduces support for Components, which means an Actor can have a graphical representation in the game and must have a Root Component (Components details below). Actors also support replication, making them suitable for multiplayer games.
Essentially, everything you see in the Outliner is based on the Actor class.
When to use it:
Use the Actor class when you need a graphical representation in the game or when you want to create a manager that should support replication.
Basic Components
Unreal has two types of components that can be used in Actors.
Actor Component
- This is the base class for components and it extends from Object.
- It holds a reference to the Actor that owns the component, allowing it to serve as a communication bridge.
- When to use it:
Use this class when you want to add specific functionality to different actors. Components promote a modular architecture, so you should take advantage of them. For example, you might create an Inventory Component or a Weapon Component to add those features to your Actor.
Scene Component
- This class extends from Actor Component, so it inherits all the functionalities of an Actor Component.
- It can have a transform in the world (such as a billboard, mesh, or location — you name it) and can be attached to other scene components.
- Think of a Scene Component as a “draw call” — the fewer you have, the better your performance. Likewise, a simpler component hierarchy also improves performance. (I’ll make a tutorial about draw calls and performance soon.)
- “Draw Call” Note: While a Scene Component doesn’t generate a draw call in the same way a Primitive Component (like a Static Mesh) does—since it doesn’t render anything—it still contributes to per-frame overhead. The engine updates its transform every frame if it’s marked as Movable, or at least once if it’s Static.
That’s why you should still treat Scene Components with care, almost like draw calls in terms of performance consideration. For example, if you just need to store a position offset relative to the player, using a Scene Component for that is not optimal. Instead, you can simply use aFVectorvariable to hold the offset—it’s lighter and more efficient.
- “Draw Call” Note: While a Scene Component doesn’t generate a draw call in the same way a Primitive Component (like a Static Mesh) does—since it doesn’t render anything—it still contributes to per-frame overhead. The engine updates its transform every frame if it’s marked as Movable, or at least once if it’s Static.
- When to use it:
Use a Scene Component when you need a graphical representation of your component in the game or when you need access to the owner’s transform in the world. Examples include splines, 3D widgets, or physics constraints.
Scene Components and Mobility

When it comes to Scene Components, they come with a Mobility feature by default, which is critical when working with them (for example, a Static Mesh is a Scene Component!). There are three types of mobility in Unreal Engine.
- Static.
This means the Scene Component will remain static and its transform (position, rotation, scale) will not be updated at runtime — there’s no need to change it.
About 99% of your components should be static for optimal performance.
For lighting components (such as Point Light or Spot Light), this means the light will use static lighting baked by Lightmass. - Stationary.
This mobility type is used only for lights and behaves differently depending on whether it’s a Directional Light, Sky Light, or Spot/Point Light. Since this post isn’t focused on lighting, we won’t go into detail here. - Movable.
This means the component can change its location at runtime and needs to be updated constantly. Movable components can have a negative impact on performance.
For lighting components (such as Point Light or Spot Light), this means the light will use dynamic lighting only.


Tip: You can change a component’s mobility from Static to Movable and back at runtime. A good approach is to keep the component Static by default, switch it to Movable only when you need to move it, and then switch it back to Static afterward. Mobility has a significant impact on your game’s performance, so managing it carefully is important.
Tip: You can create an editor widget that lists actors and components with Movable mobility, allowing you to profile and see if any can be switched to Static. I’ve added this to my tutorial todo list.
Unreal Engine comes with many built-in components you can use, such as Trigger Volume, Audio Component, Camera Component, Static Mesh Component, Skeletal Mesh Component, or Niagara Component. And many many more. It’s worth investing time to explore all these components since they are a big part of Unreal’s architecture. And remember, there might already be something implemented that does exactly what you’re planning to build from scratch — so it’s always worth checking before you start.
Actors Scene Root Component
Now that you have some context about Scene Components, it’s important to understand that every Actor needs a Root Component. This Root Component defines the Actor’s transform in the world. All other components in the Actor’s component hierarchy are attached to it.
So, what you see in the Outliner in the editor are essentially all Scene Components, with the Actor serving as a container that organizes them around its Root Component.

You should try to avoid deeply nested component hierarchies, as they can make draw calls more expensive and negatively impact performance.

You can read more about components here.
Pawn
It extends from Actor, so it inherits all of its functionalities. This class adds the ability to be possessed or unpossessed by a Controller. (will explain in a moment) It serves as the base class for any Actor that can be controlled by AI or a player.
When to use it:
Use this class when you need a simple base for your AI or enemies. For example, in a 2D game with custom movement (like following point paths) and characters rendered using 2D sprites.
It’s also ideal when you don’t want to use Unreal Engine’s Character class, which comes with a lot of built-in functionality that can be hard to strip away. If you prefer to implement all character-related logic yourself, starting from Pawn gives you full control.
The Pawn class is a more lightweight and flexible base class than Character.
Character
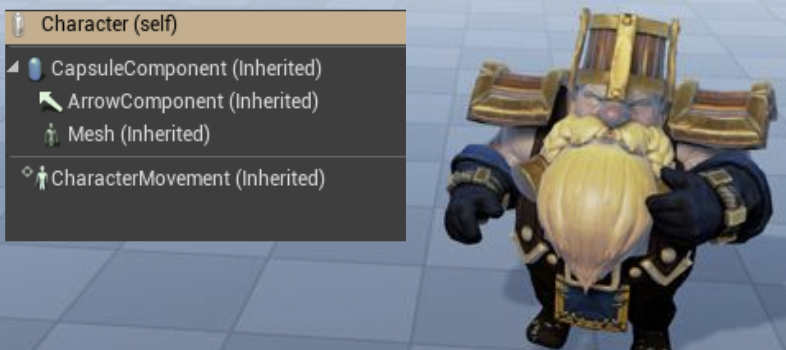
Character extends from Pawn and is a large, advanced class. It implements replicated character movement functionality via the CharacterMovementComponent. Its root component must be a CapsuleComponent, which is used by the movement system. It also includes a SkeletalMeshComponent for graphical representation.
When to use it:
Use this class when you need a ready-to-go setup for your enemies or AI characters. It’s ideal when you want built-in movement, animation, and replication features without building everything from scratch.
Controller
Extending from Actor, this is the base class for both AIController and PlayerController. A Controller can possess any Pawn (including Character), allowing you to separate gameplay logic (the “brain”) from the visual or physical representation (the actor).
You can also dynamically swap which Controller is possessing which Actor during gameplay, giving you flexibility for AI, player switching, or cutscenes.
AIController
As the name suggests, this class is responsible for controlling an Actor using AI. It includes built-in systems that make AI development easier and more modular:
- PathFollowingComponent – Allows the AI to query and navigate using the navigation system.
- BrainComponent – Can be used to run a Behavior Tree ( UBehaviorTreeComponent ) and EQS (Environment Query System) to define AI logic.
- Note: EQS does not require an AIController to run. However, in most implementations, it will typically be used in conjunction with an AIController or a possessed Pawn to drive decision-making and behavior.
- PerceptionComponent – Lets you set up senses like sight and hearing for the AI.
- Gameplay Tags – Supports gameplay tag systems, which are also used in GAS (Gameplay Ability System – more on that later).
When to use it:
When you need something to drive your AI logic.
Player Controller
This class is always created, no matter what. Its purpose is to control the game player’s Pawn or Character using input from a human player.

What’s great is that you can create a Dog AI and use it to possess a Cat Actor — and you can also control the Dog directly with a human player.
The PlayerController provides access to many systems, such as the Camera Manager, Cheats, Player Input, Voice Chat, HUD, Player State, and Audio Listener.
When to use it:
If you use Unreal Engine you will use this class. I will explain later why.
Player Camera Manager
Extending from Actor, this class acts as the central manager for all camera behavior. It provides easy access to the active camera and supports switching between cameras using functions like SetViewTarget.
It also supports Camera Modifiers, which can be used to apply effects such as camera shake, aim zoom, or FOV changes.
The PlayerController automatically spawns the PlayerCameraManager and has direct access to it—and vice versa.
Note: Actors have an option called “Find Camera Component When View Target”. When this is enabled, Unreal will automatically search for a CameraComponent inside the Actor set as the View Target and activate it as the current camera.
Camera Modifier
The Camera Manager can receive classes that modify camera behavior, which is very useful for creating various camera effects: getting hit, dying, or special vision modes. It’s also a convenient place to implement helpers—like controller helpers or collision detection.
A Camera Modifier has access to all the data we need: post-process settings, camera rotation, and location. It also supports blending.
This makes it the ideal place to work with camera or post-process effects that should trigger in specific situations.
HUD

It includes some Canvas functions you can use, but nowadays we typically use UMG / Slate for creating HUDs. That said, the HUD class is still a good place to manage your UMG widgets.
When to use it:
Unreal Engine will always create a default HUD class for your game. You can use it to draw debug stuff or manage your UMG-based UI elements.
Info
Extends from Actor. This is a base class intended for managers that need access to world-level data and may require replication.
When to use it:
Use this class when you need a manager that interacts with world data or needs to be replicated across the network.
GameModeBase

Extends from Info. This class defines which other classes Unreal Engine will use for the current Level (or World). Every level must have an associated GameMode, making it a central place for configuring core game systems.
It’s ideal for storing gameplay rules, scoring logic, and match flow. Since GameMode exists only on the server, it’s safe to store authoritative game data here.
The class is also responsible for creating and spawning players, using PlayerStart actors by default.
When a map loads, Unreal checks the default project settings (under Maps & Modes) to determine which GameMode to use.
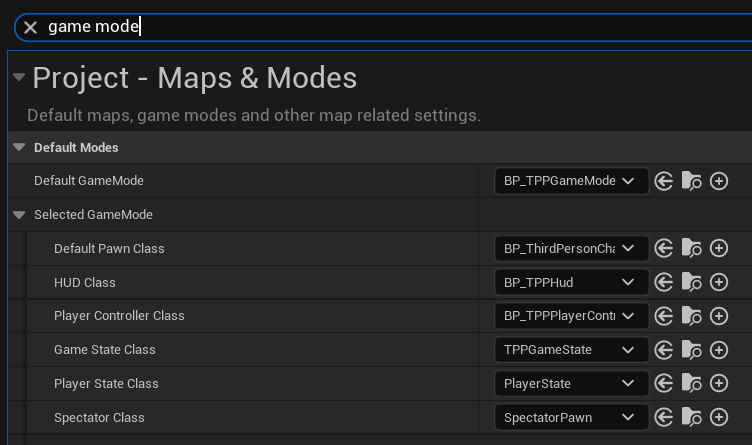
You can also override the GameMode on a per-level basis. This is useful when different levels require different rules, player setups, or gameplay logic. To do this, go to the World Settings panel in the level and assign a specific GameMode for that level, which will override the default one set in the project settings.
When to use it:
Unreal Engine will always create a default Game Mode class for your game. You can use GameMode to store gameplay rules or any other data that needs to be securely handled on the server side.
GameMode
This is a more advanced class that builds on GameModeBase, adding a lot of multiplayer-related functionality—such as player connection handling, spectating, and more.
GameStateBase
Spawned by GameModeBase and exist both on the client and the server. Used to manage game state and propagate this to all players.
The general rule is that the GameMode passes information to the GameState so that clients can read the data they’re interested in (such as the current team scores or connected players).
This helps prevent cheating or hacking by keeping sensitive logic on the server.
When to use it:
Same as GameModeBase – engine will always create this class as it’s part of the core architecture.
GameState
If there is a GameMode class, there should also be a GameState class. It serves as the way to communicate match status, player connections, and other game-related information from the GameMode to the clients.
More info about Game Mode and Game State can be found here.
Player State
This class replicates to all clients and contains network-relevant information about the player, such as their name, score, ID, and ping. You can also use it to store custom data that should be visible to everyone on the network.
Even in single-player games, this class can be useful for handling features like Steam integration or console-specific functionality.
GameModeBase is spawning PlayerState after PostLogin.
The PlayerState is linked to the PlayerController, enabling communication between the two.
When to use it:
Engine will always create this class as it’s part of the core architecture.
Local Player
Represents a player on the local machine—basically, a human player using the current device. ULocalPlayer is transient, meaning it persists even when changing levels. It can store player preferences or hardware-related data.
You’ll definitely interact with this class when working with Steam or console-related features.
When to use it:
Engine will always create this class as it’s part of the core architecture.
GameInstance
The main class used to manage the overall game lifecycle. It’s one of the few classes that persists from the moment the game starts until it exits, surviving level transitions.
When to use it:
Engine will always create this class as it’s part of the core architecture. You can use it to store game-related data that needs to be transient and persist for the entire duration of the game, from start to exit.
Subsystems
When it comes to managers or a cleaner architecture, we can also use Subsystems. Unfortunately, they’re currently only available in C++ (as of version 5.5). But don’t worry—C++ isn’t that hard in Unreal Engine. If you can create Blueprints, you’ll also be able to create C++ classes with variables and functions.
GameInstanceSubsystem
It is created and destroyed alongside the GameInstance class.
When to use it:
Use this class if you need something to persist from the start of the game to the end. A common example would be an Achievements System.
LocalPlayerSubsystem
Subsystems for LocalPlayers are created automatically when a LocalPlayer is created.
When to use it:
Use this if you want to separate data related to a LocalPlayer for a cleaner and more modular architecture.
EditorSubsystem
Created when the Editor starts (after the Engine), and destroyed when the Editor shuts down. Only available within Editor-specific classes.
When to use it:
Use this when you need an editor tool that requires persistent data across different levels—for example, a custom asset management system or level design helper.
EngineSubsystem
Created when the Engine starts and destroyed when it begins shutting down. Available in both Editor and runtime classes. Typically intended for more advanced use cases.
When to use it:
Use this when you need core functionality that must be accessible in both the Editor and during gameplay—for example, global systems like analytics, logging, or custom service managers.
WorldSubsystem
Created when a UWorld (i.e., a level) is created. This subsystem is especially useful for managing level-specific logic. Note that it is not designed with multiplayer support in mind.
When to use it:
Use this for anything tied to a specific level—such as custom camera managers, animation managers, world-specific UI displays, level-based stats, and similar systems.
World
The World represents a map, level, or sandbox where Actors and Components exist and are rendered. In the Editor, there can be multiple Worlds—such as the level being edited, PIE (Play In Editor) instances, or even editor tools that use their own viewport World. However, during gameplay, there is typically only one active World.
Why is this class so important?
Because you’ll encounter it frequently during development. The World gives you access to critical game systems: you can retrieve the current level, perform line traces, access the navigation system, AI systems, player controllers, and much more—essentially, everything that is connected to the gameplay environment.
Level
Levels are binary assets that holds information about actors and other level related data. They can be launched and need to have some Game Mode associated (if not default will be created). Engine is always having some level loaded. Even when loading data there is transient map that is running.
There are two types of an levels in Unreal Engine.
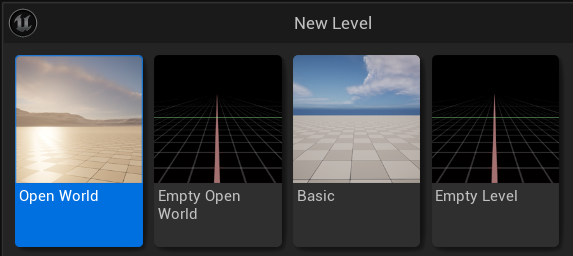
Open World
Enabling Open World activates World Partition, which unlocks many features essential for large-scale open-world games. One of these features is One File Per Actor (OFPA), which changes how level files are managed. When using an Open World level, each Actor is streamed individually and can be automatically unloaded based on camera distance.
Make sure that your Actor Managers either have “Spatially Loaded” disabled or that you’ve implemented custom loading and unloading logic.
When to use it:
Use this if you’re working with a large team on a game that has a complex (not necessarily large) world.
Basic
No open world functionalities are included. This means you will have one file per level. You can use the Level Streaming feature, which is really helpful when working on a non-open-world game but still want to keep files separated for your teammates. You can have separate levels for audio, gameplay, geometry, lighting—whatever you need.
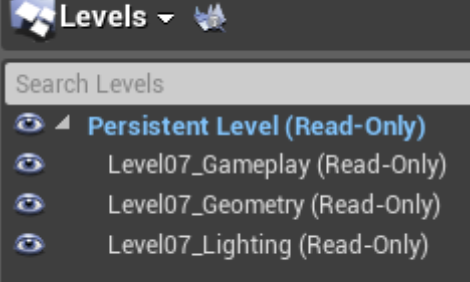
Those levels can be loaded and unloaded during gameplay. They can also be duplicated (creating instances of a level), which can be useful for things like level generators.
The main level (Persistent Level) stores information about sublevels, and you cannot create a nested hierarchy of levels.
When to use it:
When you don’t need advanced streaming, one file per actor.
World Settings
A level corresponds to a World, and the World includes a class called World Settings. Each level needs its own World Settings, where you can configure various world- or level-related properties.

You can also change the default World Settings class in the General Settings.

When to use it:
Use World Settings if you have world-specific features that need to be configured per level. For example, a custom grid system for your levels.
Level Blueprint
Each level has its own Level Blueprint, which can be used—or not—to drive gameplay logic specific to that map. You can also change the default Actor class used in levels via the Project Settings.

When to use it:
Long story short: avoid using it in production. Level Blueprints can be useful for quick tests or prototyping in temporary levels, but they are not recommended for final gameplay logic. Relying on them can lead to poor architectural practices and bad development habits. Instead, use actor-based scripting or systems like Subsystems and Game Framework classes for scalable, maintainable code.
More context about Level Bluleprint. Explaining why the Level Blueprint is not a great place for game logic isn’t easy. You’ll understand it better after finishing a couple of projects. But still, I’ll try to explain:
- You don’t have direct access to the Level Blueprint, so everything you do there ends up being hardcoded.
- Since the Level Blueprint is tied to the level, only one person can work on it at a time.
- Using the Level Blueprint means you can’t reuse your functionality elsewhere. No modularity = bad approach.
- You’ll quickly end up with spaghetti code, which will be hard to read and maintain.
- You’ll have a lot of hardcoded references, which makes your project fragile.
- You may be tempted to add more functionalities into it because your gameplay is tied to the Level Blueprint.
For example, in a puzzle project, use Actors to drive the logic. Puzzle 1 can activate Puzzle 2 using gameplay tags, for instance. This way, you don’t need the Level Blueprint anymore, and you can reuse these mechanics in different levels and change the order of logic quickly. You can even go further by creating a logic graph (using something like FlowGraph).
Trust me and avoid using Level Blueprints. This will encourage you to think about modular architecture for your game. It will be harder at first, but you’ll get it eventually—and you’ll learn a lot during the process.
Data Asset
You will often use Data Assets or Primary Data Assets. These are simple classes without a Blueprint Editor interface and are used to store your data. As of version 5.5, they can only be created in C++.
When to use it:
Use Data Assets when you need to store custom data or create custom editors—for example, item definitions or dialogue assets.
Blueprint Function Library
Sometimes, you want static functions that are accessible from anywhere and can be used in Blueprints. UBlueprintFunctionLibrary is designed for this purpose. These libraries can also be created directly in Blueprints.
When to use it:
Use this when you need static functions exposed to Blueprints. However, it’s generally better to create your function libraries in C++ rather than Blueprints, as Blueprints work differently and are less optimized.
Basic Flow

So basically, when the game starts:
- The GameInstance is created along with all of its Subsystems.
- Then, a World is created, along with its corresponding WorldSubsystems.
- The GameMode is initialized, which then spawns core gameplay classes such as the Default Pawn, Player Controller, HUD, and others.
- Finally, all Actors placed in the level are spawned.
When you restart the level, this entire flow is executed again.
As you can see, the GameInstance only exists during actual gameplay—it is not spawned when you’re just in the Editor.
Pro Tip
Read base class .h files and explore their functionality.
You can learn a lot just by reading these classes—they’ll give you a much better understanding of what functionality is already built into the engine.
This is how I started learning Unreal Engine back in versions 2.5 / 3.0+. Don’t be afraid! Just download the source code. Even in the Editor, you can easily find links to the corresponding header files.
You can also print out those .h files and read them while traveling—it’s a great way to study the engine offline.
Making games is a complex task, and Unreal Engine is a powerful but equally complex tool. It comes with a specific architecture that you need to understand and work with effectively.
What next?
I’ll continue explaining more Unreal Engine features in the future—things like GAS, UMG, Blueprints, and other fundamental systems. I plan to cover each topic separately, so it won’t be one massive post with everything crammed in. This way, it’ll be easier to follow and learn step by step.
In the meantime you can also read Gameplay Framework from the official docs.

One response to “Unreal Engine Base Classes & Architecture”
I’ve only just started to read and it already helped a ton. Thank you so much for this. I will contine reading it bit by bit in the next few days.